

Application and Page Frameworks
New Application Folders
When you create ASP.NET applications, notice that ASP.NET 2.0 now uses a file-based approach. When working with ASP.NET 2.0, you can have as many files and folders within your application as you can build without recompiling the application each and every time a new file is added to the overall solution. ASP.NET 2.0 now includes the capability to automatically precompile your ASP.NET applications dynamically.
ASP.NET 1.0/1.1 compiled everything in your solution into a DLL. This is no longer necessary because ASP.NET 2.0 applications have a defined folder structure. By using the ASP.NET 2.0 defined folders, you can have your code automatically compiled for you, your application themes accessible throughout your application, and your globalization resources available whenever you need them. Take a look at each of these defined folders to see how they work. The first is the \Code folder.
\Code folder
The \Code folder is meant to store your classes, .wsdl files, and typed datasets. Any of these items stored in this folder are then automatically available to all the pages within your solution. The nice thing about the \Code folder is that when you place something inside this folder, Visual Studio 2005 automatically detects this and compiles it if it is a class (.vb or .cs), automatically creates your XML Web service proxy class (from the .wsdl file), or automatically creates a typed dataset for you from your .xsd files. After the files are automatically compiled, these items are then instantaneously available to use in any of your ASP.NET pages that are in the same solution. Look at how to employ a simple class in your solution using the \Code folder.
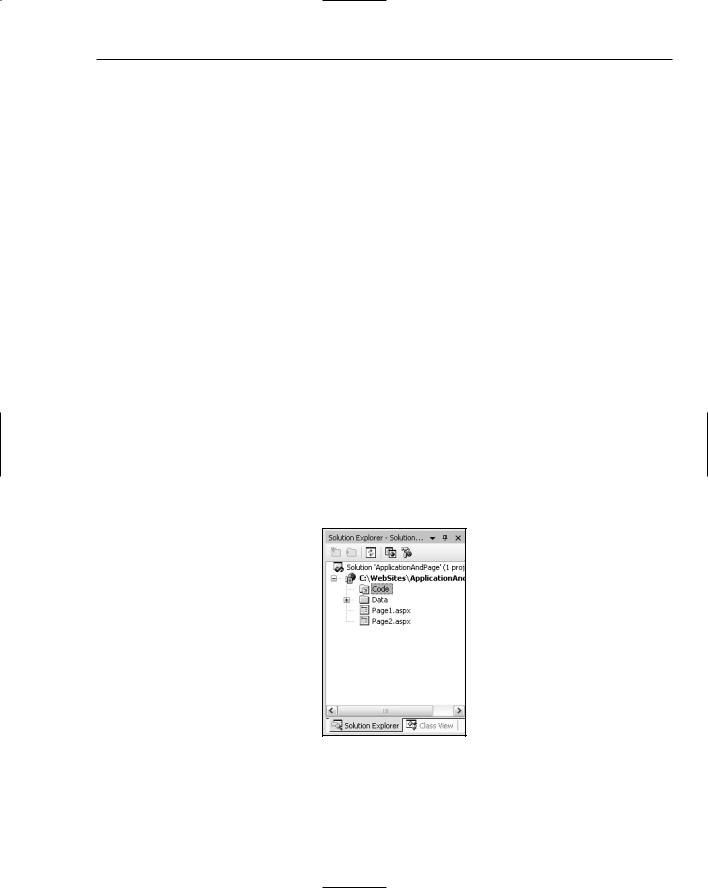
The first step is to create a \Code folder. To do this, simply right-click the solution and select New Folder. Name the folder Code. Right away you notice that Visual Studio 2005 treats this folder differently from the other folders in your solution. The Code folder is shown in a different color (gray) with a document pictured next to the folder icon. See Figure 3-8.
Figure 3-8
After the \Code folder is in place, right-click the folder and select Add New Item. The Add New Item dialog that appears doesn’t give you many options for the types of files that you can place within this folder. The available options include a Class file, an XML Schema, and an Assembly Resource File. For this first example, select Class and name the class Calculator.vb or Calculator.cs. Listing 3-13
shows how the Calculator class should appear.
61
Chapter 3
Listing 3-13: The Calculator class
VB
Imports Microsoft.VisualBasic
Public Class Calculator
Public Function Add(ByVal a As Integer, ByVal b As Integer) As Integer
Return (a + b)
End Function
End Class
C#
using System;
public class Calculator
{
public int Add(int a, int b)
{
return (a + b);
}
}
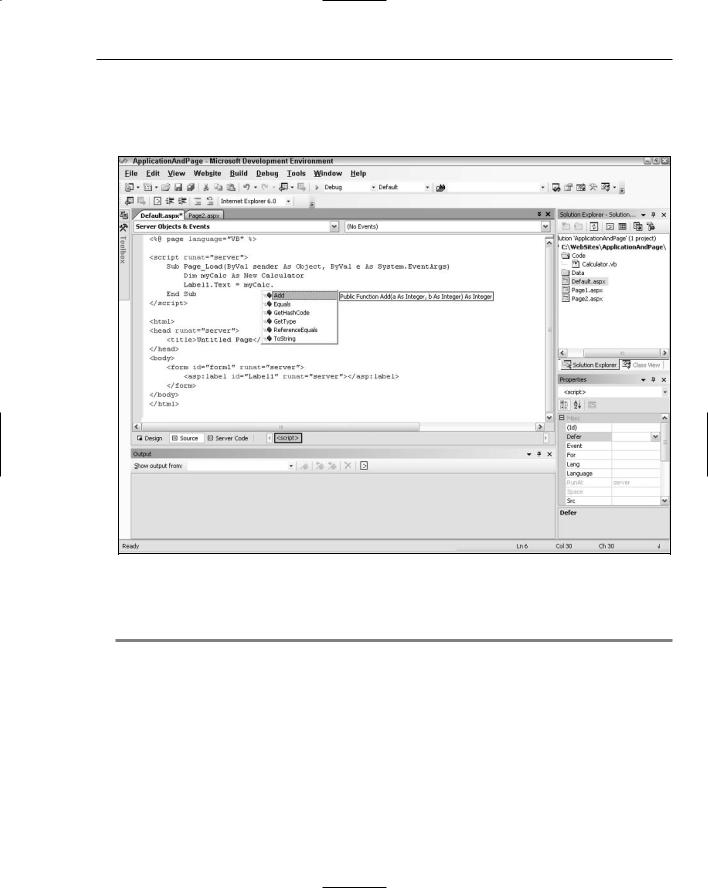
What’s next? Just save this file, and it is now available to use in any pages that are in your solution. To see this in action, create a simple .aspx page that has just a single Label server control. Listing 3-14 shows you the code to place within the Page_Load event to use this new class available to the page.
Listing 3-14: An .aspx page that uses the Calculator class
VB
<%@ Page Language=”VB” %>
<!DOCTYPE html PUBLIC “-//W3C//DTD XHTML 1.1//EN” “http://www.w3.org/TR/xhtml11/DTD/xhtml11.dtd”>
<script runat=”server”>
Sub Page_Load(ByVal sender As Object, ByVal e As System.EventArgs) Dim myCalc As New Calculator
Label1.Text = myCalc.Add(12, 12) End Sub
</script>
C#
<%@ Page Language=”C#” %>
<!DOCTYPE html PUBLIC “-//W3C//DTD XHTML 1.1//EN” “http://www.w3.org/TR/xhtml11/DTD/xhtml11.dtd”>
<script runat=”server”>
void Page_Load(object sender, System.EventArgs e)
{
Calculator myCalc = new Calculator(); Label1.Text = myCalc.Add(12, 12).ToString();
}
</script>
62
Application and Page Frameworks
When you run this .aspx page, notice that it utilizes the Calculator class without any problem, with no need to compile the class before use. In fact, right after saving the Calculator class in your solution or moving the class to the \Code folder, you also instantaneously receive IntelliSense capability on the methods that the class exposes (as illustrated in Figure 3-9).
Figure 3-9
To see Visual Studio 2005 works with the \Code folder, open the Calculator class again in the IDE and add a Subtract method. Your class should now appear as shown in Listing 3-15.
Listing 3-15: Adding a Subtract method to the Calculator class
VB
Imports Microsoft.VisualBasic
Public Class Calculator
Public Function Add(ByVal a As Integer, ByVal b As Integer) As Integer Return (a + b)
End Function
(continued)
63

Chapter 3
Listing 3-15: (continued)
Public Function Subtract(ByVal a As Integer, ByVal b As Integer) As Integer
Return (a - b)
End Function
End Class
C#
using System;
public class Calculator
{
public int Add(int a, int b)
{
return (a + b);
}
public int Subtract(int a, int b)
{
return (a - b);
}
}
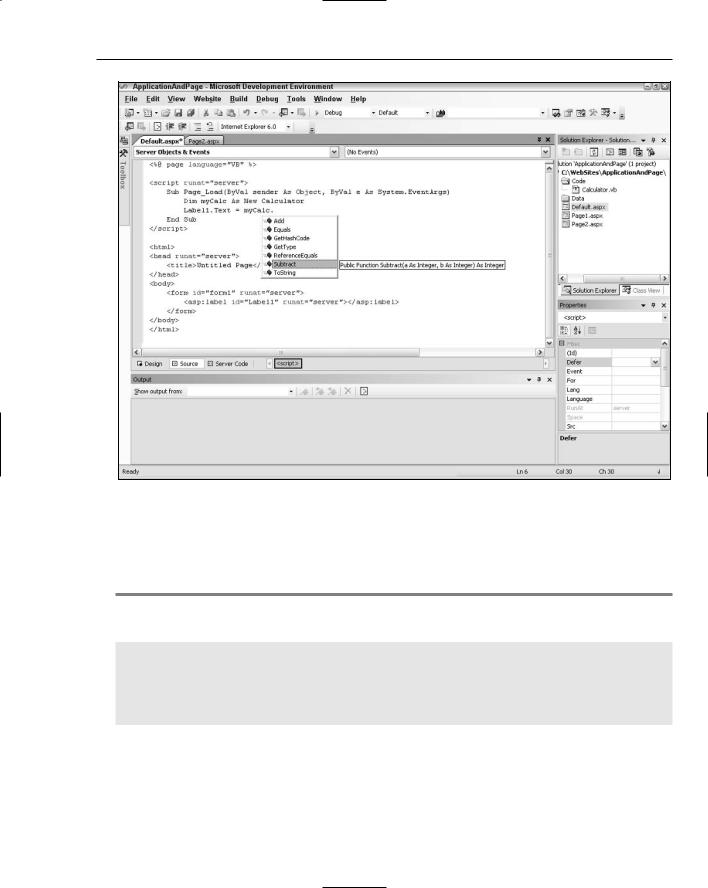
After you have added the Subtract method to the Calculator class, save the file and go back to your
.aspx page. Notice that the class has been recompiled by the IDE and the new method is now available to your page. You see this directly in IntelliSense. Figure 3-10 shows this in action.
Everything placed in the \Code folder is compiled into a single assembly. The class files placed within the \Code folder are also not required to use a specific language. This means that even if all the pages of the solution are in Visual Basic 8.0, the Calculator class in the \Code folder of the solution could be built in C# (Calculator.cs).
Because all the classes contained in this folder are built into a single assembly, you cannot have classes of different languages sitting in the root \Code folder, as in the following:
\Code
Calculator.cs
AdvancedMath.vb
Having two classes made up of different languages in the \Code folder (as shown here) causes an error to be thrown. It is impossible for the assigned compiler to work with two different languages. Therefore, in order to be able to work with multiple languages in your \Code folder, you must make some changes to the folder structure and to the web.config file.
The first step is to add two new subfolders to the \Code folder — a \vb folder and a \cs folder. This gives you the following folder structure:
\Code
\VB
Add.vb
\CS
Subtract.cs
64
Application and Page Frameworks
Figure 3-10
This still won’t correctly compile these class files into separate assemblies, not until you make some additions to the web.config file. Most likely, you don’t have a web.config file in your solution at this moment, so add one through the Solution Explorer. After it is added, change the <compilation> node so that it is structured as shown in Listing 3-16.
Listing 3-16: Fixing the web.config file so that you can have classes made up of different languages in the \Code folder
<compilation>
<codeSubDirectories>
<add directoryName=”VB”></add>
<add directoryName=”CS”></add> </codeSubDirectories>
</compilation>
Now that this is in place in your web.config file, you can work with each of the classes in your ASP.NET pages. Also, any C# class placed in the CS folder is now automatically compiled just like any of the classes placed in the VB folder. It is also important to note that because of the ability to add these directories yourself in the web.config file, you are not required to name them VB and CS as I did; you can use whatever name tickles your fancy.
65