
- •Contents
- •Introduction
- •Acknowledgments
- •The Goals of ASP.NET 2.0
- •Developer productivity
- •Administration and management
- •Performance and scalability
- •Device-specific code generation
- •Additional New Features of ASP.NET 2.0
- •New developer infrastructures
- •New compilation system
- •Additions to the page framework
- •New objects for accessing data
- •New server controls
- •A New IDE for Building ASP.NET 2.0 Pages
- •The Document Window
- •Views in the Document Window
- •The tag navigator
- •Page tabs
- •Code change status notifications
- •Error notifications and assistance
- •The Toolbox
- •The Solution Explorer
- •Lost Windows
- •Other Common Visual Studio Activities
- •Creating new projects
- •Making references to other objects
- •Using smart tags
- •Saving and importing Visual Studio settings
- •Application Location Options
- •Built-in Web server
- •Web site requiring FrontPage Extensions
- •The ASP.NET Page Structure Options
- •Inline coding
- •New code-behind model
- •New Page Directives
- •New attributes
- •New directives
- •New Page Events
- •Cross-Page Posting
- •New Application Folders
- •\Code folder
- •\Themes folder
- •\Resources folder
- •Compilation
- •The New Data Source Controls
- •The SqlDataSource and GridView Controls
- •Reading data
- •Applying paging in the GridView
- •Sorting rows in the GridView control
- •Defining bound columns in the GridView control
- •Enabling the editing of rows in the GridView control
- •Deleting data from the GridView
- •Dealing with other column types in the GridView
- •Selecting which fields to display in the DetailsView control
- •Using the GridView and DetailsView together
- •Updating, inserting, and deleting rows
- •XmlDataSource Control
- •ObjectDataSource Control
- •SiteMapDataSource Control
- •DataSetDataSource Control
- •Visual Studio 2005
- •Connection Strings
- •Site Maps
- •The PathSeparator property
- •The PathDirection property
- •The ParentLevelsDisplayed property
- •The ShowToolTips property
- •Examining the parts of the TreeView control
- •Binding the TreeView control to an XML file
- •Selecting multiple options in a TreeView
- •Specifying custom icons in the TreeView control
- •Specifying lines used to connect nodes
- •Working with the TreeView control programmatically
- •Applying different styles to the Menu control
- •Menu Events
- •Binding the Menu control to an XML file
- •SiteMap Data Provider
- •SiteMapViewType
- •StartingNodeType
- •SiteMap API
- •Why Do You Need Master Pages?
- •The Basics of Master Pages
- •Coding a Master Page
- •Coding a Content Page
- •Mixing page types and languages
- •Specifying which master page to use
- •Working with the page title
- •Working with controls and properties from the master page
- •Nesting Master Pages
- •Container-Specific Master Pages
- •Event Ordering
- •Caching with Master Pages
- •Using ASP.NET 2.0 Packaged Themes
- •Applying a theme to a single ASP.NET page
- •Applying a theme to an entire application
- •Applying a theme to all applications on a server
- •Removing themes from server controls
- •Removing themes from Web pages
- •Removing themes from applications
- •Creating Your Own Themes
- •Creating the proper folder structure
- •Creating a skin
- •Including CSS files in your themes
- •Having your themes include images
- •Defining Multiple Skin Options
- •Programmatically Working with Themes
- •Themes and Custom Controls
- •Authentication
- •Authorization
- •ASP.NET 2.0 Authentication
- •Setting up your Web site for membership
- •Adding users
- •Asking for credentials
- •Working with authenticated users
- •Showing the number of users online
- •Dealing with passwords
- •ASP.NET 2.0 Authorization
- •Using the LoginView server control
- •Setting up your Web site for role management
- •Adding and retrieving application roles
- •Deleting roles
- •Adding users to roles
- •Getting all the users of a particular role
- •Getting all the roles of a particular user
- •Removing users from roles
- •Checking users in roles
- •Using the Web Site Administration Tool
- •The Personalization Model
- •Adding a simple personalization property
- •Using personalization properties
- •Adding a group of personalization properties
- •Using grouped personalization properties
- •Defining types for personalization properties
- •Using custom types
- •Providing default values
- •Making personalization properties read-only
- •Anonymous Personalization
- •Enabling anonymous identification of the end user
- •Working with anonymous identification events
- •Anonymous options for personalization properties
- •Migrating Anonymous Users
- •Personalization Providers
- •Working with the Access personalization provider
- •Working with the SQL Server personalization provider
- •Using multiple providers
- •Building Dynamic and Modular Web Sites
- •Introducing the WebPartManager control
- •Working with zone layouts
- •Understanding the WebPartZone control
- •Explaining the WebPartPageMenu control
- •Modifying zones
- •Caching in ASP.NET 1.0/1.1
- •Output caching
- •Partial page caching
- •Data caching using the Cache object
- •Cache dependencies
- •ASP.NET 2.0 unseals the CacheDependency class
- •Enabling databases for SQL Server cache invalidation
- •Enabling tables for SQL Server cache invalidation
- •Looking at SQL Server
- •Looking at the tables that are enabled
- •Disabling a table for SQL Server cache invalidation
- •Disabling a database for SQL Server cache invalidation
- •Configuring your ASP.NET Application
- •Adding more than one table to a page
- •Attaching SQL Server cache dependencies to the Request object
- •Attaching SQL Server cache dependencies to the Cache object
- •Customizing the side navigation
- •Examining the AllowReturn attribute
- •Working with the StepType attribute
- •Adding a header to the Wizard control
- •Utilizing Wizard control events
- •Working with images from disk
- •Resizing images
- •Displaying images from streams
- •The MMC ASP.NET Snap-In
- •General
- •Custom Errors
- •Authorization
- •Authentication
- •Application
- •State Management
- •Advanced
- •ASP.NET Web Site Administration Tool
- •Home
- •Security
- •Profile
- •Application
- •Provider
- •Managing the Site Counter System
- •Generics
- •Iterators
- •Anonymous Methods
- •Operator Overloading
- •Visual Basic XML Documentation
- •New Visual Basic Keywords
- •Continue
- •Using
- •Global
- •Index

Portal Frameworks and Web Parts
Figure 10-1
Building Dynamic and Modular Web Sites
As you begin using the new Portal Framework to build Web sites, note that the framework defines everything in zones. There are zones for laying out content and zones for editing content. The zones that a page might incorporate are managed by a Portal Framework manager — they don’t have to be managed by you in any fashion — which makes working with this new Portal Framework a breeze.
This framework contains a lot of moving parts (pieces that are dependent upon each other), so I start at the beginning by examining the Portal Framework manager control: WebPartManager.
Introducing the WebPartManager control
The WebPartManager control is an ASP.NET server control that completely manages the state of the zones and the content placed in the zones on a per-user basis. This control, which has no visual aspect, can add and delete items contained within each zone of the page. The WebPartManager control can also
293

Chapter 10
manage the communications sometimes required between different elements contained in the zones. For example, you can pass a specific name/value pair from one item to another item within the same zone, or between items contained in entirely separate zones. The WebPartManager control provides the capabilities to make this communication happen.
The WebPartManager control is required to be in place on every page in your application that works with the Portal Framework. A single WebPartManager control does not manage an entire application; it manages on a per-page basis.
Listing 10-1 shows a WebPartManager control added to an ASP.NET page.
Listing 10-1: Adding a WebPartManager control to an ASP.NET page
<%@ Page Language=”VB” %>
<html xmlns=”http://www.w3.org/1999/xhtml” > <head runat=”server”>
<title>Web Parts Example</title> </head>
<body>
<form id=”form1” runat=”server”>
<asp:WebPartManager ID=”Webpartmanager1” Runat=”server”> </asp:WebPartManager>
</form>
</body>
</html>
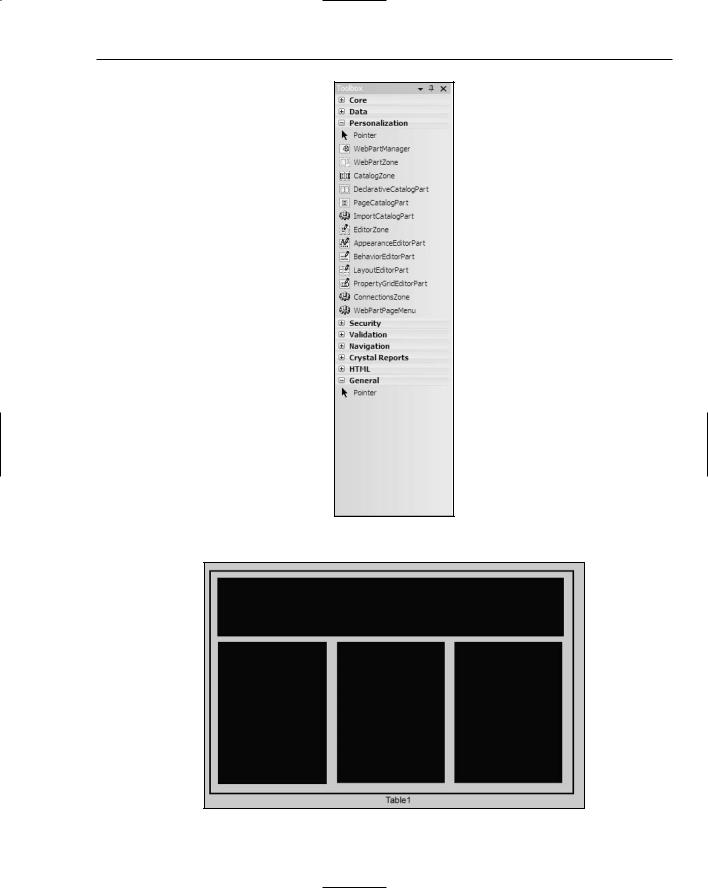
If you want to work from the design surface of Visual Studio 2005, you can drag and drop the WebPartManager control from the Toolbox to the design surface — but remember, it does not have a visual aspect and appears only as a gray box. You can find the WebPartManager control (and the other server controls that are part of the Portal Framework) in the Personalization section of the Toolbox, as shown in Figure 10-2.
Working with zone layouts
After you place the WebPartManager control, the next step is to create zones on the page on which you want to utilize the Portal Framework. You should give this step some thought because it contributes directly to the usability of the page you are creating. Web pages are constructed in a linear fashion — either horizontally or vertically. Web pages are managed in square boxes — usually through the use of tables that organize the columns and rows in which items appear on the page.
Web zones define specific rows or columns as individual content areas managed by the WebPartManager. For an example of a Web page that uses these zones, you can create a table similar to the one shown in Figure 10-3.
294

Portal Frameworks and Web Parts
Figure 10-2
Figure 10-3
295

Chapter 10
The black sections in Figure 10-3 represent Web zones. The code used to produce the table is shown in Listing 10-2.
Listing 10-2: Creating multiple Web zones
<%@ Page Language=”VB”%>
<%@ Register TagPrefix=”myUserControl1” TagName=”DailyLinksWebPart” Src=”~/controls/DailyLinksWebPart.ascx” %>
<html xmlns=”http://www.w3.org/1999/xhtml” > <head runat=”server”>
<title>Web Parts Example</title> </head>
<body>
<form id=”form1” runat=”server”>
<asp:WebPartManager ID=”Webpartmanager1” Runat=”server”> </asp:WebPartManager>
<table cellpadding=”5” border=”1”> <tr>
<td colspan=”3”>
<h1>Bill Evjen’s Web Page</h1>
<asp:WebPartZone ID=”WebPartZone1” Runat=”server” LayoutOrientation=”Horizontal”>
<ZoneTemplate>
<asp:Label ID=”Label1” Runat=”server” Text=”Label” Title=”Welcome to my web page!”>
Welcome to the page! </asp:Label>
</ZoneTemplate>
</asp:WebPartZone>
</td>
</tr>
<tr valign=”top”> <td>
<asp:WebPartZone ID=”WebPartZone2” Runat=”server”> <ZoneTemplate>
<asp:DynamicImage ID=”DynamicImage1” Runat=”server” ImageFile=”~/kids.jpg” Width=”150” Title=”My Kids”> </asp:DynamicImage> <myUserControl1:DailyLinksWebPart ID=”DailyLinksWebPart1” Runat=”server” Title=”Daily Links” > </myUserControl1:DailyLinksWebPart >
</ZoneTemplate>
</asp:WebPartZone>
</td>
<td>
<asp:WebPartZone ID=”WebPartZone3” Runat=”server”> <ZoneTemplate>
<asp:Calendar ID=”Calendar1” Runat=”server”> </asp:Calendar>
</ZoneTemplate>
</asp:WebPartZone>
</td>
<td><!-- Blank for now -->
296

Portal Frameworks and Web Parts
</td>
</tr>
</table>
</form>
</body>
</html>
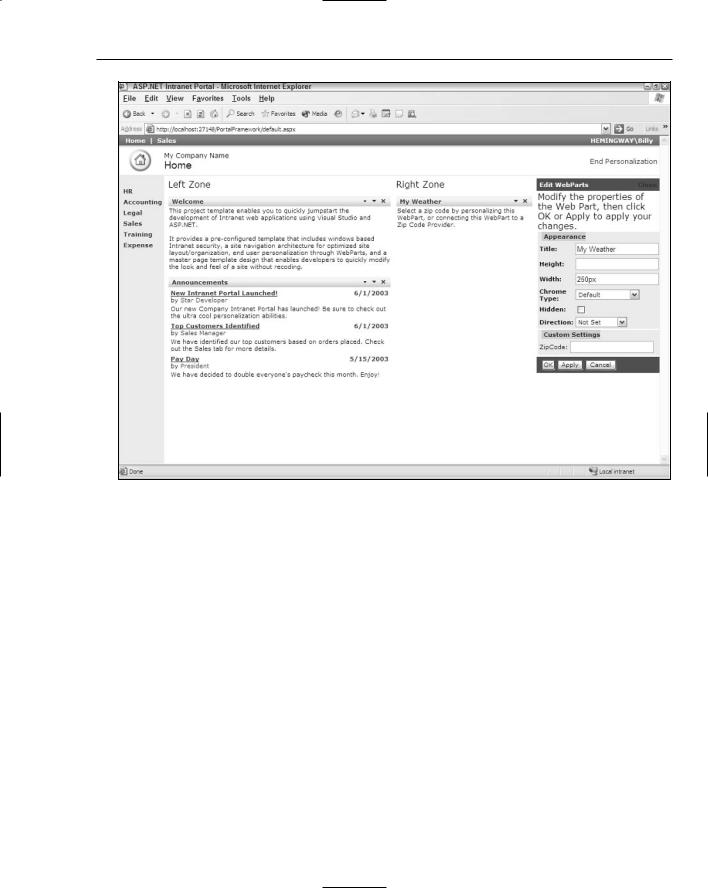
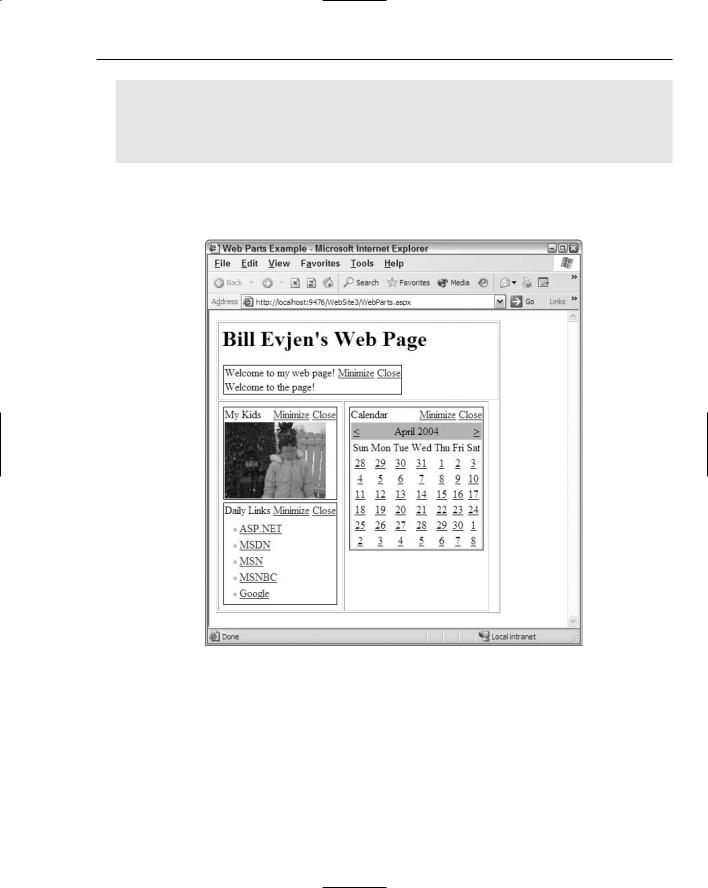
This page now has sections like the ones shown in Figure 10-3: a header section that runs horizontally and three vertical sections underneath the header. Running this page provides the result shown in Figure 10-4.
Figure 10-4
First, this page includes the <asp:WebPartManager> control that manages the items contained in the three zones on this page. Within the table, the <asp:WebPartZone> server control specifies three Web zones. You can declare each Web zone in one of two ways. You can use the <asp:WebPartZone> element directly in the code, or you can create the zones within the table by dragging and dropping WebPartZone controls onto the design surface at appropriate places within the table. In Figure 10-4, the table border width is intentionally turned on and set to 1 in order to show the location of the Web zones in greater detail. Figure 10-5 shows what the sample from Listing 10-2 looks like in the Design view of Visual Studio 2005.
297