


Chapter 8
Authentication
Authentication is a process that determines the identity of a user. After a user has been authenticated, a developer can determine if the identified user has authorization to proceed. It is impossible to give an entity authorization if no authentication process has been applied. Authentication is provided in ASP.NET 2.0 through the use of the new membership service.
Authorization
Authorization is the process determining whether an authenticated user is allowed access to any part of an application, access to specific points of an application, or access only to specific datasets that the application provides. Authenticating and authorizing users or groups enable you to customize a site based on user types or preferences. Authorization is provided in ASP.NET 2.0 through the use of a new role management service.
ASP.NET 2.0 Authentication
ASP.NET 2.0 provides the membership management service to deal with authenticating users to access a page or an entire site. The new ASP.NET management service not only provides a new API suite for managing users, but it also gives you some new server controls. These new server controls work with the end user through the process of authentication. Shortly, you will look at the functionality of these controls.
Setting up your Web site for membership
Before you can use the security controls that are provided with ASP.NET 2.0, you first have to set up your application to work with the new membership service. How you do this depends on how you approach the security framework provided.
By default, ASP.NET 2.0 uses the built-in AspNetAccessProvider for storing details about the registered users of your application. Also, for the initial demonstrations, you will work with Forms authentication. I assume that the application is open to the public for registration and viewing. If it were an intranetbased application (meaning that all the users are on a particular network), then you would use Windows Integrated Authentication for authenticating users.
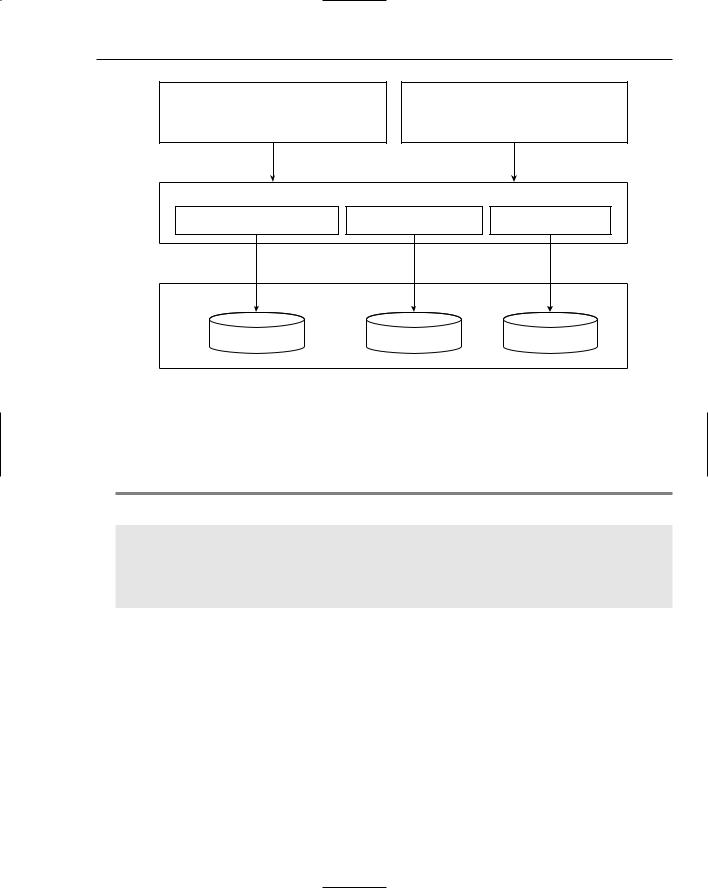
ASP.NET 2.0, as you know, offers a data provider model that handles the detailed management required to interact with multiple types of underlying data stores. Figure 8-1 shows a diagram of the new ASP.NET 2.0 membership service.
From the diagram, you can see that like the rest of the ASP.NET 2.0 provider models, the membership providers can access a wide variety of underlying data stores. In this diagram, you can see the built-in Microsoft Access and Microsoft SQL Server data stores. You can also build your own membership providers to get at any other custom data stores that work with user credentials. Above the membership providers in the diagram, you can see a list of security server controls that utilize the access granted by providers to work with the users in the authentication process.
226
|
Membership and Role Management |
Server Controls |
API |
Membership Server Controls |
Membership API |
<asp:Login>, etc. |
|
Membership Providers
AspNetAccessProvider |
AspNetSqlProvider |
Custom Provider |
Data Stores |
|
|
Access |
SQL Server |
Custom |
Figure 8-1
Adding an <authentication> element to the web.config file
To allow forms authentication in your Web application for the new membership service, the first step is to turn on this feature from the web.config file. So create a web.config file if you don’t already have one. Then, add the section shown in Listing 8-1 to the file.
Listing 8-1: Adding Forms authentication to the web.config file
<?xml version=”1.0” encoding=”utf-8”?> <configuration>
<system.web>
<authentication mode=”Forms” /> </system.web>
</configuration>
The simple addition of the <authentication> element to the web.config file turns on everything that you need to start using the membership service provided by ASP.NET 2.0. To turn on the forms authentication using this element, you simply give the value Forms to the mode attribute. This is a forms authentication example, but other possible values of the mode attribute include Windows, Passport, or None.
IIS authentication schemes include basic, digest, and Integrated Windows Authentication. Passport authentication points to a centralized service provided by Microsoft that offers a single login and core profile service for any member sites (it costs money to use Passport).
Because the mode attribute in our example is set to Forms, you can move on to the next step of adding users to the data store. You can also change the behavior of the forms authentication system at this point by making some modifications to the web.config file. These possibilities are reviewed next.
227

Chapter 8
Adding a <forms> element to the web.config file
Using forms authentication, you can provide users with access to a site or materials based upon credentials they input into a Web-based form. When an end user attempts to access a Web site, he is entering the site using anonymous authentication, which is the default authentication mode. If he is found to be anonymous, he can be redirected (by ASP.NET) to a specified login page. After the end user passes the authentication process, he is provided with an HTTP cookie, which can be used in any subsequent requests.
You can see the possibilities of the forms authentication setting in Listing 8-2, which shows possible changes to the web.config file.
Listing 8-2: Modifying the Forms authentication behavior
<?xml version=”1.0” encoding=”utf-8”?> <configuration>
<system.web>
<authentication mode=”Forms”> <forms name=”.ASPXAUTH”
loginUrl=”login.aspx”
protection=”All”
timeout=”30”
path=”/”
requireSSL=”false”
slidingExpiration=”true”
cookieless=”useDeviceProfile”
</authentication>
</system.web>
</configuration>
You can set these as you wish, and you have plenty of options for values other than the ones that are displayed. Also, as I stated earlier, these values are not required. You can use the membership service right away with only what was shown in Listing 8-1.
You can find some interesting settings in Listing 8-2, however. You can change how the forms authentication system works by adding a <forms> element to the web.config file. Make sure that you have the <forms> element nested within the <authentication> elements. The following list describes the possible attributes of the <forms> element:
name: Defines the name used for the cookie sent to the end users after they have been authenticated. By default, this cookie is named .ASPXAUTH.
loginUrl: Specifies the page location to which the HTTP request is redirected for login if no valid authentication cookie (.ASPXAUTH or otherwise) is found. By default, it is set to login.aspx.
protection: Specifies the amount of protection that you want to apply to the cookie that is stored on the end user’s machine after he has been authenticated. The possible settings include All, None, Encryption, and Validation. You should always attempt to use All.
timeout: Defines the amount of time (in minutes) after which the cookie expires. The default value is 30 minutes.
228

Membership and Role Management
path: Specifies the path for cookies issued by the application.
requireSSL: Defines whether you require that credentials be sent over an encrypted wire (SSL) instead of clear text.
slidingExpiration: Specifies whether the timeout of the cookie is on a sliding scale. The default value is True. This means that the end user’s cookie does not expire until 30 minutes (or the time specified in the timeout attribute) after the last request to the application has been made. If the value of the slidingExpiration attribute is set to False, the cookie expires 30 minutes from the first request.
cookieless: Specifies how the cookies are handled by ASP.NET. The possible values include useDeviceProfile, useCookies, auto, and useUri. The default value is useDeviceProfile. This value detects whether to use cookies based on the user agent of the device. useCookies requires that all requests have the credentials stored in a cookie. auto auto-determines whether the details are stored in a cookie on the client or within the URI (this is done by sending a test cookie first). Finally, useUri forces ASP.NET to store the details within the URI on all instances.
Now that forms authentication is turned on, the next step is adding users to the Microsoft Access data store.
Adding users
To add users to the membership service, you can register users into the Microsoft Access data store. The first question you might ask is, “Where is this data store?”
The Microsoft Access provider uses an Access file structured specifically for the membership service (and other ASP.NET systems). You can find a templated version of this Access file at C:\WINDOWS\ Microsoft.NET\Framework\v2.0.xxxxx\ASPNetdb_Template.mdb. One option is to make a copy of this file and place the copy in the Data folder of your solution. If you take this approach, be sure to rename the file AspNetDB.mdb.
The other option is to let Visual Studio 2005 create it for you. To do this, you work with the ASP.NET server controls that utilize the membership service to force the creation of this file (as I explain later).
Now that the data store is in place (or you let Visual Studio take care of it for you), it is time to start adding users to the data store.
Using the CreateUserWizard server control
The first server control that utilizes the membership service is the CreateUserWizard server control. This control enables you to plug registered users into your data store for later retrieval. If the first page of your application allows end users to register for your site, you want, at a minimum, to retrieve a login and password from the user so that he can use these items later to log in to the site.
To make your life as simple as possible, the CreateUserWizard control takes complete control of doing all these things. Listing 8-3 shows a simple use of the control.
229
Chapter 8
Listing 8-3: Allowing end users to register with the site
<%@ Page Language=”VB” %>
<html xmlns=”http://www.w3.org/1999/xhtml” > <head runat=”server”>
<title>Creating Users</title> </head>
<body>
<form id=”form1” runat=”server”>
<asp:CreateUserWizard ID=”CreateUserWizard1” Runat=”server” BorderWidth=”1px” BorderColor=”#FFDFAD” BorderStyle=”Solid” BackColor=”#FFFBD6” Font-Names=”Verdana” Font-Size=”0.8em”> <TitleTextStyle Font-Bold=”True” BackColor=”#990000”
ForeColor=”White”></TitleTextStyle>
</asp:CreateUserWizard>
</form>
</body>
</html>
This page simply uses the CreateUserWizard control and nothing more. This one control enables you to register end users. This particular CreateUserWizard control has a little style applied to it from the Auto Format option found in the control’s smart tag, but this control can be as simple as:
<asp:CreateUserWizard ID=”CreateUserWizard1” Runat=”server”> </asp:CreateUserWizard>
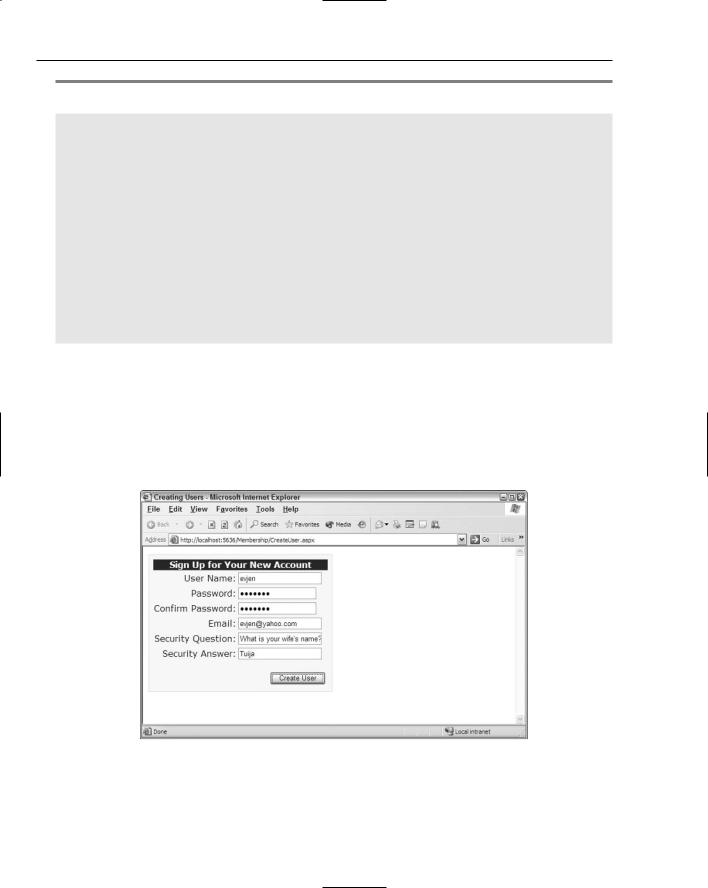
When this code is run, an end user is presented with the form shown in Figure 8-2.
Figure 8-2
230
Membership and Role Management
This screen shot shows the form as it would appear when filled out by the end user and includes user information such as the username, password, e-mail, as well as the security question-and-answer section. Clicking the Create User button places this user information into the data store.
The username and password enable the end user to log in to the application through the login server control. A Confirm Password text box is also included in the form to ensure that the password is spelled correctly. An e-mail address is included in case end users forget their login credentials and want the credentials e-mailed to them. Then finally, the security question and answer are used to verify the identity of the end user before any credentials or user information is changed.
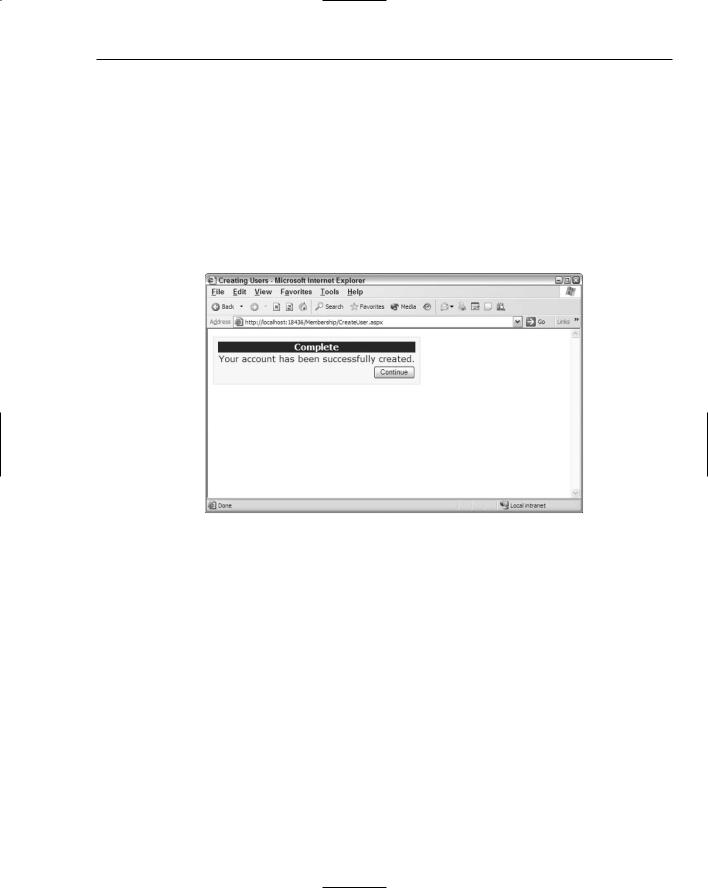
After the Create User button is clicked, the end user is presented with a confirmation of the information being stored (see Figure 8-3).
Figure 8-3
Seeing where users are stored
Now that the CreateUserWizard control has been used to add a user to the membership service, take a look at where this information is stored. If you are letting Visual Studio create the Microsoft Access file for you to store the user information, the file was created when the previous example was run. When the example is run, you can click the Refresh button in the Solution Explorer to find the AspNetDB.mdb file, which is located in the Data folder. Many different tables are included in this file, but you are only interested in the aspnet_Membership table.
When you open the aspnet_Membership table, the users you entered are in the system. This is shown in Figure 8-4.
The user password in this table is not stored as clear text, but instead, is hashed. When a user logs into an application that is using the ASP.NET 2.0 membership service, his or her password is immediately hashed and then compared to the hashed password stored in the database. If the two hashed strings do not compare, the passwords are not considered a match.
231
Chapter 8
Figure 8-4
Working with the CreateUserWizard control
When you work with the CreateUserWizard control, be aware of the ContinueButtonClick and the CreatedUser events. The ContinueButtonClick event is triggered when the Continue button on the second page is clicked after the user has been successfully created (see Listing 8-4).
Listing 8-4: The ContinueButtonClick event
VB
Sub CreateUserWizard1_ContinueButtonClick(ByVal sender As Object, _
ByVal e As System.EventArgs)
Response.Redirect(“Default.aspx”)
End Sub
C#
void CreateUserWizard1_ContinueButtonClick(object sender, EventArgs e)
{
Response.Redirect(“Default.aspx”);
}
232

Membership and Role Management
In this example, after the user has been added to the membership service through the form provided by the CreateUserWizard control, she can click the Continue button and is redirected to another page in the application. This is done with a simple Response.Redirect statement. Remember when you use this event, to add an OnContinueButtonClick=”CreateUserWizard1_ContinueButtonClick” to the
<asp:CreateUserWizard> control.
The CreateUser event is triggered when a user is successfully created in the data store. The use of this event is shown in Listing 8-5.
Listing 8-5: The CreateUser event
VB
Sub CreateUserWizard1_CreateUser(ByVal sender As Object, _
ByVal e As System.EventArgs)
‘ Code here End Sub
C#
void CreateUserWizard1_CreateUser(object sender, EventArgs e)
{
// Code here
}
Use this event if you want to take any additional actions when a user is registered to the service.
Adding users programmatically
You are not limited to using only server controls to register or add new users to the membership service. ASP.NET 2.0 provides a Membership API for performing this task programmatically. This is ideal to create your own mechanics for adding users to the service — or if you are modifying a Web application that was created using ASP.NET 1.0/1.1.
The Membership API includes the CreateUser method for adding users to the service. The CreateUser method includes three possible signatures:
Membership.CreateUser(username As String, password As String)
Membership.CreateUser(username As String, password As String, email As String)
Membership.CreateUser(username As String, password As String, email As String, passwordQuestion As String, passwordAnswer As String, isApproved As Boolean,
ByRef status As System.Web.Security.MembershipCreateStatus)
You can use this method to create users. The nice thing about this method is that you aren’t required to create an instance of the Membership class; you use it directly. A simple use of the CreateUser method is illustrated in Listing 8-6.
233

Chapter 8
Listing 8-6: Creating users programmatically
VB
<%@ Page Language=”VB” %>
<script runat=”server”>
Sub Button1_Click(ByVal sender As Object, ByVal e As System.EventArgs) Try
Membership.CreateUser(TextBox1.Text, TextBox2.Text) Label1.Text = “Successfully created user “ & TextBox1.Text
Catch ex As MembershipCreateUserException Label1.Text = “Error: “ & ex.ToString()
End Try End Sub </script>
<html xmlns=”http://www.w3.org/1999/xhtml” > <head runat=”server”>
<title>Creating a User</title> </head>
<body>
<form id=”form1” runat=”server”> <h1>Create User</h1> <p>Username<br />
<asp:TextBox ID=”TextBox1” Runat=”server”></asp:TextBox>
</p> <p>Password<br />
<asp:TextBox ID=”TextBox2” Runat=”server” TextMode=”Password”></asp:TextBox>
</p>
<p>
<asp:Button ID=”Button1” Runat=”server” Text=”Create User” OnClick=”Button1_Click” />
</p>
<p>
<asp:Label ID=”Label1” Runat=”server”></asp:Label>
</p>
</form>
</body>
</html>
C#
<%@ Page Language=”C#” %>
<script runat=”server”>
void Button1_Click(object sender, EventArgs e)
{
try
{
Membership.CreateUser(TextBox1.Text.ToString(),
TextBox2.Text.ToString());
Label1.Text = “Successfully created user “ + TextBox1.Text;
}
catch (MembershipCreateUserException ex)
234

Membership and Role Management
{
Label1.Text = “Error: “ + ex.ToString();
}
}
</script>
So, use either the CreateUserWizard control or the CreateUser method found in the Membership API to create users for your Web applications with relative ease. This functionality was possible in the past with ASP.NET 1.0/1.1, but it was a labor-intensive task. Now with ASP.NET 2.0, you can create users with either a single control or with a single line of code.
Changing how users register with your application
You determine how users register with your applications and what is required of them by the membership provider you choose. Each membership provider has default settings to determine how it behaves established from within the machine.config file. If you dig down in the machine.config file on your server you find the following code (shown in Listing 8-7).
Listing 8-7: Membership provider settings in the machine.config file
<membership defaultProvider=”AspNetAccessProvider” userIsOnlineTimeWindow=”15” > <providers>
<add name=”AspNetSqlProvider” type=”System.Web.Security.SqlMembershipProvider, System.Web, Version=2.0.3600.0, Culture=neutral, PublicKeyToken=b03f5f7f11d50a3a” connectionStringName=”LocalSqlServer” enablePasswordRetrieval=”false”
enablePasswordReset=”true”
requiresQuestionAndAnswer=”false”
applicationName=”/”
requiresUniqueEmail=”false”
passwordFormat=”Hashed”
description=”Stores and retrieves membership data from the local Microsoft SQL Server database”
/>
<add name=”AspNetAccessProvider” type=”System.Web.Security.AccessMembershipProvider, System.Web, Version=2.0.3600.0, Culture=neutral, PublicKeyToken=b03f5f7f11d50a3a” connectionStringName=”AccessFileName” enablePasswordRetrieval=”false”
enablePasswordReset=”true”
requiresQuestionAndAnswer=”false”
applicationName=”/”
requiresUniqueEmail=”false”
passwordFormat=”Hashed”
description=”Stores and retrieves membership data from the local Microsoft Access database file”
/>
</providers>
</membership>
235