


Chapter 5
Working with the TreeView control programmatically
So far with the TreeView control, you have learned how to work with the control declaratively. The great thing about ASP.NET is that you are not simply required to work with its components declaratively, but you can also manipulate these controls programmatically.
The TreeView control has an associated TreeView class that enables you to completely manage the TreeView control and how it functions from within your code. The next section takes a look at how to use some of the more common ways to control the TreeView programmatically.
Expanding and collapsing nodes programmatically
One thing you can do with your TreeView control is to expand or collapse the nodes within the hierarchy programmatically. You can accomplish this by using either the ExpandAll or CollapseAll methods from the TreeView class. Listing 5-12 shows you one of the earlier TreeView controls that you used in Listing 5-6, but with a couple of buttons above it that you now use to initiate the expanding and collapsing of the nodes.
Listing 5-12: Expanding and collapsing the nodes of the TreeView control programmatically
VB
<%@ Page Language=”VB” %>
<script runat=”server” language=”vb”>
Sub Button1_Click(ByVal sender As Object, ByVal e As System.EventArgs) TreeView1.ExpandAll()
End Sub
Sub Button2_Click(ByVal sender As Object, ByVal e As System.EventArgs) TreeView1.CollapseAll()
End Sub </script>
<html xmlns=”http://www.w3.org/1999/xhtml” > <head id=”Head1” runat=”server”>
<title>TreeView Control</title> </head>
<body>
<form id=”Form1” runat=”server”> <p>
<asp:Button ID=”Button1” Runat=”server” Text=”Expand Nodes” OnClick=”Button1_Click” />
<asp:ButtonButton ID=”Button2” Runat=”server” Text=”Collapse Nodes” OnClick=”Button2_Click” />
<br /> <br />
<asp:TreeViewTreeView ID=”TreeView1” Runat=”server” DataSourceId=”SiteMapDataSource1”> </asp:TreeViewTreeView>
<asp:SiteMapDataSource ID=”SiteMapDataSource1” Runat=”server” /></p> </form>
</body>
</html>
150
Site Navigation
C#
<%@ Page Language=”C#” %>
<script runat=”server”>
void Button1_Click(object sender, System.EventArgs e)
{
TreeView1.ExpandAll();
}
void Button2_Click(object sender, System.EventArgs e)
{
TreeView1.CollapseAll();
}
</script>
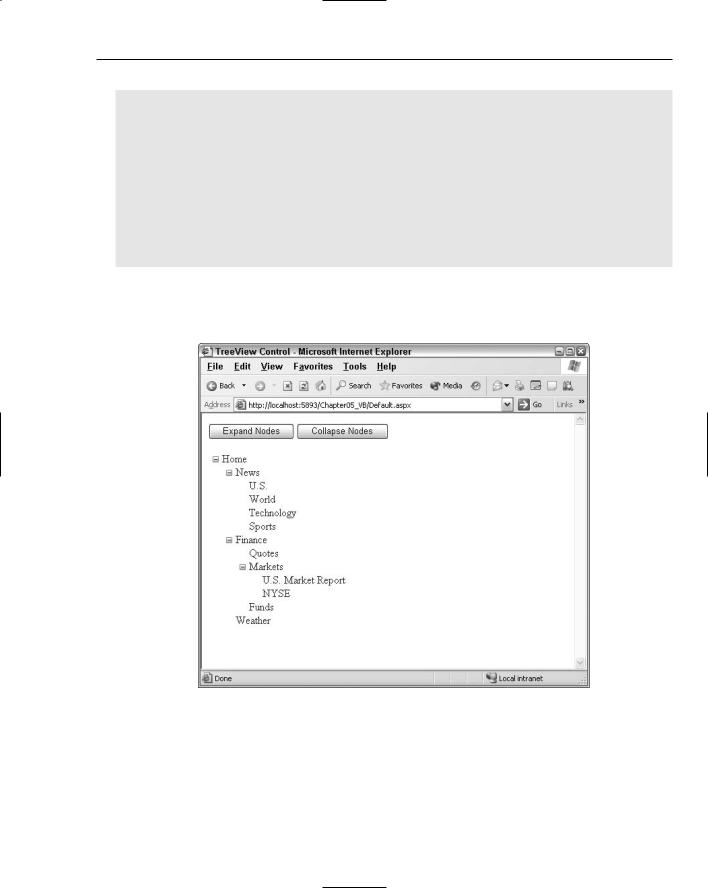
Running this page gives you two buttons above your TreeView control. Clicking the first button invokes the ExpandAll method and completely expands the entire list of nodes. Clicking the second button invokes the CollapseAll method and completely collapses the list of nodes (see Figure 5-17).
Figure 5-17
The example shown in Listing 5-12 is nice, but it only expands and collapses the nodes on end user actions (when the end user clicks the button). It would be even nicer if you could initiate this action programmatically.
151
Chapter 5
You might think that you could simply place the TreeView1.ExpandAll() command within the Page_Load event, but if you try this, you see that it doesn’t work. Instead, you use the OnDataBound attribute within the TreeView control:
<asp:TreeView ID=”TreeView1” Runat=”server” DataSourceId=”SiteMapDataSource1” OnDataBound=”TreeView1_DataBound”> </asp:TreeView>
The value of this attribute points to a method in your code, as shown here:
VB
Sub TreeView1_DataBound(ByVal sender As Object, ByVal e As System.EventArgs) TreeView1.ExpandAll()
End Sub
C#
void TreeView1_DataBound(object sender, System.EventArgs e)
{
TreeView1.ExpandAll();
}
Now when you run the page, notice that the TreeView control is completely expanded when the page is first loaded in the browser.
You can also expand specific nodes within the tree instead of just expanding the entire list. For this example, use the TreeView1_DataBound method you just created. Using the site map from Listing 5-1, change the TreeView1_DataBound method so that it appears as shown in Listing 5-13.
Listing 5-13: Expanding specific nodes programmatically
VB
Sub TreeView1_DataBound(ByVal sender As Object, ByVal e As System.EventArgs) TreeView1.FindNode(“Home”).Expand() TreeView1.FindNode(“Home\Finance”).Expand() TreeView1.FindNode(“Home\Finance\Markets”).Expand()
End Sub
C#
void TreeView1_DataBound(object sender, System.EventArgs e)
{
TreeView1.FindNode(“Home”).Expand();
TreeView1.FindNode(“Home\\Finance”).Expand(); TreeView1.FindNode(“Home\\Finance\\Markets”).Expand();
}
In this case, you are using the FindNode method and expanding the node that is found. The FindNode method takes a String value, which is the node and the path of the node that you want to reference. For instance, TreeView1.FindNode(“Home\Finance”).Expand() expands the Finance node. To find the node, it is important to specify the entire path from the root node to the node you want to work with (in this case, the Finance node). You separate the nodes within the site map path structure with a backslash in between each of the nodes in the site map path (two backslashes if you are working in C#).
152

Site Navigation
Note that you had to expand each of the nodes individually until you got to the Finance node. If you simply used TreeView1.FindNode(“Home\Finance\Markets”).Expand() in the TreeView1_DataBound method, the Finance node would indeed be expanded, but the parent nodes above it (the Finance and Home nodes) would not have been expanded and you wouldn’t see the expanded Markets node when invoking the page. (Try it, it’s interesting.)
Instead of using the Expand method, you could just as easily have used the Expanded property and set it to True, as shown in Listing 5-14.
Listing 5-14: Expanding nodes programmatically using the Expanded property
VB
Sub TreeView1_DataBound(ByVal sender As Object, ByVal e As System.EventArgs) TreeView1.FindNode(“Home”).Expanded = True TreeView1.FindNode(“Home\Finance”).Expanded = True TreeView1.FindNode(“Home\Finance\Markets”).Expanded = True
End Sub
C#
void TreeView1_DataBound(object sender, System.EventArgs e)
{
TreeView1.FindNode(“Home”).Expanded = true;
TreeView1.FindNode(“Home\\Finance”).Expanded = true; TreeView1.FindNode(“Home\\Finance\\Markets”).Expanded = true;
}
Although you focused on the Expand method and the Expanded property here, you can just as easily work on programmatically collapsing nodes using the Collapse method. No Collapsed property really exists. Instead, you simply set the Expanded property to False.
Adding nodes
Another interesting thing you can do with the TreeView control is to add nodes to the overall hierarchy programmatically. The TreeView control is made up of a collection of TreeNode objects. So as you see in previous examples, the Finance node is actually a TreeNode object that you can work with programmatically. It includes the capability to add other TreeNode objects.
A TreeNode object typically stores a Text and Value property. The Text property is what is displayed in the TreeView control for the end user. The Value property is an additional data item that you can use to associate with this particular TreeNode object. Another property that you can use (if your TreeView control is a list of navigational links) is the NavigateUrl property. Listing 5-15 demonstrates how to add nodes programmatically to the same site map from Listing 5-1 that you have been using.
Listing 5-15: Adding nodes programmatically to the TreeView control
VB
<%@ Page Language=”VB” %>
<script runat=”server” language=”vb”>
Sub Button1_Click(ByVal sender As Object, ByVal e As System.EventArgs)
(continued)
153

Chapter 5
Listing 5-15: (continued)
TreeView1.ExpandAll()
End Sub
Sub Button2_Click(ByVal sender As Object, ByVal e As System.EventArgs) TreeView1.CollapseAll()
End Sub
Sub Button3_Click(ByVal sender As Object, ByVal e As System.EventArgs) Dim myNode As New TreeNode
myNode.Text = TextBox1.Text
myNode.NavigateUrl = TextBox2.Text TreeView1.FindNode(“Home\Finance\Markets”).ChildNodes.Add(myNode)
End Sub </script>
<html xmlns=”http://www.w3.org/1999/xhtml” > <head id=”Head1” runat=”server”>
<title>TreeView Control</title> </head>
<body>
<form id=”Form1” runat=”server”> <p>
<asp:Button ID=”Button1” Runat=”server” Text=”Expand Nodes” OnClick=”Button1_Click” />
<asp:Button ID=”Button2” Runat=”server” Text=”Collapse Nodes” OnClick=”Button2_Click” /></p>
<p>
<strong>Text of new node:</strong> <asp:TextBox ID=”TextBox1” runat=”server”> </asp:TextBox>
</p>
<p>
<strong>Desination URL of new node:</strong>
<asp:TextBox ID=”TextBox2” Runat=”server”> </asp:TextBox>
<br /> <br />
<asp:Button ID=”Button3” Runat=”server” Text=”Add New Node” OnClick=”Button3_Click” />
</p>
<p>
<asp:TreeView ID=”TreeView1” runat=”server” DataSourceId=”SiteMapDataSource1”> </asp:TreeView></p>
<p>
<asp:SiteMapDataSource ID=”SiteMapDataSource1” Runat=”server” /></p> </form>
</body>
</html>
154
Site Navigation
C#
void Button3_Click(object sender, System.EventArgs e)
{
TreeNode myNode = new TreeNode(); myNode.Text = TextBox1.Text; myNode.NavigateUrl = TextBox2.Text;
TreeView1.FindNode(“Home\\Finance\\Markets”).ChildNodes.Add(myNode);
}
This page contains two text boxes and a new Button control. The first text box is used to populate the Text property of the new node that is created. The second text box is used to populate the NavigateUrl property of the new node.
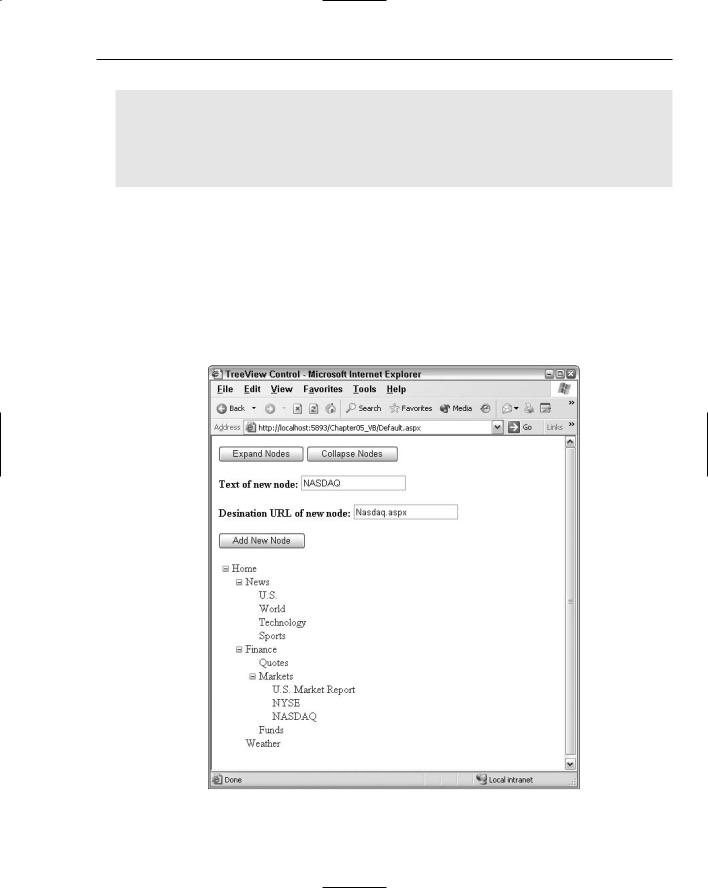
If you run the page, you can expand the entire hierarchy by pressing the Expand Nodes button. Then you can add additional child nodes to the Markets node. To add a new node programmatically, use the FindNode method as you did before to find the Markets node. When you find it, you can add additional child nodes by using the ChildNodes.Add method and pass in a TreeNode object instance. Submitting NASDAQ in the first text box and Nasdaq.aspx in the second text box changes your TreeView control, as illustrated in Figure 5-18.
Figure 5-18
155
Chapter 5
After it is added, the node stays added even after the hierarchy tree is collapsed and re-opened. You can also add as many child nodes as you want to the Markets node. It is important to note that although you are changing nodes programmatically, this in no way alters the contents of the data source (the XML file, or the .sitemap file). These sources remain unchanged throughout the entire process.
Menu Ser ver Control
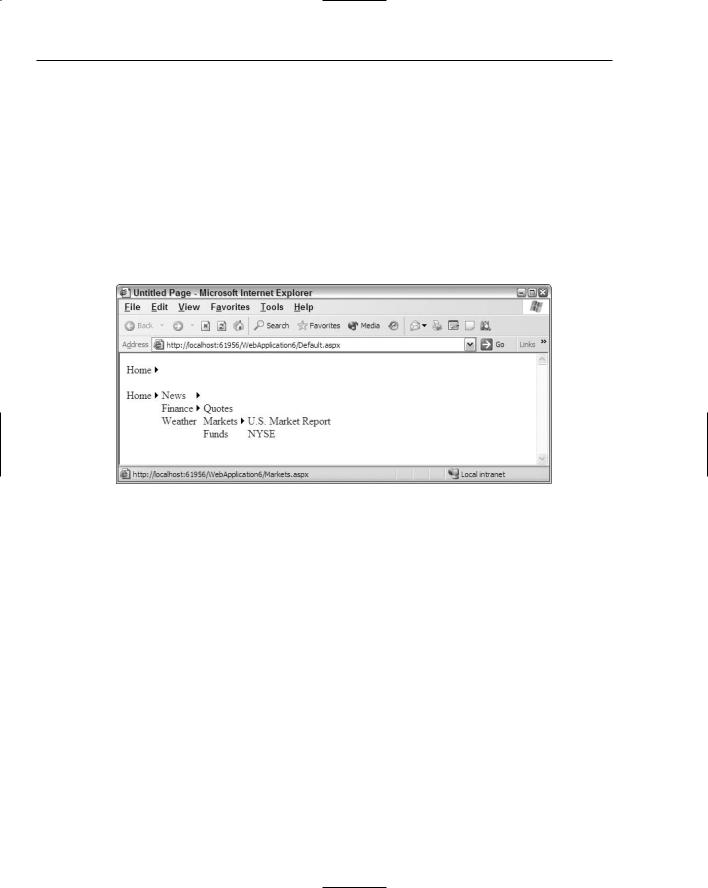
One of the cooler navigation controls provided with ASP.NET 2.0 is the new Menu server control. This control is ideal for allowing the end user to navigate a larger hierarchy of options while utilizing very little browser real estate in the process. Figure 5-19 shows you what the menu control looks like when it is either completely collapsed or completely extended down one of the branches of the hierarchy.
Figure 5-19
From here, you can see that the first Menu control displayed simply shows the Home link with a small arrow to the right of the display. The arrow means that there are more options available that relate to this up-most link in the hierarchy. The second Menu control displayed shows what the default control looks like when the end user works down one of the branches provided by the site map.
The Menu control is an ideal control to use when you have lots of options — whether these options are selections the end user can make or navigation points provided by the application in which they are working. The Menu control can provide a multitude of options and consumes little space in the process.
Using the Menu control in your ASP.NET applications is rather simple. You need to have the control work with a SiteMapDataSource control. You can drag and drop the SiteMapDataSource control and the Menu control onto the Visual Studio 2005 design surface and connect the two by using the Menu control’s DataSourceId property. Alternatively, you can create and connect them directly in code.
Listing 5-16 shows an example of the Menu control in its simplest form.
156