

Chapter 4
The UpdateCommand attribute takes a String value, which is the SQL command to update the database. A number of named parameters, such as @CompanyName, @Country, @Region, and @CustomerID, are placeholders for the corresponding information that is going to come from the selected row. Now that you are using named parameters in the update command, however, you must define the parameters. This is where the <UpdateParameters> section of the SqlDataSource control comes into play:
<UpdateParameters>
<asp:Parameter Name=”CustomerID” Type=”String”> </asp:Parameter>
<asp:Parameter Name=”CompanyName” Type=”String”> </asp:parameter>
<asp:parameter Name=”Country” Type=”String”> </asp:parameter>
<asp:parameter Name=”Region” Type=”String”> </asp:parameter>
</UpdateParameters>
Within the <UpdateParameters> section of the GridView control, each named parameter is defined using the <asp:Parameter> element. The <asp:Parameter> element here uses two attributes that define the name and data type of the parameter (in this case, all parameters are of type String). In addition to an <UpdateParameters> section for the GridView control, you can also use the <DeleteParameters>,
<FilterParameters>, <InsertParameters>, and <SelectParameters> sections to provide parameters for other operations.
Deleting data from the GridView
Deleting data from the table produced by the GridView is even easier than editing data. Just a few additions to the code enable you to delete an entire row of data from the table. As you saw in the previous example (Listing 4-9), you simply add the Delete button to the <asp:CommandField> element of the GridView by setting the value of the ShowDeleteButton attribute to True (see Listing 4-10).
Listing 4-10: Adding a Delete link (partial code)
<asp:CommandField ShowEditButton=”True” ShowDeleteButton=”True”> </asp:CommandField>
The addition of the ShowDeleteButton to the GridView is the only change you make to this control. Now look at the SqlDataSource control. Listing 4-11 shows you the root element of this control.
Listing 4-11: Adding delete functionality to the SqlDataSource control
<asp:SqlDataSource Id=”SqlDataSource1” Runat=”server” SelectCommand=”Select * From Customers”
UpdateCommand=”UPDATE Customers SET CompanyName = @CompanyName,
Country = @Country, Region = @Region WHERE (CustomerID = @CustomerID)” DeleteCommand=”DELETE From Customers WHERE (CustomerID = @CustomerID)” ConnectionString=”Server=(local);Trusted_Connection=True;Integrated
Security=SSPI;Persist Security Info=True;Database=Northwind” ProviderName=”System.Data.SqlClient”>
92
New Ways to Handle Data
In addition to the SelectCommand and UpdateCommand attributes, you also add the DeleteCommand attribute to the SqlDataSource server control and provide the SQL command that deletes the specified row. Just like the UpdateCommand attribute, the DeleteCommand attribute uses a named parameter.
Because of this, you define what this parameter is from within the SqlDataSource control. To do this, add a <DeleteParameters> section to the SqlDataSource control, as shown in Listing 4-12.
Listing 4-12: Adding a <DeleteParameters> section to the SqlDataSource control
<DeleteParameters>
<asp:Parameters Name=”CustomerID” Type=”String”>
</asp:Parameters>
</DeleteParameters>
This is the only parameter definition needed for the <DeleteParameters> section because the SQL command for this deletion requires only the CustomerID from the row to delete the entire row.
When you run the example with this code in place, you see a Delete link next to the Edit link. Clicking the Delete link completely deletes the selected row.
Dealing with other column types in the GridView
So far in this chapter, you have looked at only two types of columns in the GridView control: the BoundField and the CommandField columns. Although these are the column types that you most commonly use, additional column types are at your disposal (such as the CheckBoxField, HyperLinkField, and the TemplateField columns). Take a quick look at each of these column types.
<asp:CheckBoxField>
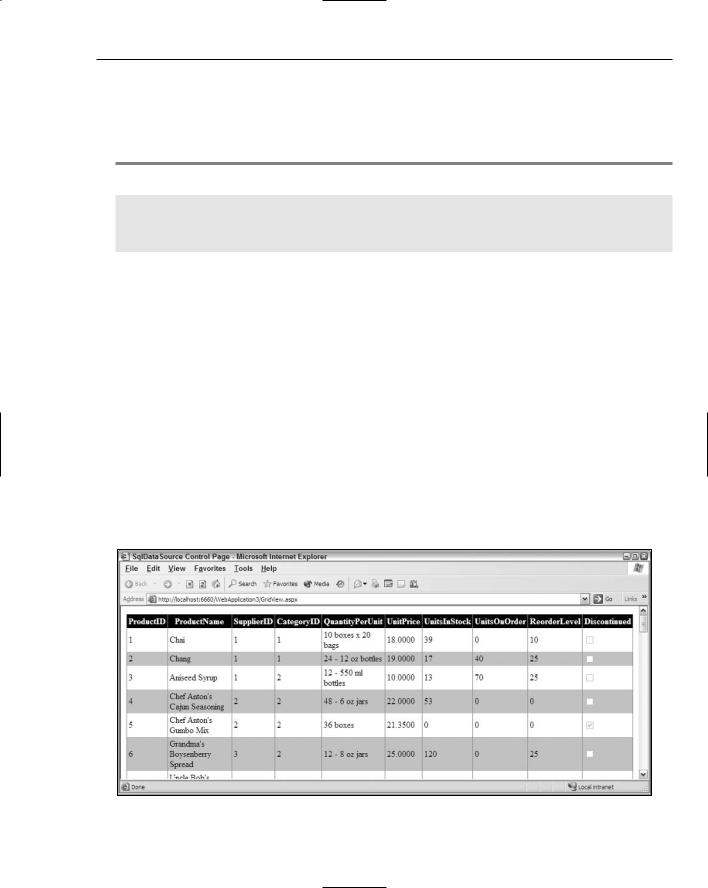
An example of the CheckBoxField column is the Discontinued column, shown in Figure 4-14. In it, the GridView control displays the contents of the Products table in the Northwind database of SQL Server.
Figure 4-14
93
Chapter 4
The GridView automatically converts a column type to a CheckBoxField if the data store’s column type is using a Boolean or a bit value. To specify which columns should be displayed using the <Columns> section of the GridView, use the method shown in Listing 4-13.
Listing 4-13: Showing check boxes in the GridView control
<Columns>
<asp:CheckBoxField SortExpression=”Discontinued” DataField=”Discontinued” HeaderText=”Discontinued”>
</asp:CheckBoxField>
</Columns>
<asp:HyperLinkField>
You can also just as easily create columns in your tables that include hyperlinks by using the HyperLinkField column. You can use the HyperLinkField column to enable end users to see related information on another page that you can link to from each row in the table. Each row might need a distinct URL, requiring you to put this type of column in the GridView. Listing 4-14 shows an example of using the <asp:HyperLinkField> element to link to more information about the customer represented in the Customers table from the Northwind database of SQL Server.
Listing 4-14: Showing hyperlinks in the GridView control
<Columns>
<asp:HyperLinkField SortExpression=”CompanyName” DataTextField=”CompanyName” HeaderText=”Company Name” DataNavigateUrlFields=”CustomerID”
DataNavigateUrlFormatString=”http://www.reuters.com/mycustomers?custid={0}”>
</asp:HyperLinkField>
</Columns>
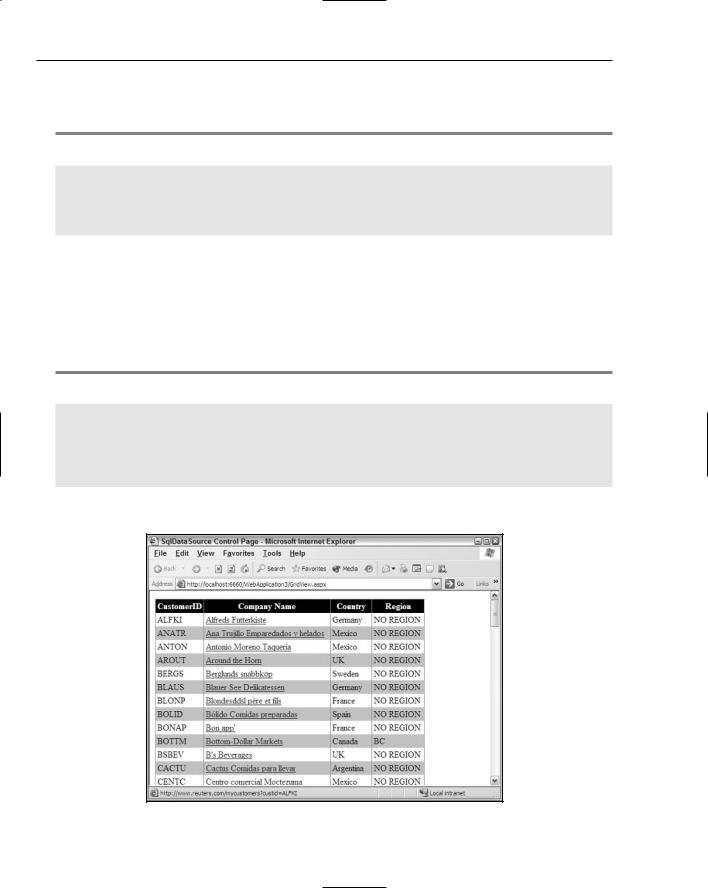
This code gives you the results illustrated in Figure 4-15.
Figure 4-15
94

New Ways to Handle Data
You can see that each of the company names is a hyperlink in the table. If you hover your mouse over the links, note that each one has a different hyperlink destination. The <asp:HyperLinkField> element contains some attributes that differ from the other items in the <Columns> section of the GridView control. Instead of a DataField attribute, the HyperLinkField column uses a DataTextField attribute. This attribute specifies the text used for the hyperlink — in this case, the information found in the CompanyName column from the data store.
Using the DataNavigateUrlFormatString attribute, you specify the link destination to be used for the hyperlink. In this case, it is http://www.reuters.com/mycustomers?custid={0}. Looking at the link itself, you see that every customer link goes to the same page, but the page can be customized for the customer selected in the table because of the querystring used with the link (custid={0}). The querystring itself does not contain a value for custid. This is generated dynamically and is unique
for each and every row in the table. You show the dynamic part of a hyperlink with the use of {0}.
After the DataNavigateUrlFormatString attribute is in place, you specify what takes the place of the {0} in each hyperlink that is created. For this, you use the DataNavigateUrlFields attribute. This attribute can take one or more fields to be used in the hyperlink. For this example, refer to the CustomerID column from the data store. When you refer to CustomerID, a link like this appears: http://www.reuters.com/mycustomers?custid=WARTH.
By the way, if you have to create a hyperlink such as http://www.reuters.com/mycustomers? custid=WARTH&country=Finland, you give the DataNavigateUrlFormatString a value of http://www.reuters.com/mycustomers?custid={0}&country={1}. Because this hyperlink contains two dynamic parts, you construct the DataNavigateUrlFields attribute as follows:
DataNavigateUrlFields=”CustomerID, Country”
<asp:TemplateField>
The final column type is the TemplateField column. This column enables you to completely customize the appearance and the structure of the generated column in the GridView control. You can place pretty much anything you want in the cells of your table. For instance, you could put any of the other <asp:> controls in the templates used for the cells — this would be easy to achieve using the <asp:TemplateField. For example, if you want a cell that contains both the CustomerID and CompanyName items from the Customers table in the Northwind database, you use the code illustrated in Listing 4-15.
Listing 4-15: Working with the TemplateField column
<asp:TemplateField SortExpression=”CustomerID” HeaderText=”Our Customers”> <itemtemplate>
<asp:Label Runat=”server” Text=’<%# Eval(“CustomerID”) %>’ Font-Bold=”True” BackColor=”Red” /><br />
<asp:Label Runat=”Server” Text=’<%# Eval(“CompanyName”) %>’ /> </itemtemplate>
<alternatingitemtemplate>
<asp:Label Runat=”server” Text=’<%# Eval(“CustomerID”) %>’ Font-Bold=”True” BackColor=”Yellow” /><br />
<asp:Label ID=”Label1” Runat=”Server” Text=’<%# Eval(“CompanyName”) %>’ /> </alternatingitemtemplate>
</asp:TemplateField>
95
Chapter 4
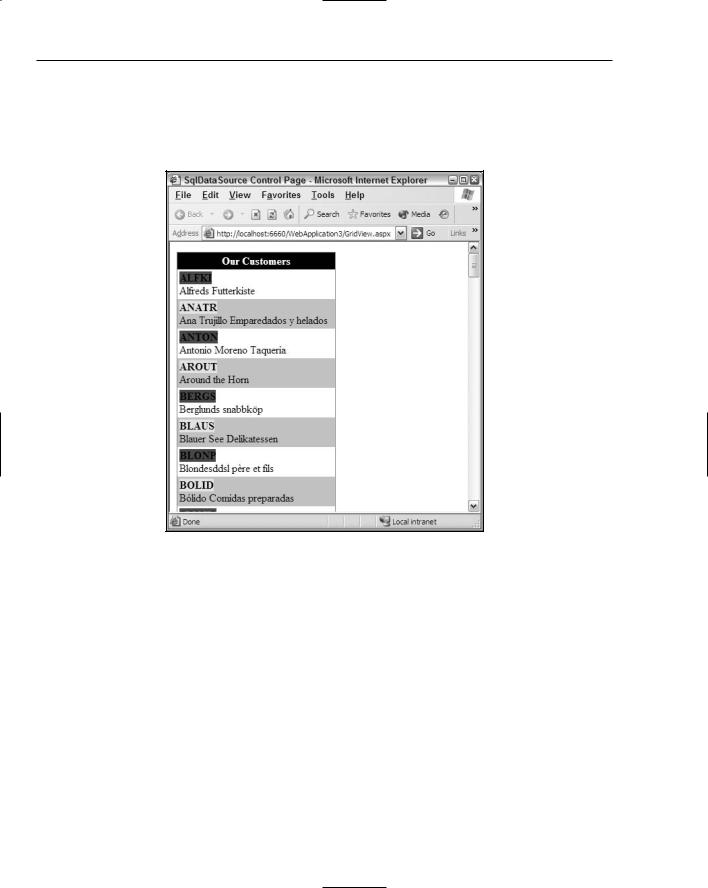
In this example, both the CustomerID data item and the CompanyName data item are shown in the same cell. By using the <ItemTemplate> and the <AlternatingItemTemplate> elements, you can change the background color used for the CustomerID data item, as shown in Figure 4-16 (it’s not easy to tell in this black-and-white screen shot, but red and yellow have been used as background colors for the customer ID).
Figure 4-16
The AccessDataSource and
DetailsView Controls
Not only can you easily connect to Microsoft SQL Server using the new SqlDataSource control, you can also connect to any Microsoft Access database (an .mdb file) just as easily by using the AccessDataSource control provided with ASP.NET 2.0. Microsoft Access is a great database to use in smaller sites or applications. It is especially useful when you are working with an application hosted on a third-party server that doesn’t provide or allow you to work with a SQL Server database. You can use this data source control with any of the data-bound server controls. Previous examples of using the GridView control can be done just as easily using the AccessDataSource control in place of the SqlDataSource control. Instead of showing more examples using just the GridView control, this section focuses on using the AccessDataSource control with another new data-bound control — the DetailsView control.
96

New Ways to Handle Data
You won’t find that much difference between the AccessDataSource control and the previously viewed SqlDataSource control (besides the fact that they connect to different types of data stores). You can work with the AccessDataSource control in much the same manner as you worked with the SqlDataSource control.
Microsoft Access, just like SQL Server, comes with a sample database called Northwind. For this chapter, I use the sample Northwind database found at C:\Program Files\Microsoft Office\OFFICE11 \SAMPLES\Northwind.mdb from the Microsoft Access product that is part of Office 11. You can get to the sample Northwind database within Microsoft Access by choosing Help Sample Databases Northwind Sample Database. If you do not have the database installed, you are prompted at this time to install it.
After the sample database is in place, you can use this sample .mdb file (titled Northwind.mdb) and the AccessDataSource control to work with the samples in this chapter.
The DetailsView control is a new data-bound control that enables you to view a single record at a time. Although the GridView control is an excellent control for viewing a collection of data that consists of multiple rows, you might also want to drill down into one of those individual records. The DetailsView control lets you do this.
This control has a lot of the same types of behaviors and functionality found in the GridView control. You can use the DetailsView control to do things like paging, updating, inserting, and deleting data.
For an example of using the new AccessDataSource control with the new DetailsView control, follow these steps to get at the Customers table from the Northwind database in the sample .mdb file:
1.Create a new ASP.NET page using either Visual Basic or C#.
2.Drag and drop a DetailsView server control onto the design surface.
3.Change the style of the DetailsView to something more interesting by clicking the AutoFormat link in control’s smart tag (for this example, I selected Brown Sugar).
4.Add the Northwind.mdb file to your solution by right-clicking the solution and selecting Add Existing Item. You can find the sample .mdb file at C:\Program Files\Microsoft Office\OFFICE11\SAMPLES\Northwind.mdb. It is best to place this and all .mdb files within the Data folder included with your solution.
5.Drag and drop an AccessDataSource control onto the design surface.
Just like the SqlDataSource control, the AccessDataSource control is represented on the Design surface as a gray box. Highlight the gray box and turn your attention to the Properties Window.
The first item to change here is the DataFile property. This property should point to the Northwind.mdb file. You can do this by simply giving the DataFile property a value of Northwind.mdb.
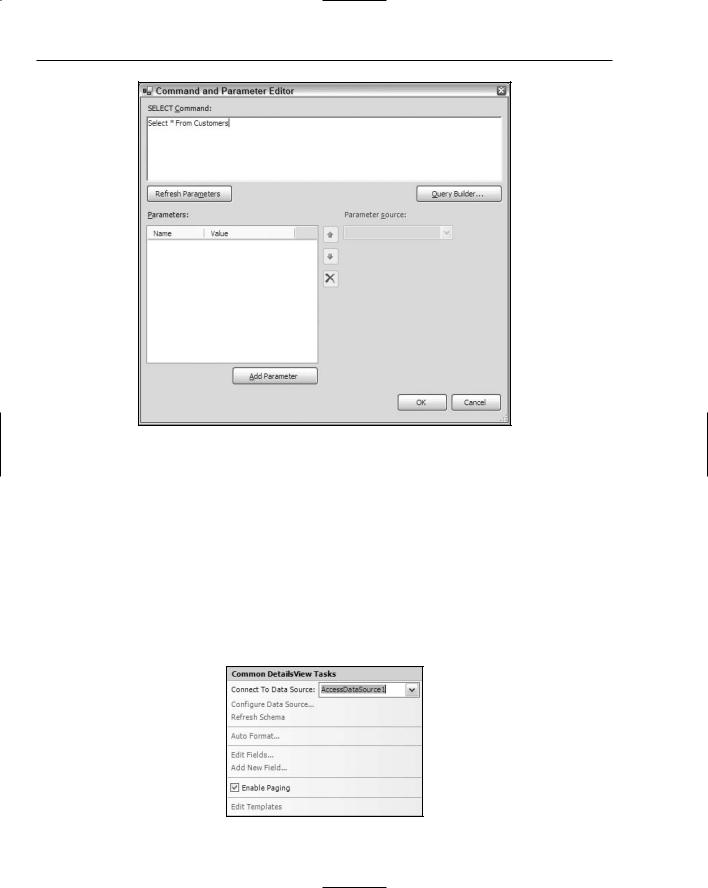
Next, change the SelectQuery property by clicking the button next to this property. This launches the Command and Parameter Editor dialog, as shown in Figure 4-17.
97
Chapter 4
Figure 4-17
Place the value Select * From Customers in the SELECT Command text box. Click OK. The AccessDataSource control is now ready to use.
Next, locate DetailsView on the Design surface, highlight the DetailsView1 control on the page, and give the DataSourceId property the value of AccessDataSource1. If you run the page at this point, the DetailsView control displays only a single result (the first result) and won’t allow you to see anything else. If that is the functionality you are looking for, you probably want a different SQL statement, such as Select * From Customers Where CustomerID=ALFKI, so that you don’t grab every record from the table.
To enable the end user to scroll through the records one at a time, you enable paging in the DetailsView control. This is done either by adding AllowPaging=”True” or by checking the Enable Paging check box in the smart tag of the DetailsView control (shown in Figure 4-18).
Figure 4-18
98

New Ways to Handle Data
After all this is complete, your code should resemble Listing 4-16.
Listing 4-16: Looking at a single record at a time
<%@ Page Language=”VB” %>
<html xmlns=”http://www.w3.org/1999/xhtml” > <head runat=”server”>
<title>DetailsView Control</title> </head>
<body>
<form id=”form1” runat=”server”>
<asp:DetailsView ID=”DetailsView1” Runat=”server” DataSourceId=”AccessDataSource1”
AllowPaging=”True” BorderColor=”#DEBA84” BorderStyle=”None” BorderWidth=”1px”
BackColor=”#DEBA84” CellSpacing=”2” CellPadding=”3”> <PagerStyle ForeColor=”#8C4510” HorizontalAlign=”Center”> </PagerStyle>
<EditRowStyle ForeColor=”White” BackColor=”#738A9C” Font-Bold=”True”> </EditRowStyle>
<RowStyle ForeColor=”#8C4510” BackColor=”#FFF7E7”> </RowStyle>
<FooterStyle ForeColor=”#8C4510” BackColor=”#F7DFB5”> </FooterStyle>
<HeaderStyle ForeColor=”White” BackColor=”#A55129” Font-Bold=”True”> </HeaderStyle>
</asp:DetailsView>
<asp:AccessDataSource ID=”AccessDataSource1” Runat=”server” SelectCommand=”Select * From Customers” DataFile=”Data/Northwind.mdb”>
</asp:AccessDataSource>
</form>
</body>
</html>
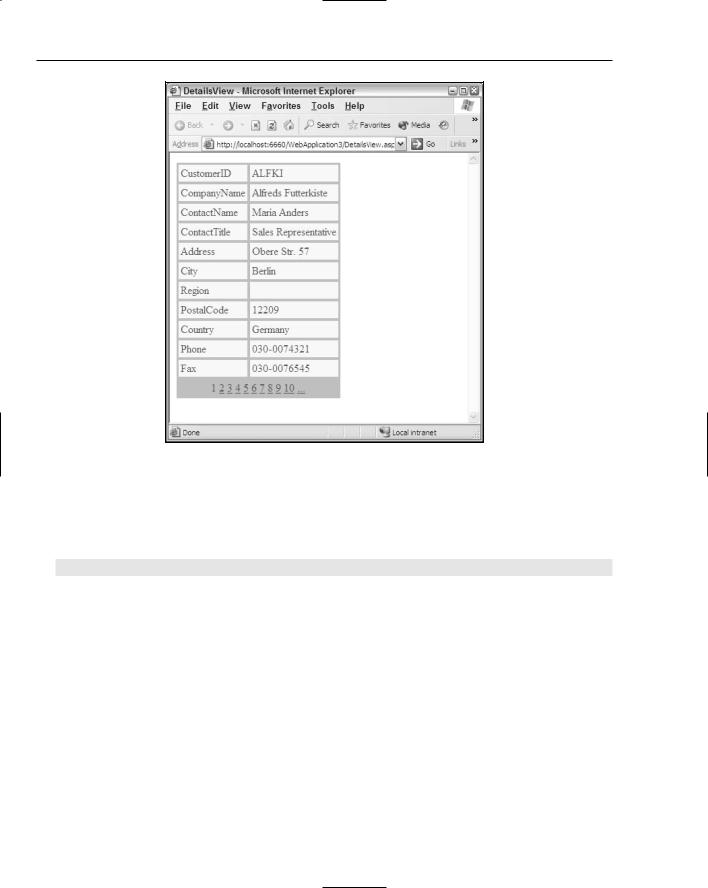
After it is run, your page should look like Figure 4-19.
The DetailsView control associates itself with the AccessDataSource control via the use of the DataSourceId attribute. This attribute takes a String value and points to a particular data source control by using the data source control’s control ID as a value. In this case, it is AccessDataSource1.
The AccessDataSource control, shown previously, uses the typical ID and Runat attributes as well as the SelectCommand attribute. The SelectCommand attribute takes a String value. Later when you begin inserting, updating, and deleting data from a data store using the DetailsView control, you use the other InsertCommand, UpdateCommand, and DeleteCommand attributes. The last important attribute from Listing 4-16 is the DataFile attribute. This attribute takes a String value that points to the location of the Access data file used by the control. In this case, because the Northwind.mdb file is located with the
.aspx file itself, the value of this attribute is simply Northwind.mdb.
99
Chapter 4
Figure 4-19
Looking at the figure, you can see that, by default, the DetailsView control performs its paging capability in a numeric fashion. You can, however, change this behavior just as you can change the behavior of the GridView control. Just add the following attribute to the root <asp:DetailsView> element in the DetailsView control:
PagerSettings-Mode=”NextPrevious”
This gives you logical arrows that enable the end user to move up or down the row collection, as illustrated in Figure 4-20.
Also, just as with the GridView control, you can completely customize not only the appearance of the pager functionality (including the use of images), but also the appearance of the entire control.
100