

Application and Page Frameworks
Web site requiring FrontPage Extensions
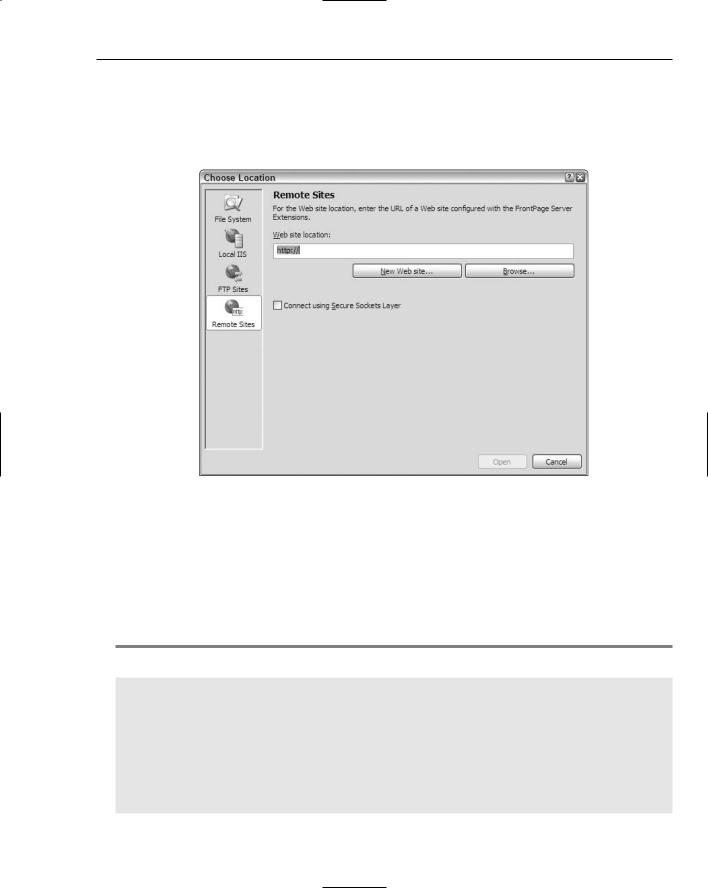
The last option in the Choose Location dialog is the Remote Sites option. Clicking this button provides a dialog that enables you to connect to a remote or local server that utilizes FrontPage Extensions. This option is displayed in Figure 3-5.
Figure 3-5
The ASP.NET Page Structure Options
One of the major complaints about Visual Studio .NET 2002 and 2003 is that it forced you to use the code-behind model when developing your ASP.NET pages. The code-behind model in ASP.NET was introduced as a new way to separate the presentation code and business logic. Listing 3-1 shows a typical .aspx page generated using Visual Studio .NET 2002 or 2003.
Listing 3-1: A typical .aspx page from ASP.NET 1.0/1.1
<%@ Page Language=”vb” AutoEventWireup=”false” Codebehind=”WebForm1.aspx.vb” Inherits=”WebApplication.WebForm1”%>
<!DOCTYPE HTML PUBLIC “-//W3C//DTD HTML 4.0 Transitional//EN”> <HTML>
<HEAD>
<title>WebForm1</title>
<meta name=”GENERATOR” content=”Microsoft Visual Studio .NET 7.1”> <meta name=”CODE_LANGUAGE” content=”Visual Basic .NET 7.1”>
<meta name=”vs_defaultClientScript” content=”JavaScript”> <meta name=”vs_targetSchema”
(continued)
45

Chapter 3
Listing 3-1: (continued)
content=”http://schemas.microsoft.com/intellisense/ie5”>
</HEAD>
<body>
<form id=”Form1” method=”post” runat=”server”> <P>What is your name?<br>
<asp:TextBox id=”TextBox1” runat=”server”></asp:TextBox><BR> <asp:Button id=”Button1” runat=”server” Text=”Submit”></asp:Button></P> <P><asp:Label id=”Label1” runat=”server”></asp:Label></P>
</form>
</body>
</HTML>
The code-behind file created within Visual Studio .NET 2002/2003 for the .aspx page is shown in Listing 3-2.
Listing 3-2: A typical .aspx.vb / .aspx.cs page from ASP.NET 1.0/1.1
Public Class WebForm1
Inherits System.Web.UI.Page
#Region “ Web Form Designer Generated Code “
‘This call is required by the Web Form Designer. <System.Diagnostics.DebuggerStepThrough()> Private Sub InitializeComponent()
End Sub
Protected WithEvents TextBox1 As System.Web.UI.WebControls.TextBox
Protected WithEvents Button1 As System.Web.UI.WebControls.Button
Protected WithEvents Label1 As System.Web.UI.WebControls.Label
‘NOTE: The following placeholder declaration is required by the Web Form Designer.
‘Do not delete or move it.
Private designerPlaceholderDeclaration As System.Object
Private Sub Page_Init(ByVal sender As System.Object, ByVal e As System.EventArgs) Handles MyBase.Init
‘CODEGEN: This method call is required by the Web Form Designer ‘Do not modify it using the code editor.
InitializeComponent() End Sub
#End Region
Private Sub Page_Load(ByVal sender As System.Object, ByVal e As System.EventArgs) Handles MyBase.Load
‘Put user code to initialize the page here End Sub
Private Sub Button1_Click(ByVal sender As System.Object, ByVal e As System.EventArgs) Handles Button1.Click
Label1.Text = “Hello “ & TextBox1.Text End Sub
End Class
46

Application and Page Frameworks
In this code-behind page from ASP.NET 1.0/1.1, you can see that a lot of code developers never have to deal with is hidden in the Region section of the page. Because ASP.NET 2.0 is built on top of .NET 2.0, it can now take advantage of the new .NET Framework capability of partial classes. Partial classes enable you to separate your classes into multiple class files, which are then combined into a single class when the application is compiled. Because ASP.NET 2.0 combines all this page code for you behind the scenes when the application is compiled, the code-behind files you work with in ASP.NET 2.0 are simpler in appearance and the model is easier to use. You are presented with only the pieces of the class that you need. Now take a look at both the inline and code-behind models from ASP.NET 2.0.
Inline coding
In the past, many developers chose to develop against Visual Studio .NET and built their ASP.NET pages inline. Now Visual Studio 2005 allows you to build using this coding style. To build an ASP.NET page inline instead of using the code-behind model, you simply select the page type from the Add New Item dialog (see Figure 3-6) and uncheck the Place Code in Separate File check box. You can get at this dialog by right-clicking on the project or the solution in the Solution Explorer and selecting Add New Item.
Figure 3-6
From here, you can see the check box you need to unselect if you want to build your ASP.NET pages inline. In fact, many page types have options for both inline and code-behind styles. The following table shows your inline options when selecting files from this dialog.
File Options Using Inline Coding |
Option Creates |
|
|
Web Form |
.aspx file |
Master Page |
.master file |
Web User Control |
.ascx file |
Web Service |
.asmx file |
|
|
47

Chapter 3
By using the Web Form option with a few controls, you get a page that encapsulates not only the presentation logic, but the business logic as well. This is illustrated in Listing 3-3.
Listing 3-3: A simple page that uses the inline coding model
VB
<%@ Page Language=”VB” %>
<!DOCTYPE html PUBLIC “-//W3C//DTD XHTML 1.1//EN” “http://www.w3.org/TR/xhtml11/DTD/xhtml11.dtd”>
<script runat=”server”>
Sub Button1_Click(ByVal sender As Object, ByVal e As System.EventArgs) Label1.Text = “Hello “ & Textbox1.Text
End Sub </script>
<html xmlns=”http://www.w3.org/1999/xhtml” > <head runat=”server”>
<title>Simple Page</title> </head>
<body>
<form runat=”server”>
What is your name?<br />
<asp:Textbox ID=”Textbox1” Runat=”server”></asp:Textbox><br /> <asp:Button ID=”Button1” Runat=”server” Text=”Submit” OnClick=”Button1_Click” />
<p><asp:Label ID=”Label1” Runat=”server”></asp:Label></p> </form>
</body>
</html>
C#
<%@ Page Language=”C#” %>
<!DOCTYPE html PUBLIC “-//W3C//DTD XHTML 1.1//EN” “http://www.w3.org/TR/xhtml11/DTD/xhtml11.dtd”>
<script runat=”server”>
void Button1_Click(object sender, System.EventArgs e)
{
Label1.Text = “Hello “ + Textbox1.Text;
}
</script>
From this example, you can see that all the business logic is encapsulated in between <script> tags. The nice feature of the inline model is that the business logic and the presentation logic are contained within the same file. Some developers find that having everything in a single viewable instance makes working with the ASP.NET page easier. The other great thing about the inline coding model and ASP.NET 2.0 is that Visual Studio 2005 now provides IntelliSense when working with these types of files. In the past, this capability didn’t exist. Visual Studio forced you to use the code-behind model and, even if you rigged it so your pages were using the inline model, you lost all IntelliSense capabilities.
48