
- •Contents
- •Introduction
- •Acknowledgments
- •The Goals of ASP.NET 2.0
- •Developer productivity
- •Administration and management
- •Performance and scalability
- •Device-specific code generation
- •Additional New Features of ASP.NET 2.0
- •New developer infrastructures
- •New compilation system
- •Additions to the page framework
- •New objects for accessing data
- •New server controls
- •A New IDE for Building ASP.NET 2.0 Pages
- •The Document Window
- •Views in the Document Window
- •The tag navigator
- •Page tabs
- •Code change status notifications
- •Error notifications and assistance
- •The Toolbox
- •The Solution Explorer
- •Lost Windows
- •Other Common Visual Studio Activities
- •Creating new projects
- •Making references to other objects
- •Using smart tags
- •Saving and importing Visual Studio settings
- •Application Location Options
- •Built-in Web server
- •Web site requiring FrontPage Extensions
- •The ASP.NET Page Structure Options
- •Inline coding
- •New code-behind model
- •New Page Directives
- •New attributes
- •New directives
- •New Page Events
- •Cross-Page Posting
- •New Application Folders
- •\Code folder
- •\Themes folder
- •\Resources folder
- •Compilation
- •The New Data Source Controls
- •The SqlDataSource and GridView Controls
- •Reading data
- •Applying paging in the GridView
- •Sorting rows in the GridView control
- •Defining bound columns in the GridView control
- •Enabling the editing of rows in the GridView control
- •Deleting data from the GridView
- •Dealing with other column types in the GridView
- •Selecting which fields to display in the DetailsView control
- •Using the GridView and DetailsView together
- •Updating, inserting, and deleting rows
- •XmlDataSource Control
- •ObjectDataSource Control
- •SiteMapDataSource Control
- •DataSetDataSource Control
- •Visual Studio 2005
- •Connection Strings
- •Site Maps
- •The PathSeparator property
- •The PathDirection property
- •The ParentLevelsDisplayed property
- •The ShowToolTips property
- •Examining the parts of the TreeView control
- •Binding the TreeView control to an XML file
- •Selecting multiple options in a TreeView
- •Specifying custom icons in the TreeView control
- •Specifying lines used to connect nodes
- •Working with the TreeView control programmatically
- •Applying different styles to the Menu control
- •Menu Events
- •Binding the Menu control to an XML file
- •SiteMap Data Provider
- •SiteMapViewType
- •StartingNodeType
- •SiteMap API
- •Why Do You Need Master Pages?
- •The Basics of Master Pages
- •Coding a Master Page
- •Coding a Content Page
- •Mixing page types and languages
- •Specifying which master page to use
- •Working with the page title
- •Working with controls and properties from the master page
- •Nesting Master Pages
- •Container-Specific Master Pages
- •Event Ordering
- •Caching with Master Pages
- •Using ASP.NET 2.0 Packaged Themes
- •Applying a theme to a single ASP.NET page
- •Applying a theme to an entire application
- •Applying a theme to all applications on a server
- •Removing themes from server controls
- •Removing themes from Web pages
- •Removing themes from applications
- •Creating Your Own Themes
- •Creating the proper folder structure
- •Creating a skin
- •Including CSS files in your themes
- •Having your themes include images
- •Defining Multiple Skin Options
- •Programmatically Working with Themes
- •Themes and Custom Controls
- •Authentication
- •Authorization
- •ASP.NET 2.0 Authentication
- •Setting up your Web site for membership
- •Adding users
- •Asking for credentials
- •Working with authenticated users
- •Showing the number of users online
- •Dealing with passwords
- •ASP.NET 2.0 Authorization
- •Using the LoginView server control
- •Setting up your Web site for role management
- •Adding and retrieving application roles
- •Deleting roles
- •Adding users to roles
- •Getting all the users of a particular role
- •Getting all the roles of a particular user
- •Removing users from roles
- •Checking users in roles
- •Using the Web Site Administration Tool
- •The Personalization Model
- •Adding a simple personalization property
- •Using personalization properties
- •Adding a group of personalization properties
- •Using grouped personalization properties
- •Defining types for personalization properties
- •Using custom types
- •Providing default values
- •Making personalization properties read-only
- •Anonymous Personalization
- •Enabling anonymous identification of the end user
- •Working with anonymous identification events
- •Anonymous options for personalization properties
- •Migrating Anonymous Users
- •Personalization Providers
- •Working with the Access personalization provider
- •Working with the SQL Server personalization provider
- •Using multiple providers
- •Building Dynamic and Modular Web Sites
- •Introducing the WebPartManager control
- •Working with zone layouts
- •Understanding the WebPartZone control
- •Explaining the WebPartPageMenu control
- •Modifying zones
- •Caching in ASP.NET 1.0/1.1
- •Output caching
- •Partial page caching
- •Data caching using the Cache object
- •Cache dependencies
- •ASP.NET 2.0 unseals the CacheDependency class
- •Enabling databases for SQL Server cache invalidation
- •Enabling tables for SQL Server cache invalidation
- •Looking at SQL Server
- •Looking at the tables that are enabled
- •Disabling a table for SQL Server cache invalidation
- •Disabling a database for SQL Server cache invalidation
- •Configuring your ASP.NET Application
- •Adding more than one table to a page
- •Attaching SQL Server cache dependencies to the Request object
- •Attaching SQL Server cache dependencies to the Cache object
- •Customizing the side navigation
- •Examining the AllowReturn attribute
- •Working with the StepType attribute
- •Adding a header to the Wizard control
- •Utilizing Wizard control events
- •Working with images from disk
- •Resizing images
- •Displaying images from streams
- •The MMC ASP.NET Snap-In
- •General
- •Custom Errors
- •Authorization
- •Authentication
- •Application
- •State Management
- •Advanced
- •ASP.NET Web Site Administration Tool
- •Home
- •Security
- •Profile
- •Application
- •Provider
- •Managing the Site Counter System
- •Generics
- •Iterators
- •Anonymous Methods
- •Operator Overloading
- •Visual Basic XML Documentation
- •New Visual Basic Keywords
- •Continue
- •Using
- •Global
- •Index

Application and Page
Frameworks
When you first look at what is new in ASP.NET 2.0, you may be amazed by all the wonderful new server controls that it provides. You may marvel at how it enables you to work with data more effectively using the new data providers. You may be impressed at how easily you can build in security and personalization.
Its great capabilities don’t end there, however. The application and ASP.NET pages as a whole also have some exciting new capabilities that you might overlook. This chapter takes a look at plenty of these new additions for working with ASP.NET pages and applications. One of the first steps you, the developer, should take when starting a project is to become familiar with the foundation you are building on and the options available for customizing this foundation.
Application Location Options
With ASP.NET 2.0, you now have the option — using Visual Studio 2005 — to create an application with a virtual directory mapped to IIS or a standalone application outside the confines of IIS. Whereas Visual Studio .NET forced developers to use IIS for all Web applications, Visual Studio 2005 includes a built-in Web server that you can use for development, much like you used the ASP.NET Web Matrix.
The following section shows you how to use this new built-in Web server that comes with ASP.NET 2.0.
Built-in Web server
By default, Visual Studio 2005 builds applications without the use of IIS. You can see this when you select New Web Site in the IDE. By default, the location provided for your application is in C:\Websites\ (shown in Figure 3-1). It is not in C:\Inetpub\wwwroot\ as it would have been in

Chapter 3
Visual Studio .NET. Any site that you build and host inside C:\Websites\ (or any other folder you might create) uses the built-in Web server by default that is part of Visual Studio 2005. If you use the built-in Web server from Visual Studio 2005, you are not locked into the Websites folder; you can create any folder in your system that you want.
Figure 3-1
To change from this default, you have a handful of options. Click the Browse button in the New Web Site dialog. This brings up the Choose Location dialog, shown in Figure 3-2.
Figure 3-2
42

Application and Page Frameworks
From this dialog, you can choose a new location for your Web application if you continue to use the built-in Web server that Visual Studio 2005 provides. To choose a new location, select a new folder and save your .aspx pages and any other associated files to this directory. When using Visual Studio 2005, you can run your application completely from this location. This new way of working with the ASP.NET pages you create is ideal for developers without access to a Web server, as it enables you to build applications that don’t reside on a machine with IIS. This means that you can even develop ASP.NET applications on operating systems such as Windows XP Home Edition.
IIS
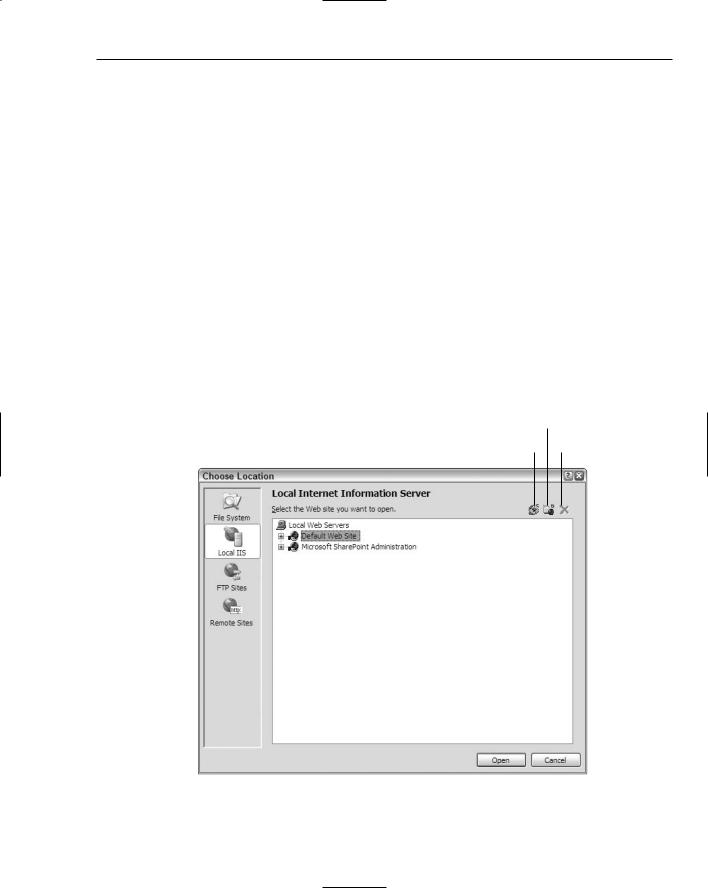
From the Choose Location dialog, you can also change where your application is saved and which type of Web server your application employs. To use IIS (as you probably did when you used Visual Studio
.NET), select the Local IIS button in the dialog. This changes the results in the text area to show you a list of all the virtual application roots on your machine.
To create a new virtual root for your application, highlight Default Web Site. Two accessible buttons appear at the top of the dialog (see Figure 3-3). Looking from left to right, the first button in the upperright corner of the dialog is for creating a new Web application — or a virtual root. This button is shown as a globe inside a box. The second button enables you to create virtual roots for any of the virtual directories you created. The third button is a Delete button, which allows you to delete any selected virtual directories or virtual roots on the server.
Create New Virtual Directory
Create New Web Application Delete
Figure 3-3
43

Chapter 3
After you have created the virtual directory you want, click the Open button. Visual Studio 2005 then goes through the standard process to create your application. Now, however, instead of depending on the built-in Web server from ASP.NET 2.0, your application uses IIS. When you invoke your application, the URL now contains something like http://localhost/myweb/default.aspx — meaning that it is using IIS.
FTP
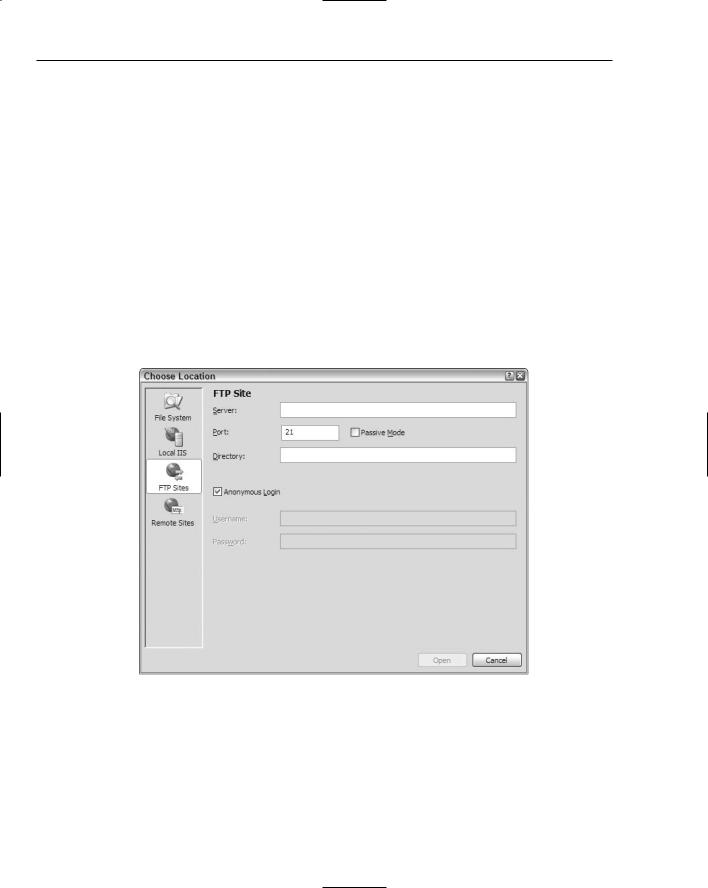
Not only can you decide on the type of Web server for your Web application when you create it using the Choose Location dialog, but you can also decide where your application is going to be located. With the previous options, you built applications that resided on your local server. The FTP option enables you to actually store and even code your applications while they reside on a server somewhere else in your enterprise — or on the other side of the planet. You can also use the FTP capabilities to work on different locations within the same server. Using this new capability provides a wide range of possible options.
The built-in capability giving FTP access to your applications is a major enhancement to the IDE. Although formerly difficult to achieve, this is now quite simple, as you can see from Figure 3-4.
Figure 3-4
To create your application on a remote server using FTP, simply provide the server name, port to use, and the directory — as well as any required credentials. If the correct information is provided, Visual Studio 2005 reaches out to the remote server and creates the appropriate files for the start of your application, just as if it were doing the job locally. From this point on, you can open your project and connect to the remote server using FTP.
44