
- •Contents at a Glance
- •Table of Contents
- •Acknowledgments
- •Introduction
- •Who This Book Is For
- •Finding Your Best Starting Point in This Book
- •Conventions and Features in This Book
- •Conventions
- •Other Features
- •System Requirements
- •Code Samples
- •Installing the Code Samples
- •Using the Code Samples
- •Support for This Book
- •Questions and Comments
- •Beginning Programming with the Visual Studio 2008 Environment
- •Writing Your First Program
- •Using Namespaces
- •Creating a Graphical Application
- •Chapter 1 Quick Reference
- •Understanding Statements
- •Identifying Keywords
- •Using Variables
- •Naming Variables
- •Declaring Variables
- •Working with Primitive Data Types
- •Displaying Primitive Data Type Values
- •Using Arithmetic Operators
- •Operators and Types
- •Examining Arithmetic Operators
- •Controlling Precedence
- •Using Associativity to Evaluate Expressions
- •Associativity and the Assignment Operator
- •Incrementing and Decrementing Variables
- •Declaring Implicitly Typed Local Variables
- •Chapter 2 Quick Reference
- •Declaring Methods
- •Specifying the Method Declaration Syntax
- •Writing return Statements
- •Calling Methods
- •Specifying the Method Call Syntax
- •Applying Scope
- •Overloading Methods
- •Writing Methods
- •Chapter 3 Quick Reference
- •Declaring Boolean Variables
- •Using Boolean Operators
- •Understanding Equality and Relational Operators
- •Understanding Conditional Logical Operators
- •Summarizing Operator Precedence and Associativity
- •Using if Statements to Make Decisions
- •Understanding if Statement Syntax
- •Using Blocks to Group Statements
- •Cascading if Statements
- •Using switch Statements
- •Understanding switch Statement Syntax
- •Following the switch Statement Rules
- •Chapter 4 Quick Reference
- •Using Compound Assignment Operators
- •Writing while Statements
- •Writing for Statements
- •Understanding for Statement Scope
- •Writing do Statements
- •Chapter 5 Quick Reference
- •Coping with Errors
- •Trying Code and Catching Exceptions
- •Handling an Exception
- •Using Multiple catch Handlers
- •Catching Multiple Exceptions
- •Using Checked and Unchecked Integer Arithmetic
- •Writing Checked Statements
- •Writing Checked Expressions
- •Throwing Exceptions
- •Chapter 6 Quick Reference
- •The Purpose of Encapsulation
- •Controlling Accessibility
- •Working with Constructors
- •Overloading Constructors
- •Understanding static Methods and Data
- •Creating a Shared Field
- •Creating a static Field by Using the const Keyword
- •Chapter 7 Quick Reference
- •Copying Value Type Variables and Classes
- •Understanding Null Values and Nullable Types
- •Using Nullable Types
- •Understanding the Properties of Nullable Types
- •Using ref and out Parameters
- •Creating ref Parameters
- •Creating out Parameters
- •How Computer Memory Is Organized
- •Using the Stack and the Heap
- •The System.Object Class
- •Boxing
- •Unboxing
- •Casting Data Safely
- •The is Operator
- •The as Operator
- •Chapter 8 Quick Reference
- •Working with Enumerations
- •Declaring an Enumeration
- •Using an Enumeration
- •Choosing Enumeration Literal Values
- •Choosing an Enumeration’s Underlying Type
- •Working with Structures
- •Declaring a Structure
- •Understanding Structure and Class Differences
- •Declaring Structure Variables
- •Understanding Structure Initialization
- •Copying Structure Variables
- •Chapter 9 Quick Reference
- •What Is an Array?
- •Declaring Array Variables
- •Creating an Array Instance
- •Initializing Array Variables
- •Creating an Implicitly Typed Array
- •Accessing an Individual Array Element
- •Iterating Through an Array
- •Copying Arrays
- •What Are Collection Classes?
- •The ArrayList Collection Class
- •The Queue Collection Class
- •The Stack Collection Class
- •The Hashtable Collection Class
- •The SortedList Collection Class
- •Using Collection Initializers
- •Comparing Arrays and Collections
- •Using Collection Classes to Play Cards
- •Chapter 10 Quick Reference
- •Using Array Arguments
- •Declaring a params Array
- •Using params object[ ]
- •Using a params Array
- •Chapter 11 Quick Reference
- •What Is Inheritance?
- •Using Inheritance
- •Base Classes and Derived Classes
- •Calling Base Class Constructors
- •Assigning Classes
- •Declaring new Methods
- •Declaring Virtual Methods
- •Declaring override Methods
- •Understanding protected Access
- •Understanding Extension Methods
- •Chapter 12 Quick Reference
- •Understanding Interfaces
- •Interface Syntax
- •Interface Restrictions
- •Implementing an Interface
- •Referencing a Class Through Its Interface
- •Working with Multiple Interfaces
- •Abstract Classes
- •Abstract Methods
- •Sealed Classes
- •Sealed Methods
- •Implementing an Extensible Framework
- •Summarizing Keyword Combinations
- •Chapter 13 Quick Reference
- •The Life and Times of an Object
- •Writing Destructors
- •Why Use the Garbage Collector?
- •How Does the Garbage Collector Work?
- •Recommendations
- •Resource Management
- •Disposal Methods
- •Exception-Safe Disposal
- •The using Statement
- •Calling the Dispose Method from a Destructor
- •Making Code Exception-Safe
- •Chapter 14 Quick Reference
- •Implementing Encapsulation by Using Methods
- •What Are Properties?
- •Using Properties
- •Read-Only Properties
- •Write-Only Properties
- •Property Accessibility
- •Understanding the Property Restrictions
- •Declaring Interface Properties
- •Using Properties in a Windows Application
- •Generating Automatic Properties
- •Initializing Objects by Using Properties
- •Chapter 15 Quick Reference
- •What Is an Indexer?
- •An Example That Doesn’t Use Indexers
- •The Same Example Using Indexers
- •Understanding Indexer Accessors
- •Comparing Indexers and Arrays
- •Indexers in Interfaces
- •Using Indexers in a Windows Application
- •Chapter 16 Quick Reference
- •Declaring and Using Delegates
- •The Automated Factory Scenario
- •Implementing the Factory Without Using Delegates
- •Implementing the Factory by Using a Delegate
- •Using Delegates
- •Lambda Expressions and Delegates
- •Creating a Method Adapter
- •Using a Lambda Expression as an Adapter
- •The Form of Lambda Expressions
- •Declaring an Event
- •Subscribing to an Event
- •Unsubscribing from an Event
- •Raising an Event
- •Understanding WPF User Interface Events
- •Using Events
- •Chapter 17 Quick Reference
- •The Problem with objects
- •The Generics Solution
- •Generics vs. Generalized Classes
- •Generics and Constraints
- •Creating a Generic Class
- •The Theory of Binary Trees
- •Building a Binary Tree Class by Using Generics
- •Creating a Generic Method
- •Chapter 18 Quick Reference
- •Enumerating the Elements in a Collection
- •Manually Implementing an Enumerator
- •Implementing the IEnumerable Interface
- •Implementing an Enumerator by Using an Iterator
- •A Simple Iterator
- •Chapter 19 Quick Reference
- •What Is Language Integrated Query (LINQ)?
- •Using LINQ in a C# Application
- •Selecting Data
- •Filtering Data
- •Ordering, Grouping, and Aggregating Data
- •Joining Data
- •Using Query Operators
- •Querying Data in Tree<TItem> Objects
- •LINQ and Deferred Evaluation
- •Chapter 20 Quick Reference
- •Understanding Operators
- •Operator Constraints
- •Overloaded Operators
- •Creating Symmetric Operators
- •Understanding Compound Assignment
- •Declaring Increment and Decrement Operators
- •Implementing an Operator
- •Understanding Conversion Operators
- •Providing Built-In Conversions
- •Creating Symmetric Operators, Revisited
- •Adding an Implicit Conversion Operator
- •Chapter 21 Quick Reference
- •Creating a WPF Application
- •Creating a Windows Presentation Foundation Application
- •Adding Controls to the Form
- •Using WPF Controls
- •Changing Properties Dynamically
- •Handling Events in a WPF Form
- •Processing Events in Windows Forms
- •Chapter 22 Quick Reference
- •Menu Guidelines and Style
- •Menus and Menu Events
- •Creating a Menu
- •Handling Menu Events
- •Shortcut Menus
- •Creating Shortcut Menus
- •Windows Common Dialog Boxes
- •Using the SaveFileDialog Class
- •Chapter 23 Quick Reference
- •Validating Data
- •Strategies for Validating User Input
- •An Example—Customer Information Maintenance
- •Performing Validation by Using Data Binding
- •Changing the Point at Which Validation Occurs
- •Chapter 24 Quick Reference
- •Querying a Database by Using ADO.NET
- •The Northwind Database
- •Creating the Database
- •Using ADO.NET to Query Order Information
- •Querying a Database by Using DLINQ
- •Creating and Running a DLINQ Query
- •Deferred and Immediate Fetching
- •Joining Tables and Creating Relationships
- •Deferred and Immediate Fetching Revisited
- •Using DLINQ to Query Order Information
- •Chapter 25 Quick Reference
- •Using Data Binding with DLINQ
- •Using DLINQ to Modify Data
- •Updating Existing Data
- •Adding and Deleting Data
- •Chapter 26 Quick Reference
- •Understanding the Internet as an Infrastructure
- •Understanding Web Server Requests and Responses
- •Managing State
- •Understanding ASP.NET
- •Creating Web Applications with ASP.NET
- •Building an ASP.NET Application
- •Understanding Server Controls
- •Creating and Using a Theme
- •Chapter 27 Quick Reference
- •Comparing Server and Client Validations
- •Validating Data at the Web Server
- •Validating Data in the Web Browser
- •Implementing Client Validation
- •Chapter 28 Quick Reference
- •Managing Security
- •Understanding Forms-Based Security
- •Implementing Forms-Based Security
- •Querying and Displaying Data
- •Understanding the Web Forms GridView Control
- •Displaying Customer and Order History Information
- •Paging Data
- •Editing Data
- •Updating Rows Through a GridView Control
- •Navigating Between Forms
- •Chapter 29 Quick Reference
- •What Is a Web Service?
- •The Role of SOAP
- •What Is the Web Services Description Language?
- •Nonfunctional Requirements of Web Services
- •The Role of Windows Communication Foundation
- •Building a Web Service
- •Creating the ProductsService Web Service
- •Web Services, Clients, and Proxies
- •Talking SOAP: The Easy Way
- •Consuming the ProductsService Web Service
- •Chapter 30 Quick Reference

338 Part III Creating Components
Generics and Constraints
Occasionally, you will want to ensure that the type parameter used by a generic class
identifies a type that provides certain methods. For example, if you are defining a PrintableCollection class, you might want to ensure that all objects stored in the class have a Print method. You can specify this condition by using a constraint.
By using a constraint, you can limit the type parameters of a generic class to those that
implement a particular set of interfaces, and therefore provide the methods defined by those interfaces. For example, if the IPrintable interface defined the Print method, you could create the PrintableCollection class like this:
public class PrintableCollection<T> where T : IPrintable
When you build this class with a type parameter, the compiler will check to ensure that the type used for T actually implements the IPrintable interface and will stop with a compilation
error if it doesn’t.
Creating a Generic Class
The .NET Framework class library contains a number of generic classes readily available for you. You can also define your own generic classes, which is what you will do in this section. Before you do this, I provide a bit of background theory.
The Theory of Binary Trees
In the following exercises, you will define and use a class that represents a binary tree. This is a practical exercise because this class happens to be one that is missing from the System. Collections.Generic namespace. A binary tree is a useful data structure used for a variety of
operations, including sorting and searching through data very quickly. There are volumes written on the minutiae of binary trees, but it is not the purpose of this book to cover binary
trees in detail. Instead, we just look at the pertinent details. If you are interested, you should consult a book such as The Art of Computer Programming, Volume 3: Sorting and Searching
by Donald E. Knuth (Addison-Wesley Professional, 2nd edition, 1998).
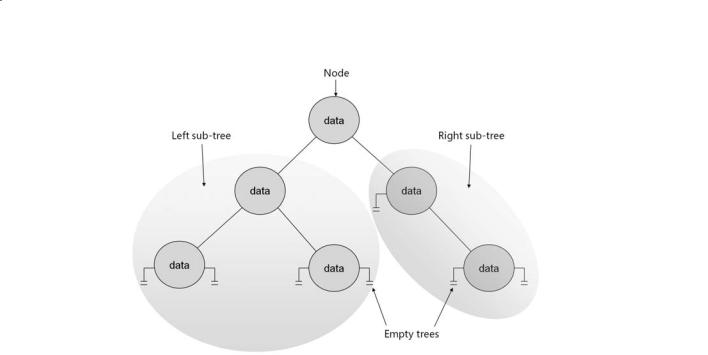
A binary tree is a recursive (self-referencing) data structure that can either be empty or con-
tain three elements: a datum, which is typically referred to as the node, and two subtrees, which are themselves binary trees. The two subtrees are conventionally called the left subtree and the right subtree because they are typically depicted to the left and right of the node,
respectively. Each left subtree or right subtree is either empty or contains a node and other subtrees. In theory, the whole structure can continue ad infinitum. Figure 18-1 shows the structure of a small binary tree.

Chapter 18 Introducing Generics |
339 |
FIGURE 18-1 A binary tree.
The real power of binary trees becomes evident when you use them for sorting data. If you start with an unordered sequence of objects of the same type, you can construct an ordered binary tree and then walk through the tree to visit each node in an ordered sequence. The algorithm for inserting an item I into an ordered binary tree T is shown here:
If the tree, T, is empty Then
Construct a new tree T with the new item I as the node, and empty left and right subtrees
Else
Examine the value of the current node, N, of the tree, T If the value of N is greater than that of the new item, I Then
If the left subtree of T is empty Then
Construct a new left subtree of T with the item I as the node, and empty left and right subtrees
Else
Insert I into the left subtree of T End If
Else
If the right subtree of T is empty Then
Construct a new right subtree of T with the item I as the node, and empty left and right subtrees
Else
Insert I into the right subtree of T End If
End If End If

340 Part III Creating Components
Notice that this algorithm is recursive, calling itself to insert the item into the left or right subtree depending on how the value of the item compares with the current node in the tree.
Note The definition of the expression greater than depends on the type of data in the item and node. For numeric data, greater than can be a simple arithmetic comparison, for text data it can be a string comparison, but other forms of data must be given their own means of comparing values. This is discussed in more detail when you implement a binary tree in the upcoming section titled “Building a Binary Tree Class by Using Generics.”
If you start with an empty binary tree and an unordered sequence of objects, you can iterate through the unordered sequence, inserting each object into the binary tree by using this algorithm, resulting in an ordered tree. Figure 18-2 shows the steps in the process for constructing a tree from a set of five integers.
FIGURE 18-2 Constructing an ordered binary tree.
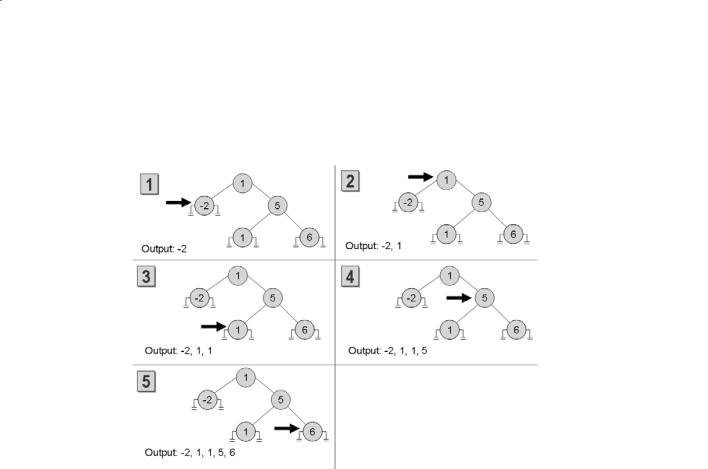
After you have built an ordered binary tree, you can display its contents in sequence by visiting each node in turn and printing the value found. The algorithm for achieving this task is also recursive:
If the left subtree is not empty
Then
Display the contents of the left subtree
End If
Display the value of the node
If the right subtree is not empty

Chapter 18 Introducing Generics |
341 |
Then
Display the contents of the right subtree
End If
Figure 18-3 shows the steps in the process for outputting the tree constructed in Figure 18-2. Notice that the integers are now displayed in ascending order.
FIGURE 18-3 Printing an ordered binary tree.
Building a Binary Tree Class by Using Generics
In the following exercise, you will use generics to define a binary tree class capable of holding almost any type of data. The only restriction is that the data type must provide a means of comparing values between different instances.
The binary tree class is a class that you might find useful in many different applications. Therefore, you will implement it as a class library rather than as an application in its own right. You can then reuse this class elsewhere without having to copy the source code and recompile it. A class library is a set of compiled classes (and other types such as structures and delegates) stored in an assembly. An assembly is a file that usually has the .dll suffix.
Other projects and applications can make use of the items in a class library by adding a reference to its assembly and then bringing its namespaces into scope with using statements. You
will do this when you test the binary tree class.

342 |
Part III Creating Components |
The System.IComparable and System.IComparable<T> Interfaces
If you need to create a class that requires you to be able to compare values according to some natural (or possibly unnatural) ordering, you should implement the IComparable interface. This interface contains a method called CompareTo, which takes a single param-
eter specifying the object to be compared with the current instance and returns an integer that indicates the result of the comparison as shown in the following table.
Value |
Meaning |
Less than 0 |
The current instance is less than the value of the parameter. |
0The current instance is equal to the value of the parameter.
Greater than 0 |
The current instance is greater than the value of the parameter. |
|
|
As an example, consider the Circle class that was described in Chapter 7, “Creating and Managing Classes and Objects,” and reproduced here:
class Circle
{
public Circle(int initialRadius)
{
radius = initialRadius;
}
public double Area()
{
return Math.PI * radius * radius;
}
private double radius;
}
You can make the Circle class “comparable” by implementing the System.IComparable interface and providing the CompareTo method. In the example shown, the CompareTo method compares Circle objects based on their areas. A circle with a larger area is
considered to be greater than a circle with a smaller area.
class Circle : System.IComparable
{
...
public int CompareTo(object obj)
{
Circle circObj = (Circle)obj; // cast the parameter to its real type if (this.Area() == circObj.Area())
return 0;
if (this.Area() > circObj.Area()) return 1;

Chapter 18 Introducing Generics |
343 |
return -1;
}
}
If you examine the System.IComparable interface, you will see that its parameter is defined as an object. However, this approach is not type-safe. To understand why this is so, consider what happens if you try to pass something that is not a Circle to the CompareTo method. The System.IComparable interface requires the use of a cast to be able to access the Area method. If the parameter is not a Circle but some other type of object, this cast will fail. However, the System namespace also defines the generic IComparable<T> interface, which contains the following methods:
int CompareTo(T other); bool Equals(T other);
Notice that there is an additional method in this interface called Equals, which should return true if both instances are equals and false if they are not equals.
Also notice that these methods take a type parameter (T) rather than an object and,
therefore, are much safer than is the nongeneric version of the interface. The following code shows how you can implement this interface in the Circle class:
class Circle : System.IComparable<Circle>
{
...
public int CompareTo(Circle other)
{
if (this.Area() == other.Area()) return 0;
if (this.Area() > other.Area()) return 1;
return -1;
}
public bool Equals(Circle other)
{
return (this.CompareTo(other) == 0);
}
}
The parameters for the CompareTo and Equals methods must match the type specified in the interface, IComparable<Circle>. In general, it is preferable to implement the
System.IComparable<T> interface rather than the System.IComparable interface. You can also implement both just as many of the types in the .NET Framework do.

344 |
Part III Creating Components |
Create the Tree<TItem> class
1.Start Visual Studio 2008 if it is not already running.
2.If you are using Visual Studio 2008 Standard Edition or Visual Studio 2008 Professional Edition, perform the following tasks to create a new class library project:
2.1.On the File menu, point to New, and then click Project.
2.2.In the New Project dialog box, select the Class Library template.
2.3.Set the Name to BinaryTree and set the Location to \Microsoft Press\Visual CSharp Step By Step\Chapter 18 under your Documents folder.
2.4.Click OK.
3.If you are using Microsoft Visual C# 2008 Express Edition, perform the following tasks to create a new class library project:
3.1.On the Tools menu, click Options.
3.2.In the Options dialog box, click Projects and Solutions in the tree view in the left pane.
3.3.In the right pane, in the Visual Studio projects location text box, specify the location \Microsoft Press\Visual CSharp Step By Step\Chapter 18 folder under your Documents folder.
3.4.Click OK.
3.5.On the File menu, click New Project.
3.6.In the New Project dialog box, click the Class Library icon.
3.7.In the Name field, type BinaryTree.
3.8.Click OK.
4.In Solution Explorer, right-click Class1.cs and change the name of the file to Tree.cs. Allow Visual Studio to change the name of the class as well as the name of the file when prompted.
5.In the Code and Text Editor window, change the definition of the Tree class to Tree<TItem>, as shown in bold type in the following code:
public class Tree<TItem>
{
}

Chapter 18 Introducing Generics |
345 |
6.In the Code and Text Editor window, modify the definition of the Tree<TItem> class as follows in bold type to specify that the type parameter TItem must denote a type that implements the generic IComparable<TItem> interface.
The modified definition of the Tree<TItem> class should look like this:
public class Tree<TItem> where TItem : IComparable<TItem>
{
}
7.Add three public, automatic properties to the Tree<TItem> class: a TItem property called NodeData and two Tree<TItem> properties called LeftTree and RightTree, as follows in bold type:
public class Tree<TItem> where TItem : IComparable<TItem>
{
public TItem NodeData { get; set; } public Tree<TItem> LeftTree { get; set; }
public Tree<TItem> RightTree { get; set; }
}
8.Add a constructor to the Tree<TItem> class that takes a single TItem parameter called nodeValue. In the constructor, set the NodeData property to nodeValue, and initialize the LeftTree and RightTree properties to null, as shown in bold type in the following code:
public class Tree<TItem> where TItem : IComparable<TItem>
{
public Tree(TItem nodeValue)
{
this.NodeData = nodeValue; this.LeftTree = null; this.RightTree = null;
}
...
}
Note Notice that the name of the constructor does not include the type parameter; it is called Tree, and not Tree<TItem>.
9.Add a public method called Insert to the Tree<TItem> class as shown in bold type in the following code. This method will insert a TItem value into the tree.
The method definition should look like this:
public class Tree<TItem> where TItem: IComparable<TItem>
{
...
public void Insert(TItem newItem)
{
}
...
}

346 Part III Creating Components
The Insert method will implement the recursive algorithm described earlier for creating
an ordered binary tree. The programmer will have used the constructor to create the initial node of the tree (there is no default constructor), so the Insert method can as-
sume that the tree is not empty. The part of the algorithm after checking whether the tree is empty is reproduced here to help you understand the code you will write for the Insert method in the following steps:
...
Examine the value of the node, N, of the tree, T
If the value of N is greater than that of the new item, I Then
If the left subtree of T is empty Then
Construct a new left subtree of T with the item I as the node, and empty left and right subtrees
Else
Insert I into the left subtree of T End If
...
10.In the Insert method, add a statement that declares a local variable of type TItem, called currentNodeValue. Initialize this variable to the value of the NodeData property of the tree, as shown here:
public void Insert(TItem newItem)
{
TItem currentNodeValue = this.NodeData;
}
11.Add the following if-else statement shown in bold type to the Insert method after the definition of the currentNodeValue variable. This statement uses the CompareTo
method of the IComparable<T> interface to determine whether the value of the current node is greater than the new item is:
public void Insert(TItem newItem)
{
TItem currentNodeValue = this.NodeData;
if (currentNodeValue.CompareTo(newItem) > 0)
{
// Insert the new item into the left subtree
}
else
{
// Insert the new item into the right subtree
}
}
12.Replace the // Insert the new item into the left subtree comment with the following block of code:
if (this.LeftTree == null)
{

Chapter 18 Introducing Generics |
347 |
this.LeftTree = new Tree<TItem>(newItem);
}
else
{
this.LeftTree.Insert(newItem);
}
These statements check whether the left subtree is empty. If so, a new tree is created
using the new item and attached as the left subtree of the current node; otherwise, the new item is inserted into the existing left subtree by calling the Insert method
recursively.
13.Replace the // Insert the new item into the right subtree comment with the equivalent code that inserts the new node into the right subtree:
if (this.RightTree == null)
{
this.RightTree = new Tree<TItem>(newItem);
}
else
{
this.RightTree.Insert(newItem);
}
14.Add another public method called WalkTree to the Tree<TItem> class after the Insert method. This method will walk through the tree, visiting each node in sequence and printing out its value.
The method definition should look like this:
public void WalkTree()
{
}
15.Add the following statements to the WalkTree method. These statements implement the algorithm described earlier for printing the contents of a binary tree:
if (this.LeftTree != null)
{
this.LeftTree.WalkTree();
}
Console.WriteLine(this.NodeData.ToString());
if (this.RightTree != null)
{
this.RightTree.WalkTree();
}
16.On the Build menu, click Build Solution. The class should compile cleanly, but correct any errors that are reported and rebuild the solution if necessary.
17.If you are using Visual C# 2008 Express Edition, on the File menu, click Save All. If the Save Project dialog box appears, click Save.

348 Part III Creating Components
In the next exercise, you will test the Tree<TItem> class by creating binary trees of integers and strings.
Test the Tree<TItem> class
1.In Solution Explorer, right-click the BinaryTree solution, point to Add, and then click New Project.
Note Make sure you right-click the BinaryTree solution rather than the BinaryTree project.
2.Add a new project using the Console Application template. Name the project
BinaryTreeTest. Set the Location to \Microsoft Press\Visual CSharp Step By Step\Chapter 18 under your Documents folder, and then click OK.
Note Remember that a Visual Studio 2008 solution can contain more than one project.
You are using this feature to add a second project to the BinaryTree solution for testing the Tree<TItem> class. This is the recommended way of testing class libraries.
3.Ensure that the BinaryTreeTest project is selected in Solution Explorer. On the Project menu, click Set as Startup Project.
The BinaryTreeTest project is highlighted in Solution Explorer. When you run the application, this is the project that will actually execute.
4.Ensure that the BinaryTreeTest project is still selected in Solution Explorer. On the Project menu, click Add Reference. In the Add Reference dialog box, click the Projects tab. Select the BinaryTree project, and then click OK.
The BinaryTree assembly appears in the list of references for the BinaryTreeTest project in Solution Explorer. You will now be able to create Tree<TItem> objects in the BinaryTreeTest project.
Note If the class library project is not part of the same solution as the project that uses it,
you must add a reference to the assembly (the .dll file) and not to the class library project. You do this by selecting the assembly from the Browse tab in the Add Reference dialog
box. You will use this technique in the final set of exercises in this chapter.
5.In the Code and Text Editor window displaying the Program class, add the following using directive to the list at the top of the class:
using BinaryTree;

Chapter 18 Introducing Generics |
349 |
6. Add the statements in bold type in the following code to the Main method:
static void Main(string[] args)
{
Tree<int> tree1 = new Tree<int>(10); tree1.Insert(5);
tree1.Insert(11);
tree1.Insert(5); tree1.Insert(-12); tree1.Insert(15); tree1.Insert(0); tree1.Insert(14); tree1.Insert(-8); tree1.Insert(10); tree1.Insert(8); tree1.Insert(8); tree1.WalkTree();
}
These statements create a new binary tree for holding ints. The constructor creates an initial node containing the value 10. The Insert statements add nodes to the tree, and the WalkTree method prints out the contents of the tree, which should appear sorted in
ascending order.
Note Remember that the int keyword in C# is actually just an alias for the System.Int32 type; whenever you declare an int variable, you are actually declaring a struct variable of type System.Int32. The System.Int32 type implements the IComparable and
IComparable<T> interfaces, which is why you can create Tree<int> variables. Similarly, the string keyword is an alias for System.String, which also implements IComparable and
IComparable<T>.
7.On the Build menu, click Build Solution. Verify that the solution compiles, and correct any errors if necessary.
8.Save the project, and then on the Debug menu, click Start Without Debugging. The program runs and displays the values in the following sequence:
–12, –8, 0, 5, 5, 8, 8, 10, 10, 11, 14, 15
9.Press the Enter key to return to Visual Studio 2008.
10.Add the following statements shown in bold type to the end of the Main method in the Program class, after the existing code:
static void Main(string[] args)
{
...
Tree<string> tree2 = new Tree<string>(“Hello”); tree2.Insert(“World”);
tree2.Insert(“How”);
tree2.Insert(“Are”);
tree2.Insert(“You”);