

Chapter 12 Working with Inheritance |
227 |
Notice two things: first, the override keyword used by the GetTypeName method (which will be described shortly) in the Horse and Whale classes, and second, the fact that the Aardvark class does not have a GetTypeName method.
Now examine the following block of code:
Mammal myMammal;
Horse myHorse = new Horse(...);
Whale myWhale = new Whale(...);
Aardvark myAardvark = new Aardvark(...);
myMammal = myHorse; Console.WriteLine(myMammal.GetTypeName()); // Horse myMammal = myWhale; Console.WriteLine(myMammal.GetTypeName()); // Whale myMammal = myAardvark; Console.WriteLine(myMammal.GetTypeName()); // Aardvark
What will be output by the three different Console.WriteLine statements? At first
glance, you would expect them all to print “This is a mammal,” because each statement calls the GetTypeName method on the myMammal variable, which is a Mammal. However, in the first case, you can see that myMammal is actually a reference to a Horse. (Remember, you are allowed to assign a Horse to a Mammal variable because the Horse class is derived from the Mammal class.) Because the GetTypeName method is defined as virtual, the runtime works out that it should call the Horse.GetTypeName
method, so the statement actually prints the message “This is a horse.” The same logic applies to the second Console.WriteLine statement, which outputs the message “This is a whale.” The third statement calls Console.WriteLine on an Aardvark object. However, the Aardvark class does not have a GetTypeName method, so the default method in the Mammal class is called, returning the string “This is a mammal.”
This phenomenon of the same statement invoking a different method is called polymorphism, which literally means “many forms.”
Understanding protected Access
The public and private access keywords create two extremes of accessibility: public fields and methods of a class are accessible to everyone, whereas private fields and methods of a class are accessible to only the class itself.
These two extremes are sufficient when considering classes in isolation. However, as all experienced object-oriented programmers know, isolated classes cannot solve complex problems. Inheritance is a powerful way of connecting classes, and there is clearly a special and close relationship between a derived class and its base class. Frequently it is useful for a base class to
228 Part II Understanding the C# Language
allow derived classes to access some of its members while hiding these same members from classes that are not part of the hierarchy. In this situation, you can use the protected keyword
to tag members:
If a class A is derived from another class B, it can access the protected class members of class B. In other words, inside the derived class A, a protected member of class B is effectively public.
If a class A is not derived from another class B, it cannot access any protected members of class B. In other words, within class A, a protected member of class B is effectively private.
C# gives programmers complete freedom to declare methods and fields as protected. However, most object-oriented programming guidelines recommend keeping your fields strictly private. Public fields violate encapsulation because all users of the class have direct, unrestricted access to the fields. Protected fields maintain encapsulation for users of a class, for whom the protected fields are inaccessible. However, protected fields still allow encapsulation to be violated by classes that inherit from the class.
Note You can access a protected base class member not only in a derived class but also in classes derived from the derived class. A protected base class member retains its protected accessibility in a derived class and is accessible to further derived classes.
In the following exercise, you will define a simple class hierarchy for modeling different types of vehicles. You will define a base class named Vehicle and derived classes named Airplane and Car. You will define common methods named StartEngine and StopEngine in the Vehicle
class, and you will add some additional methods to both of the derived classes that are specific to those classes. Last you will add a virtual method named Drive to the Vehicle class and
override the default implementation of this method in both of the derived classes.
Create a hierarchy of classes
1.Start Microsoft Visual Studio 2008 if it is not already running.
2.Open the Vehicles project, located in the \Microsoft Press\Visual CSharp Step by Step\ Chapter 12\Vehicles folder in your Documents folder.
The Vehicles project contains the file Program.cs, which defines the Program class with the Main and Entrance methods that you have seen in previous exercises.
3.In Solution Explorer, right-click the Vehicles project, point to Add, and then click Class.
The Add New Item—Vehicles dialog box appears, enabling you to add a new file defining a class to the project.

Chapter 12 Working with Inheritance |
229 |
4.In the Add New Item—Vehicles dialog box, in the Name box, type Vehicle.cs, and then click Add.
The file Vehicle.cs is created and added to the project and appears in the Code and Text Editor window. The file contains the definition of an empty class named Vehicle.
5.Add the StartEngine and StopEngine methods to the Vehicle class as shown here in bold:
class Vehicle
{
public void StartEngine(string noiseToMakeWhenStarting)
{
Console.WriteLine(“Starting engine: {0}”, noiseToMakeWhenStarting);
}
public void StopEngine(string noiseToMakeWhenStopping)
{
Console.WriteLine(“Stopping engine: {0}”, noiseToMakeWhenStopping);
}
}
All classes that derive from the Vehicle class will inherit these methods. The values for the noiseToMakeWhenStarting and noiseToMakeWhenStopping parameters will be dif-
ferent for each different type of vehicle and will help you to identify which vehicle is being started and stopped later.
6.On the Project menu, click Add Class.
The Add New Item—Vehicles dialog box appears again.
7.In the Name box, type Airplane.cs, and then click Add.
A new file containing a class named Airplane is added to the project and appears in the
Code and Text Editor window.
8.In the Code and Text Editor window, modify the definition of the Airplane class so that it derives from the Vehicle class, as shown in bold here:
class Airplane : Vehicle
{
}
9. Add the TakeOff and Land methods to the Airplane class, as shown in bold here:
class Airplane : Vehicle
{
public void TakeOff()
{
Console.WriteLine(“Taking off”);
}
public void Land()
{
Console.WriteLine(“Landing”);
}
}

230Part II Understanding the C# Language
10.On the Project menu, click Add Class.
The Add New Item—Vehicles dialog box appears again.
11.In the Name box, type Car.cs, and then click Add.
A new file containing a class named Car is added to the project and appears in the
Code and Text Editor window.
12.In the Code and Text Editor window, modify the definition of the Car class so that it derives from the Vehicle class, as shown here in bold:
class Car : Vehicle
{
}
13. Add the Accelerate and Brake methods to the Car class, as shown in bold here:
class Car : Vehicle
{
public void Accelerate()
{
Console.WriteLine(“Accelerating”);
}
public void Brake()
{
Console.WriteLine(“Braking”);
}
}
14.Display the Vehicle.cs file in the Code and Text Editor window.
15.Add the virtual Drive method to the Vehicle class, as shown here in bold:
class Vehicle
{
...
public virtual void Drive()
{
Console.WriteLine(“Default implementation of the Drive method”);
}
}
16.Display the Program.cs file in the Code and Text Editor window.
17.In the Entrance method, create an instance of the Airplane class and exercise its methods by simulating a quick journey by airplane, as follows:
static void Entrance()
{
Console.WriteLine(“Journey by airplane:”); Airplane myPlane = new Airplane(); myPlane.StartEngine(“Contact”);
Chapter 12 Working with Inheritance |
231 |
myPlane.TakeOff();
myPlane.Drive();
myPlane.Land();
myPlane.StopEngine(“Whirr”);
}
18.Add the following statements shown in bold to the Entrance method after the code you have just written. These statements create an instance of the Car class and test its methods.
static void Entrance()
{
...
Console.WriteLine(“\nJourney by car:”); Car myCar = new Car(); myCar.StartEngine(“Brm brm”); myCar.Accelerate();
myCar.Drive();
myCar.Brake(); myCar.StopEngine(“Phut phut”);
}
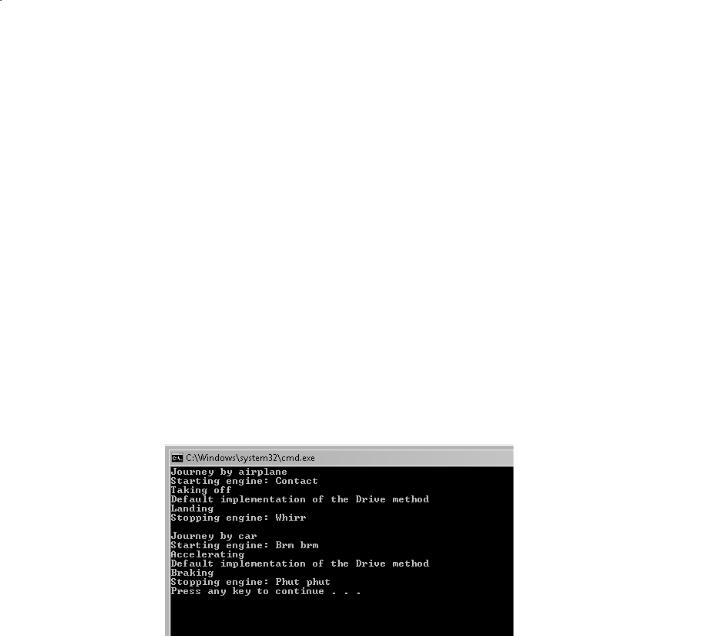
19.On the Debug menu, click Start Without Debugging.
In the console window, verify that the program outputs messages simulating the different stages of performing a journey by airplane and by car, as shown in the following image:
Notice that both modes of transport invoke the default implementation of the virtual Drive method because neither class currently overrides this method.
20.Press Enter to close the application and return to Visual Studio 2008.
21.Display the Airplane class in the Code and Text Editor window. Override the Drive method in the Airplane class, as follows:
public override void Drive()
{
Console.WriteLine(“Flying”);
}
232 |
Part II Understanding the C# Language |
Note Notice that IntelliSense automatically displays a list of available virtual methods. If
you select the Drive method from the IntelliSense list, Visual Studio automatically inserts into your code a statement that calls the base.Drive method. If this happens, delete the
statement, as this exercise does not require it.
22.Display the Car class in the Code and Text Editor window. Override the Drive method in the Car class as follows:
public override void Drive()
{
Console.WriteLine(“Motoring”);
}
23.On the Debug menu, click Start Without Debugging.
In the console window, notice that the Airplane object now displays the message Flying when the application calls the Drive method and the Car object displays the message
Motoring.
24.Press Enter to close the application and return to Visual Studio 2008.
25.Display the Program.cs file in the Code and Text Editor window.
26.Add the statements shown here in bold to the end of the Entrance method:
static void Entrance()
{
...
Console.WriteLine(“\nTesting polymorphism”); Vehicle v = myCar;
v.Drive(); v = myPlane; v.Drive();
}
This code tests the polymorphism provided by the virtual Drive method. The code creates a reference to the Car object using a Vehicle variable (this is safe, because all Car objects are Vehicle objects) and then calls the Drive method using this Vehicle variable. The final two statements refer the Vehicle variable to the Airplane object and call what seems to be the same Drive method again.
27.On the Debug menu, click Start Without Debugging.
In the console window, verify that the same messages appear as before, followed by this text:
Testing polymorphism Motoring
Flying