


Chapter 29 Protecting a Web Site and Accessing Data with Web Forms |
605 |
21.Type a random user name and password, and then click Log In.
The Login page reappears, displaying the error message “Invalid User Name or Password. Please enter a valid User Name and Password.”
22.In the User Name box, type John; in the Password box, type Pa$$w9rd; and then click
Log In.
The CustomerData page appears, displaying the message “This form will be implemented later.”
23.Close Internet Explorer, and return to Visual Studio 2008.
Querying and Displaying Data
Now that you can control access to your application, you can turn your attention to querying and maintaining data. You will use Web Server data controls to connect to the database, query data, and update data.
Understanding the Web Forms GridView Control
When you looked at presenting data from a database in a WPF application in Chapter 26,
“Displaying and Editing Data by Using Data Binding,” you learned how to display data in a tabular manner by using a ListView control. ASP.NET provides a different set of controls from
those available with WPF, and one control that is very useful for displaying and managing data in a Web form is the GridView control. This control is specifically designed to operate
in a network bandwidth–constrained environment. In a Web forms application, it is very likely that the client application (or the browser) will be remote from the server holding the database. It is imperative that you use network bandwidth wisely (this has been stated several times already, but it is very important and worth repeating), and you should not waste
resources retrieving vast amounts of data that the user does not actually want to see. The GridView control supports paging, which you can employ to fetch data on demand as the
user scrolls up and down through the data.
Note Do not confuse the ASP.NET Web Forms GridView control used for displaying data retrieved from a database with the WPF GridView control that you use for defining the layout of
controls in a WPF window. They are different controls that just happen to have the same name.
The information in a Web forms GridView control is presented in a grid of read-only labels, rendered as an HTML table in the browser. The properties of the GridView control enable the
user to enter edit mode, which changes a selected row into a set of text boxes that the user can use to modify the data that is presented.

606 |
Part VI Building Web Applications |
|
To save database connection resources, the GridView control is designed to operate while it |
|
is disconnected from the database. You can create a data source to connect to a database, |
|
fetch data and display it in a GridView control, and then disconnect from the database. When |
|
the user wants to save any changes, the application can reconnect to the database and |
|
submit the changes. You will use this technique in the exercises in this chapter. |
Displaying Customer and Order History Information
In the following exercises, you will build a Web application that displays in a GridView control on a Web form the details of the customers recorded in the Northwind database. You will provide functionality enabling the user to select a customer and display the order history for that customer. To do this, you will make use of data binding by using a LINQ data source.
Note This exercise assumes that you have completed the exercises in Chapter 25, “Querying Information in a Database,” and Chapter 26, “Displaying and Editing Data by Using Data Binding,” on your computer.
Create a data source for retrieving customer information
1.On the Website menu, click Add New Item.
2.In the Add New Item dialog box, click the LINQ to SQL Classes template, type Customer. dbml in the Name text box, select Visual C# in the Language drop-down list, and then click Add.
3.In the Microsoft Visual Studio message box, click Yes to place the Linq to SQL file in the App_Code folder.
4.If you are using Visual Studio 2008 Professional Edition or Enterprise Edition, on the
View menu, click Server Explorer.
5.If you are using Visual Web Developer 2008 Express Edition, perform the following tasks:
5.1.On the View menu, click Database Explorer.
5.2.In the Database Explorer window, right-click Data Connections, and then click Add Connection.
5.3.In the Add Connection dialog box, click Change.
5.4.In the Choose Data Source dialog box, click the Microsoft SQL Server Database File data source, make sure the .NET Framework Data Provider for SQL Server is selected as the data provider, and then click OK.
Chapter 29 Protecting a Web Site and Accessing Data with Web Forms |
607 |
Note In contrast with Visual C# 2008 Express Edition, you do not have to connect directly to a database file when creating a data source with Visual Web Developer 2008 Express
Edition. If you prefer, you can reattach the Northwind database to SQL Server and then connect by using the Microsoft SQL Server data source. For more information about attaching a database, see the sp_attach_db command in the MSDN Library for Visual
Studio 2008.
5.5.In the Add Connection dialog box, in the Database file name box, click Browse.
5.6.In the Select SQL Server Database File dialog box, move to the folder C:\Program
Files\Microsoft SQL Server\MSSQL.1\MSSQL\Data, click the Northwind database file, and then click Open.
5.7.Select the Use Windows Authentication option to log on to the server, and then click OK.
6.In Server Explorer or Database Explorer, expand the new data connection (YourComputer\sqlexpress.Northwind.dbo or Northwind.mdf), and then expand Tables.
7.Click the Customers table, and drag it onto the Object Relational Designer window.
Note If you are using Visual Web Developer 2008 Express Edition, a message box appears, asking you whether you want to add the data file for the Northwind database to your project. Click No.
8. On the File menu, click Save All.
Lay out the CustomerData Web form
1.Display the CustomerData.aspx Web form in the Design View window. Delete the label displaying the text “This form will be implemented later.”
2.In the Properties window, set the Title property of the DOCUMENT object to Northwind Traders – Customers.
3.In the Toolbox, expand the Data category. Add a LinqDataSource control to the Web form.
A control called LinqDataSource1 is added to the Web form.
Note Although the LinqDataSource control appears on the Web form at design time, it will not be visible when the Web form runs.
608 |
Part VI Building Web Applications |
4.Using the Properties window, change the (ID) property of LinqDataSource1 to
CustomerInfoSource.
5.Select the CustomerInfoSource control on the Web form. Click the smart tag icon to display the Common LinqDataSource Tasks menu, and then click the Configure Data Source link.
The Configure Data Source Wizard appears.
6.On the Choose a Context Object page, ensure that CustomerDataContext is selected in the Choose your context object drop-down list box, and then click Next.
7.On the Configure Data Selection page, in the Table drop-down list box, select the Customers table. In the Select list box, select the * box, and then click Finish.
8.On the Common LinqDataSource Tasks menu, select the Enable Update box, but leave the Enable Insert and Enable Delete boxes clear.
The Enable Update check box enables the data source to generate the appropriate SQL UPDATE statements for modifying the data in the Customers table. For reasons of referential integrity, the Web form in this application will not allow the user to create or delete customers.
Note If you don’t select any of these options, the data retrieved through the data source is effectively read-only.
9.In the Toolbox, click the GridView control and drag it onto the form. A GridView is added to the form and displays placeholder data.
10.Using the Properties window, change the (ID) property of the GridView control to
CustomerGrid, and set the Caption property to Northwind Traders Customers.
11.Click the smart tag icon on the top edge of the GridView control, near the right-hand corner. On the Common GridView Tasks menu, click the Auto Format link.
12.In the AutoFormat dialog box, select the Classic scheme, and then click OK.
Tip If you don’t like any of the predefined formats available in the AutoFormat dialog box, you can change the styles of the elements of a GridView control manually by using the properties in the Styles section in the Properties window.
13.In the Properties window, set the DataSourceID property of the GridView control to
CustomerInfoSource.

Chapter 29 Protecting a Web Site and Accessing Data with Web Forms |
609 |
The column headings for the Customers table appear in the GridView control on the screen.
14.Click the Source button at the bottom of the Design View window to display the HTML source code for the CustomerData.aspx page.
Notice that the HTML code for the GridView control sets the DataSourceID property of the control to CustomerInfoSource. The control also contains a <columns> element with boundfield controls defining the properties of each column displayed. The DataField property of each boundfield object specifies the name of the property the object is bound to in the data source. The HeaderText property is the string displayed in the column header for the column. Currently, the HeaderText and DataField values for each column are the same.
15.Change the values of the HeaderText property for the boundfield objects using the information in the following table.
DataField Value |
HeaderText Value |
CustomerID |
Customer ID |
|
|
CompanyName |
Company |
|
|
ContactName |
Contact |
|
|
ContactTitle |
Title |
|
|
Address |
Address |
|
|
City |
City |
|
|
Region |
Region |
|
|
PostalCode |
Postal Code |
|
|
Country |
Country |
|
|
Phone |
Phone |
|
|
Fax |
Fax |
|
|
Test the CustomerData form
1.On the Debug menu, click Start Without Debugging.
Internet Explorer starts and displays the Northwind Traders - Login page.
2.Log in as John using the password Pa$$w9rd.
610 |
Part VI Building Web Applications |
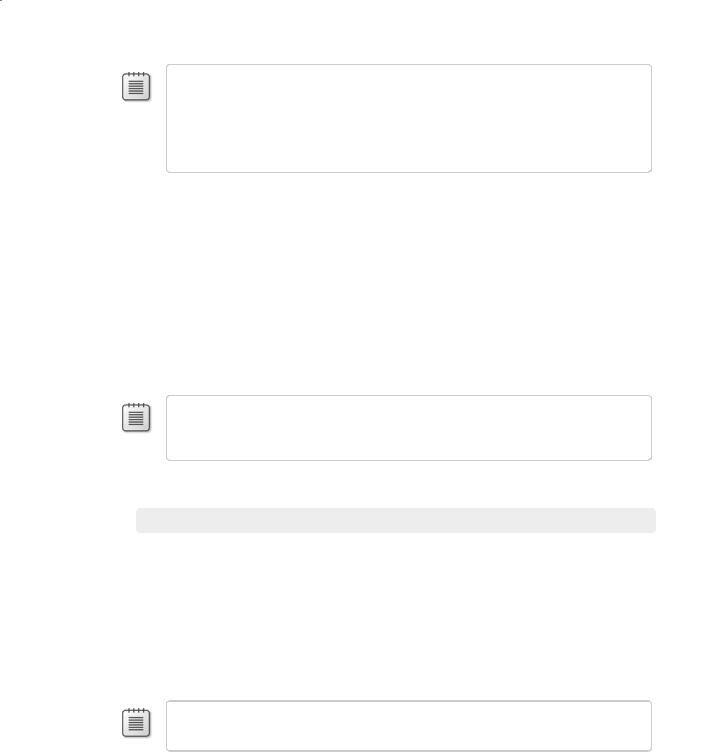
The CustomerData Web form appears, displaying the details of every customer in the database:
Notice that the page is currently read-only; you cannot modify any of the details displayed. You will enhance the Web form later in this chapter to enable the user to make changes.
3.Close Internet Explorer when you have finished browsing the data, and return to Visual Studio 2008.
Web Site Security and SQL Server
When you use the ASP.NET Development Server to run an application that uses Formsbased security, it executes in the context of the account you are using to run Visual Studio 2008. Assuming you used the same account to create the Northwind database, the Web application should have no problems accessing the database.
However, if you deploy the Web site to a Microsoft Internet Information Services (IIS) server, the situation changes. IIS runs applications that use Forms-based security by using the NETWORK SERVICE account under the Windows Vista operating system or the ASPNET account under Windows XP. This account has very few user rights by default, for security purposes. In particular, it will not be able to connect to SQL Server Express and query the Northwind database. Therefore, you will need to grant the NETWORK
SERVICE account (or the ASPNET account) login access to SQL Server Express and add it as a user to the Northwind database. For more details, see the sp_grantlogin and sp_grantdbaccess commands in the MSDN Library for Visual Studio 2008.