

Digital Sculpting with mudbox
.pdfDigital Sculpting with Mudbox
FIG 2.12 Digital Images Are Composed of a Pixel Grid. Each Pixel Stores Information Like Color and Transparency. Mudbox Uses Digital Images as Stencils and Stamps and Creates Digital Images When Painting Textures.
Photography by Christina Sizemore.
stamps are digital images, and Mudbox can also save screenshots of the scene as digital images of various formats.
Mudbox Hotkeys
You should become familiar with the following important keyboard shortcuts referred to as hotkeys. These hotkeys increase productivity and usability by allowing you to quickly access common commands or tasks while working (Table 2.1). There are many more Mudbox hotkeys, but for now, you need to know the ones in the list below. If you would like to see a complete hotkey list, go to the Help menu and choose Mudbox Help.
Quickstart Tutorial: Sculpting a Bell Pepper
The purpose of this tutorial is to introduce you to the basics of sculpting with Mudbox. This tutorial is designed for someone who has little or no experience with Mudbox, so it assumes that you don’t know anything about Mudbox or digital sculpting. If you have experience with Mudbox, you may want to skip to the sculpting tutorial in Chapter 3. This tutorial will cover fundamentals like camera navigation, several of the sculpting tools, sculpting workflow, layers, and stencils.
The subject of the sculpture in this tutorial is a bell pepper. This may seem like an odd choice for the subject of the first tutorial, but the reason we chose a bell pepper is because it has a simple but recognizable shape that is forgiving
26
Introduction to Mudbox
TABLE 2.1 Hotkeys
Action |
Windows Hotkeys |
Mac OS X Hotkeys |
Rotate camera |
Alt + left mouse button |
Option + left mouse button |
|
|
command + left mouse button |
|
|
|
Pan or Track camera |
Alt + middle mouse button |
Option + middle mouse button |
|
|
command + middle mouse button |
|
|
|
Zoom or Dolly camera |
Alt + right mouse button |
Option + right mouse button |
|
|
command + right mouse button |
|
|
|
Roll camera |
Shift + middle mouse button |
Shift + middle mouse button |
|
|
|
Focus |
Place cursor on the area of |
Place cursor on the area of interest |
|
interest and press F |
and press F |
|
|
|
Frame all |
A |
A |
|
|
|
Adjust tool size |
B + left mouse button |
B + left mouse button |
|
|
|
Adjust tool strength |
M + left mouse button |
M + left mouse button |
|
|
|
Toggle Smooth tool |
Shift |
Shift |
|
|
|
Invert Sculpting tool |
Ctrl |
Control |
|
|
|
Add subdivision level |
Shift + D |
Shift + D |
|
|
|
Step up subdivision level |
Page Up |
Page Up |
|
|
|
Step down subdivision level |
Page Down |
Page Down |
|
|
|
Invert Freeze |
Shift + I |
Shift + I |
|
|
|
Unfreeze all |
Shift + U |
Shift + U |
|
|
|
Undo |
Ctrl + Z |
Command + Z |
|
|
|
enough to allow you to focus on learning the sculpting workflow without worrying too much about details. You will sculpt the sphere model that comes with Mudbox into a bell pepper, so everything will be done within Mudbox without any imported models.
Setting Up the Scene
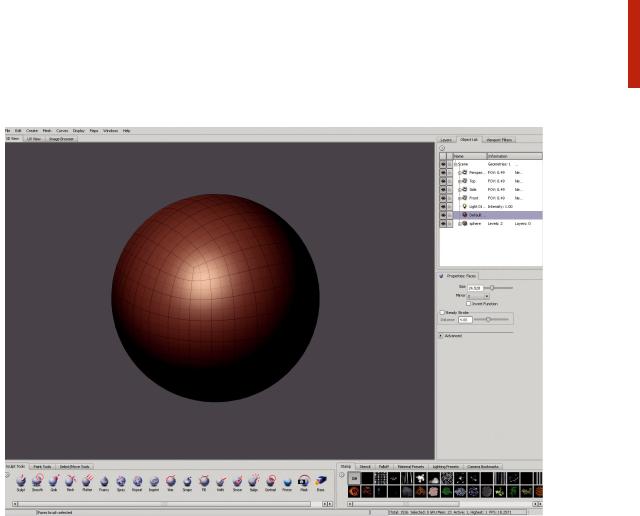
After launching Mudbox, you will see the Welcome window. In the “Start a new sculpture section,” scroll down until you see the Sphere and click to
insert it into the scene. The default Mudbox scene displays a grid along the
x and z axes and a gradient background. For the purposes of this tutorial, turn off the grid and gradient by right-clicking anywhere in the scene (but not
on the sphere), and from the contextual menu, uncheck Grid and Gradient Background (Figure 2.13).
27
Digital Sculpting with Mudbox
FIG 2.13 The Pepper Will Be Sculpted from Mudbox’s Stock Sphere Model. Insert a Sphere into the Scene and Turn off the Grid and Gradient Background.
Selecting and Scaling a Model
Next, you will select the sphere in the scene and scale it down (make it smaller). You may select the sphere either by clicking on its icon in the Object List or by choosing the Objects tool from the Select/Move Tools tray and clicking on the sphere in the scene, and once selected, the sphere will turn yellow. Next, choose the Scale tool from the Select/Move Tools tray. Notice that the Scale manipulator is displayed within the sphere. At this point, you may scale the sphere by clicking and dragging on any of the manipulator’s squares. However, clicking and dragging on the green, blue, or red squares will scale the sphere along one axis, resulting in an oval. In this case, the sphere should be uniformly scaled so that it retains its spherical shape. Click on the manipulator’s white middle square and drag until the sphere is about half of its original size (Figure 2.14). An alternate method to scale the sphere is to do it numerically. To scale the sphere numerically, make sure that it is selected, choose the Scale tool from the Select/Move Tools tray, and in the Properties tray, enter the numerical value in the Scale input fields. In this case, you would enter .5 for each field to scale down the sphere by 50%.
28

Introduction to Mudbox
FIG 2.14 Scale Down the Sphere by about 50%. You May Scale a Selected Object by Clicking and Dragging the Scale manipulator or by Numerically Changing the Values of the Rotate x, y, z Input Fields.
Creating a Layer and Subdividing
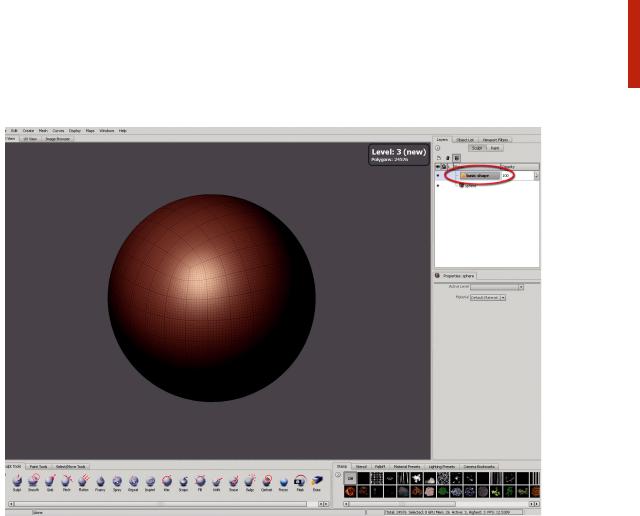
Next, you are going to create the first sculpting layer and subdivide the sphere in preparation for sculpting. A layer in Mudbox is an important tool that manages the sculpting process. For example, you could rough in the basic shape of the pepper in one layer and then add details in another layer. If you don’t like the work you have done in the layer in which you sculpted the details, you can delete it, create a new layer, and try again without disturbing any of the work done in the first layer in which you roughed in the basic shape. Mudbox’s layers are in many ways similar to layers in programs like Photoshop. As mentioned earlier in this chapter, subdividing the model means increasing the resolution or number of polygons that makes up the model. The reason the model is subdivided is to have enough polygons to effectively sculpt. You will learn more about layers and subdivision as you work through this tutorial; for now, follow these next steps to add a new layer and subdivide the sphere.
To add a new layer, click on the Layers tab, then click on Layers menu (the small, circular button with the arrow pointing to the right), and select New Layer. A new layer is created above the object-labeled sphere. Double-click on the layer to make the layer name editable and name the layer as Basic Shape.
Press Shift + D twice to subdivide the sphere two times. As you subdivide, notice that the HUD in the upper right corner of the scene displays the active subdivision level and number of polygons in the model. You should be in level 3 and the model should have 24,576 polygons. If you missed the HUD display (it flashes by quickly), look for labels “Total:” and “Active:” in the status bar at the bottom of the interface, and they should read Total: 24,576 and Active: 3 (Figure 2.15). A key Mudbox feature is that you can move between subdivision levels. In this case, press the Page Down key to go down to level 2; now press Page Up to go back up to level 3.
29
Digital Sculpting with Mudbox
FIG 2.15 Before Starting to Sculpt, Create a New Sculpt Layer and Subdivide the Sphere Twice.
An important feature about layers and subdivision levels is that layers only work with one subdivision level. In other words, if you are at subdivision level 3 and begin sculpting in the layer Basic Shapes, then that layer is locked at level 3. So, if you subdivide again to level 4, you cannot sculpt in the layer Basic Shapes anymore and you would have to create a new layer to work at level 4.
Roughing In the Shape
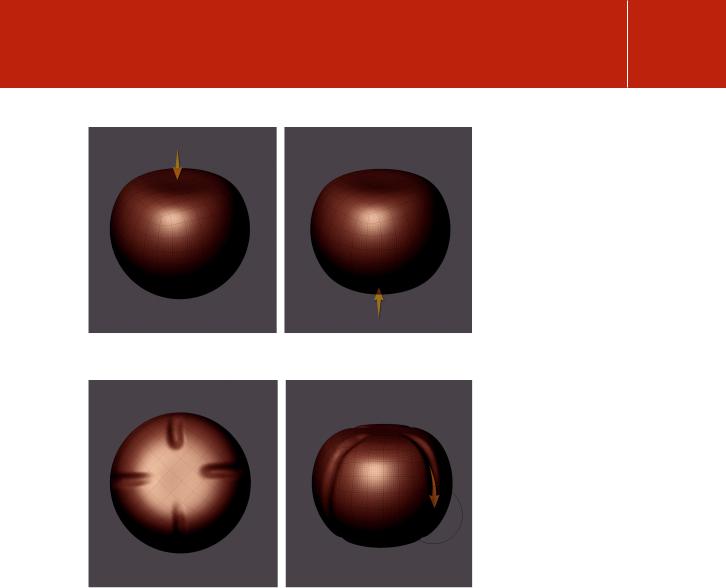
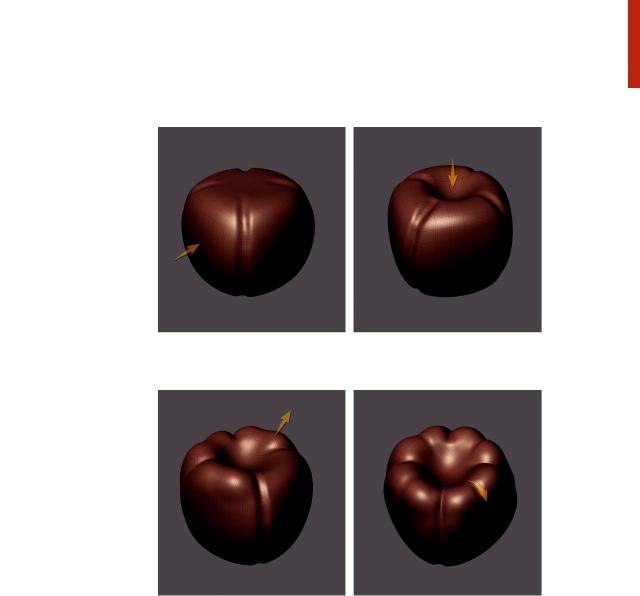
At this point, the scene and sphere are set up, a new layer has been created, and the sphere has enough polygons to begin sculpting – so let’s get started. Make sure that you are working in the layer named Basic Shape by clicking on it once to make it active. Now, rotate the camera so you can see the top of the model. Select the Grab tool from the Sculpting Tools tray and set the Size of the Grab tool to about 50 and the Strength to 65. Position the Grab tool above the sphere (at the North pole) and move the Grab tool down to flatten the sphere as seen in Figure 2.16. Repeat the process for the bottom of the sphere.
In this next step, you will mark the sections of the pepper. Peppers can have many sections, but to keep things simple, our pepper will have four. Rotate the camera so that you are looking down on the sphere and select the Bulge
30
Introduction to Mudbox
FIG 2.16 To Begin Shaping the Sphere into a Pepper, Use the Grab Tool to Quickly Flatten the Top and Bottom.
FIG 2.17 Use the Bulge Tool to Mark the Sections of the Pepper. However, In This Case, You Will Invert the Bulge Tool by Pressing Ctrl While Sculpting to Sculpt Indentions.
tool. Set the Size to about 20 and the Strength to 65. But, before applying the Bulge tool, press Ctrl (Mac Control) and then create four indentations. Certain sculpting tools like the Bulge tool can be inverted by pressing the Ctrl key.
This means that instead of pulling out when sculpting, the tool pushes in. Rotate the camera around to see the sides of the model and use the inverted Bulge tool to continue the indented marks to the bottom of the model (Figure 2.17). Don’t worry too much about making the indentions perfect; these are just guides for sculpting the sections of the pepper.
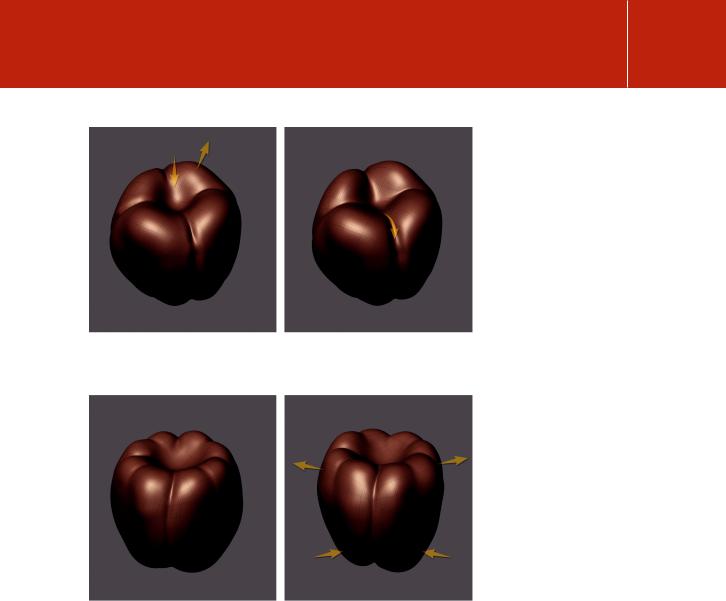
Now, you will shape the sections so that the sphere is even squattier. With the Grab tool set to about Size 50 and Strength 65, push in each end of the
sphere. Reduce the Strength of the Grab tool to about 30 and shape the top as in Figure 2.18. Select the Bulge tool, set its Size to about 40 and Strength to 60, and sculpt the bumps at the top of each section. To delineate grooves between
31
Digital Sculpting with Mudbox
FIG 2.18 With the Grab Tool, Push in the Sides of the Sphere Then Indent the Top.
FIG 2.19 Use the Pinch Tool to Delineate or Tighten the Grooves between Bumps and Sections.
the bumps, invert the Bulge tool, set it to a small size of about 15, and sculpt the grooves as seen in Figure 2.19. Focus on getting a feel on how the sculpting tools work; don’t fret too much over details. You may use the Smooth tool to soften or smooth out any bumps or lumps you don’t want. The Smooth tool may be accessed by selecting it from the Sculpt Tools tray or by pressing Shift to toggle to the Smooth tool while working with any other sculpting tool.
Rotate the camera so that you are looking at the bottom of the sphere. Use a combination of the Grab and the Bulge tools to create the features seen in Figure 2.20. At this point, the sphere should resemble a pepper, so we’ll refer to it as a pepper from now on. Rotate the camera so that the pepper is right- side-up. Use the Grab tool to pull out the sides at the top of the pepper and push in the sides at the bottom. See Figure 2.21. You can do as little or as much
reshaping as you like. Remember that peppers come in all shapes, so you can’t
32
Introduction to Mudbox
FIG 2.20 Use a Combination of the Grab and Bulge Tools to Shape the Bottom of the Sphere. By This Point, You Should Be Getting a Feel of How the Sculpting Tools Work.
FIG 2.21 Use the Grab Tool to Give the Pepper Its Characteristic Bell Shape.
get it wrong. Once you are finished shaping the pepper, use the Pinch tool to emphasize the grooves between each section. The Pinch tool moves polygons closer together, so when the tool is run along a groove, it makes the groove tighter. Select the Pinch tool and set its Size to about 10 and Strength to 30. In the tool properties, check the Steady Stroke option. Steady Stroke makes
it easier to follow along a path. Run the Pinch tool along all of the grooves on the pepper to make them tighter and more distinct.
Sculpting Details
So far, you have sculpted a sphere into the general shape of bell pepper using the Grab, Bulge, Smooth, and Pinch tools. You have learned that some sculpting tools may be inverted by pressing the Ctrl key (Control Mac) so they push in instead of pulling out, and that the Smooth tool can be toggled on
33
Digital Sculpting with Mudbox
FIG 2.22 Use the Freeze Tool to Paint the Area Where the Stem Will Be Sculpted. Then Invert the Freeze Tool to Freeze the Rest of the Pepper and Leave the Stem Spot Unmasked.
by pressing Shift while working with any other sculpting tool. You have also learned to manage the size and strength of the sculpting tools to get the desired amount of sculpting effect. In the next section of this tutorial, you will sculpt the floret and stem of the pepper with new tools like Freeze, Flatten, and Fill, and continue to practice with the sculpting tools that you have already been working with.
Before moving on to sculpting the floret and stem, add a new layer and name it Stem. In this way, you can practice sculpting the stem without disturbing the work you have already done to shape the pepper. If you mess up the stem, delete the Stem layer, create a new layer, and try again. After you have created a new layer, subdivide (Shift + D) the pepper twice to level 5. At this level, the pepper has 393,216 polygons. The added polygons will allow you to sculpt with the smaller details of the floret and stem.
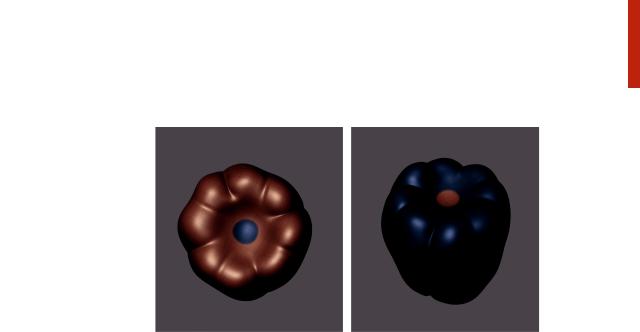
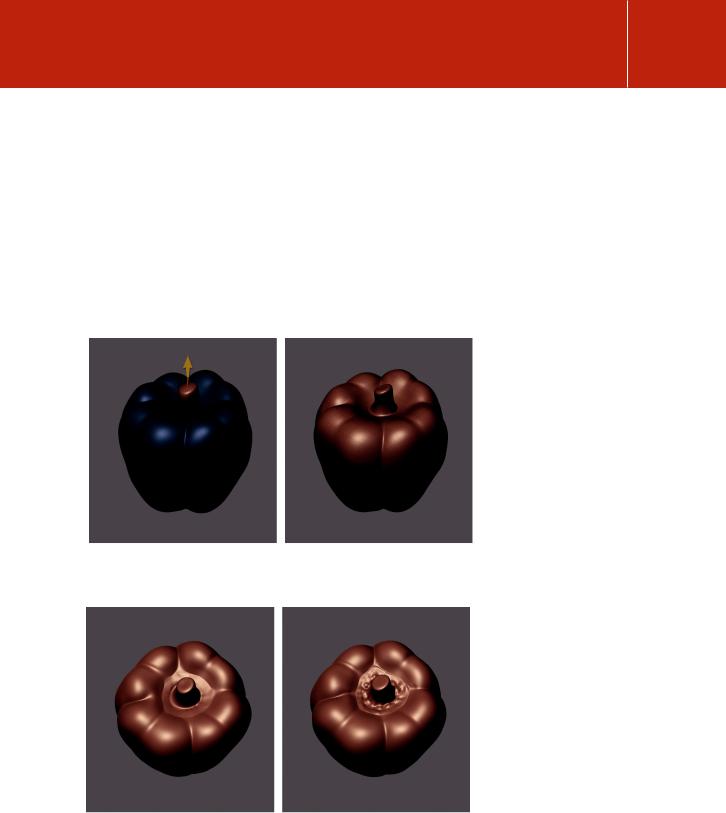
In the following steps, you will use the Freeze tool to create a mask that will allow you to sculpt the stem. The Freeze mask will protect the masked areas, allowing the sculpting tools to work only in the unmasked areas. Rotate the camera so you are looking down at the pepper. Select the Freeze tool from the Sculpting Tools tray, set its Size to about 10 and Strength to 100, and paint the area shown in Figure 2.22. Now, press Shift + I to invert the Freeze. Make sure that you are working in the new Stem layer by clicking on it once to make it active.
With the Grab tool set to Size 20 and Strength 65, pull out the stem as shown in Figure 2.23. The Freeze mask is not necessary any more, so turn it off by pressing Shift + U. Next, use the Smooth tool to smooth the base of the stem if necessary. You can shape the shaft of the stem by using any combination of the Grab, Bulge, and Smooth tools. Try experimenting with different tools to see how they work together. The top of the stem can be shaped with the
34
Introduction to Mudbox
Flatten tool. If you like, you may turn off the wireframe by pressing W. At very high subdivision levels, there are so many polygons that the wireframe is not useful.
The floret of the pepper is made up of very small, lumpy leaves. In the following steps, you are going to suggest the floret without really sculpting all of the details. Use the Fill to fill in the area around the sections of the pepper and the stem, as shown in Figure 2.24. You may have to determine the appropriate Size and Strength for the Fill tool because your pepper and stem will probably be different than what is shown in the figures. However, a Size of about 30 and Strength of 25 is a good starting point. Next, use the Bulge and Wax tools to sculpt the lumps and bumps of the floret and use the Pinch tool around
FIG 2.23 Use the Grab Tool to Pull Out the Stem. Once Finished, Turn Off the Freeze Mask and Shape the Stem.
FIG 2.24 Use the Fill Tool to Fill In the Area around the Stem. This Will Give You a Base to Sculpt the Floret. Then Use the Bulge and Wax Tools to Sculpt the Lumpy Leaves and, Finally, Use the Pinch Tool around the Edges to Delineate the Floret.
35