

4.7.1: Packet Tracer Skills Integration Challenge Activity
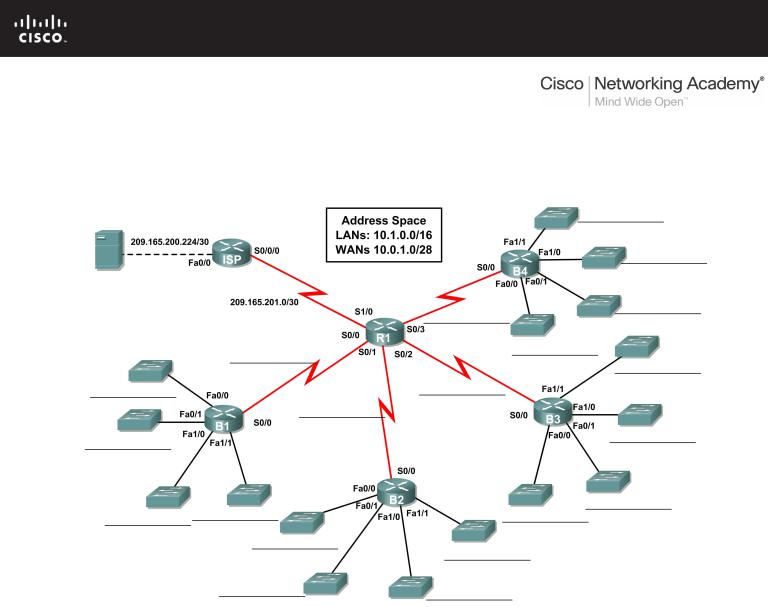
Topology Diagram
All contents are Copyright © 1992–2007 Cisco Systems, Inc. All rights reserved. This document is Cisco Public Information. |
Page 1 of 5 |

CCNA Exploration |
|
Routing Protocols and Concepts: |
|
Distance Vector Routing Protocols |
4.7.1: Packet Tracer Skills Integration Activity |
Addressing Table
|
Device |
Interface |
IP Address |
Subnet Mask |
|
|
|
|
|
|
|
S0/0 |
|
|
|
|
|
|
|
|
|
S0/1 |
|
|
|
R1 |
|
|
|
|
S0/2 |
|
|
|
|
|
|
|
|
|
|
S0/3 |
|
|
|
|
|
|
|
|
|
S1/0 |
209.165.201.2 |
255.255.255.252 |
|
|
|
|
|
|
|
Fa0/0 |
|
|
|
|
|
|
|
|
|
Fa0/1 |
|
|
|
B1 |
|
|
|
|
Fa1/0 |
|
|
|
|
|
|
|
|
|
|
Fa1/1 |
|
|
|
|
|
|
|
|
|
S0/0 |
|
|
|
|
|
|
|
|
|
Fa0/0 |
|
|
|
|
|
|
|
|
|
Fa0/1 |
|
|
|
B2 |
|
|
|
|
Fa1/0 |
|
|
|
|
|
|
|
|
|
|
Fa1/1 |
|
|
|
|
|
|
|
|
|
S0/0 |
|
|
|
|
|
|
|
|
|
Fa0/0 |
|
|
|
|
|
|
|
|
|
Fa0/1 |
|
|
|
B3 |
|
|
|
|
Fa1/0 |
|
|
|
|
|
|
|
|
|
|
Fa1/1 |
|
|
|
|
|
|
|
|
|
S0/0 |
|
|
|
|
|
|
|
|
|
Fa0/0 |
|
|
|
|
|
|
|
|
|
Fa0/1 |
|
|
|
B4 |
|
|
|
|
Fa1/0 |
|
|
|
|
|
|
|
|
|
|
Fa1/1 |
|
|
|
|
|
|
|
|
|
S0/0 |
|
|
|
|
|
|
|
|
ISP |
S0/0 |
209.165.201.1 |
255.255.255.252 |
|
|
|
|
|
|
Fa0/0 |
209.165.200.225 |
255.255.255.252 |
|
|
|
|||
|
|
|
|
|
|
Web |
NIC |
209.165.200.226 |
255.255.255.252 |
|
Server |
|||
|
|
|
|
|
|
|
|
|
|
All contents are Copyright © 1992–2007 Cisco Systems, Inc. All rights reserved. This document is Cisco Public Information. |
Page 2 of 5 |

CCNA Exploration |
|
Routing Protocols and Concepts: |
|
Distance Vector Routing Protocols |
4.7.1: Packet Tracer Skills Integration Activity |
Objectives
•Design and document an addressing scheme based on requirements.
•Select appropriate equipment and cable the devices.
•Apply a basic configuration to the devices.
•Configure static and default routing.
•Verify full connectivity between all devices in the topology.
Task 1: Design and document an addressing scheme.
Step 1: Design an addressing scheme.
Using the topology and the following requirements, design an addressing scheme:
•The WAN link between R1 and ISP is already configured.
•For the WAN links between R1 and the branch routers (B1, B2, B3 and B4), subnet the address space 10.0.1.0/28 to provide the necessary WAN subnets. Assign the subnets using the following guidelines:
Subnet 0: R1 <--> B1 ________________________
Subnet 1: R1 <--> B2 ________________________
Subnet 2: R1 <--> B3 ________________________
Subnet 3: R1 <--> B4 ________________________
•For the LANs attached to the branch routers, divide the address space 10.1.0.0/16 into four equal subnets. Assign the subnets using the following guidelines:
Subnet 0: B1 LANs ________________________
Subnet 1: B2 LANs ________________________
Subnet 2: B3 LANs ________________________
Subnet 3: B4 LANs ________________________
•For each branch router, divide that router’s LAN subnet into four equal subnets. Assign the subnets using the following guidelines:
•B1 LANs
Subnet 0: B1 Fa0/0 ________________________
Subnet 1: B1 Fa0/1 ________________________
Subnet 2: B1 Fa1/0 ________________________
Subnet 3: B1 Fa1/1 ________________________
•B2 LANs
Subnet 0: B2 Fa0/0 ________________________
Subnet 1: B2 Fa0/1 ________________________
Subnet 2: B2 Fa1/0 ________________________
Subnet 3: B2 Fa1/1 ________________________
•B3 LANs
Subnet 0: B3 Fa0/0 ________________________
Subnet 1: B3 Fa0/1 ________________________
Subnet 2: B3 Fa1/0 ________________________
Subnet 3: B3 Fa1/1 ________________________
All contents are Copyright © 1992–2007 Cisco Systems, Inc. All rights reserved. This document is Cisco Public Information. |
Page 3 of 5 |

CCNA Exploration |
|
Routing Protocols and Concepts: |
|
Distance Vector Routing Protocols |
4.7.1: Packet Tracer Skills Integration Activity |
•B4 LANs
Subnet 0: B4 Fa0/0 ________________________
Subnet 1: B4 Fa0/1 ________________________
Subnet 2: B4 Fa1/0 ________________________
Subnet 3: B4 Fa1/1 ________________________
Step 2: Document the addressing scheme.
•On the topology, label each subnet in the blanks provided.
•Use the table provided in the printed instructions to document the IP addresses and subnet masks. Assign the first IP address to the router interface.
•For the WAN links, assign the first IP address to R1.
Task 2: Select equipment and cable devices.
Step 1: Select the necessary equipment.
•To add the branch routers, use the “Custom Made Devices” option and choose the 2621XM router. This router has four Serial interfaces and four Fast Ethernet interfaces in the correct configuration to insure the “Check Results” feature functions properly for this activity.
•Each router uses four switches. The switches are not part of the “Check Results” feature so any switch will satisfy the requirement for a LAN link to the branch router. Arrange the switches around each router similar to how it is shown in the topology.
Step 2:Cable the devices.
Cable the networks according to the topology taking care that interfaces match the topology and your documentation in Task 1. R1 is the DCE side for B1, B2, B3 and B4. ISP is the DCE for the link to R1.
Task 3: Apply a basic configuration.
Using your documentation, configure the routers with basic configurations including addressing. Use cisco as the line passwords and class as the secret password. Use 64000 as the clock rate.
Task 4: Configure static and default routing
Configure static and default routing using the exit interface argument.
•R1 should have four static routes and one default route.
•B1, B2, B3, and B4 should have one default route each.
•ISP should have two static routes: one for the WAN address space and one for the LAN address space.
All contents are Copyright © 1992–2007 Cisco Systems, Inc. All rights reserved. This document is Cisco Public Information. |
Page 4 of 5 |
CCNA Exploration |
|
Routing Protocols and Concepts: |
|
Distance Vector Routing Protocols |
4.7.1: Packet Tracer Skills Integration Activity |
Task 5: Test connectivity and examine the configuration.
Step 1: Test connectivity.
•You should now have end-to-end connectivity. Use ping to test connectivity across the network. Each router should be able to ping all other router interfaces and the Web Server.
•Use extended ping to test LAN connectivity to the Web Server. For example, the test the Fa0/0 interface on B1, you would do the following:
B1#ping
Protocol [ip]:
Target IP address: 209.165.200.226 Repeat count [5]:
Datagram size [100]: Timeout in seconds [2]: Extended commands [n]: yes
Source address or interface: 10.1.0.1 Type of service [0]:
Set DF bit in IP header? [no]: Validate reply data? [no]: Data pattern [0xABCD]:
Loose, Strict, Record, Timestamp, Verbose[none]: Sweep range of sizes [n]:
Type escape sequence to abort.
Sending 5, 100-byte ICMP Echos to 209.165.200.226, timeout is 2 seconds: Packet sent with a source address of 10.1.0.1
!!!!!
Success rate is 100 percent (5/5), round-trip min/avg/max = 67/118/138 ms
•Troubleshoot until pings are successful.
Step 2: Examine the configuration.
Use verification commands to make sure your configurations are complete.
All contents are Copyright © 1992–2007 Cisco Systems, Inc. All rights reserved. This document is Cisco Public Information. |
Page 5 of 5 |