

does. We only need to know how to coax it to do what we need it to do, which in our case is convert Blinky.c into Blinky.hex that we can download to the Butterfly. If you raise the hood on WinAVR you would see a massively complex set of software that has been created over the years by folks involved in the open software movement. When you get a little extra time check out www.sourceforge.net.
When you have questions about WinAVR, and you will, check out the forums on www.AVRFreaks.net, especially the gcc forum, since WinAVR uses gcc to compile the C software. Try searching the forums before asking questions since someone has probably already asked your question and received good responses. Forum helpers tend to get annoyed with newbies who don’t do sufficient background research before asking questions.
Simulation with AVRStudio
Now that you’ve gone to the trouble to construct the hardware, and have the burned fingers to prove it… guess what? You didn’t need to do any of that to test Blinky or get an introduction to C programming for microcontrollers. With a minor modification you can run Blinky in the AVR Studio simulator and learn the introductory C programming ideas in the next chapter without any of the hardware. I decided to do things the hard way, ummm… hardware way because our goal is to control ‘real’ things like LEDs, not virtual things like little boxes on your PC screen. Theoretically, we could have a whole slew of virtual things to control, from LEDs to motors to full blown Cylon robots reeking havoc on your screen, which actually sounds kind of fun, but not nearly so much fun as having a real Cylon robot stomping around your neighborhood scaring the noodles out of your enemies. Fun aside, it is often more practical to simulate software before running it in the real world. You wouldn’t want your Cylon to mistake you, the imperious leader, for an enemy, would you?
The simulator runs your program in a virtual environment that is MUCH slower than the real microcontroller. Most of your code will run plenty fast to simulate, but some things, such as the delay functions take too long to simulate. In Blinky we call _delay_loop_2(30000); We don’t know yet how this function works, but we can guess that we are telling it to do something 30000 times. If we simulate
27
the delay, the simulated LEDs will move at geologic speeds, making glaciers seem fast, so we remove the delay before simulation.
•Open Blinky.c in Programmers Notepad and save it to a new directory, SimBlinky, as SimBlinky.c.
•Put comment lines in front of both of the _delay_loop_2() function calls in main():
•// _delay_loop_2(30000);
•Open the makefile in the Blinky directory
•Change the target: TARGET = SimBlinky
•Save the makefile to the SimBlinky directory
•Run the Make All, then Make Extcoff.
•In the AVRStudio open the SimBlinky.coff file.
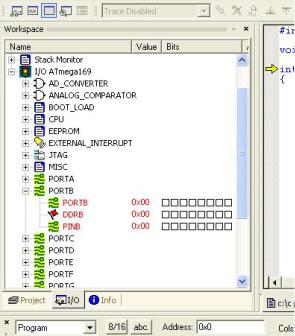
•In the AVRStudio Workspace window click the I/O ATmega169, then the PORTD, you should see: (the following image shows PORTB instead of PORTD, -- live with it)
•In the toolbar click the AutoStep button:
28