

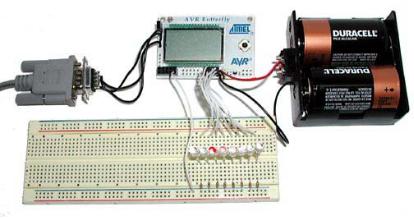
Figure 10: Hardware setup for Blinky.
Blinking LEDs – Your First C Program
You might wonder why blinking an LED is the first project, when traditional C programming texts start with the classic “Hello, world” program. It certainly seems that since the Butterfly has an LCD that can show the words it would be easy. But the reality is that controlling the LCD is much more complex than blinking an LED, so we’ll save the LCD for later when we’ve gotten a better handle on things.
•Make a directory called Blinky for this project.
•Copy ‘…/WinAVR/Samples/makefile’ (notice that it has no extension) to the Blinky directory.
Write it in Programmers Notepad
• Find Programmers Notepad that was installed as part of WinAVR (you should have an icon for it on your desktop) and open it. You will need to add a tool, which will let you use the AVR Studio simulator.
•Open the Tools menu and click on Options.
19

•In the Options window select Tools:
•Then select Add:
20
•Change the check box to look like:
21
•Click OK.
•Click File, then New, then C/C++, and name it Blinky.c.
•Save in Blinky directory and CAREFULLY TYPE exactly as shown:
// Blinky.c
#include <avr/io.h> #include <avr/delay.h>
int main (void)
{
// set PORTD for output DDRD = 0xFF;
while(1) {
for(int i = 1; i <= 128; i = i*2)
{
PORTD = i; _delay_loop_2(30000);
}
for(int i = 128; i > 1; i -= i/2)
{
PORTD = i; _delay_loop_2(30000);
}
}
return 1;
}
•Open File and again save ‘Blinky.c’ to your Blinky directory
•NOTE: YOU MUST ADD THE EXTENSION ‘.c’ TO THE NAME
•Open the file ‘makefile’ in your Blinky directory.
•Change these lines:
MCU = atmega128
# Output format. (can be srec, ihex, binary) FORMAT = ihex
22