

2005-bomber-en
.pdf
I. USE OF THE MANUAL
• |
Carefully read, understand and follow the |
||||||||||
8 |
instructions given in this manual. This manual |
||||||||||
|
is an essential part of the product, and you |
||||||||||
|
should keep it in a safe place for future |
||||||||||
|
reference.1 |
|
|
|
|
|
|
|
|||
• If |
the |
|
use |
and |
maintenance |
instructions |
|||||
|
provided in this manual are not properly |
||||||||||
|
performed, or if the other instructions in this |
||||||||||
|
manual are not followed, an accident could |
||||||||||
|
occur, resulting in an accident, serious injury |
||||||||||
|
or death. |
|
|
|
|
|
|
|
|||
• This |
manual |
does |
not |
explain |
how |
to |
|||||
|
assemble/disassemble the fork from the |
||||||||||
|
bicycle, the wheel, the steering set or any |
||||||||||
|
other component directly or indirectly |
||||||||||
|
associated with the fork that are not actually a |
||||||||||
|
part of the fork. |
|
|
|
|
|
|
||||
• Please |
be advised |
|
that suspension |
system |
|||||||
|
installation and repair requires specialized |
||||||||||
|
knowledge, tools and experience. General |
||||||||||
|
mechanical aptitude may not be sufficient to |
||||||||||
|
properly install or repair your suspension |
||||||||||
|
system. Please have your suspension system |
||||||||||
|
installed and/or serviced only by an authorized |
||||||||||
|
Marzocchi Service Center. |
|
|
|
|
||||||
• |
Never make any modification whatsoever to |
||||||||||
|
any component of your suspension system. |
|
|||||||||
• |
If you have any questions regarding the care, |
||||||||||
|
maintenance or use of your suspension |
||||||||||
|
system, please contact your nearest |
||||||||||
|
Marzocchi service center directly. A list of |
||||||||||
|
service centers can be found at the end of this |
||||||||||
|
manual |
or |
on |
|
the |
Internet |
page |
||||
|
www.marzocchi.com. |
|
|
|
|
||||||
A. GENERAL SAFETY RECOMMENDATIONS
•You must select and use the correct suspension system for your style of riding. Check and follow the “Intended Use Instructions” in this manual.
•Please note that there are inherent risks
associated with downhill, freeride, cross
1.MARZOCCHI reserves the right, in its sole discretion, to make changes to the products, at any time and without prior notice.
country, marathon, trekking, dirt jumping and urban style riding. You could be seriously injured or killed while engaged in those riding styles. Learn how to ride, never ride beyond your capabilities, be sure to use the proper safety equipment, and be sure that all your riding equipment is in excellent condition.
•The lifespan of Marzocchi products depends on many factors, such as riding style and riding conditions. Impacts, falls, improper use or harsh use in general may compromise the structural integrity of the suspension system and significantly reduce its lifespan. Please have your bicycle regularly inspected by a qualified mechanic for any oil leaks, cracks, chips, deformation, or other signs of fatigue. The frequency of inspection depends on many factors; check with your authorized Marzocchi representative to select a schedule that is best for you. If the inspection reveals any deformation, cracks, impact marks, stress marks or bent parts, no matter how slight, immediately have a Certified Marzocchi Repair Center inspect the forks before you ride again.
•Never make any modifications whatsoever to any component of your forks.
•When installing or removing your bicycle from a bicycle carrier (roof rack or rear hitch mount), be sure that you fully loosen the quick release fastener on the carrier. In addition, be sure that your bicycle is lifted from or installed on the carrier in a perfectly vertical direction. If the quick release fastener is not fully loosened, or if there is any bending action while installing or removing your bicycle, you will scratch, bend or otherwise damage your suspension system.
•If you strike at any speed any overhead object, such as a parking garage, bridge, tree limb or other abutment, with your bicycle while your bicycle is attached to a bicycle carrier, you can damage your forks. Have your forks inspected by an authorized Marzocchi Service Center before you ride.
•Always wear a properly fitted and fastened bicycle helmet that has been approved by ANSI or SNELL, and any other safety equipment necessary for your riding style.
MZ0024
B. BEFORE EVERY RIDE
•Check that none of the components to your suspension system, or the remainder of your bicycle, are leaking, bent, deformed, cracked, chipped or otherwise damaged.
•Check to be sure that all quick release fasteners, nuts and bolts are properly adjusted. Bounce the bicycle on the ground and listen and look for anything which may be loose.
•Be sure that your wheels are perfectly centered. Spin the wheels to be sure that they do not wobble up and down or from side to side, and that they do not make contact with the fork legs or brake pads while rotating.
•Be sure that all cables and other components of your braking system are in proper position and that your braking system is functioning properly.
•Learn and follow the local bicycle laws and regulations, and obey all traffic signals, signs and laws while you ride.
DO NOT RIDE YOUR BICYCLE IF IT DOES NOT PASS THIS PRE-RIDE TEST. CORRECT ANY CONDITION BEFORE YOU RIDE.
II. INTENDED USE INSTRUCTIONS
A.SELECT THE CORRECT FORK FOR YOUR RIDING STYLE AND RIDE PROPERLY
Marzocchi suspension forks are among the most durable and technologically advanced forks on the market today. However, no fork can withstand misuse, abuse or improper use that, over a short period of time, can cause your forks to fail when you least expect it.
It is critical that you select and use the fork that is appropriate for your riding style, and that you use the fork properly.
 WARNING!
Failure to properly match the forks to your frames could cause the forks to fail, resulting in a loss of bicycle control and,
MZ0024 |
possibly, serious injury or death to the rider. |
|
In addition, an improper match and will void the forks’ warranty.
9
1. Identify Your Riding Style:
Cross Country (XC)/Marathon: Riding along hilly trails where some bumps and smaller obstacles, such as rocks, roots, or depressions, may be encountered. XC riding does not include jumps or “drops” (riding off rocks, fallen trees or ledges) from any height. XC forks must only be used with tires specifically designed for cross country riding, or disk, rim or linear pull brakes.
All Mountain (AM): Riding BASED WITH more emphasis on aggressive XC riding WITH larger obstacles. AM RIDING DOES NOT INCLUDE LARGE JUMPS OR DROPS. These forks should be used only with disk brakes, as well as frames, wheels and other components specifically designed for this riding style. The disk brakes must be attached to the designated mounting points provided on the fork. Never make any modification to your fork to attach any equipment.
Trekking: Trekking is similar to XC riding but not as aggressive as XC. It involves slower riding and no riding over obstacles such as rocks, roots, or depressions. You should only attach generators and racks to the designated mounting points provided on the forks. Never make any modification to your fork to attach any equipment.
FreeRide (FR): This riding style is for skilled riders and involves aggressive slopes, large obstacles, and moderate jumps. Freeride forks should be used only with disk brakes as well as frames, wheels and other components specifically designed for Freeriding. The disk brakes must be attached to the designated mounting points provided on the fork. Never make any modification to your fork to attach any equipment.
Dirt Jumper (DJ) / Urban Riding: This “BMX” or “motocross” style riding is only for the most skilled riders and involves jumping from one mound of dirt to another. It also includes riding over and around “urban obstacles” such as
10 |
man-made or other concrete structures. These forks should be used only with disk brakes, as well as frames, wheels and other components specifically designed for this riding style. The disk brakes must be attached to the designated mounting points provided on the fork. Never make any modification to your fork to attach any equipment.
Downhill (DH) / Extreme Freeride: This discipline is only for professional or highly skilled riders. It includes relatively high jumps or “drops” and negotiating larger obstacles such as
boulders, fallen trees or holes. These forks should be used only with disk brakes, as well as frames, wheels and other components specifically designed for this riding style. The disk brakes must be attached to the designated mounting points provided on the fork. Never make any modification to your fork to attach any equipment.
 WARNING!
Ride only in areas specifically designated for your riding style.
2. Select the Correct Fork for Your Riding Style from the Table Below.
Please see your Marzocchi retailer, or contact Marzocchi directly, if you require assistance in selecting the correct fork.
Tab 1: 2005 Fork Riding Categories and Intended USE
Trekking |
XC / Marathon |
All |
Urban Riding |
Freeriding |
Extreme Freeriding |
|
Mountain |
Dirt Jumping |
Downhill |
||||
|
|
|
||||
TXC |
EXR |
All Mountain |
Dirt Jam Comp |
Drop Off |
66 RC |
|
SL |
||||||
|
|
|
|
|
||
TXC |
EXR Pro |
All Mountain |
Dirt Jam Pro |
Shiver SC |
66 R |
|
ECC |
1 |
|||||
|
|
|
|
|||
|
EXR Race |
All Mountain |
Dirt Jumper 1 |
Z.1 FR SL |
66 VF |
|
|
2 |
|||||
|
|
|
|
|
||
|
Marathon |
All Mountain |
Dirt Jumper 2 |
Z.1 FR 1 |
888 RC |
|
|
RACE |
3 |
||||
|
|
|
|
|||
|
Marathon SL |
|
Dirt Jumper 3 |
Z.1 FR 2 |
888 R |
|
|
Marathon XC |
|
D-Street Comp |
Z.1 FR 3 |
888 VF |
|
|
|
24” |
||||
|
|
|
|
|
||
|
MX Comp |
|
D-Street 24” |
|
Drop-Off Triple |
|
|
MX Pro |
|
Shiver SC |
|
Junior T |
|
|
MZ Comp |
|
|
|
Monster T |
|
|
MZ Race |
|
|
|
Shiver DC |
|
WARNING |
|
WARNING |
|
USE ONLY FOR: |
|
USE ONLY FOR: |
||
• CROSS COUNTRY |
|
• CROSS COUNTRY |
||
• ALL MOUNTAIN |
|
• ALL MOUNTAIN |
||
DO NOT USE FOR: |
|
• FREERIDE |
||
|
• DIRT JUMPER |
|||
|
|
|
|
|
• FREERIDE |
||||
• DIRT JUMPER |
|
DO NOT USE FOR: |
||
• FREERIDE EXTREME |
|
• FREERIDE EXTREME |
||
• DOWNHILL |
|
• DOWNHILL |
||
Improper use of this fork |
|
Improper use of this fork |
||
can result in fork failure |
|
can result in fork failure |
||
and personal injury |
|
and personal injury |
||
FOR MORE DETAILS SEE |
|
FOR MORE DETAILS SEE |
||
OWNERS MANUAL OR |
|
OWNERS MANUAL OR |
||
WWW.MARZOCCHI.COM |
|
WWW.MARZOCCHI.COM |
||
MZ0024
3. Do Not Misuse or Abuse Your Forks
Do not misuse or abuse your forks. Learn how to ride, and always ride within your abilities. An out-of-control ride puts the equivalent of years of hard use on your forks after only a few rides.
Learn how to properly flow around obstacles on the trail. Hitting obstacles such as rocks, trees or holes straight on puts forces on your fork it was not designed to absorb.
Landing improperly after a jump or drop also puts forces on your fork it was not designed to absorb. You should only perform jumps or drops when a transition or down ramp is available to help your bicycle absorb the impact forces generated during the landing, and both wheels should smoothly make contact with the transition or down ramp at the same time. Any other type of landing is dangerous, as it could result in a component part failure and an accident. The steepness and length of the transition or down ramp depends on the height from which you jump or drop. Every situation is different for every rider; consult with an experienced rider before attempting any jump or drop.
WARNING! |
|
|
Failure to properly flow around obstacles on |
11 |
|
the trail, or failure to properly land after a |
||
|
||
jump or drop could cause your forks to fail, |
|
|
resulting in a loss of bicycle control and |
|
|
serious injury or death to the rider. |
|
WARNING!
Your forks require regular maintenance and repair. The harder you ride, the more often you must inspect and maintain your forks. If your forks are leaking, bent, deformed, cracked, or chipped, no matter how slight, immediately have a Certified Marzocchi Repair Center inspect the forks before you ride again.
REMEMBER
Even forks made out of solid metal will fail if they are misused, abused, or improperly used! Extreme use can eventually wear out and break even the strongest components.
“Ride fast, yet ride Smart”
MZ0024

Use and maintenane instruction manual
EngliItlanosh
49
MZ024

English
I
96
Contents
CONTENTS |
|
|
11 |
regulationsIntroduction........................................-general safety |
98 |
1.1 |
Conventions..................................... |
98 |
1.1.1 Orientation of the fork ................. |
98 |
|
1.1.2 Editorial pictograms.................... |
98 |
|
22 |
Technical information ...................... |
99 |
2.1 |
Spring systems ............................... |
99 |
2.2 |
Damping system............................ |
100 |
2.3 |
Lubrication and cooling.................. |
102 |
2.4 |
Sliding bushing and oil seals ......... |
102 |
33 |
Installation ...................................... |
103 |
3.1 |
Installing on the frame ................... |
103 |
3.2 |
Installing the brake system ............. |
104 |
3.3 |
Wheel Installation .......................... |
105 |
3.4 |
Wheel axle securing system.......... |
105 |
3.4.1Wheel installation on a
standard fork’s end ................... |
106 |
3.4.2Wheel installation on ø 32 mm
forks with ø 20 mm through |
|
hole axle .................................. |
106 |
3.4.3 Wheel installation on 66 |
|
and 888 series forks ................. |
107 |
3.4.4Wheel installation on Shiver
series forks .............................. |
108 |
3.4.5Wheel installation on Monster
|
series forks ............................... |
109 |
3.5 |
Fender Installing ............................ |
110 |
3.6 |
Handlebar clamp installing............. |
110 |
3.6.1Handlebar clamp installing on all dual crown models except the
888 series ................................. |
110 |
3.6.2Handlebar clamp installing
on 888 series............................ |
111 |
44 Maintenance ................................... |
112 |
4.1Problems - Diagnosis - Solutions .. 112
4.2General maintenance
|
recommendations .......................... |
114 |
4.3 |
Cleaning the fork legs.................... |
115 |
4.4 |
Monster T air bleeding................... |
115 |
5 |
Adjustments.................................... |
116 |
5.1 |
Adjustment kit and springs............. |
116 |
5.2 |
Spring preload................................ |
116 |
5.3 |
Positive Air ..................................... |
116 |
|
SAG ............................................... |
117 |
5.4 |
Negative air.................................... |
118 |
5.5PAR – Air progression at travel
|
end ................................................. |
118 |
5.6 |
Rebound adjustment...................... |
118 |
5.7 |
Compression adjustment ............... |
118 |
5.8 |
ETA (Extension Travel Adjust) ....... |
118 |
5.9 |
TAS (Travel Adjustment System) ... |
119 |
5.10 |
TST (Terrain Selection Tecnology). 119 |
|
66 |
Summarizing tables........................ |
121 |
77 |
Warranty .......................................... |
140 |
|
Marzocchi distributors and service |
|
|
centers.............................................. |
281 |
MZ024

TABLE INDEX |
|
Table 2.1: Spring systems ............................ |
99 |
Table 2.2: Damping systems ..................... |
100 |
Table 3.1: Steer tube maximum length |
|
between crowns........................ |
103 |
Table 3.2: Brake system settings .............. |
104 |
Table 3.3: Maximum wheel dimension ...... |
105 |
Table 4.1: Problems - Diagnosis - |
|
Solutions.................................... |
112 |
Table 4.2: Periodic maintenance table ...... |
113 |
Table 5.1: TST control positions table ....... |
119 |
Table 5.2: Forks adjustments .................... |
120 |
Table 6.1: Summarizing tables reading. .... |
121 |
Table 6.2: Mx Series.................................. |
122 |
Table 6.3: Marathon Series ....................... |
124 |
Table 6.4: All Mountain Series................... |
126 |
Table 6.5: Dirt Jumper Series.................... |
130 |
Table 6.6: D-Street 24”” ............................. |
131 |
Table 6.7: Z1 FR Series ............................ |
132 |
Table 6.8: 66 Series .................................. |
135 |
Table 6.9: 888 Series ................................ |
136 |
Table 6.10: Junior T................................... |
137 |
Table 6.11: Moster T.................................. |
137 |
Table 6.12: Shiver SC ............................... |
138 |
Table 6.13: Shiver DC ............................... |
138 |
Table 6.14: Tightening torques .................. |
139 |
Table index
English
I
97
MZ024
Introduction-general safety regulations
|
INTRODUCTION-GENERAL |
|
11 |
This manual does not explain how to assemble/ |
|
|
SAFETY REGULATIONS |
disassemble the fork from the bicycle, the |
If you have any questions regarding the care, |
wheel, the steering set or any other component |
|
directly or indirectly associated with the fork that |
||
maintenance or use of your suspension system, |
are not actually a part of the fork. |
|
please contact your nearest service center |
MARZOCCHI reserves the right, in its sole |
|
directly. A list of service centers can be found at |
discretion, to make changes to the products, at |
|
the end of this manual or on the Internet page |
any time and without prior notice. |
|
www.marzocchi.com. |
|
|
English
1
98
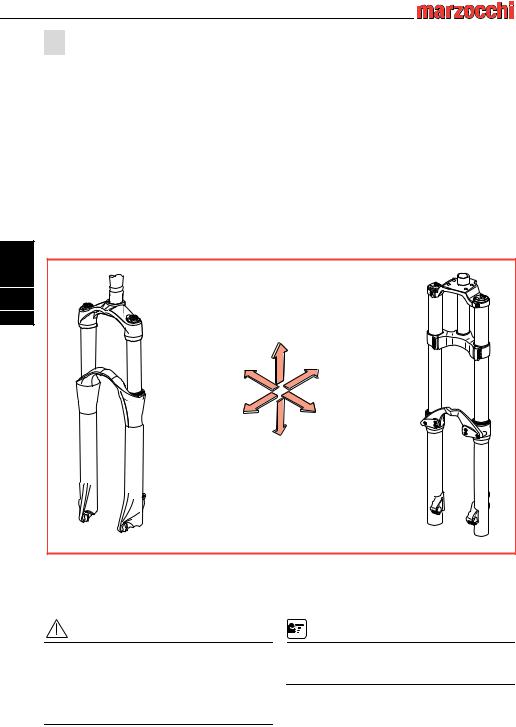
1.1 Conventions
1.1.1 Orientation of the fork
|
TOP |
RIGHT |
BACK |
FRONT |
LEFT |
|
|
|
BOTTOM |
MZ024001
Picture 1 - Conventional orientation of the fork
1.1.2 Editorial pictograms
WARNING! |
NOTE |
Descriptions preceded by this symbol contain information, instructions or procedures, which, if not followed can result in damage or malfunction of the fork, damage to the environment, an accident, personal injury or death.
Descriptions preceded by this symbol contain information, or procedures recommended by MARZOCCHI for optimum use of the fork.
MZ024