


Chapter 5
9.Now that we have the current chat room sitting as a state on all of our calls to the chat Hub, we can also implement a way of logging out of a chat room when we're joining one. To do this, make the Join method look as follows:
We basically just add a Remove word to the Groups property with the current chat room.
Summary
From time to time there are bits of information that one could centralize, and not have to pass along on all function and method calls. As shown in this chapter, the current chat room is a good example of such a state. You should now be able to add a state that roundtrips from the server to the client and gives you back the opportunity to simplify your own code.
[ 57 ]
www.it-ebooks.info
www.it-ebooks.info

Security
This chapter will cover how you can secure your SignalR connections, require the user to be authenticated with specific roles for calls coming from the client, and also how you can communicate this back to the client in a graceful manner.
The topics covered in this chapter are:
•How to require authenticated users for your connection to accept connections
•How to require a specific role for your connection to accept incoming messages
At this stage the developer should be familiar with securing their SignalR connections.
Becoming private
Security is something all applications need to have a relationship with, in one way or the other. Take a chat like the one we're building for instance, you might want to have private chat rooms or want the entire chat to be private. You might have operations that are only allowed by users with a certain role. Luckily, SignalR has out of the box support for the most common scenarios, and is very extensible if you have more complex scenarios. This chapter will take you through enabling Forms authentication, a common scenario for applications. You could use Windows authentication and others as well, but for our application we're using Forms.
www.it-ebooks.info
Security
First of all, since our web application is built from HTML files, and not ASPX or ASP.NET MVC controllers, we need to be able to have security kick in for these as well, so that we get redirected to a login page when not authenticated. There are a couple of approaches one can choose from to make the security pipeline of ASP.NET kick in for static files such as HTML files. One could be to enable all HTTP modules to run for all requests, but that would mean a potential performance hit for static content. So instead, we're going to tell ASP.NET to deal with the .html and .htm files specifically:
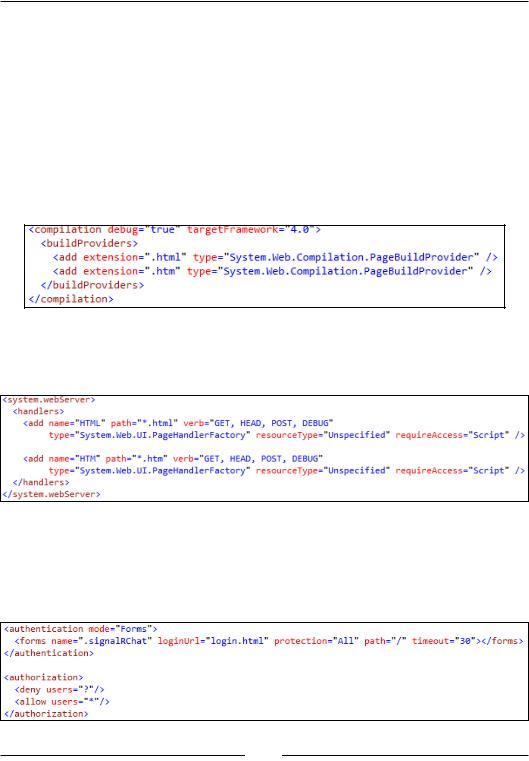
1.We will need to make a few changes to the Web.config file sitting in the web project to accomplish this. In the <compilation> tag sitting at the top, we need to add the page build providers for the extensions we want to support:
2.At the bottom right before the <runtime> tag, we will be adding a web server section, which is specific to IIS7 and higher, for configuring pretty much the same as we did for compilation:
3.Then, inside the <system.web> tag again, right below the <compilation> tag, we will be adding our security. First we set the authentication to Forms and add a form for our application with some attributes configuring its behavior. We also need to add in an <authorization> tag denying all anonymous users but allowing any logged in users:
[ 60 ]
www.it-ebooks.info
Chapter 6
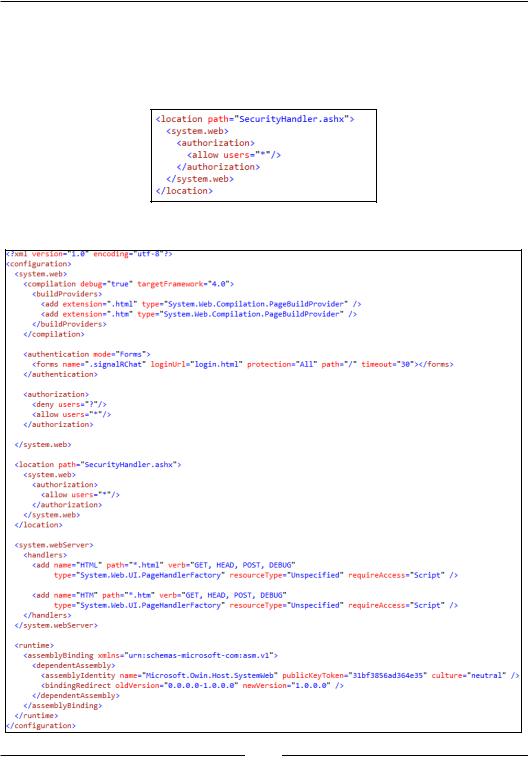
4.To be able to log in from the login page that we will be creating, we will need an HTTP handler for authenticating and giving us the authentication cookie for any subsequent requests. We'll create the handler shortly. But for now, let's just configure it to allow requests even if we're not logged in. Add the following code snippet right before the <system.webserver> tag in web.config:
Your web.config file should now look as follows:
[ 61 ]
www.it-ebooks.info
Security
5.Let's add the security handler that we just configured. Right-click on the web project and navigate to Add | New item. Select Web and then select Generic Handler. Give it the name SecurityHandler.ashx:
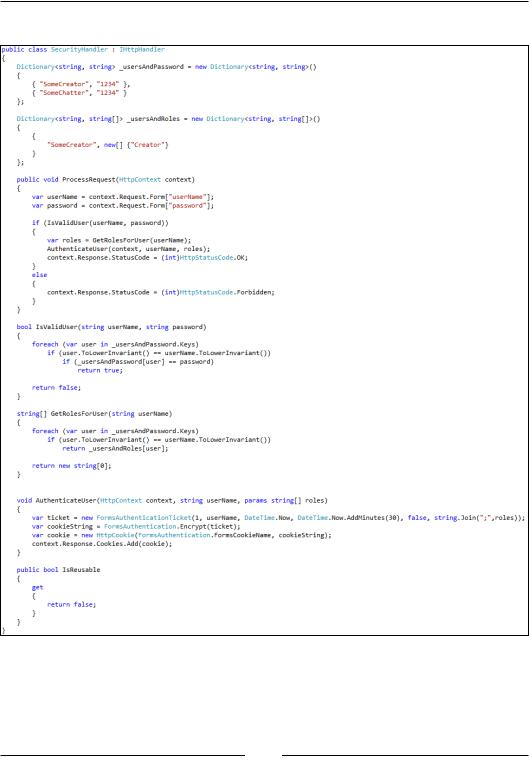
6.We will, for simplicity, just be hardcoding our users, passwords, and roles. At the top of the SecurityHandler.ashx file, add the following code snippet:
7.Let's add the simple authentication methods for dealing with the users. The authentication will result in a FormsAuthentication cookie that we generate in the AuthenticateUser method that follows. The cookie will hold the username and all the roles for the user:
[ 62 ]
www.it-ebooks.info

Chapter 6
8.The handler will need an implementation in ProcessRequest() that deals with the incoming authentication. Again, for simplicity, we will be using clear text passwords sitting inside an HTTP form. Of course, it's recommended that you do something a bit more involved than this, especially if you're not using SSL to secure your connection.
[ 63 ]
www.it-ebooks.info
Security
The entire SecurityHandler class should look as follows:
[ 64 ]
www.it-ebooks.info
Chapter 6
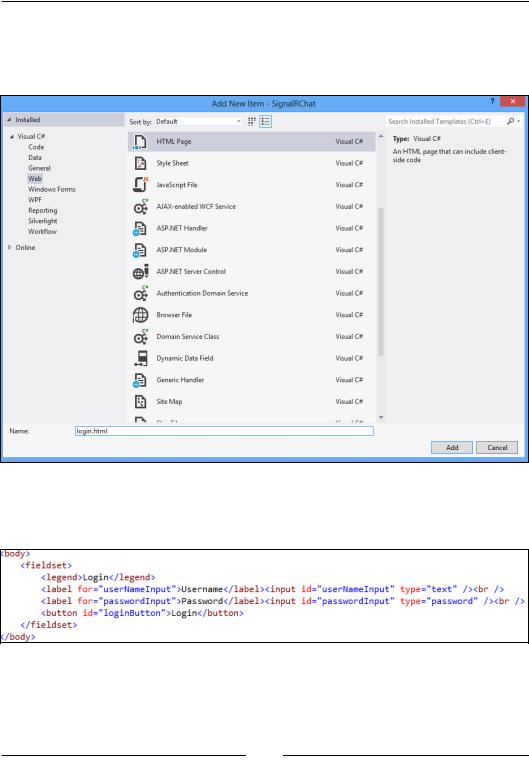
9.Now we will need a page to log us in; the page we configured in web.config as the redirect URL when users try to access the site. Right-click on the web project, navigate to Add | New Item, select Web, and then select HTML Page. Name the page login.html:
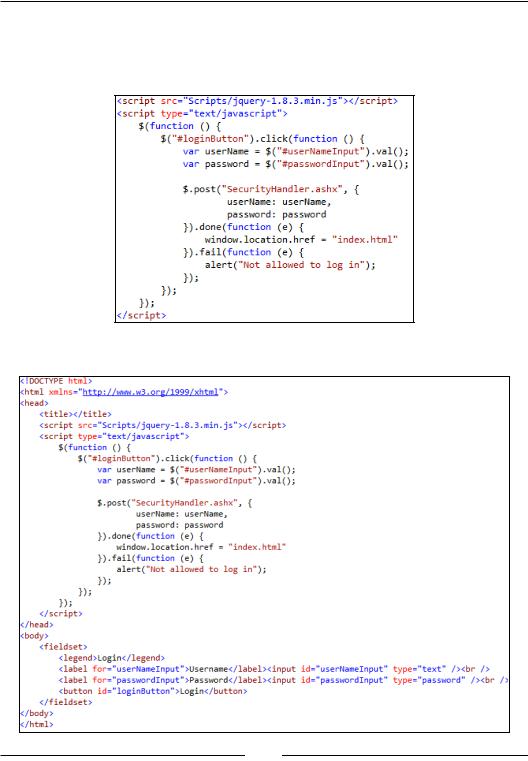
10.In the page we will add a fieldset inside the body holding the input for authentication. This could also have been a form pointing directly to the SecurityHandler class, but we will be doing this programmatically instead:
[ 65 ]
www.it-ebooks.info
Security
11.Then we add the following scripts inside the <head> element in the login. html file. The script basically hooks up the Login button's click event, and makes a post using jQuery to the SecurityHandler. If it's successful, we redirect to the index.html page; if not, we show an alert message:
The entire login.html should look as follows:
[ 66 ]
www.it-ebooks.info
Chapter 6
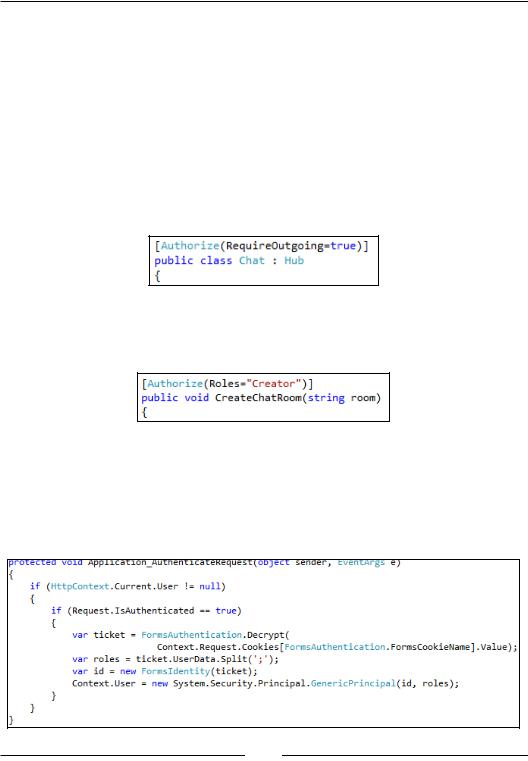
12.Running the chat should now lead you to the login page and you will not be able to get to the index.html page. The hub is now protected as well; so going directly to the URL won't get you there. But we will be explicitly securing the hub. SignalR comes with an attribute called Authorize(), similar to the one you find in ASP.NET MVC and so on. There are other mechanisms for securing hubs, but we won't go into that in this book.
The Authorize() attribute can be used for both hubs and methods on a hub. It has a couple of options that can be passed to it, such as Users and Roles holding comma delimited required users and/or roles. But it also has a property called RequireOutgoing that tells SignalR what direction it should be securing. By default it is only incoming, but by setting it to true it will also be outgoing. We will set it to true, so that we secure both directions:
13.In addition to requiring authenticated users for the hub, we will be adding a specific role requirement for the CreateChatRoom() method that sits on the hub:
14.Now, the final piece of the puzzle; SignalR uses the underlying credential information found on threads in .NET. This means we will have to set this information on the current thread based on the cookie generated by the security handler. Open the Global.asax.cs file and add the following method to that class. This will get the cookie, decrypt it, and put the identity and roles into the HttpContext class found in System.Web:
[ 67 ]
www.it-ebooks.info
Security
15.Running the web app should now lead you straight to the login.html page. Log in as one of the users, such as SomeCreator and its password 1234, and on logging in you should be redirected to index.html where you can do everything you could before. Verify that everything is working by closing the browser and logging in as SomeChatter and try to create a new chat room; a new room should not appear.
Now, our .NET client won't be able to do anything at this stage, in fact, the application will just crash. So we need to authenticate from this application as well. Since we don't have any fancy user interface, we will be hardcoding it in this application, but it will at least show us how it's done.
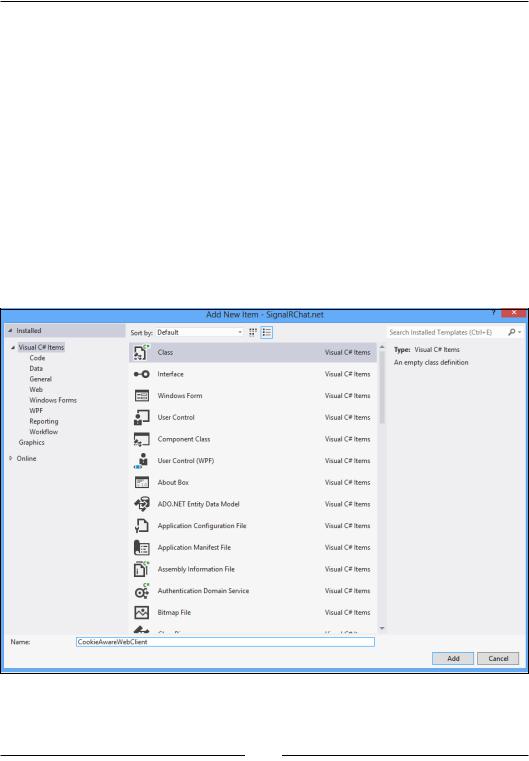
Since our authentication is using a cookie, we will need the cookie in all of our SignalR requests from this client as well. There are a few ways we could do that, but the simplest is probably to implement a specialized WebClient that gets the cookie container. Right-click on the SignalRChat. net project, navigate to Add | New Item, and then select Class. Name it
CookieAwareWebClient.cs:
[ 68 ]
www.it-ebooks.info

Chapter 6
16.The web client will expose a CookieContainer class that will hold the cookies for any requests going through this WebClient class. In order to access the cookies, we override the GetWebRequest() method so we can intercept it and add our CookieContainer as the recipient of any cookies received during the request:
17.The next step is to take the variable Site that sits at the top of the Main() method inside the Program.cs file and make it a constant at the top of that class:
18.In the Program.cs class we will now add an Authenticate() method that will perform the authentication against the server and return the cookies. The method will simulate what a browser does when posting a form. So we will create a name-value collection that holds our username and password and upload it, which will result in the client receiving the cookies:
[ 69 ]
www.it-ebooks.info