

Beginning Visual Basic 2005 (2006)
.pdfChapter 13
Exercise
Add a property to the MyNamespace control called SuppressMsgBox, which contains a Boolean value. Add code to the Click event handlers for each of the buttons on this control to show the message box when the SuppressMsgBox property is False and to suppress the message box when this property is
True.
426

14
Programming Custom
Graphics
So far in this book, you have built user interfaces entirely from existing controls. When you are writing programs with Visual Basic 2005, you also have the freedom to draw your own user interface. This gives you absolute freedom over the look and feel of your programs, and makes certain programming tasks possible.
In this chapter, you are going to look at the graphics and drawing functionality available in Visual Basic 2005. You will be introduced to the concepts by building a fairly complex drawing program, just to illustrate how simple drawing your own user interface actually is. Toward the end of the chapter, you will examine some of the multimedia features of Visual Basic 2005 and learn how you can display common Internet file formats such as .gif, .jpg, and .png.
In this chapter, you will:
Learn about the System.Drawing namespace
Use pens and brushes
Learn how to select and use colors
Size and stretch images
Create your own Paint program
Building a Simple Paint Program
You are going to create a simple Paint program by creating a new Windows application project and build some user controls that you will wire up to provide functionality for the application.

Chapter 14
Creating a Project with User Controls
Your motivation for building user controls for this application is simple: It’s good practice to break the application down into components. By following this technique, if you want to pull your paint functionality out of this application and into another, you can do it relatively easily.
What you are doing here with your controls is taking over the responsibility for painting them. Whenever you do this, you are creating owner drawings. Therefore, the controls you build are known as owner-draw user controls.
Try It Out |
Creating the Project |
1.Create a new Visual Basic Windows Application project in the usual way. Call it WroxPaint.
2.In the Solution Explorer, right-click the WroxPaint project and select Add User Control. Set the name to PaintCanvas.vb and click Add.
3.Make sure the Form Designer for PaintCanvas is showing. Click the background of the control, and from the Properties window, change the BackColor property to White. (To do this, use the BackColor property’s drop-down list, change to the Custom tab, and click the white box in the top-left corner.)
4.Before you can use the control you need to build the project. From the menu select Build Build WroxPaint. This will create the new PaintCanvas control and let you use it.
5.Now, go back to the Forms Designer for Form1. Click the Toolbox; then click the WroxPaint Components tab and select the new PaintCanvas control and drag it onto your form. Set the Dock property of the PaintCanvas control to Fill.
6.For the sake of neatness change the Text property of the form to WroxPaint.
How Drawing Programs Work
Your computer screen is made up of pixels — hundreds of thousands of them. They are very small, but when working together they make a display on the screen. Since pixels on any given display are always of a uniform size, they are the common unit of measurement used in computer graphics.
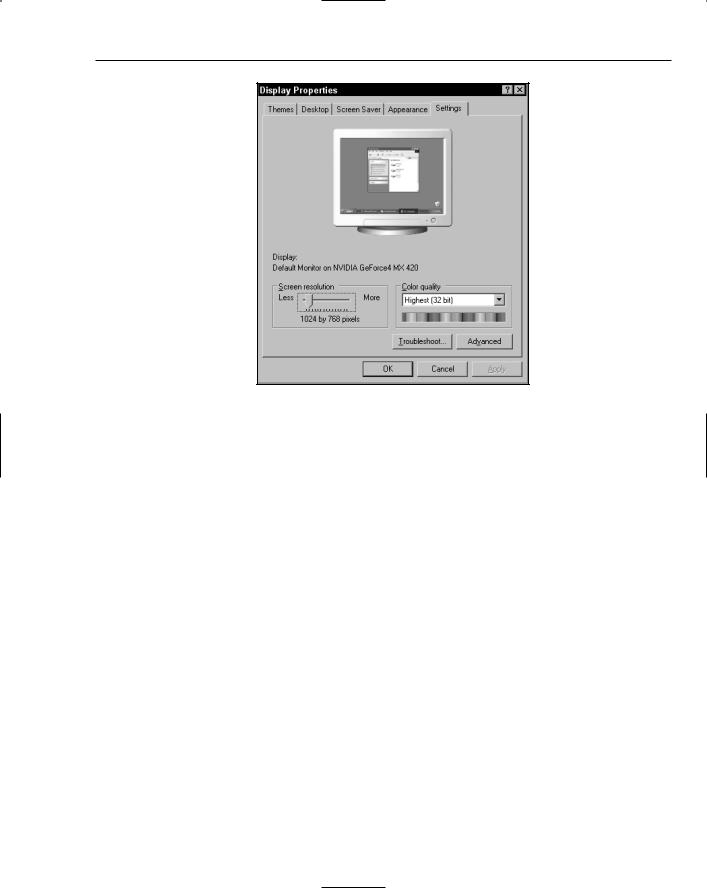
To find out how big your desktop is, minimize all your windows and right-click your Windows desktop. Select Properties and change to the Settings tab. The slider in the bottom-left corner controls the size of your desktop — or, rather, it controls the number of pixels on your display. In Figure 14-1, you can see that the screen is set to 1,024 pixels across and 768 pixels down.
There are two very common computer graphics techniques: raster and vector. It is very useful to understand the difference between the two.
Raster Graphics
Raster graphics work a little like a physical canvas: You have a space, and you fill it up with color using various tools like brushes and pens. In a raster graphics program, the space is divided up into pixels. Each pixel has a color, and it’s the drawing program’s responsibility to set the color of each one depending on what kind of drawing tool you’re using and the position and movement of the mouse.
428
Programming Custom Graphics
Figure 14-1
The graphics program stores the image that you’ve drawn as a bitmap, this being a description of the pixels that make up the image and the color of each. A bitmap is basically a two-dimensional array of pixels. Each element in the array, accessed through a pair of (x, y) coordinates, stores a color value.
The name “bitmap” comes from the days when computer displays were monochrome, so each pixel could be only black or white and therefore could be stored in a single bit.
If you draw a rectangle in a raster graphics package, that rectangle is abstracted to a set of pixels on the bitmap. After it’s been drawn, you can’t change the rectangle at all, other than using other tools to draw over it or draw another one.
.jpg, .gif, and .png images use a variation of the bitmap format to save images. However, they are compressed in particular ways to save space and download time when used in Web pages.
Vector Graphics
Vector graphics packages work in a different way. When you draw a rectangle onto the canvas, they physically record the fact that a rectangle exists at a given location. Vector graphics packages store a blueprint of how to draw the image, rather than storing the image that’s been drawn. They do not abstract the rectangle down to a set of pixels. What this means is that you can pick it up again and move it, or change its shape or color later on, because the package has an understanding of what it is.
A number of modern graphics packages offer a hybrid approach to this, combining raster graphics with vector graphics.
429

Chapter 14
Even in a vector graphics program, the screen itself works in pixels and is a raster format. Therefore, for the program to be able to display the drawing, the picture recorded by the package has to be converted into a raster format for the display. This process is known as rendering.
Your paint package is going to be a vector-based drawing package, for no other reason than it makes it easier to understand how drawing works in the .NET Framework. You’re going to build a set of objects that represent certain shapes — namely, circles and squares — and hold them in a list.
The GraphicsItem Class
In your application, you’re going to have two basic drawing types: circle and square. Each drawing type will need to have an understanding of where it appears on the canvas (and ultimately, the screen), what its color is, and whether it is filled. You’ll build a base class called GraphicsItem, from which you’ll derive GraphicsCircle.
Try It Out |
Building GraphicsItem and GraphicsCircle |
1.Create a new class by right-clicking WroxPaint in the Solution Explorer and selecting Add Class. Name the class GraphicsItem.vb and click Add.
2.Add this code to GraphicsItem. Remember to add the MustInherit keyword to the first line (that’s why we highlighted it). The MustInherit keyword tells Visual Basic 2005 that you cannot create instances of GraphicsItem directly. Instead, you have to create classes that inherit from it.
Public MustInherit Class GraphicsItem
‘Public members
Public Color As Color
Public IsFilled As Boolean
Public Rectangle As Rectangle
‘Public methods
Public MustOverride Sub Draw(ByVal graphics As Graphics)
‘Add an item at the given point
Public Sub SetPoint(ByVal x As Integer, ByVal y As Integer, _ ByVal graphicSize As Integer, ByVal graphicColor As Color, _ ByVal graphicIsFilled As Boolean)
‘Set the rectangle depending on the graphic and the size
Rectangle = New Rectangle(x - (graphicSize / 2), y - (graphicSize / 2), _ graphicSize, graphicSize)
‘Set the Color and IsFilled members Color = graphicColor
IsFilled = graphicIsFilled End Sub
End Class
430

Programming Custom Graphics
3.Create another class named GraphicsCircle.vb. Add the following highlighted code. After you type Inherits GraphicsItem and press Enter, an empty Draw procedure will be added to your class, and you can add the code shown here to it.
Public Class GraphicsCircle
Inherits GraphicsItem
Public Overrides Sub Draw(ByVal graphics As System.Drawing.Graphics)
‘Create a new pen
Dim objSolidBrush As New SolidBrush(Me.Color)
‘Draw the circle graphics.FillEllipse(objSolidBrush, Me.Rectangle)
End Sub End Class
How It Works
When you created the GraphicsItem class, you added the MustInherit keyword to the Class declaration. This instructs Visual Basic 2005 not to let users create instances of this class but to force them to inherit this class.
When you created the Draw method in this class, you used the MustOverride keyword. This has a similar meaning to MustInherit — you use it to force derived classes to add their own implementation for a particular method without providing any implementation in the base class. The MustOverride keyword can be used only in MustInherit classes.
The SetPoint method is used to populate an object depending on the position of the mouse and the current graphic size and color. The first thing you need to do in this method is to set up the rectangle.
When you want to draw a circle, you provide the center point, whereas .NET expects the position of the top left corner of the rectangle that encloses the circle. Therefore, the top left corner of the rectangle must be adjusted up and left depending on the size provided through graphicSize parameter. You pass the top left corner through as the first and second parameters to the rectangle’s constructor. The third parameter supplied is the width, and the fourth provides the height.
After you have the parameter, you need to store the color and also a flag that indicates whether the circle is filled.
Public MustInherit Class GraphicsItem
‘Public members
Public Color As Color
Public IsFilled As Boolean
Public Rectangle As Rectangle
‘Public methods
Public MustOverride Sub Draw(ByVal graphics As Graphics)
‘Add an item at the given point
Public Sub SetPoint(ByVal x As Integer, ByVal y As Integer, _ ByVal graphicSize As Integer, ByVal graphicColor As Color, _ ByVal graphicIsFilled As Boolean)
431

Chapter 14
‘Set the rectangle depending on the graphic and the size
Rectangle = New Rectangle(x - (graphicSize / 2), y - (graphicSize / 2), _ graphicSize, graphicSize)
‘Set the Color and IsFilled members Color = graphicColor
IsFilled = graphicIsFilled End Sub
End Class
When you created the GraphicsCircle class, you inherited the GraphicsItem class. Once you typed the Inherits GraphicsItem statement and pressed Enter, Visual Studio 2005 automatically added an empty Draw method, and all you had to do was add your own code to this method.
Painting is usually a matter of calling some simple methods on the Graphics object. This method draws and fills an ellipse (or circle, depending on which parameters you provide). Note that there’s a similar method called DrawEllipse, which doesn’t fill in the ellipse after it’s drawn.
You’ll also notice that at the top of the method you created a new SolidBrush object. You then pass this brush through to the FillEllipse method. This SolidBrush object, as you have probably guessed, describes the kind of brush you want to use.
Public Class GraphicsCircle
Inherits GraphicsItem
Public Overrides Sub Draw(ByVal graphics As System.Drawing.Graphics) ‘Create a new pen
Dim objSolidBrush As New SolidBrush(Me.Color)
‘Draw the circle graphics.FillEllipse(objSolidBrush, Me.Rectangle)
End Sub End Class
Screen and Client Coordinates
When you get into the world of building your own painting code for your user interface, you usually have to work a lot with the mouse. We have already mentioned that in Windows and the .NET Framework, the base currency of drawing is the pixel. This means that when you ask the mouse for its position (for example, when verifying that the user has moved the mouse across your control or clicked one of the buttons), you get back a set of coordinates given in pixels. If the user clicks the mouse in the very top left pixel, you’ll get back coordinates of (0, 0). If you’re using a 1024x768 display and the user clicks in the very bottom right pixel, you’ll get back coordinates of (1024, 768).
Although this seems straightforward, there is a wrinkle. When you click inside a window, the coordinates are adjusted depending on where the window itself is on the screen.
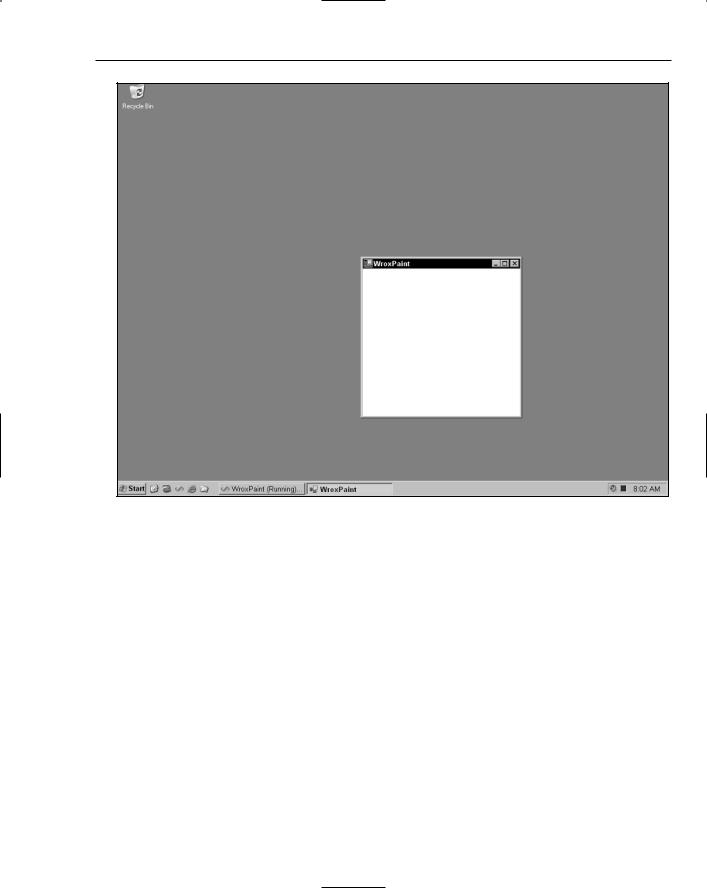
In Figure 14-2, the WroxPaint program is shown towards the bottom right corner of the screen. This display is configured at 1024 pixels across and 786 pixels down, which means that the top left corner of WroxPaint itself is at approximately (500, 300), according to the screen.
432
Programming Custom Graphics
Figure 14-2
However, every window has a client area, which is the area the programmer can use to report the program’s output. This client area is exclusive of the window border, the caption, menu, scrollbars, and the toolbar. When you are drawing onto the control or form, you are always dealing with this client area. The coordinates you use when drawing are adjusted so that the position of the window itself on the screen becomes irrelevant. These coordinates are known as client coordinates.
If you click the top-left corner of the WroxPaint paint area (the white part), there are actually two different coordinates that you can get:
The first one will be around (510, 330), a little in and down from the top-left corner of the window. These are the screen coordinates, also known as the absolute position.
The second pair will be around (0, 0), and these are the adjusted client coordinates. If you click the same graphic in the client, you will get (0, 0) irrespective of where the window is positioned on the screen. This is sometimes known as relative position.
433

Chapter 14
Listening to the Mouse and Drawing GraphicsCircle Objects
For your graphics application to work, you’ll monitor what the user is doing with the mouse, create new objects derived from GraphicsItem, and store them in a big list. When it is time for you to draw, you’ll go through this list and ask each GraphicsItem in turn to render itself on the screen. You try drawing in the next Try It Out.
Try It Out |
Drawing |
1.In the Solution Explorer, right click the PaintCanvas control and select View Code. Add these enumerations to the class as highlighted. The first will be used to store the current graphics mode/tool, while the second stores the size of the pen used for drawing:
Public Class PaintCanvas
‘Public enumerations
Public Enum GraphicTools As Integer CirclePen = 0
End Enum
Public Enum GraphicSizes As Integer
Small = 4
Medium = 10
Large = 20
End Enum
End Class
2.Next, add these members to this class:
‘Public members
Public GraphicsItems As New ArrayList()
Public GraphicTool As GraphicTools = GraphicTools.CirclePen Public GraphicSize As GraphicSizes = GraphicSizes.Medium Public GraphicColor As Color = Color.Black
Here is what each member will do. Notice that you define a default value for these members to make initialization of the application easier:
GraphicItems will hold a list of the GraphicsItem objects that make up the drawing.
GraphicsTool will keep track of which graphic tool is currently being used.
GraphicsSize will keep track of how big you want each graphic to be.
GraphicsColor will keep track of the color of the item that you want to draw.
3.Drawing the items on the page is a two-phase process. When the user moves the mouse around on the control, you want to create new GraphicsCircle objects and add them to the Graphics Items list. At some point, Windows will ask you to paint the control, so you’ll need to go through the GraphicsItems list and draw each one in turn. Add this method to PaintCanvas:
Private Sub DoMousePaint(ByVal e As MouseEventArgs) ‘Store the new item somewhere
Dim objGraphicsItem As GraphicsItem
434

Programming Custom Graphics
‘What tool are you using? Select Case GraphicTool
‘CirclePen
Case GraphicTools.CirclePen
‘Create a new graphics circle
Dim objGraphicsCircle As New GraphicsCircle()
‘Set the point for drawing objGraphicsCircle.SetPoint(e.X, e.Y, GraphicSize, _
GraphicColor, True)
‘Store this for addition objGraphicsItem = objGraphicsCircle
End Select
‘Were you given an item?
If objGraphicsItem IsNot Nothing Then
‘Add it to the list GraphicsItems.Add(objGraphicsItem)
‘Invalidate the control Me.Invalidate()
End If
End Sub
4.In the Class Name combo at the top of the Code Editor, select (PaintCanvas Events) and in the Method Name combo box select the MouseDown event. Add the following highlighted code to the new event handler:
Private Sub PaintCanvas_MouseDown(ByVal sender As Object, _
ByVal e As System.Windows.Forms.MouseEventArgs) Handles Me.MouseDown
‘Is the left mouse button down?
If e.Button = MouseButtons.Left Then
DoMousePaint(e)
End If
End Sub
5.Now select (PaintCanvas Events) in the Class Name combo box and the MouseMove event in the Method Name combo box. Add the following highlighted code to the MouseMove event handler:
Private Sub PaintCanvas_MouseMove(ByVal sender As Object, _
ByVal e As System.Windows.Forms.MouseEventArgs) Handles Me.MouseMove
‘Is the left mouse button down?
If e.Button = MouseButtons.Left Then
DoMousePaint(e)
End If
End Sub
435