

Beginning JavaScript With DOM Scripting And Ajax - From Novice To Professional (2006)
.pdf426 |
C H A P T E R 1 1 ■ U S I N G T H I R D - P A R T Y J A V A S C R I P T |
jqueryTestAjax.js (continued)
code=code.replace( /&/mg, '&' ); code=code.replace( /</mg, '<' ); code=code.replace( />/mg, '>' ); code=code.replace( /\"/mg, '"' ); code=code.replace( /\r?\n/g, '<br>' ); code=code.replace( /<br><br>/g, '<br>' ); code=code.replace( / /g, ' ' ); o.nextSibling.innerHTML = '<code>'+code+'</code>'; o.nextSibling.hascode = true;
You then use regular expressions to replace all ampersands, tag brackets, and quotation marks with their numbered HTML entities, line breaks with <br>, and spaces with their HTML entity before adding the result inside a CODE element as the innerHTML property of the PRE element. You set the hascode property to true to ensure that the next time the user clicks the link to show the code, the $.get() construct is skipped.
jqueryTestAjax.js (continued)
}
);
}
$(o.nextSibling).show();
}
}
)
All that is left to do is to show the PRE element using jQuery’s show() method. Notice that you need to do that outside the $.get() construct to make sure the code gets shown the second and consecutive times the user chooses to show the code.
Dangers of jQuery and Other Libraries Using Their Own Syntax
It is amazing how many day-to-day web application and web development tasks you can fulfill easily and quickly with jQuery. However, if you were to hand this document over to a thirdparty developer for maintenance, she’d have to know about jQuery or she would be completely lost. This is one of the dangers of using libraries. Instead of relying on JavaScript syntax and rules, you add an extra layer of necessary knowledge to the process. It is up to you to decide whether the benefits the library offers are worth that.
The other issue is that a lot of code library examples are not unobtrusive, but were made to show what the library can do. It is very tempting to expect JavaScript to be available when using and explaining libraries. Make sure you don’t make this mistake. Libraries are there to make

C H A P T E R 1 1 ■ U S I N G T H I R D - P A R T Y J A V A S C R I P T |
427 |
the development process quicker and easier, not make us dependent on them or repeat mistakes we’ve done with libraries in the past already—creating applications and web sites that don’t work without JavaScript.
Next we’ll look at using the Google Maps API to create mapping applications.
Using an API: Adding a Map to Your Site with Google Maps
Google Maps (http://maps.google.com) is probably the web application that got the whole Ajax craze rolling. It provides the user with maps that can be moved around, zoomed, and—the implementation permitting—even annotated. You can show the location you want to see as maps, as satellite pictures, or as a mixture of both.
Google allows web developers to use Google Maps on their own web sites by means of an API. In order to use the API, you need to sign up for a free developer key at its homepage: http://www.google.com/apis/maps/. Here you will also find the documentation and many examples of how to use Google maps. The key will enable you to use maps on a single domain or subfolder in this domain. The examples in this chapter use a key that works with localhost, which means you need to run them in your local server via http://localhost/ and not from the file system.
Once you have obtained the developer key, you can link to the JavaScript that contains all the map’s code in the head of your document. The “your key” in bold should be replaced with the key you obtained from Google—if you try the example code on a different server than localhost, you will have to change the key in the example files.
<script src="http://maps.google.com/maps?file=api_ &v=2&key=your key" type="text/javascript"> </script>
■Caution This URL might change in the future, so be sure to check the API homepage should your examples fail to work out all of a sudden. The part that is likely to change is the v parameter in the URL, which is the version of the API.
The next step you need to take is to get the latitude and longitude value of the location you want to display. If you are in the US, you are in luck, as there is a free service that converts addresses to these values available at http://geocoder.us/. For example, if you want to show the location of Paramount Studios in Hollywood, California, which is located at 5555 Melrose Avenue, you can get the data from http://geocoder.us/demo.cgi?address=5555+Melrose+Ave%2C+Hollywood%2C+CA.

428 C H A P T E R 1 1 ■ U S I N G T H I R D - P A R T Y J A V A S C R I P T
The result is
Address
5555 Melrose Ave
Los Angeles CA 90038 Latitude
34.083517 °
N 34 ° 5' 0.7" Longitude -118.321951 °
W 118 ° 19' 19.0"
An even easier solution is to use the REST APIs at http://www.localsearchmaps.com
(explained at http://emad.fano.us/blog/?p=277) and http://www.zeesource.net/maps/ geocoding.do. The former returns code that is compatible with the Google Maps API (sadly enough at the moment outdated code for the old API, but this might have changed by the time this book comes out), and the latter returns a series of comma-separated lines with the longitude and latitude information—both return worldwide information, not only for the US.
When you have the information, you can start adding your own map to your web site. As an example for an international location, let’s use my street in the north of London, England. The coordinates of my street are 51.5623° latitude and –0.0934° longitude. Using this information and the methods provided for you by the API, it is easy to show a map of my area.
You start with an HTML element to contain the map. You can add content in this element that is displayed when JavaScript is not available or the browser isn’t supported. This content could be any HTML, text, or even a static image of the same map. The latter is a nice option to ensure backwards compatibility; you just need to ensure not to tell the user anywhere in the text that the map is dynamic, because it might not be.
exampleGoogleMaps.html (Excerpt)
<div id="map">
<p>Here you should see an interactive map, but you either have scripting disabled or your browser
is not supported by Google Maps.</p> </div>

C H A P T E R 1 1 ■ U S I N G T H I R D - P A R T Y J A V A S C R I P T |
429 |
Make sure that you give that element dimensions in the CSS, as otherwise the map will behave erratically.
googleMaps.css
#map{
width:400px;
height:300px; border:1px solid #999; margin:1em;
}
To add the map to your HTML document, embed the following script (either inline or in a SCRIPT element) after you add the main Google Maps code as explained earlier.
googleMaps.js
function addMap() {
if ( GBrowserIsCompatible() ) {
var mapContainer = document.getElementById( 'map' ); var map = new GMap2( mapContainer );
var point = new GLatLng( 51.5623, -0.0934 ); map.setCenter( point, 13 );
}
}
window.onload = addMap; window.onunload = GUnload;
The GBrowserIsCompatible() function of the API tests whether the browser can support Google Maps and returns true if that is the case. You call your own function addMap() when the document has finished loading and the function GUnload() provided by the API when the window gets closed (as closing the window triggers the unload event). The latter is necessary because the maps use a lot of event handling, which might slow down MSIE because of its memory-leak issues.
■Tip You can learn more about MSIE’s memory leaking and workarounds at http://javascript. weblogsinc.com/2005/03/07/javascript-memory-leaks/.

430 |
C H A P T E R 1 1 ■ U S I N G T H I R D - P A R T Y J A V A S C R I P T |
You add the map by calling the GMap2() method, which creates a new map object. The method takes the element to insert the map into as the parameter, in this case the element with the ID map. You can add as many maps as you want to a document.
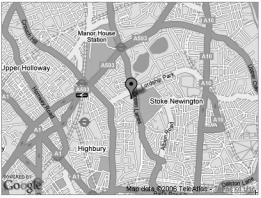
You define a new point with the GLatLng() method that takes the latitude and longitude values as parameters. You then center the map at this point via the setCenter() method, which takes the point to center the map and the zoom level (1 to 17) as parameters. This is all it takes to have an interactive map as shown in Figure 11-2 on your page.
Figure 11-2. A plain map with Google Maps
Without the usual controls shown on http://maps.google.com and other dynamic map web sites (zooming, panning, changing the type of the map), this map could be confusing to users, as nothing indicates that this is an interactive map rather than a static image. Therefore, it makes sense to add the controls using the addControl() method of the API.
googleMapsControls.js
function addMap() {
if ( GBrowserIsCompatible() ) {
var mapcontainer = document.getElementById('map'); var map = new GMap2( mapcontainer ); map.addControl( new GSmallMapControl() ); map.addControl( new GMapTypeControl() ); map.addControl( new GScaleControl() ); map.addControl( new GOverviewMapControl() );
var point = new GLatLng( 51.5623, -0.0934 ); map.setCenter( point, 13 );
}
}
window.onload = addMap; window.onunload = GUnload;
The addControl() method takes an instance of the control’s object as its sole parameter. This example adds a GSmallMapControl(), which consists of the arrows that pan the map
C H A P T E R 1 1 ■ U S I N G T H I R D - P A R T Y J A V A S C R I P T |
431 |
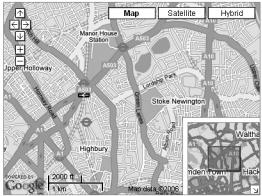
around and the + and – buttons to zoom in and out. The GMapTypeControl() creates the three buttons to show the map, a satellite photo, or a hybrid—which means a satellite photo with road names. The GScaleControl() displays the scale of the map on the bottom left next to the Google logo, and last but not least the GOverviewMapControl() provides the overview rectangle on the bottom right. The outcome is shown in Figure 11-3.
Figure 11-3. A map with controls
At the time of writing, the overview control invoked by GOverviewMapControl() has one problem: the API places the control outside the map on the bottom-right corner of the screen. In order to make the overview appear on the map, you need to apply the following fix:
googleMapsControlsFixed.js
function addMap() {
if ( GBrowserIsCompatible() ) {
var mapContainer = document.getElementById('map'); var map = new GMap2( mapContainer ); map.addControl( new GSmallMapControl() ); map.addControl( new GMapTypeControl() ); map.addControl( new GScaleControl() ); map.addControl( new GOverviewMapControl() );
var point = new GLatLng( 51.5623, -0.0934 ); map.setCenter( point, 13 );
var overview = document.getElementById('map_overview'); mapContainer.style.position = 'relative'; overview.style.position = 'absolute'; mapContainer.appendChild(overview);
}
}
window.onload = addMap; window.onunload = GUnload;
432 |
C H A P T E R 1 1 ■ U S I N G T H I R D - P A R T Y J A V A S C R I P T |
The API creates the overview control element as a <div> with the ID map_overview. It does that with any map; if the map has the ID myMap, the ID of the overview control would be myMap_overview. You can use this information to position the control absolutely and the main map DIV relatively, and append the overview control as a child to mapContainer. This will keep the control inside the main map.
The map now displays the area that I live in, but you cannot tell where I am. To highlight points in the map, you can use the GMarker() method, which needs a point as the parameter. The addOverlay() method of the map adds the marker at the position of the point.
googleMapsMarker.js
function addMap() {
if ( GBrowserIsCompatible() ) {
var mapContainer = document.getElementById('map'); var map = new GMap2( mapContainer );
var point = new GLatLng( 51.5623, -0.0934 ); map.setCenter( point, 13 );
var marker = new GMarker( point ); map.addOverlay( marker );
}
}
window.onload = addMap; window.onunload = GUnload;
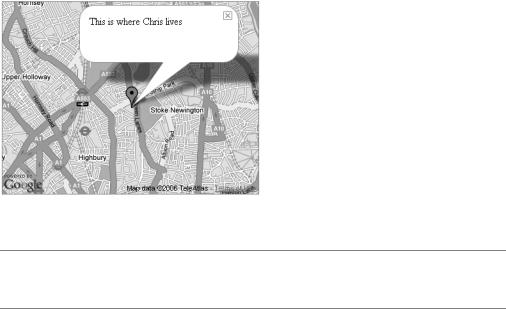
This change shows a red marker icon at the location you define as the point, as shown in Figure 11-4. You can set as many markers on a map as you want.
Figure 11-4. A map with a marker
The API also allows you to add event handlers to the map and each of its elements. For example, if you want to show an information window when the user clicks the marker (as markers are clickable by default), you can use the GEvent.addListener() method. This method takes the element to add an event, the event, and the function to call as parameters, much like
C H A P T E R 1 1 ■ U S I N G T H I R D - P A R T Y J A V A S C R I P T |
433 |
addEvent() does. In the function that adds the message, you create a new text node of the document and use the openInfoWindow() method of the map with the point and the new text node as parameters to display the information window as shown in Figure 11-5.
exampleGoogleMapsMarkerEvent.js
function addMap() {
if ( GBrowserIsCompatible() ) {
var mapContainer = document.getElementById('map'); var map = new GMap2( mapContainer );
var point = new GLatLng( 51.5623, -0.0934 ); map.setCenter( point, 13 );
var marker = new GMarker( point ); map.addOverlay( marker );
GEvent.addListener( marker, 'click', addMessage );
}
function addMessage() {
var message = 'This is where Chris lives';
var msgNode = document.createTextNode( message ); map.openInfoWindow( point, msgNode );
}
}
window.onload = addMap; window.onunload = GUnload;
Figure 11-5. A map with a marker and an information window
■Tip You can use HTML inside the information window, just use the openInfoWindowHtml() method instead of openInfoWindow().
434 |
C H A P T E R 1 1 ■ U S I N G T H I R D - P A R T Y J A V A S C R I P T |
Another really cool option of Google maps is that you can set the zoom level with the setZoom() method, and you can move the map center to another location by using the panTo() method. Furthermore, the openInfoWindowHtml() method allows you to define a function to call when the user closes the information window, and you don’t need to use your own event handler for that (technically, this is of course also done with an event handler, but the API does that for you). The syntax of this functionality is a bit odd: you add a JSON object as the last parameter to the openInfoWindowHtml() method, that, among others, has a property called onCloseFn, which has the name of the function that should get called when the user closes the window as a value.
Let’s use setZoom(), panTo(), and openInfoWindowHtml() with the third parameter to create an interactive map that opens a window when the user clicks the initial marker, zooms the map out when he closes that window, moves the map to a different location, and opens another window there.
googleMapsPan.js
function addMap() {
if ( GBrowserIsCompatible() ) {
var mapContainer = document.getElementById('map'); var map = new GMap2( mapContainer );
var home = new GLatLng( 51.5623, -0.0934 ); var work = new GLatLng( 51.5138, -0.1284 ); var homeMarker = new GMarker( home );
var workMarker = new GMarker( work );
var homeMessage = 'This is where Chris lives'; var workMessage = 'This is where Chris works'; map.setCenter( home, 13 );
map.addOverlay( homeMarker ); map.addOverlay( workMarker ); function addMessage() {
map.openInfoWindowHtml( home, homeMessage,
{ onCloseFn : goToWork } );
}
function goToWork() { map.setZoom( 12 ); map.panTo( work )
map.openInfoWindowHtml( work, workMessage,
{ onCloseFn : backToHome } );
}
function backToHome(){ map.panTo( home )
map.openInfoWindowHtml( home, homeMessage,
{ onCloseFn : goToWork } );
map.setZoom( 13 );
}
C H A P T E R 1 1 ■ U S I N G T H I R D - P A R T Y J A V A S C R I P T |
435 |
GEvent.addListener( homeMarker, 'click', addMessage );
}
}
window.onload = addMap; window.onunload = GUnload;
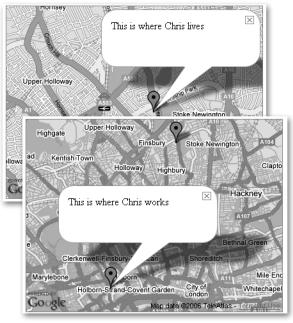
The result is shown in Figure 11-6.
Figure 11-6. Panning from one map location to a different one
The example needs to zoom out one level to pan smoothly to the other location. If the point you give panTo() as a parameter is outside the currently visible map, the API will simply render a new map with this location as the center. If you keep both start and end point on the same map, it will animate the map and move there smoothly.
Let’s go through the script step by step:
googleMapsPan.js (excerpt)
function addMap() {
if ( GBrowserIsCompatible() ) {
var mapContainer = document.getElementById('map'); var map = new GMap2( mapContainer );
You test whether the browser supports Google maps and define mapContainer as the element that gets converted into a map. You create a new map by calling the GMap2() constructor with mapContainer as the parameter.