

Beginning JavaScript With DOM Scripting And Ajax - From Novice To Professional (2006)
.pdf246 |
C H A P T E R 7 ■ J A V A S C R I P T A N D U S E R I N T E R A C T I O N : N A V I G A T I O N A N D F O R M S |
The list of pages the user visited before reaching the current one is stored in the window.history object. This object has only one single property, called length, which stores the number of already visited pages. It has, however, three methods you can use:
•back(): Go back one page in the browser history.
•forward(): Go forward one page in the browser history.
•go(n): Go n steps forward or back in the browser history depending on n being positive or negative. You can also reload the same page via history.go(0).
The history object only allows you to navigate to the other pages—not read out their URIs or change them. The exception to the rule is the current page, which gets wiped from the browser history when you use replace().
As already explained in the previous chapter, you effectively simulate browser functionality by sending the user to other pages via JavaScript, which might be superfluous or thoroughly confuse the user.
In-Page Navigation
You can use JavaScript to make navigation within the same page more interesting and less screen-space consuming. In HTML, you can provide in-page navigation via anchors and targets, both defined with the <a> tag, either with an href attribute for an anchor or a name or id attribute for a target.
■Note The name attribute for anchors is deprecated in XHTML, and it actually is enough to provide an ID to link an anchor and target pair. However, to ensure compatibility with older browsers, it might be a good idea to use it as you will in the following example.
Let’s take a list of internal links in a table of contents linked to different targets further down the page as an example for in-page navigation:
exampleLinkedAnchors.html (excerpt)
<h1>X - a tool that does Y</h1> <div id="toolinfo">
<ul id="toolinfotoc">
<li><a href="#info">Information</a></li> <li><a href="#demo">Demo</a></li>
<li><a href="#installation">Installation</a></li> <li><a href="#use">Use</a></li>
<li><a href="#license">License</a></li> <li><a href="#download">Download</a></li>
</ul>
<div class="infoblock">
<h2><a id="info" name="info">Information about X</a></h2>

C H A P T E R 7 ■ J A V A S C R I P T A N D U S E R I N T E R A C T I O N : N A V I G A T I O N A N D F O R M S |
247 |
[... content ...] <p class="back">
<a href="#toolinfotoc">Back to
<acronym title="Table of Contents">TOC</acronym></a> </p>
</div>
<div class="infoblock">
<h2><a id="demo" name="demo">Demonstration of what X can do</a></h2>
[... content ...] <p class="back">
<a href="#toolinfotoc">Back to
<acronym title="Table of Contents">TOC</acronym></a> </p>
</div>
[... more sections ...] </div>
You may be thinking that the DIV elements with the class infoblock are not necessary for this in-page navigation to work. That is only partly true, as MSIE has a very annoying bug when it comes to named anchors and keyboard navigation.
If you open the demo page exampleLinkedAnchors.html in MSIE, navigate through the different menu items by hitting the Tab key, and choose the section you want by hitting the Enter key, the browser gets sent to the anchor you choose. However, MSIE does not send the keyboard focus to this anchor. If you hit the Tab key again, you don’t get to the next link in the document; instead you get sent back to the menu.
You can fix this problem by—among other tricks—nesting the anchor in an element that has a defined width. This is what the DIVs are for. You can test this out on the demo page exampleLinkedAnchorsFixed.html. The practical upshot is that you can use these elements— in this case the DIVs—for CSS styling.
■Tip If you want to learn more about this problem and other ways to work around it, read the in-depth article on the subject written by accessibility researcher extraordinaire Gez Lemon at http:// juicystudio.com/article/ie-keyboard-navigation.php.
Now let’s replicate and improve this functionality with a script. What the script should do is show the menu, but hide all the sections, and only show the one you choose to keep the page shorter and less overwhelming. The logic is pretty easy:
•Loop through the links in the menu and add click event handlers to show the sections connected with the menu item.
•In the event listener method, hide the previously shown section and show the current one.
•When initializing the page, hide all the sections and show the first one.

248 |
C H A P T E R 7 ■ J A V A S C R I P T A N D U S E R I N T E R A C T I O N : N A V I G A T I O N A N D F O R M S |
However, this does not take another aspect of in-page navigation into consideration: the page could have been requested with a predefined target coming from another link. Try it out by adding an anchor to the URI—for example, exampleLinkedAnchorsFixed.html#use—in your browser. You’ll automatically scroll down to the “Using” section. Your script should take this use case into consideration,.
Let’s start by defining the skeleton of the script. The main object of the script is called iv for inner navigation—as in is a reserved word in JavaScript, and you want to keep it short. You’ll need several properties:
•A CSS class to define when the menu is JavaScript enhanced
•A CSS class to highlight the current link in the menu
•A CSS class to show the current section
■Tip You don’t need to hide the sections via JavaScript, but you can use the CSS parent class trick described in the last chapter.
You’ll need to define properties for the parent element to add the CSS class to and the ID of the menu to be able to loop through the links.
Two more properties are needed, one to store the currently shown section and one to store the currently highlighted link.
In terms of methods, you’ll need an init() method, an event listener to get the current section, and a method to hide the previous section and show the current section.
innerNav.js (skeleton)
iv= {
//CSS classes dynamicClass : 'dyn',
currentLinkClass : 'current', showClass : 'show',
//IDs
parentID : 'toolinfo', tocID : 'toolinfotoc',
// Global properties current : null, currentLink : null,
init : function(){ }, getSection : function( e ){ }, showSection : function( o ){ }
DOMhelp.addEvent( window, 'load', iv.init, false );
C H A P T E R 7 ■ J A V A S C R I P T A N D U S E R I N T E R A C T I O N : N A V I G A T I O N A N D F O R M S |
249 |
The init() method begins with checking whether DOM is supported and all necessary elements are available. Only then you add the class to the parent element to hide all the section elements automatically, via CSS.
innerNav.js (excerpt) init : function(){
if( !document.getElementById || !document.createTextNode) { return;
}
iv.parent = document.getElementById( iv.parentID ); iv.toc = document.getElementById( iv.tocID );
if( !iv.parent || !iv.toc ) { return; } DOMhelp.cssjs( 'add', iv.parent, iv.dynamicClass );
Store a possible URL hash in the variable loc and start looping through all the links in the menu. Replacing the # in the hash value makes it easier to use it later on, as you can use the name in a getElementById() without having to remove the hash.
innerNav.js (continued)
var loc = window.location.hash.replace( '#', '' ); var toclinks = iv.toc.getElementsByTagName( 'a' ); for( var i = 0; i < toclinks.length; i++ ) {
Compare the current link’s href attribute with loc and store the link in the currentLink property if they are the same. The string replace() method used here deletes anything but the anchor name from the href property. This is necessary because getAttribute('href') in some browsers like MSIE returns the entire link location including the file path, not only what is inside the HTML href attribute.
innerNav.js (continued)
if( toclinks[i].getAttribute( 'href' ). replace( /.*#/, '' ) == loc ){
iv.currentLink = toclinks[i];
}
Next, add a click event pointing to getSection(). Notice that in this example script you don’t need to stop the default event—on the contrary, allowing the browser to jump to the section will also change the URI in the location bar, and that in turn allows the user to bookmark the section.
innerNav.js (continued)
DOMhelp.addEvent( toclinks[i], 'click', iv.getSection, false );
}
The currentLink property is defined only when one of the links is the same as the hash in the URI. This means that if the URI has no hash, or has one that points to an anchor that isn’t
250 |
C H A P T E R 7 ■ J A V A S C R I P T A N D U S E R I N T E R A C T I O N : N A V I G A T I O N A N D F O R M S |
there, you need to define currentLink as the first anchor in the menu instead. The init() method finishes by calling the showSection() method with the currentLink as a parameter.
innerNav.js (continued)
if( !iv.currentLink ) { iv.currentLink = toclinks[0];
}
iv.showSection( iv.currentLink );
},
The event listener method getSection() does not need to do much; all it needs to do is to determine which link was clicked and send it on to showSection() as a parameter. If it weren’t for the need to access window.location.hash, these two lines could have been part of the showSection() method.
innerNav.js (continued)
getSection : function( e ) {
var t = DOMhelp.getTarget( e ); iv.showSection( t );
},
The showSection() method retrieves the link object that was either clicked or defined in the init() method as the parameter o. The first task is to read the href attribute of this link and retrieve the anchor name by deleting everything before and including the hash sign via a regular expression. You then retrieve the section to show by reading the element with the anchor ID and going up two nodes in the node tree.
innerNav.js (continued)
showSection : function( o ) {
var targetName = o.getAttribute( 'href' ). replace( /.*#/,'' );
var section = document.getElementById(targetName). parentNode.parentNode;
C H A P T E R 7 ■ J A V A S C R I P T A N D U S E R I N T E R A C T I O N : N A V I G A T I O N A N D F O R M S |
251 |
Why two nodes up? If you remember the HTML, you nested the links inside headings and nested the headings and the rest of the section inside DIV elements:
exampleLinkedAnchors.html (excerpt)
<li><a href="#demo">Demo</a></li> [... code snipped ...]
<div class="infoblock">
<h2><a id="demo" name="demo"> Demonstration of what X can do
</a></h2>
As getElementById( 'demo' ) gives you the link, one node up is the H2 and another one up is the DIV.
You then need to check whether there is an old section shown and a link highlighted, and remove the highlight and hide the section by removing the appropriate classes. Then add the classes for the current link and the current section and set the properties current and currentLink, making sure that next time showSection() is called it undoes what you did now.
innerNav.js (continued)
if( iv.current != null ){
DOMhelp.cssjs( 'remove', iv.current, iv.showClass ); DOMhelp.cssjs( 'remove', iv.currentLink, iv.currentLinkClass );
}
DOMhelp.cssjs( 'add', section, iv.showClass ); DOMhelp.cssjs( 'add', o,iv.currentLinkClass ); iv.current = section;
iv.currentLink = o;
}
}
DOMhelp.addEvent( window, 'load', iv.init, false );
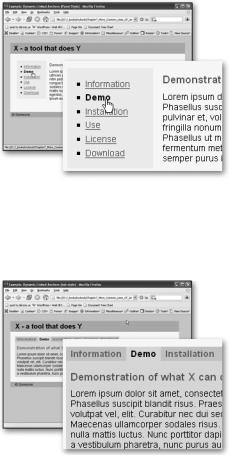
If you apply this script to the demo HTML page and add an appropriate style sheet, you get a much shorter page showing the different sections when you click the links. You can see this for yourself by opening exampleLinkedAnchorsPanel.html in a browser. On Windows XP in Firefox 1.5, the page looks like what you see in Figure 7-2.
252 |
C H A P T E R 7 ■ J A V A S C R I P T A N D U S E R I N T E R A C T I O N : N A V I G A T I O N A N D F O R M S |
Figure 7-2. A panel interface created from an anchor—target list
Simply applying a different style sheet turns the page into a tabbed interface, as you can see in exampleLinkedAnchorsTabs.html and in Figure 7-3.
Figure 7-3. A tabbed interface created from an anchor—target list
This is pretty neat for a short script; however, cleaning up the link href and retrieving the section every time the user clicks one of the options seems repetitive.
A different approach to accomplishing the same task would be to store the links and
the sections in two associative arrays and simply provide showSection() with the name of the anchor to show and highlight. The demo exampleLinkedAnchorsTabsNamed.html uses this technique and shows how to apply a mouseover handler for the same effect at the same time.
C H A P T E R 7 ■ J A V A S C R I P T A N D U S E R I N T E R A C T I O N : N A V I G A T I O N A N D F O R M S |
253 |
innerNavNamed.js
iv= {
//CSS classes dynamicClass : 'dyn',
currentLinkClass : 'current', showClass : 'show',
//IDs
parentID : 'toolinfo', tocID : 'toolinfotoc',
The first change is that you need only one current property as well as two new array properties called sections and sectionLinks, which will store the sections and links later on.
innerNavNamed.js (continued)
// Global properties current : null, sections : [], sectionLinks : [], init : function() {
var targetName,targetElement;
if( !document.getElementById || !document.createTextNode ){ return;
}
var parent = document.getElementById( iv.parentID ); var toc = document.getElementById( iv.tocID );
if( !parent || !toc ) { return; }
DOMhelp.cssjs( 'add', parent, iv.dynamicClass ); var toclinks = toc.getElementsByTagName( 'a' ); for( var i = 0; i < toclinks.length; i++ ){
Add a mouseover handler in addition to the click and store the href attribute in a property called targetName for each of the links in the menu.
innerNavNamed.js (continued)
DOMhelp.addEvent( toclinks[i], 'click', iv.getSection, false ); DOMhelp.addEvent( toclinks[i], 'mouseover', iv.getSection, false);
targetName = toclinks[i].getAttribute( 'href' ). replace( /.*#/,'' );
toclinks[i].targetName = targetName;
254 |
C H A P T E R 7 ■ J A V A S C R I P T A N D U S E R I N T E R A C T I O N : N A V I G A T I O N A N D F O R M S |
Define the first link as the currently active link by storing it in the presetLink variable and determine whether the anchor points to an existing element. If it does, store the element in the sections array and the link in the sectionLinks array. Note that this results in an associative array, which means you can reach the first section via section['info'].
innerNavNamed.js (continued)
if( i == 0 ){ var presetLink = targetName; } targetElement = document.getElementById( targetName ); if( targetElement ) {
iv.sections[targetName] = targetElement.parentNode.parentNode; iv.sectionLinks[targetName] = toclinks[i];
}
}
Then you can obtain a possible anchor name from the URI hash and call showSection() initially either with that anchor name or with the one stored in presetLink.
innerNavNamed.js (continued)
var loc = window.location.hash.replace( '#', '' );
loc = document.getElementById(loc) ? loc : presetLink; iv.showSection( loc );
},
The getSection() event () event listener calls showSection() with the value of the targetName property of the link. This property was set in the init() method earlier.
innerNavNamed.js (continued)
getSection:function( e ){
var t = DOMhelp.getTarget( e ); iv.showSection( t.targetName );
},
All of this makes showSection() a piece of cake, as all it needs to do to reset the last link and section and set the current ones is to use the arrays to reach the right elements and add or remove the CSS classes. The current section gets stored in one single property called current instead of properties for both the section and the link.
C H A P T E R 7 ■ J A V A S C R I P T A N D U S E R I N T E R A C T I O N : N A V I G A T I O N A N D F O R M S |
255 |
innerNavNamed.js (continued)
showSection : function( sectionName ){ if( iv.current != null ){
DOMhelp.cssjs( 'remove', iv.sections[iv.current], iv.showClass);
DOMhelp.cssjs( 'remove', iv.sectionLinks[iv.current], iv.currentLinkClass );
}
DOMhelp.cssjs( 'add', iv.sections[sectionName], iv.showClass ); DOMhelp.cssjs( 'add', iv.sectionLinks[sectionName], iv.currentLinkClass );
iv.current = sectionName;
}
}
DOMhelp.addEvent( window, 'load', iv.init, false );
There are more options for in-page navigation—for example, you could offer “previous” and “next” links instead of “back” links to go through the options. If you want to see a script that does that and also offers several tabbed navigations per page, you can check out DOMtab at http://onlinetools.org/tools/domtabdata/.
Site Navigation
Web site navigation is a different kettle of fish from page internal navigation. You must be tired of reading it by now, but there is just no good argument for navigation that is dependent on JavaScript. Yes, you can use JavaScript to send the user to other locations automatically, but it is not a safe method, as browsers like Opera and Mozilla allow users to prevent that (malicious web sites used redirection in the past to send the user to spam sites). Furthermore, it strips you as the site maintainer of the opportunity to use site metrics software that counts hits and records how your visitors travel around the site, as not all metrics packages count JavaScript redirects.
For these reasons, site navigation is basically constrained to enhancing the functionality of the HTML structure of the menu and adding functionality to it via event handlers. The real redirection of the user to other pages still needs to happen via links or form submission.
One very logical HTML construct for a web site menu is a nested list:
exampleSiteNavigation.html (excerpt)
<ul id="nav">
<li><a href="index.php">Home</a></li> <li><a href="products.php">Products</a>
<ul>
<li><a href="cms.php">CMS solutions</a> <ul>
<li><a href="minicms.php">Mini CMS</a></li>
<li><a href="ncc1701d.php">Enterprise CMS</a></li> </ul>