

226 Chapter 5 WORKING WITH FORMS
Manipulating Menus at Runtime
Dynamic menus change at runtime to display more or fewer commands, depending on the current status of the program. This section explores two techniques for implementing dynamic menus:
Creating short and long versions of the same menu
Adding and removing menu commands at runtime
Once the menu is in place and you have named all the items—you can use the default names, but this makes the code harder to read—you can program them by setting their properties from within your code. Each item in the menu is represented by a MenuItem object, which you program as usual.
Creating Short and Long Menus
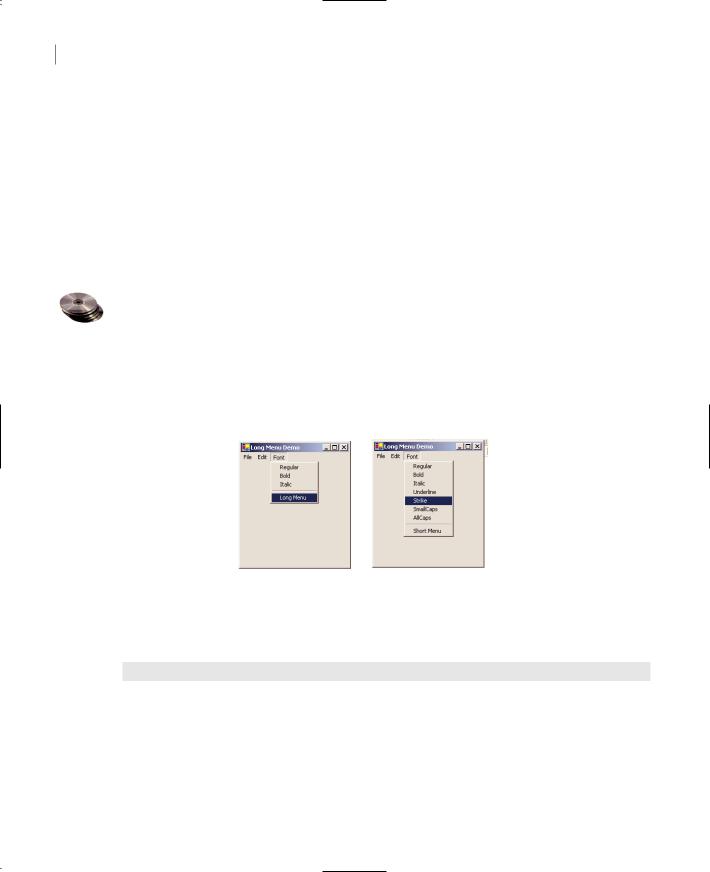
A common technique in menu design is to create long and short versions of a menu. If a menu contains many commands, and most of the time only a few of them are needed, you can create one menu with all the commands and another with the most common ones. The first menu is the long one, and the second is the short one. The last command in the long menu should be Short Menu, and when selected, it should display the short version. The last command in the short menu should be Long Menu, and it should display the long version. Figure 5.21 shows a long and a short version of the same menu (from the LongMenu project, which you will find on the CD). The short version omits infrequently used commands and is easier to handle.
Figure 5.21
The two versions of the Font menu of the LongMenu application
To implement the LongMenu command, start a new project and create a menu that has the structure shown in Table 5.7. Listing 5.9 is the code that shows/hides the long menu in the MenuSize command’s Click event.
Table 5.7: LongMenu Command Structure
Command Name |
Caption |
FontMenu |
Font |
mFontBold |
Bold |
mFontItalic |
Italic |
Continued on next page
Copyright ©2002 SYBEX, Inc., Alameda, CA |
www.sybex.com |

DESIGNING MENUS 227
Table 5.7: LongMenu Command Structure (continued)
Command Name |
Caption |
mFontRegular |
Regular |
mFontUnderline |
Underline |
mFontStrike |
Strike |
mFontSmallCaps |
SmallCaps |
mFontAllCaps |
AllCaps |
Separator |
- (hyphen) |
MenuSize |
Short Menu |
|
|
Listing 5.9: The MenuSize Menu Item’s Click Event
Protected Sub menuSize_Click(ByVal sender As Object, _ ByVal e As System.EventArgs)
If MenuSize.text = “Short Menu” Then MenuSize.text = “Long Menu”
Else
MenuSize.text = “Short Menu” End If
mFontUnderline.Visible = Not mFontUnderline.Visible mFontStrike.Visible = Not mFontStrike.Visible mFontSmallCaps.Visible = Not mFontSmallCaps.Visible mFontAllCaps.Visible = Not mFontAllCaps.Visible
End Sub
The subroutine in Listing 5.9 doesn’t do much. It simply toggles the Visible property of certain menu commands and changes the command’s caption to Short Menu or Long Menu, depending on the menu’s current status. Notice that because the Visible property is a True/False value, we don’t care about its current status; we simply toggle the current status with the Not operator.
Adding and Removing Commands at Runtime
We’ll conclude our discussion of menu design with a technique for building dynamic menus, which grow and shrink at runtime. Many applications maintain a list of the most recently opened files in their File menu. When you first start the application, this list is empty, and as you open and close files, it starts to grow.
The RunTimeMenu project demonstrates how to add items to and remove items from a menu at runtime. The main menu of the application’s form contains the Run Time Menu submenu, which is initially empty.
Copyright ©2002 SYBEX, Inc., Alameda, CA |
www.sybex.com |

228 Chapter 5 WORKING WITH FORMS
The two buttons on the form add commands to and remove commands from the Run Time Menu. Each new command is appended at the end of the menu, and the commands are removed from the bottom of the menu first (the most recently added commands). To change this order, and display the most recent command at the beginning of the menu, use a large initial index value (like 99) and increase it with every new command you add to the menu. Listing 5.10 shows the code behind the two buttons that add and remove menu items.
Listing 5.10: Adding and Removing MenuItems at Runtime
Protected Sub bttnRemoveOption_Click(ByVal sender As Object, _
ByVal e As System.EventArgs)
If RunTimeMenu.MenuItems.Count > 0 Then
RunTimeMenu.MenuItems.Remove(RunTimeMenu.MenuItems.count - 1)
End If
End Sub
Protected Sub bttnAddOption_Click(ByVal sender As Object, _
ByVal e As System.EventArgs)
RunTimeMenu.MenuItems.Add(“Run Time Option “ & _
RunTimeMenu.MenuItems.Count.toString, _
New EventHandler(AddressOf Me.OptionClick))
End Sub
The Remove button’s code uses the Remove method to remove the last item in the menu by its index, after making sure the menu contains at least one item. The Add button adds a new item, sets its caption to “Run Time Option n”, where n is the item’s order in the menu. In addition, it assigns an event handler to the new item’s Click event. This event handler is the same for all the items added at runtime; it’s the OptionClick() subroutine.
Adding menu items with the simpler forms of the Add method is trivial. The new menu items, however, would be quite useless unless there was a way to program them as well. The code uses the following form of the Add method, which accepts two arguments: the caption of the item and an event handler:
Menu.MenuItems.Add(caption, event_handler)
The event handler is the address of a subroutine, which will be invoked when the corresponding menu item is clicked, and it’s specified as a New EventHandler object. The AddressOf operator passes the address of the OptionClick() subroutine to the new menu item, so that it knows which subroutine to execute when it’s clicked.
As you can understand, all the runtime options invoke the same event handler—it would be quite cumbersome to come up with a separate event handlers for different items. In the single event handler, you can examine the name of the MenuItem object that invoked the event handler and act accordingly. The OptionClick() subroutine used in this example (Listing 5.11) displays the name of the menu item that invoked it. It doesn’t do anything, but it shows you how to figure out the item of the Run Time Menu that was clicked:
Copyright ©2002 SYBEX, Inc., Alameda, CA |
www.sybex.com |
DESIGNING MENUS 229
Listing 5.11: Programming Dynamic Menu Items
Private Sub OptionClick(ByVal sender As Object, ByVal e As EventArgs) Dim itemClicked As New MenuItem()
itemClicked = CType(sender, MenuItem)
Console.WriteLine(“You have selected the item “ & itemClicked.Text) End Sub
Creating Context Menus
Nearly every Windows application provides a context menu that the user can invoke by right-clicking a form or a control. (It’s sometimes called a shortcut menu or pop-up menu.) This is a regular menu, but it’s not anchored on the form. It can be displayed anywhere on the form or on specific controls. Different controls can have different context menus, depending on the operations you can perform on them at the time.
To create a context menu, place a ContextMenu control on your form. The new context menu will appear on the form just like a regular menu, but it won’t be displayed there at runtime. You can create as many context menus as you need by placing multiple instances of the ContextMenu control on your form and adding the appropriate commands to each one. To associate a context menu with a control on your form, set the control’s ContextMenu property to the name of the corresponding context menu.
Designing a context menu is identical to designing a MainMenu. The only difference is that the first command in the menu is actually the context menu’s name, and it’s not displayed along with the menu. Figure 5.22 shows a context menu at design time and how the same menu is displayed at runtime. Context Menu is the menu’s name, not a menu item.
Figure 5.22
A context menu, (left) at design time and (right) at runtime
You can create as many context menus as you wish on a form. Each control has a ContextMenu property, which you can set to any of the existing ContextMenu controls. Select the control for which you want to specify a context menu and, in the Properties window, locate the ContextMenu property. Expand the drop-down list and select the name of the desired context menu.
To edit one of the context menus on a form, select the appropriate ContextMenu control at the bottom of the Designer. The corresponding context menu will appear on the form’s menu bar, as if it were a regular form menu. This is temporary, however, and the only menu that will appears on the
Copyright ©2002 SYBEX, Inc., Alameda, CA |
www.sybex.com |
230 Chapter 5 WORKING WITH FORMS
form’s menu bar at runtime is the one that corresponds to the MainMenu control (and there can be only one of those on each form).
You can also merge two menus to create a new one that combines their items. This technique is used with MDI forms, where we want to add the commands of the child form to the parent form. For more information on the Merge method, see Chapter 19.
Iterating a Menu’s Items
The last menu-related topic in this chapter demonstrates how to iterate through all the items of a menu structure, including their submenus at any depth. The main menu of an application can be accessed by the expression Me.Menu. This is a reference to the top-level commands of the menu, which appear in the form’s menu bar. Each command, in turn, is represented by a MenuItem object. All the MenuItems under a menu command form a MenuItems collection, which you can scan and retrieve the individual commands.
The first command in a menu is accessed with the expression Me.Menu.MenuItems(0); this is the File command in a typical application. The expression Me.Menu.MenuItems(1) is the second command on the same level as the File command (typically, the Edit menu).
To access the items under the first menu, use the MenuItems collection of the top command. The first command in the File menu can be accessed by the expression
Me.Menu.MenuItems(0).MenuItems(0)
The same items can be accessed by name as well, and this is how you should manipulate the menu items from within your code. In unusual situations, or if you’re using dynamic menus to which you add and subtract commands at runtime, you’ll have to access the menu items through the MenuItems collection.
VB.NET at Work: The MapMenu Project
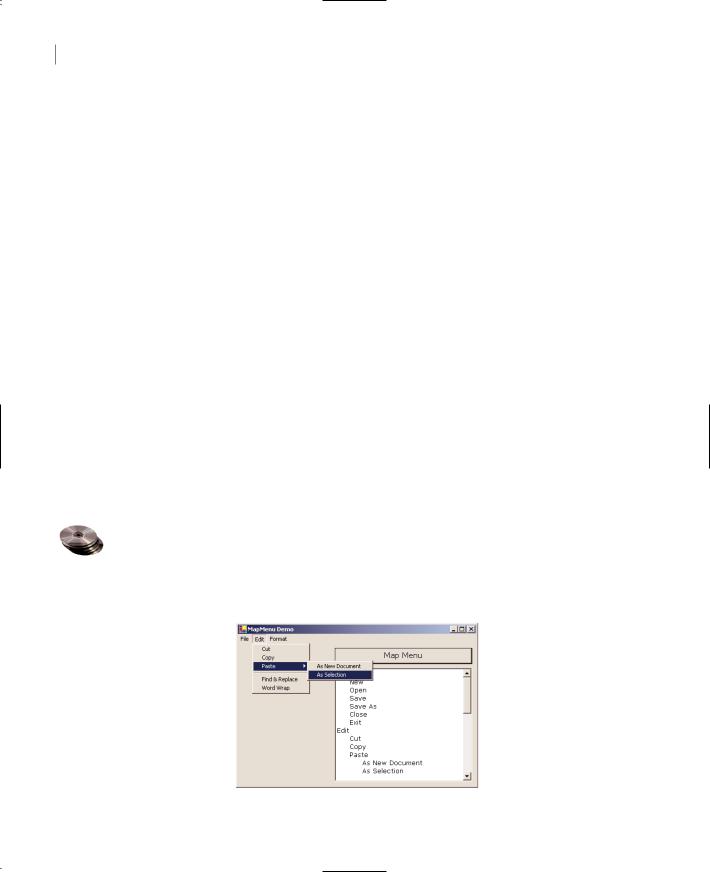
The MapMenu project demonstrates how to access the items of a menu from within your application’s code. The project’s main form, shown in Figure 5.23, contains a menu, a TextBox control, and a Button that prints the menu’s structure on the TextBox. You can edit the menu before running the program, and the code behind the Button will print the structure of the menu items without any modifications.
Figure 5.23
The MapMenu application
Copyright ©2002 SYBEX, Inc., Alameda, CA |
www.sybex.com |

DESIGNING MENUS 231
The code behind the Map Menu button (Listing 5.12) iterates through the items of a MainMenu object and prints all the commands in the Output window. It scans all the items of the menu’s MenuItems collection and prints their captions. After printing each command’s caption, it calls the PrintSubMenu() subroutine, passing the current MenuItem as argument. The PrintSubMenu() subroutine iterates through the items of the collection passed as argument and prints their captions.
Listing 5.12: Printing the Top-Level Commands of a Menu
Protected Sub MapMenu_Click(ByVal sender As Object, ByVal e As System.EventArgs) Dim itm As MenuItem
For Each itm In Me.Menu.MenuItems Console.WriteLine(itm.Text) PrintSubMenu(itm)
Next End Sub
The PrintSubMenu() subroutine, shown in Listing 5.13, goes through the MenuItems collection of the MenuItem object passed to it as argument and prints the captions of the submenu it represents. At each iteration, it examines the value of the property itm.MenuItems.Count. This is the number of commands under the current menu items. If it’s a positive value, the current item leads to a submenu. To print the submenu’s items, it calls itself, passing the itm object as argument. This simple technique scans all the submenus, at any depth. The PrintSubMenu() subroutine is a recursive routine, because it calls itself.
Listing 5.13: Printing Submenu Items
Sub PrintSubMenu(ByVal MItem As MenuItem)
Dim itm As New MenuItem()
For Each itm In MItem.MenuItems
Console.WriteLine(itm.Text)
If itm.MenuItems.Count > 0 Then PrintSubMenu(itm)
Next
End Sub
Tip There’s a tutorial on coding recursive routines in Chapter 18 of this book, and you will find more examples of recursive routines in the course of the book. If you’re totally unfamiliar with recursive routines, you can come back and examine the code more carefully after reading this chapter.
Open the MapMenu application, edit the menu on its form, run the project, and click the Map Menu Structure button. The few lines of the PrintSubMenu() subroutine will iterate through all the items in the form’s menu and submenus, at any depth.
Copyright ©2002 SYBEX, Inc., Alameda, CA |
www.sybex.com |