

DISTRIBUTING AN APPLICATION |
69 |
Applications designed for the Windows environment can’t fit in a single file. It just wouldn’t make sense. Along with the executable files, your application requires support files, and these files may already exist on many of the machines on which your application will be installed. That’s why it doesn’t make sense to distribute huge files. Each user should install the main application and only the support files that aren’t already installed on their computer.
The executable will run on the system on which it was developed, because the support files are there. Under the project’s file, you will find two folders named Bin and Obj. Open the Obj folder, and you will see that it contains a subfolder named Debug. This is where you will find the executable, which is named after the project and has the extension .exe. Make sure that no instance of VS is running on your computer and then double-click the icon of the MathCalculator.exe or LoanCalculator.exe file. The corresponding application will start outside the Visual Studio IDE, and you can use it like any other application on your PC. You can create desktop shortcuts to the two applications.
The folder Debug contains the Debug version of the executable. Normally, after you’re done debugging the application, you should change the default configuration of the project from Debug to Release. To change the project’s configuration, select Build Configuration Manager. The Configuration Manager dialog box will pop up, as shown in Figure 2.14.
Figure 2.14
The Configuration
Manager window
The default configuration for all projects is Debug. This configuration generates code optimized for debugging. The other possible setting for the configuration is Release. Change the configuration to Release and close the dialog box. If you build the project or the solution again, a Release folder will be created under the Obj folder and will contain the new executable. The difference between the two versions of the executable files is that Debug files contain symbolic debug information. The Release configuration executes faster because it doesn’t contain any debugging information.
Distributing an Application
Distributing just an EXE file isn’t going to be any good, because the executable requires support files. If these files aren’t installed on the target system (the computer on which your application will be installed), then the EXE file isn’t going to work. The file will be executed only on a system that has Visual Studio.NET on it. Distributing a large number of files and installing them on the target computer is quite a task. You must create an installation program that (almost) automatically installs your application and the required support files on the target computer. If some of those files are already installed, they will not be installed again.
Copyright ©2002 SYBEX, Inc., Alameda, CA |
www.sybex.com |

70 |
Chapter 2 VISUAL BASIC PROJECTS |
Note Eventually, all the support files will become part of the operating system, and then you’ll be able to distribute a single EXE file (or a small number of files). This hasn’t happened with Windows 2000 or Windows XP and won’t for some time. Until it does, you must provide your own installer.
A Setup project creates a Windows installer file (a file with extension .msi), which contains the executable(s) of the application and auxiliary files that are necessary for the application, Registry entries (if the application interacts with the Registry), installation instructions, and so on. The resulting MSI file is usually quite long, and this is the file you distribute to end users. They must double-click the icon of the MSI file to install the application on their computer. If they run the same file again, the application will be removed. Moreover, if something goes wrong during the installation, the installation will be rolled back and any components that were installed in the process will be removed.
The topic of creating and customizing Windows installers is huge, and there are already a couple of books on this topic alone—for example, VB/VBA Developer’s Guide to the Windows Installer by Mike Gunderloy (Sybex, 2000). As you can understand, in this chapter we’ll only scratch the surface. I will show you how to create a simple Setup project for installing the Calculators project on another machine. Your main priority right now is to learn to write .NET applications and master the language. You should be able to distribute even small applications, so the topic of creating Setup projects shouldn’t be missing from this book. Yet you aren’t going to use the more advanced features for a while—not before you can write elaborate applications that require a customized installation procedure. In this section, I’ll show you how to create a Setup project for the Calculators project. It’s a simple project that demonstrates the basic steps of creating a Windows installer using the default options, and you’ll be able to use this application to install the Calculators application to a target computer.
VB.NET at Work: Creating a Windows Installer
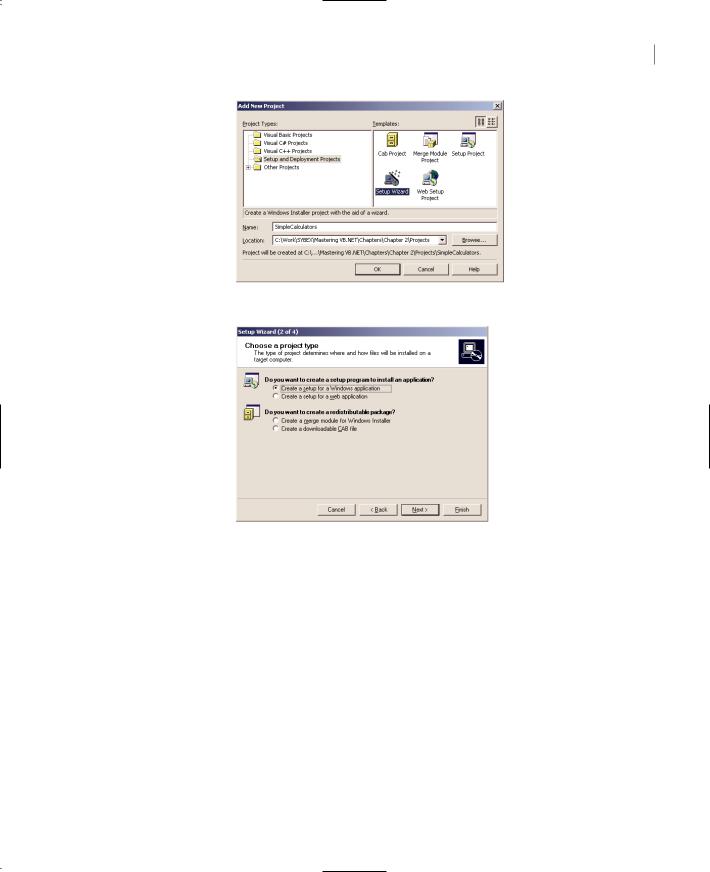
To create a Windows installer, you must add a Setup project to your solution. The Setup project will create an installation program for the projects in the current solution. Open the Calculators solution and add a new project (File Add Project New Project). In the dialog box that appears (Figure 2.15), click the Setup and Deployment Projects item. In the Templates pane, you will see five different types of Setup and Deployment projects. The simplest type of Setup project is the Setup Wizard. This wizard takes you through the steps of creating a Setup project, which is another wizard that takes the user through the steps of installing the application on the target computer. Select this template and then enter the project’s name in the Name box: name the project SimpleCalculators. Click OK, and the first screen of the wizard will appear. This is a welcome screen, and you can click the Next button to skip it.
On the next screen, you’ll be prompted to choose a project type. You can create a project that installs an application or one that adds components to an existing installation. We want to create a project that installs an application for the first time, and we have two options: to create a setup for a Windows application or for a Web application. Select the first option, as shown in Figure 2.16, and click Next to move to the next screen of the wizard.
Copyright ©2002 SYBEX, Inc., Alameda, CA |
www.sybex.com |
DISTRIBUTING AN APPLICATION |
71 |
Figure 2.15
Adding a Setup and Deployment project to your solution
Figure 2.16
The Project Type screen of the wizard
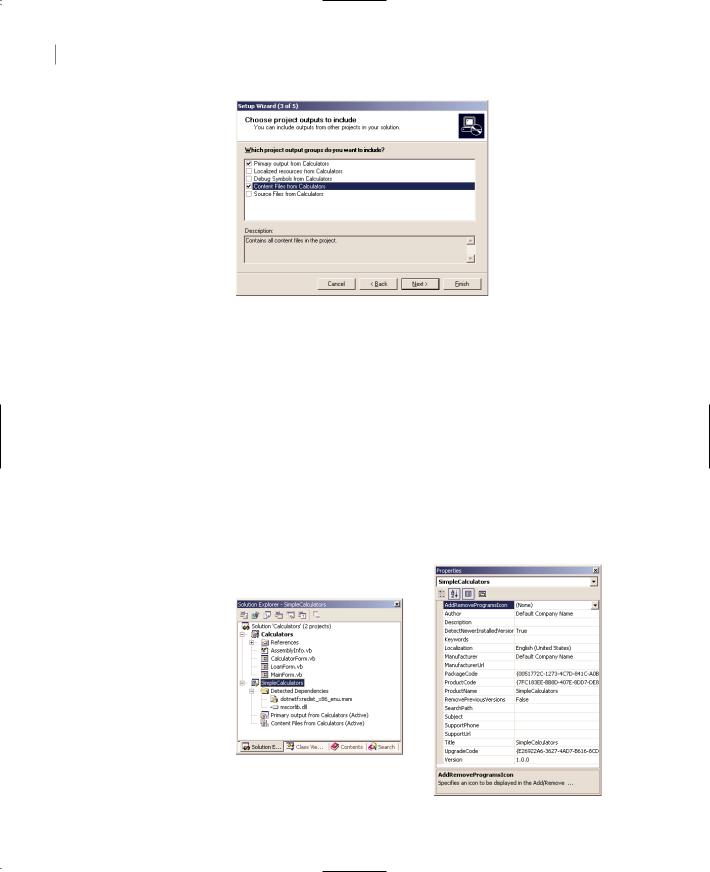
On the next screen, you’ll be prompted to select any files you want to add to the installation program. Here you must click the items checked in Figure 2.17. The Primary Output is the executable file, and the Content Files include things like the HTML file we added to the project. In the release version of the program, you don’t usually want to include debug symbols or source files (well, perhaps the debug symbols for large projects that are also tested at the client’s side). If your application includes localized resource files, you should check the second option. Localized resources allow you to write applications that adjust their text to the end user’s culture. It’s a special topic that’s not covered in this book.
The Setup project we’re creating here is part of a solution with the project you want to install on the target machine. I’ve included the Setup project in the same solution for convenience only. You can also create a Setup project and specify any executable file you want to install. The Setup project takes a while to compile, so you should add it to the solution only after you have debugged the application. Or remove the Setup project from the solution after you have created the setup file.
Copyright ©2002 SYBEX, Inc., Alameda, CA |
www.sybex.com |
72 |
Chapter 2 VISUAL BASIC PROJECTS |
Figure 2.17
Specifying the items you want to install
Click Next again to see another screen, where you can specify additional files that are not part of the project. You can add text files with installation instructions, compatibility data, registration information, and so on. Click Next again, and the last screen of the wizard displays a summary of the project you specified. Click Finish to close the wizard and create the Setup project.
The wizard adds the Setup project to your solution. Select the new project with the mouse and open the Properties window to see the properties of the new project. The Solution Explorer and the new project’s Properties window should look like the ones shown in Figure 2.18. The good news is that you don’t have to write any code for this project. All you have to do is set a few properties and you’re done.
The AddRemoveProgramsIcon property lets you specify the icon of the installation and removal programs—yes, VB will also create a program to uninstall the application. You can specify whether the Setup project will detect newer versions of the application and won’t overwrite them with an older version. The DetectNewerInstalledVersion property is True by default. You can also specify your company’s name and URL, support line, the title of the installation windows, and so on.
Figure 2.18
The Setup project’s
Properties
Copyright ©2002 SYBEX, Inc., Alameda, CA |
www.sybex.com |

DISTRIBUTING AN APPLICATION |
73 |
The Manufacturer property will become the name of the folder in which the installation will take place. By default, this folder will be created in the user’s Program Files folder. Assign a name that reflects either your company or the project type—a string like “The Math Experts” for the Calculators example. The Author property is where your name should appear. The ProductName property is by default the name of the Setup project; change it to “The EasyCalc Project”. The Title property is the title of the installer (what users see on the installation wizard’s title bar while the application is being installed).
The Solution Explorer Buttons
You will notice that the usual buttons on the Solution Explorer have been replaced by six new buttons, which are described in the following sections.
File System Editor Button
Click this button and you will see the four sections of the target machine’s file system your setup program can affect. Decide whether your application’s action should appear on the user’s Desktop or in the Programs menu. Right-click either item and you will see a context menu that contains the commands Add and Create Shortcut. The Add command leads to a submenu with four objects you can automatically create from within your Setup program: Folder, Project Output, File, Assembly. For typical applications you can add a folder (in which you can later place the project’s output), or the project output. The less intruding option is to place a shortcut in the user’s Programs menu.
To make the project a little more interesting, we’ll install not only the Calculators application, but the two individual applications: the Calculator and LoanCalculator projects. We’re going to add three new commands to the user’s Programs menu, so let’s add a folder to this menu and then the names of the applications in this folder. Right-click the item User’s Programs Menu and select Add Folder. A new folder will be added under the User’s Programs Menu item. Change its name to Demo Calculators, as shown in Figure 2.19. Select the new folder and look up its properties. The AlwaysCreate property should be True—if not, the wizard will not add the folder to the user’s Programs menu.
Then right-click the newly added folder and select Add File. A dialog box will pop up where you can select the executables that must appear in the Demo Calculators folder on the Programs menu. Browse your disk and locate the Calculators, Calculator, and LoanCalculator executables in the \Obj\Release folder under the corresponding project’s folder (all three files have the extension EXE).
After adding the items you want to appear in the Demo Calculators folder of the Programs menu, the File System Editor should like the one in Figure 2.19.
Figure 2.19
Specifying how the installation program will affect the user’s File System
Copyright ©2002 SYBEX, Inc., Alameda, CA |
www.sybex.com |
74 |
Chapter 2 VISUAL BASIC PROJECTS |
Registry Editor Button
Click this button to add new keys to the user’s Registry. You don’t have to add anything to the user’s Registry, especially for this project. But you can place special strings in the Registry, like an encoded date to find out when a demo version of your application may expire. You must first familiarize yourself with the Registry and how to program it with Visual Basic, before you attempt to use it with your applications.
File Types Editor Button
If your application uses its own file type, you can associate that type with your application, so that when the user double-clicks a file of this type your application starts automatically. This is a sure way to ruin the user’s file associations. If your application can handle GIF images or HTML files, don’t even think of taking over these files. Use this option only with files that are unique to your application.
To add a new file type on the user’s machine, click the File Types Editor button on the Properties window. On the Designer’s surface, you will see a single item: File Types On Target Machine. Right-click the item and select Add File Type. This command will add a new file type and the verb &Open under it. Click the new file type and you will see its properties in the Properties window.
You can assign a description to the new file type, its extension, and the command that will be used to open the files of this type (the name of your application’s EXE file).
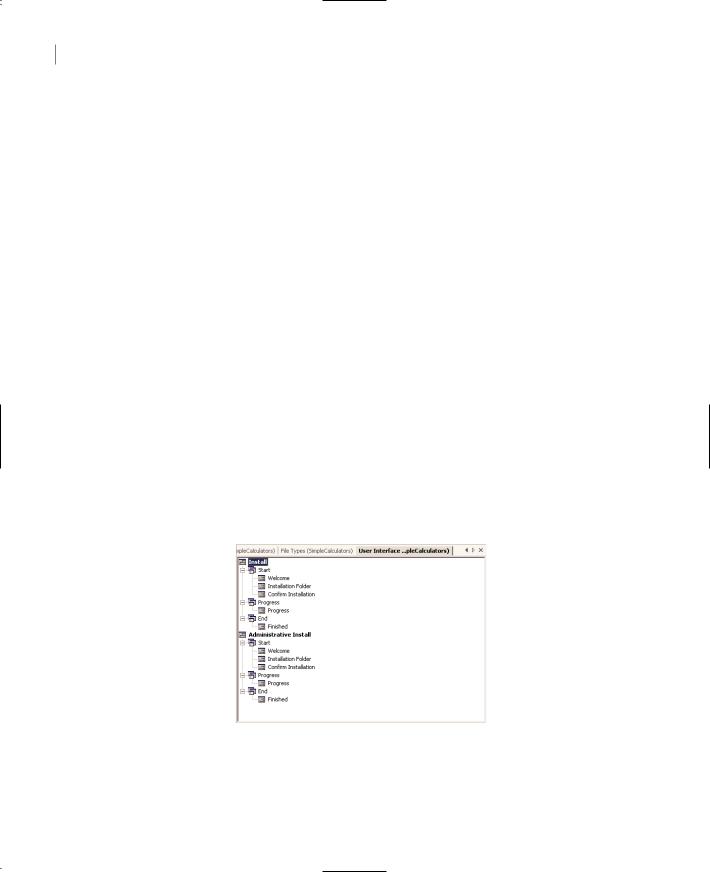
User Interface Editor Button
Click this button and you will see the steps of the installation on the Designer’s surface, as shown in Figure 2.20. Each phase of the installation process has one or more steps, and a different dialog box is displayed at each step. Some of the dialog boxes contain messages, like a short description of the application or a copyright message. These strings are exposed as properties of the corresponding dialog box, and you can change them. Just click a dialog box in the User Interface Editor and then look up its properties in the Properties window.
Figure 2.20
The outline of the installation process
The wizard inserts all the necessary dialog boxes, but you can add custom dialog boxes. If you do, you must also provide some code to process the user’s selections on the custom dialog box. For our simple example, we don’t need any customized dialog boxes. I will repeat here that the topic of creating a customized Windows installer is one of the major aspects of Visual Studio.NET, and when
Copyright ©2002 SYBEX, Inc., Alameda, CA |
www.sybex.com |