

BUILDING A MATH CALCULATOR 45
The Single data type can hold much larger values. Besides, the Single data type can also hold noninteger values. I’m assuming you won’t ask for a loan of $25,000 and some cents, but if you want to calculate the precise monthly payment for a debt you have accumulated, then you should be able to specify a non-integer amount. In short, we should have declared the LoanAmount variable with the Single data type in the first place (but then I wouldn’t have been able to demonstrate the overflow exception).
An overflow error can’t be caught with data-validation code. There’s always a chance your calculations will produce overflows or other types of math errors. Data validation isn’t going to help here; you just don’t know the result before you carry out the calculations. We need something called error handling, or error trapping. This is additional code than can handle errors after they occur. In effect, you’re telling VB that it shouldn’t stop with an error message. This would be embarrassing for you and wouldn’t help the user one bit. Instead, VB should detect the error and execute the proper statements that will handle the error. Obviously, you must supply these statements, and you’ll see examples of handling errors at runtime in the following section.
Building a Math Calculator
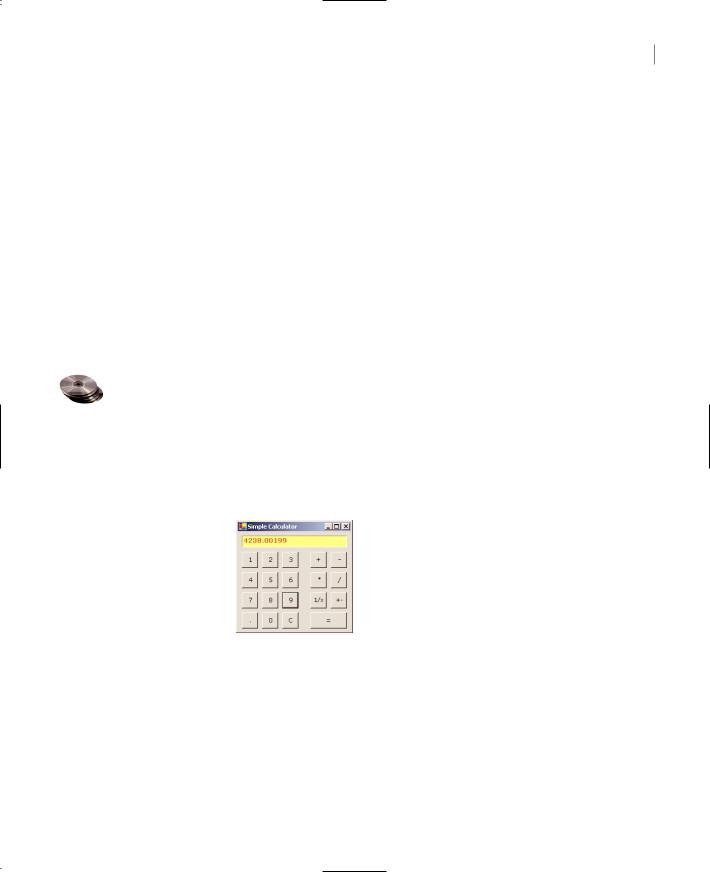
Our next application is more advanced, but not as advanced as it looks. It’s a math calculator with a typical visual interface that demonstrates how Visual Basic can simplify the programming of fairly advanced operations. If you haven’t tried it, you may think that writing an application such as this one is way too complicated, but it isn’t. The MathCalculator application is shown in Figure 2.6, and you’ll find it in this chapter’s folder on the CD. The application emulates the operation of a handheld calculator and implements the basic arithmetic operations. It has the structure of a math calculator, and you can easily expand it by adding more features. In fact, adding features like cosines and logarithms is actually simpler than performing the basic arithmetic operations.
Figure 2.6
The Calculator application window
Designing the User Interface
The application’s interface is straightforward, but it takes quite a bit of effort. You must align buttons on the form and make the calculator look as much like a hand-held calculator as possible. Start a new project, the MathCalculator project, and name its main form CalculatorForm.
Designing the interface of the application isn’t trivial, because it’s made up of many buttons, all perfectly aligned on the form. To simplify the design, follow these steps:
1.Select a font that you like for the form. All the Command buttons you’ll place on the form will inherit this font. The MathCalculator application on the CD uses 10-point Verdana font.
Copyright ©2002 SYBEX, Inc., Alameda, CA |
www.sybex.com |

46Chapter 2 VISUAL BASIC PROJECTS
2.Add the Label control, which will become the calculator’s display. Set its BorderStyle property to Fixed 3D so that it will have a 3-D look, as shown in Figure 2.6. Change its ForeColor and BackColor properties too, if you want it to look different than the rest of the form. The project you will find on the CD uses colors that emulate the—now extinct— green CRT monitors.
3.Draw a Button control on the form, change its caption (Text property) to 1, and name it bttn1. Size the button carefully so that its caption is centered on the control. The other buttons on the form will be copies of this one, so make sure you’ve designed the first button as best as you can, before you start making copies of it.
4.Place the button in its final position on the form. At this point you’re ready to create the other buttons for the calculator’s digits. Right-click the button and select Copy. The Button control is copied to the Clipboard, and now you can paste it on the form (which is much faster than designing an identical button).
5.Right-click somewhere on the form and select Paste to create a copy of the button you copied earlier. The button you copied to the Clipboard will be pasted on the form, on top of the original button. The copy will have the same caption as the button it was copied from, and its name will be Button1.
6.Now set the button’s Name to bttn2 and its Text property to 2. This button is the digit 2. Place the new button to the right of the previous button. You don’t have to align the two buttons perfectly now; later we’ll use the Format menu to align the buttons on the form.
7.Repeat Steps 5 and 6 eight more times, once for each numeric digit. Each time a new Button control is pasted on the form, Visual Basic names it Button1 and sets its caption to 1; you must change the Name and Text properties. You can name the buttons anything you like; their Click event will be handled by the same subroutine, which will read the button’s Text property to find out which digit was clicked.
8.When the buttons of the numeric digits are all on the form, place two more buttons, one for the C (Clear) operation and one for the Period button. Name them bttnClear and bttnPeriod, and set their captions accordingly. Use a larger font size for the Period button to make its caption easier to read.
9.When all the digit buttons of the first group are on the form and in their approximate positions, align them with the commands of the Format menu.
a.First, align the buttons of the top row. Start by aligning the 1 button with the left side of the lblDisplay Label. Then select all the buttons of the top row and make their horizontal spacing equal (select Format Horizontal Spacing Make Equal). Then do the same with the buttons in the first column, and this time, make sure their vertical distances are equal (Format Vertical Spacing Make Equal).
b.Now you can align the buttons in each row and each column separately. Use one of the buttons you aligned in the last step as the guide for the rest of them. The buttons can be
Copyright ©2002 SYBEX, Inc., Alameda, CA |
www.sybex.com |

BUILDING A MATH CALCULATOR 47
aligned in many ways, so don’t worry if somewhere in the process you ruin the alignment. You can always use the Undo command in the Edit menu. Select the three buttons on the second row and align their Tops using the first button as reference. Do the same for the third and fourth rows of buttons. Then do the same for the four columns of buttons.
Now, place the buttons for the arithmetic operations on the form—addition (+), subtraction (-), multiplication (*), and division (/). Use the commands on the Format menu to align these buttons as shown earlier in Figure 2.6. The control with the black handles can be used as a reference for aligning the other controls into rows and columns. The form shown in Figure 2.6 has a few more buttons, which you can align using the same techniques you used to align the numeric buttons.
The Equals button at the bottom is called bttnEquals, and you must make it wide enough to cover the space of the three buttons above it.
Programming the MathCalculator App
Now you’re ready to add some code to the application. Double-click one of the digit buttons on the form, and you’ll see the following in the code window:
Private Sub bttn1_Click(ByVal sender As System.Object, _
ByVal e As System.EventArgs) Handles bttn1.Click
End Sub
This is the Click event’s handler for a single digit button. Your first attempt is to program the Click event handler of each digit button, but repeating the same code 10 times isn’t very productive. We’re going to use the same event handler for all buttons that represent digits. All you have to do is append the names of the events to be handled by the same subroutine after the Handles keyword. You should also change the name of the event handler to something that indicates its role. Since this subroutine handles the Click event for all the digit buttons, let’s call it Digit_Click(). Here’s the revised declaration of a subroutine that can handle all the digit buttons:
Private Sub Digit_Click(ByVal sender As System.Object, _
ByVal e As System.EventArgs) Handles bttn1.Click, bttn2.Click, _ bttn3.Click, bttn4.Click, bttn5.Click, bttn6.Click, _ bttn7.Click, bttn8.Click, bttn9.Click, bttn0.Click
End Sub
When you press a digit button on a hand-held calculator, the corresponding digit is appended to the display. To emulate this behavior, insert the following line in the Click event handler:
lblDisplay.Text = lblDisplay.Text + sender.Text
This line appends the digit clicked to the calculator’s display. The sender argument of the Click event represents the control that was clicked (the control that fired the event). The Text property of this control is the digit of the button that was clicked. For example, if you have already entered the value 345, clicking the digit 0 displays the value 3450 on the Label control that acts as the calculator’s display.
Copyright ©2002 SYBEX, Inc., Alameda, CA |
www.sybex.com |

48 |
Chapter 2 VISUAL BASIC PROJECTS |
The expression sender.Text is not the best method of accessing the Text property of the button that was clicked, but it will work as long as the Strict option is off. We’ll return to this topic later in the book, but for now let me briefly explain that you should convert the sender object to a TextBox object and then access its Text property with the following statement:
CType(sender, TextBox).Text
The CType() function is discussed in the following chapter. For now, keep in mind that it converts an object to an object of a different type. You will also notice that after typing the period following the closing parenthesis, all the members of the TextBox control will appear in a list, as if you had entered the name of a TextBox control followed by a period.
The code behind the digit buttons needs a few more lines. After certain actions, the display should be cleared. After pressing one of the buttons that correspond to math operations, the display should be cleared in anticipation of the second operand. Actually, the display must be cleared as soon as the first digit of the second operand is pressed. Revise the Digit_Click event handler as shown in Listing 2.3.
Listing 2.3: The Digit_Click Event
Private Sub Digit_Click(ByVal sender As System.Object, _
ByVal e As System.EventArgs) Handles bttn1.Click, bttn2.Click, _ bttn3.Click, bttn4.Click, bttn5.Click, bttn6.Click, _ bttn7.Click, bttn8.Click, bttn9.Click, bttn0.Click
If clearDisplay Then lblDisplay.Text = “” clearDisplay = False
End If
lblDisplay.Text = lblDisplay.Text + sender.text End Sub
The clearDisplay variable is declared as Boolean, which means it can take a True or False value. Suppose the user has performed an operation and the result is on the calculator’s display. The user now starts typing another number. Without the If clause, the program would continue to append digits to the number already on the display. This is not how calculators work. When a new number is entered, the display must clear. And our program uses the clearDisplay variable to know when to clear the display.
The Equals button sets the clearDisplay variable to True to indicate that the display contains the result of an operation. The Digit_Click() subroutine examines the value of this variable each time a new digit button is pressed. If the value is True, Digit_Click() clears the display and then
prints the new digit on it. The subroutine also sets clearDisplay to False so that when the next digit is pressed, the program won’t clear the display again.
What if the user makes a mistake and wants to undo an entry? The typical hand-held calculator has no backspace key. The Clear key erases the current number on the display. Let’s implement this feature. Double-click the C button and enter the code of Listing 2.4 in its Click event.
Copyright ©2002 SYBEX, Inc., Alameda, CA |
www.sybex.com |
BUILDING A MATH CALCULATOR 49
Listing 2.4: The Clear Button
Private Sub bttnClear_Click(ByVal sender As System.Object, _
ByVal e As System.EventArgs) Handles bttnClear.Click lblDisplay.Text = “”
End Sub
Now we can look at the Period button. A calculator, no matter how simple, should be able to handle fractional numbers. The Period button works just like the digit buttons, with one exception. A digit can appear any number of times in a numeric value, but the period can appear only once. A number like 99.991 is valid, but you must make sure that the user can’t enter numbers such as 23.456.55. Once a period is entered, this button mustn’t insert another one. The code in Listing 2.5 accounts for this.
Listing 2.5: The Period Button
Private Sub bttnPeriod_Click(ByVal sender As System.Object, _
ByVal e As System.EventArgs) Handles bttnPeriod.Click If lblDisplay.Text.IndexOf(“.”) > 0 Then
Exit Sub Else
lblDisplay.Text = lblDisplay.Text & “.” End If
End Sub
IndexOf is a method that can be applied to any string. The expression lblDisplay.Text is a string (the text on the Label control), so we can call its IndexOf method. The code IndexOf(“.”) returns the location of the first instance of the period in the caption of the Label control. If this number is positive, the number entered contains a period already, and another can’t be entered. In this case, the program exits the subroutine. If the method returns 0, the period is appended to the number entered so far, just like a regular digit.
Check out the operation of the application. We have already created a functional user interface that emulates a hand-held calculator with data-entry capabilities. It doesn’t perform any operations yet, but we have already created a functional user interface with only a small number of statements.
Math Operations
Now we can move to the interesting part of the application: considering how a calculator works. Let’s start by defining three variables:
Operand1 |
The first number in the operation |
Operator |
The desired operation |
Operand2 |
The second number in the operation |
Copyright ©2002 SYBEX, Inc., Alameda, CA |
www.sybex.com |

50 |
Chapter 2 VISUAL BASIC PROJECTS |
When the user clicks one of the math symbols, the value on the display is stored in the variable Operand1. If the user then clicks the Plus button, the program must make a note to itself that the current operation is an addition and then clear the display so that the user can enter another value. The symbol of the operation is stored in the Operator variable. The user enters another value and then clicks the Equals button to see the result. At this point, our program must do the following:
1.Read the Operand2 value on the display.
2.Add that value to Operand1.
3.Display the result.
The Equals button must perform the following operation:
Operand1 Operator Operand2
Suppose the number on the display when the user clicks the Plus button is 3342. The user then enters the value 23 and clicks the Equals button. The program must carry out the addition:
3342 + 23
If the user clicked the Division button, the operation is:
3342 / 23
In both cases, when Equals is clicked, the result is displayed (and it may become the first operand for the next operation).
Variables are local in the subroutines where they are declared. Other subroutines have no access to them and can’t read or set their values. Sometimes, however, variables must be accessed from many places in a program. If the Operand1, Operand2, and Operator variables in this application must be accessed from within more than one subroutine, they must be declared outside any subroutine. The same is true for the clearDisplay variable. Their declarations, therefore, must appear outside any procedure, and they usually appear at the beginning of the code with the following statements:
Dim clearDisplay As Boolean
Dim Operand1 As Double
Dim Operand2 As Double
Dim Operator As String
Let’s see how the program uses the Operator variable. When the user clicks the Plus button, the program must store the value “+” in the Operator variable. This takes place from within the Plus button’s Click event. But later, the Equals button must have access to the value of the Operator variable in order to carry out the operation (in other words, it must know what type of operation the user specified). Because these variables must be manipulated from within more than a single subroutine, they were declared outside any subroutine.
The keyword Double is new to you. It tells VB to create a numeric variable with the greatest possible precision for storing the values of the operators. (Numeric variables and their types are discussed in detail in the next chapter.) The Boolean type takes two values, True and False. You have already seen how the clearDisplay variable is used.
The variables Operand1, Operand2, and Operator are called Form-wide, or simply Form, variables, because they are visible from within any subroutine on the form. If our application had another form, these variables wouldn’t be visible from within the other form(s). In other words, any
Copyright ©2002 SYBEX, Inc., Alameda, CA |
www.sybex.com |

BUILDING A MATH CALCULATOR 51
subroutine on a form on which the variables are declared can read or set the values of the variables, but no subroutine outside that form can do so.
With the variable declarations out of the way, we can now implement the Operator buttons. Double-click the Plus button and, in the Click event’s handler, enter the lines shown in Listing 2.6.
Listing 2.6: The Plus Button
Private Sub bttnPlus_Click(ByVal sender As System.Object, _
ByVal e As System.EventArgs) Handles bttnPlus.Click Operand1 = Val(lblDisplay.Text)
Operator = “+” clearDisplay = True
End Sub
The variable Operand1 is assigned the value currently on the display. The Val() function returns the numeric value of its argument. The Text property of the Label control is a string. For example, you can assign the value “My Label” to a label’s Text property. The actual value stored in the Text property is not a number. It’s a string such as “428”, which is different from the numeric value 428. That’s why we use the Val() function to convert the value of the Label’s caption to a numeric value. The remaining buttons do the same, and I won’t show their listings here.
So far, we have implemented the following functionality in our application: When an operator button is clicked, the program stores the value on the display in the Operand1 variable and the operator in the Operator variable. It then clears the display so that the user can enter the second operand. After the second operand is entered, the user can click the Equals button to calculate the result. When this happens, the code of Listing 2.7 is executed.
Listing 2.7: The Equals Button
Private Sub bttnEquals_Click(ByVal sender As System.Object, _
ByVal e As System.EventArgs) Handles bttnEquals.Click Dim result As Double
Operand2 = Val(lblDisplay.Text) Select Case Operator
Case “+”
result = Operand1 + Operand2 Case “-”
result = Operand1 - Operand2 Case “*”
result = Operand1 * Operand2 Case “/”
If Operand2 <> “0” Then result = Operand1 / Operand2 End Select
lblDisplay.Text = result clearDisplay = True
End Sub
Copyright ©2002 SYBEX, Inc., Alameda, CA |
www.sybex.com |

52 |
Chapter 2 VISUAL BASIC PROJECTS |
The result variable is declared as Double so that the result of the operation will be stored with maximum precision. The code extracts the value displayed in the Label control and stores it in the variable Operand2. It then performs the operation with a Select Case statement. This statement compares the value of the Operator variable to the values listed after each Case statement. If the value of the Operator variable matches one of the Case values, the following statement is executed.
If the operator is “+”, the result variable is set to the sum of the two operands.
If the operator is “-”, the result variable is set to the difference of the first operand minus the second.
If the operator is “*”, the result variable is set to the product of the two operands.
If the operator is “/”, the result variable is set to the quotient of the first operand divided by the second operand, provided that the divisor is not zero.
Note Division takes into consideration the value of the second operand because if it’s zero, the division can’t be carried out. The last If statement carries out the division only if the divisor is not zero. If Operand2 happens to be zero, nothing happens.
Now run the application and check it out. It works just like a hand-held calculator, and you can’t crash it by specifying invalid data. We didn’t have to use any data-validation code in this example because the user doesn’t get a chance to type invalid data. The data-entry mechanism is foolproof. The user can enter only numeric values because there are only numeric digits on the calculator. The only possible error is to divide by zero, and that’s handled in the Equals button.
Debugging Tools
Our application works nicely and is quite easy to test—and to fix, if you discover something wrong with it. But that’s only because it’s a very simple application. As you write code, you’ll soon discover that something doesn’t work as expected, and you should be able to find out why and repair it. The process of eliminating errors is called debugging, and Visual Studio provides the tools to simplify the process of debugging. These tools are discussed in Chapter 17. There are a few simple operations you should know, though, even as you work with simple projects like this one.
Open the MathCalculator project in the code editor and place the cursor in the line that calculates the difference between the two operands. Let’s pretend there’s a problem with this line and we want to follow the execution of the program closely, to find out what’s going wrong with the application. Press F9 and the line will be highlighted in brown. This line has become a breakpoint: as soon as it is reached, the program will stop.
Press F5 to run the application and perform a subtraction. Enter a number, then click the minus button, then another number, and finally the Equals button. The application will stop, and the code editor will open. The breakpoint will be highlighted in yellow. Hover the pointer over the Operand1 and Operand2 variables in the code editor’s window. The value of the corresponding variable will appear in a small box or tooltip. Move the pointer over any variable in the current event handler
to see its value. These are the values of the variables just prior to the execution of the highlighted statement.
Copyright ©2002 SYBEX, Inc., Alameda, CA |
www.sybex.com |

BUILDING A MATH CALCULATOR 53
The result variable will most likely be zero, because the statement hasn’t been executed yet. If the variables involved in this statement have their proper values (if not, you know that the problem is prior to this statement, and perhaps in another event handler), then you can execute this statement by pressing F10. By pressing F10, you’re executing the highlighted statement only. The program will stop at the next line. The next statement to be executed is the End Select statement.
Find an instance of the result variable in the current event handler, rest the mouse over it, and you will see the value of the variable after it has been assigned a value. Now you can press F10 to execute another statement or F5 to return to normal execution mode.
You can also evaluate expressions involving any of the variables in the current event handler by entering the appropriate statement in the Command window. The Command window appears at the bottom of the IDE. If it’s not visible, then from the main menu, select View Other Windows Command Window. The current line in the Output window is prefixed with the greater than symbol (reminiscent of the DOS days). Place the cursor next to it and enter the following statement:
? Operand1 / Operand2
The quotient of the two values will appear in the following line. The question mark is just a shorthand notation for the Print command. If you want to know the current value on the calculator’s display, enter the following statement:
? lblDisplay.Text
This statement requests the value of a property of a control on the form. The current value of the Label control’s Text property will appear in the following line. You can also evaluate math expressions with statements like the following:
? Math.Log(3/4)
Log() is the logarithm function, and it’s a method of the Math class. To create a random value between 0 and 1, enter the statement:
? Rnd()
With time, you’ll discover that the Command window is a very handy tool in debugging applications. If you have a statement with a complicated expression, you can request the values of the individual components of the expression and thereby make sure they can be evaluated.
Now move the pointer off the breakpoint and press F9 again. This will toggle the breakpoint status, and the execution of the program won’t halt the next time this statement is executed.
If the execution of the program doesn’t stop at a breakpoint, it means that the statement was never reached. In this case, you must search for the bug in statements that are executed before the breakpoint. If you didn’t assign the proper value to the Operator variable, the Case “-” statement will never be reached. You should place the breakpoint at the first executable statement of the Equals button’s Click event handler to examine the values of all variables the moment this subroutine starts its execution. If all variables had the expected values, you will continue testing the code forward. If not, you’d have to test the statements that lead to this statement—the statements in the event handlers of the various buttons.
Another simple technique for debugging applications is the Output window. Although this isn’t a debugging tool, it’s very common among VB programmers (and very practical, may I add). Many
Copyright ©2002 SYBEX, Inc., Alameda, CA |
www.sybex.com |