

- •Using Your Sybex Electronic Book
- •Acknowledgments
- •Contents at a Glance
- •Introduction
- •Who Should Read This Book?
- •How About the Advanced Topics?
- •The Structure of the Book
- •How to Reach the Author
- •The Integrated Development Environment
- •The Start Page
- •Project Types
- •Your First VB Application
- •Making the Application More Robust
- •Making the Application More User-Friendly
- •The IDE Components
- •The IDE Menu
- •The Toolbox Window
- •The Solution Explorer
- •The Properties Window
- •The Output Window
- •The Command Window
- •The Task List Window
- •Environment Options
- •A Few Common Properties
- •A Few Common Events
- •A Few Common Methods
- •Building a Console Application
- •Summary
- •Building a Loan Calculator
- •How the Loan Application Works
- •Designing the User Interface
- •Programming the Loan Application
- •Validating the Data
- •Building a Math Calculator
- •Designing the User Interface
- •Programming the MathCalculator App
- •Adding More Features
- •Exception Handling
- •Taking the LoanCalculator to the Web
- •Working with Multiple Forms
- •Working with Multiple Projects
- •Executable Files
- •Distributing an Application
- •VB.NET at Work: Creating a Windows Installer
- •Finishing the Windows Installer
- •Running the Windows Installer
- •Verifying the Installation
- •Summary
- •Variables
- •Declaring Variables
- •Types of Variables
- •Converting Variable Types
- •User-Defined Data Types
- •Examining Variable Types
- •Why Declare Variables?
- •A Variable’s Scope
- •The Lifetime of a Variable
- •Constants
- •Arrays
- •Declaring Arrays
- •Initializing Arrays
- •Array Limits
- •Multidimensional Arrays
- •Dynamic Arrays
- •Arrays of Arrays
- •Variables as Objects
- •So, What’s an Object?
- •Formatting Numbers
- •Formatting Dates
- •Flow-Control Statements
- •Test Structures
- •Loop Structures
- •Nested Control Structures
- •The Exit Statement
- •Summary
- •Modular Coding
- •Subroutines
- •Functions
- •Arguments
- •Argument-Passing Mechanisms
- •Event-Handler Arguments
- •Passing an Unknown Number of Arguments
- •Named Arguments
- •More Types of Function Return Values
- •Overloading Functions
- •Summary
- •The Appearance of Forms
- •Properties of the Form Control
- •Placing Controls on Forms
- •Setting the TabOrder
- •VB.NET at Work: The Contacts Project
- •Anchoring and Docking
- •Loading and Showing Forms
- •The Startup Form
- •Controlling One Form from within Another
- •Forms vs. Dialog Boxes
- •VB.NET at Work: The MultipleForms Project
- •Designing Menus
- •The Menu Editor
- •Manipulating Menus at Runtime
- •Building Dynamic Forms at Runtime
- •The Form.Controls Collection
- •VB.NET at Work: The DynamicForm Project
- •Creating Event Handlers at Runtime
- •Summary
- •The TextBox Control
- •Basic Properties
- •Text-Manipulation Properties
- •Text-Selection Properties
- •Text-Selection Methods
- •Undoing Edits
- •VB.NET at Work: The TextPad Project
- •Capturing Keystrokes
- •The ListBox, CheckedListBox, and ComboBox Controls
- •Basic Properties
- •The Items Collection
- •VB.NET at Work: The ListDemo Project
- •Searching
- •The ComboBox Control
- •The ScrollBar and TrackBar Controls
- •The ScrollBar Control
- •The TrackBar Control
- •Summary
- •The Common Dialog Controls
- •Using the Common Dialog Controls
- •The Color Dialog Box
- •The Font Dialog Box
- •The Open and Save As Dialog Boxes
- •The Print Dialog Box
- •The RichTextBox Control
- •The RTF Language
- •Methods
- •Advanced Editing Features
- •Cutting and Pasting
- •Searching in a RichTextBox Control
- •Formatting URLs
- •VB.NET at Work: The RTFPad Project
- •Summary
- •What Is a Class?
- •Building the Minimal Class
- •Adding Code to the Minimal Class
- •Property Procedures
- •Customizing Default Members
- •Custom Enumerations
- •Using the SimpleClass in Other Projects
- •Firing Events
- •Shared Properties
- •Parsing a Filename String
- •Reusing the StringTools Class
- •Encapsulation and Abstraction
- •Inheritance
- •Inheriting Existing Classes
- •Polymorphism
- •The Shape Class
- •Object Constructors and Destructors
- •Instance and Shared Methods
- •Who Can Inherit What?
- •Parent Class Keywords
- •Derived Class Keyword
- •Parent Class Member Keywords
- •Derived Class Member Keyword
- •MyBase and MyClass
- •Summary
- •On Designing Windows Controls
- •Enhancing Existing Controls
- •Building the FocusedTextBox Control
- •Building Compound Controls
- •VB.NET at Work: The ColorEdit Control
- •VB.NET at Work: The Label3D Control
- •Raising Events
- •Using the Custom Control in Other Projects
- •VB.NET at Work: The Alarm Control
- •Designing Irregularly Shaped Controls
- •Designing Owner-Drawn Menus
- •Designing Owner-Drawn ListBox Controls
- •Using ActiveX Controls
- •Summary
- •Programming Word
- •Objects That Represent Text
- •The Documents Collection and the Document Object
- •Spell-Checking Documents
- •Programming Excel
- •The Worksheets Collection and the Worksheet Object
- •The Range Object
- •Using Excel as a Math Parser
- •Programming Outlook
- •Retrieving Information
- •Recursive Scanning of the Contacts Folder
- •Summary
- •Advanced Array Topics
- •Sorting Arrays
- •Searching Arrays
- •Other Array Operations
- •Array Limitations
- •The ArrayList Collection
- •Creating an ArrayList
- •Adding and Removing Items
- •The HashTable Collection
- •VB.NET at Work: The WordFrequencies Project
- •The SortedList Class
- •The IEnumerator and IComparer Interfaces
- •Enumerating Collections
- •Custom Sorting
- •Custom Sorting of a SortedList
- •The Serialization Class
- •Serializing Individual Objects
- •Serializing a Collection
- •Deserializing Objects
- •Summary
- •Handling Strings and Characters
- •The Char Class
- •The String Class
- •The StringBuilder Class
- •VB.NET at Work: The StringReversal Project
- •VB.NET at Work: The CountWords Project
- •Handling Dates
- •The DateTime Class
- •The TimeSpan Class
- •VB.NET at Work: Timing Operations
- •Summary
- •Accessing Folders and Files
- •The Directory Class
- •The File Class
- •The DirectoryInfo Class
- •The FileInfo Class
- •The Path Class
- •VB.NET at Work: The CustomExplorer Project
- •Accessing Files
- •The FileStream Object
- •The StreamWriter Object
- •The StreamReader Object
- •Sending Data to a File
- •The BinaryWriter Object
- •The BinaryReader Object
- •VB.NET at Work: The RecordSave Project
- •The FileSystemWatcher Component
- •Properties
- •Events
- •VB.NET at Work: The FileSystemWatcher Project
- •Summary
- •Displaying Images
- •The Image Object
- •Exchanging Images through the Clipboard
- •Drawing with GDI+
- •The Basic Drawing Objects
- •Drawing Shapes
- •Drawing Methods
- •Gradients
- •Coordinate Transformations
- •Specifying Transformations
- •VB.NET at Work: Plotting Functions
- •Bitmaps
- •Specifying Colors
- •Defining Colors
- •Processing Bitmaps
- •Summary
- •The Printing Objects
- •PrintDocument
- •PrintDialog
- •PageSetupDialog
- •PrintPreviewDialog
- •PrintPreviewControl
- •Printer and Page Properties
- •Page Geometry
- •Printing Examples
- •Printing Tabular Data
- •Printing Plain Text
- •Printing Bitmaps
- •Using the PrintPreviewControl
- •Summary
- •Examining the Advanced Controls
- •How Tree Structures Work
- •The ImageList Control
- •The TreeView Control
- •Adding New Items at Design Time
- •Adding New Items at Runtime
- •Assigning Images to Nodes
- •Scanning the TreeView Control
- •The ListView Control
- •The Columns Collection
- •The ListItem Object
- •The Items Collection
- •The SubItems Collection
- •Summary
- •Types of Errors
- •Design-Time Errors
- •Runtime Errors
- •Logic Errors
- •Exceptions and Structured Exception Handling
- •Studying an Exception
- •Getting a Handle on this Exception
- •Finally (!)
- •Customizing Exception Handling
- •Throwing Your Own Exceptions
- •Debugging
- •Breakpoints
- •Stepping Through
- •The Local and Watch Windows
- •Summary
- •Basic Concepts
- •Recursion in Real Life
- •A Simple Example
- •Recursion by Mistake
- •Scanning Folders Recursively
- •Describing a Recursive Procedure
- •Translating the Description to Code
- •The Stack Mechanism
- •Stack Defined
- •Recursive Programming and the Stack
- •Passing Arguments through the Stack
- •Special Issues in Recursive Programming
- •Knowing When to Use Recursive Programming
- •Summary
- •MDI Applications: The Basics
- •Building an MDI Application
- •Built-In Capabilities of MDI Applications
- •Accessing Child Forms
- •Ending an MDI Application
- •A Scrollable PictureBox
- •Summary
- •What Is a Database?
- •Relational Databases
- •Exploring the Northwind Database
- •Exploring the Pubs Database
- •Understanding Relations
- •The Server Explorer
- •Working with Tables
- •Relationships, Indices, and Constraints
- •Structured Query Language
- •Executing SQL Statements
- •Selection Queries
- •Calculated Fields
- •SQL Joins
- •Action Queries
- •The Query Builder
- •The Query Builder Interface
- •SQL at Work: Calculating Sums
- •SQL at Work: Counting Rows
- •Limiting the Selection
- •Parameterized Queries
- •Calculated Columns
- •Specifying Left, Right, and Inner Joins
- •Stored Procedures
- •Summary
- •How About XML?
- •Creating a DataSet
- •The DataGrid Control
- •Data Binding
- •VB.NET at Work: The ViewEditCustomers Project
- •Binding Complex Controls
- •Programming the DataAdapter Object
- •The Command Objects
- •The Command and DataReader Objects
- •VB.NET at Work: The DataReader Project
- •VB.NET at Work: The StoredProcedure Project
- •Summary
- •The Structure of a DataSet
- •Navigating the Tables of a DataSet
- •Updating DataSets
- •The DataForm Wizard
- •Handling Identity Fields
- •Transactions
- •Performing Update Operations
- •Updating Tables Manually
- •Building and Using Custom DataSets
- •Summary
- •An HTML Primer
- •HTML Code Elements
- •Server-Client Interaction
- •The Structure of HTML Documents
- •URLs and Hyperlinks
- •The Basic HTML Tags
- •Inserting Graphics
- •Tables
- •Forms and Controls
- •Processing Requests on the Server
- •Building a Web Application
- •Interacting with a Web Application
- •Maintaining State
- •The Web Controls
- •The ASP.NET Objects
- •The Page Object
- •The Response Object
- •The Request Object
- •The Server Object
- •Using Cookies
- •Handling Multiple Forms in Web Applications
- •Summary
- •The Data-Bound Web Controls
- •Simple Data Binding
- •Binding to DataSets
- •Is It a Grid, or a Table?
- •Getting Orders on the Web
- •The Forms of the ProductSearch Application
- •Paging Large DataSets
- •Customizing the Appearance of the DataGrid Control
- •Programming the Select Button
- •Summary
- •How to Serve the Web
- •Building a Web Service
- •Consuming the Web Service
- •Maintaining State in Web Services
- •A Data-Driven Web Service
- •Consuming the Products Web Service in VB
- •Summary

BUILDING A WEB SERVICE 1085
Building a Web Service
In all previous chapters, I’ve used the visual tools for just about anything. Here I’ll make an exception to show you how easy it really is to build a Web service. You’ll build your first Web service with Notepad. The following listing is a simple class that exposes two simple members. The same class could appear in any VB project. Its two methods are way too simple, but they contain straight VB code and you can make them as complicated as you wish.
Public Class MasteringServices
Public Function Add(ByVal a As Decimal, ByVal b As Decimal) As Decimal
Return(a + b)
End Function
Public Function Multiply(ByVal a As Decimal, ByVal b As Decimal) As Decimal
Return(a * b)
End Function
End Class
To turn this class into a Web service, insert the following statements at the beginning of the file:
<%@ webservice class=”MasteringServices” language=”vb” %> Imports System.Web.Services
The first statement is a directive that tells the compiler that the rest of the file is a Web service, written in Visual Basic. The name of the class is MasteringServices, but it will normally be a name made up from your company’s (or department’s) name and a name that reflects the functionality of the class. The second statement imports the System.Web.Services class, necessary for all Web services. Then prefix each method’s definition with the following tag:
<WebMethod()>
The <WebMethod()> tag tells the compiler that the specific method is to be exposed to HTTP requests; the class may also contain private members. The WebMethod tag may also contain attributes, similar to the attributes of the members exposed by the controls. One of them is the Description attribute, whose syntax is shown next:
<WebMethod(“Description”, “This method adds two numbers”)>
Listing 25.1 shows the code of your first Web service. Create a text file with these statements, and save it under the filename Mastering.asmx (the extension must be ASMX) in the Web server’s root folder. You’re actually ready to test your Web service.
Listing 25.1: The Structure of a Web Service
<%@ webservice class=”MasteringServices” language=”vb” %> Imports System.Web.Services
Public Class MasteringServices <WebMethod()> _
Public Function Add(ByVal a As Decimal, ByVal b As Decimal) As Decimal Return(a + b)
Copyright ©2002 SYBEX, Inc., Alameda, CA |
www.sybex.com |

1086 Chapter 25 XML WEB SERVICES
End Function <WebMethod()> _
Public Function Multiply(ByVal a As Decimal, ByVal b As Decimal) As Decimal Return(a * b)
End Function End Class
To test the new service, start Internet Explorer and connect to the following URL:
http://localhost/Mastering.asmx
If you’re using a Web server on another machine, replace the localhost specification with the appropriate server address or name. A few seconds later, you will see the page shown in Figure 25.1.
Figure 25.1
Testing the
MasteringServices
Web service
The page shown in Figure 25.1 isn’t your page. Obviously, it was created on the fly and contains information about the MasteringServices Web service. Actually, you won’t find this page anywhere on your server. When you contact the Web service for the first time, it’s compiled and the compiler generates code to display the test pages as well.
Below the title of the Web service is a list of the members it exposes, the Add and Multiply methods. There’s also a warning to the effect that it uses the default namespace, which is http:// tempuri.org/. That’s a placeholder domain name owned by Microsoft and stands for “temporary URI.” When you post a Web service on the Web so that others can connect to it, you’ll add the following attribute to the WebService tag:
namespace=”http://your.server.com/yourservices”
as suggested at the bottom of the page.
Copyright ©2002 SYBEX, Inc., Alameda, CA |
www.sybex.com |

BUILDING A WEB SERVICE 1087
The two methods are hyperlinks. Click the Add hyperlink and you’ll see the arguments of the method on a new page, which is shown in Figure 25.2. On this page, you can enter two numeric values to be added and then click the Invoke button. A new page will appear, with the result returned by the Add method. The result returned by the method is:
<?xml version=”1.0” encoding=”utf-8” ?>
<decimal xmlns=”http://tempuri.org/”>18</decimal>
Figure 25.2
Connecting to a Web service with your browser
This is the XML description of a decimal value. Had you entered the values –0.91 and 1.92, the Add method would have returned the following value:
<?xml version=”1.0” encoding=”utf-8” ?>
<decimal xmlns=”http://tempuri.org/”>1.01</decimal>
Test the Multiply function as well; nothing will differ. You can also add more members to the test class; you can use any VB statement or function, as well as any of the Framework’s classes, because the method’s code is executed on a machine that has access to the .NET Framework.
A Web service is a Class that resides on a Web server and makes its members (usually methods) available to any client. In addition, it displays information about itself on a page that’s built automatically when you attempt to contact one of the members of the Web service. This information includes the service’s name and the members it exposes. As you saw, you can even test these members from within Internet Explorer. Of course, the format of the output is a little unusual, but this is the only way to get information to the client through the HTTP protocol. Besides, only text will go through firewalls. Web services use XML to format their return value and pass it to the client. In effect, the Web service and its consumer (the application that makes use of the Web service) pretend they’re exchanging requests and HTML pages, all in textual format. As you can see, no special component needs to be installed on the client or the server.
Copyright ©2002 SYBEX, Inc., Alameda, CA |
www.sybex.com |

1088 Chapter 25 XML WEB SERVICES
Web services aren’t necessarily text files created with Notepad. You will see in the following section how to create Web services in the environment of Visual Studio, but I wanted to demonstrate how easy it is to build a Web service.
Consuming the Web Service
The Web service is in place, and you have tested it with your browser. The ultimate goal is for an application to consume this Web service, so let’s build one. Actually, we’ll build two applications that consume the same Web service, a Windows app and an ASP Web app.
Start a new Windows Application project and place a Button control on its form. Since VB calculates sums too quickly to notice, let’s use the Add method of the MasteringServices Web service. To access the members of a Web service, you must add a reference to it through the Project Add Web Reference command. When the Add Web Reference dialog box appears, enter the URL of the ASMX file in its Address bar and press Enter. You will see the description of the MasteringServices Web service on the dialog box, as shown in Figure 25.3. At this point, you can click the Add Reference button at the bottom of the window to add the Web service to the current project. This is similar to adding a reference to a regular class.
Figure 25.3
Referencing a Web service in a project
When you first open the Add Web Reference dialog box and before you select a Web service, you’ll see a link that displays the Web services on the localhost (the Web References On Local Web Server link). In addition, you will see two links for the Microsoft’s UDDI directory and Microsoft’s UDDI test directory. Click the link to display the Web references on your local Web server. You will see the names of the Web services you may have already built, but the Mastering service won’t be listed.
Copyright ©2002 SYBEX, Inc., Alameda, CA |
www.sybex.com |
ASP.NET WEB SERVICE PROJECTS 1089
As you can see, each Web service is represented by a .vsdico file. This is called a discovery file and contains information about your service, and this is how clients that connect to your server can find out what services it provides. This file is created automatically by Visual Studio when you create a Web Service project, but we haven’t created this project in VS—we simply creates an ASMX file to the Web server’s root folder. We’ll do so shortly, but in the meantime you can add a reference to the new Web service explicitly. Enter the URL of the Mastering.asmx file in the Address box of the Add Web Reference dialog box. This URL is the following:
http://localhost/mastering.asmx
You will see the names of the two methods in the left pane of the dialog box. Click the Add Reference button to close the dialog box and return to the project.
Then insert the following code in the button’s Click event handler:
Private Sub Button1_Click(ByVal sender As System.Object,_
ByVal e As System.EventArgs) Handles Button1.Click
Dim WS As New localhost.MasteringServices()
MsgBox(WS.Add(43.32, 22.1))
End Sub
You don’t really need an elaborate interface to test the members of the simple Web service. Run the project, click the button, wait, and the sum of the two values should appear on a message box. The delay, which is more than noticeable, is due to the fact that the ASMX file must be compiled and contacted through the HTTP protocol. There’s a lot of overhead, but then again Web services are not usual Classes. If you insert another call to the Add method (or a call to the Multiply method) in the Click event handler, the second call will be serviced immediately, because the class has been compiled and is ready to be used by any client.
ASP.NET Web Service Projects
In this section, we’ll build a slightly more complicated Web service that exposes a single method to calculate monthly payments on a loan. We’ll add some error handling to the method, to make it more robust than the first one. We’ll also use the tools of the IDE to build the new service.
Start a new project and select the ASP.NET Web Service template. Call the new project WSLoan. Notice that, by default, all Web service projects are stored in the localhost virtual folder (this is the root folder of the Web server). Initially, the Designer will add to the project an ASMX file called Service1, a configuration file, and a discovery file. The configuration file contains configuration information for the Web server, and the discovery file (the one with extension .vsdisco) contains information that allows other applications that connect to your server to locate the specific service and see its “contract” (the names and the syntax of its members). The initial configuration of the IDE for an ASP.NET Web service project is shown in Figure 25.4.
The project we’ll build in this section is within this chapter’s folder on the CD. Copy the entire Loan folder in the Web server’s root folder, and then open it with VB.
Ready to build another loan calculator? This example isn’t going to be quite as trivial as you think. You’ll see how you can raise exceptions from within a Web service and catch them in your VB code. Listing 25.2 shows the Loan class’s source code. Right-click the design surface of Service1, select View Code from the context menu, and then enter the listing’s statements in the editor.
Copyright ©2002 SYBEX, Inc., Alameda, CA |
www.sybex.com |

1090 Chapter 25 XML WEB SERVICES
Figure 25.4
Starting a new Web service project
Listing 25.2: The Loan Web Service
Imports System.Web.Services Public Class Service1
Inherits System.Web.Services.WebService <WebMethod()> _
Public Function Loan(ByVal Amount As Decimal, ByVal Duration As Integer, _ ByVal Rate As Decimal, ByVal PayEarly As Boolean) As Decimal
If Rate < 0 Then
Throw New Exception(“Interest rate can’t be negative!”) End If
If Rate < 1 Then Rate = Rate / 12
Else
Rate = Rate / (12 * 100) End If
Return Pmt(Rate, Duration, Amount, 0, PayEarly) End Function
End Class
The actual project on the CD contains one more method, which will be discussed shortly. The Web service is ready to be tested. Press F5 and Internet Explorer will come up with the
description of the new Web service. Click the Loan hyperlink to test the Loan method. On the page
Copyright ©2002 SYBEX, Inc., Alameda, CA |
www.sybex.com |

ASP.NET WEB SERVICE PROJECTS 1091
that appears (Figure 25.5), enter the parameters of the loan and click the Invoke button as before. The result for the loan shown in Figure 25.5 is:
<?xml version=”1.0” encoding=”utf-8” ?>
<decimal xmlns=”http://tempuri.org/”>-740.680595446082</decimal>
Figure 25.5
Testing the Loan method of the Service1 Web service
The Web service works; let’s copy it to the Web server so that other applications can use it. Stop the project, and select the Copy Project command in the Project menu. In the subsequent dialog box (see Figure 25.6), specify the Loan folder under the Web server’s root folder and click OK. All the files needed for the discovery and use of the Loan Web service will be copied in the specified folder.
Figure 25.6
Copying a project’s files to the Web server
Now start a new Windows application that will contact the Loan service. The test project on the CD is called TestLoan (unlike the Web Service project, the test project may appear anywhere on your hard disk). Make sure that you change the project type in the New Project dialog box, because
Copyright ©2002 SYBEX, Inc., Alameda, CA |
www.sybex.com |
1092 Chapter 25 XML WEB SERVICES
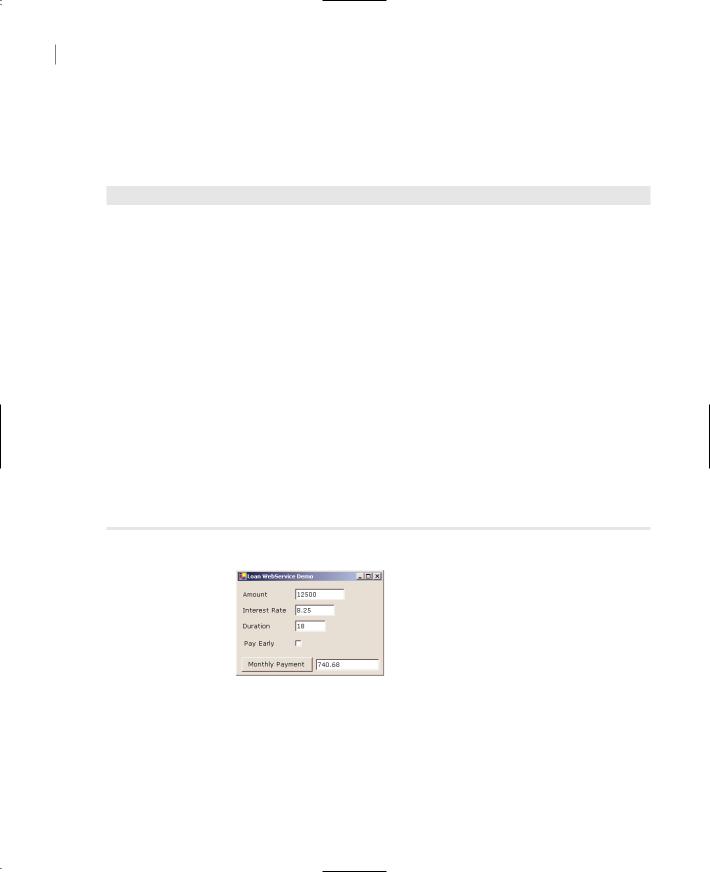
the IDE remembers the type of the last project and will create another Web Service project. The test application’s form is shown in Figure 25.7. To make use of the Web service, add a reference to it as explained in the previous example and enter the code of Listing 25.3 behind the Monthly Payment button.
Listing 25.3: Consuming a Web Service from within a Windows Application
Private Sub Button1_Click(ByVal sender As System.Object,_
ByVal e As System.EventArgs) Handles Button1.Click Dim ws As New localhost.Service1()
Dim amount, duration, rate As Decimal Dim payEarly As Boolean
Try
amount = CDec(txtAmount.Text) duration = CInt(txtDuration.Text) rate = CSng(txtRate.Text) payEarly = False
If chkPayEarly.Checked Then payEarly = True Catch DataException As SystemException
MsgBox(DataException.ToString) Exit Sub
End Try Try
txtPayment.Text = -Math.Round(ws.Loan(amount, duration, rate, payEarly), 2) Catch calcException As Exception
MsgBox(calcException.Message) End Try
End Sub
Figure 25.7
The TestLoan application’s form
Run the application and see that it calculates the monthly payments of properly defined loans. Set the interest rate to a negative value, and the exception raised in the Web service’s class will be caught in your VB application. But of course you should improve the exception-handling code; the exception’s message is too lengthy and too technical for the average user (it’s meant to help the developer, not the user). Figure 25.8 shows the error message cause by a negative interest rate. The
Copyright ©2002 SYBEX, Inc., Alameda, CA |
www.sybex.com |