

Beginning ASP.NET 2.0 With CSharp (2006) [eng]
.pdfChapter 8
Improving the Upload of Pictures
You finish this chapter with an improvement to the page that uploads photos and, in the process, review some ideas from this chapter and Chapters 6 and 7. You will add a feature that creates an entry in the database table of photos when a photo is uploaded. In other words, you will both upload the file and create a new record. The following few paragraphs give an overview of your tasks and the Try It Out gives exact directions.
Start by using the Data Explorer to take a look at the structure of the Gallery table as in Figure 8-12. Each record represents an image a fan has uploaded, with fields for the fan’s name, URL of the picture file, date, and opponent.
Figure 8-12
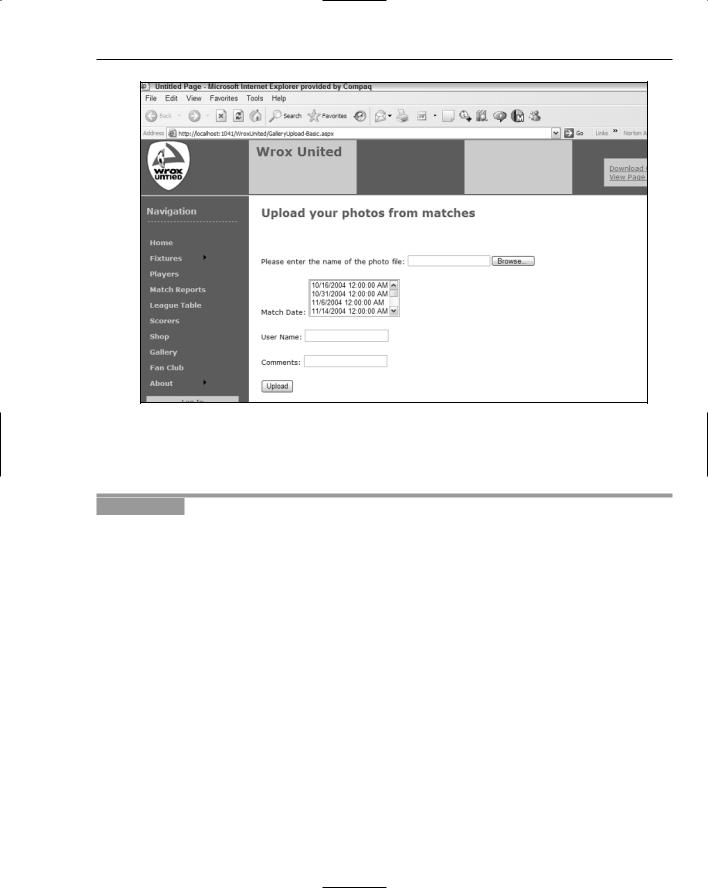
Now you need to add inputs to the page to get the information you need for the fields of the Gallery table. Whenever possible, avoid letting users type information. In this case, the number of matches is reasonably small, so you will create a ListBox control for that input. The SelectCommand that provides data for the ListBox will display the date of the match to the user. The FixtureID will be the ListBoxValue. You will also want to gather the user’s name and comments with text boxes. The page will end up looking like Figure 8-13.
Now the trick will be inserting a new record into the table. You do this by setting up a SqlDataSource control that is enabled for inserting. But you do not need to render any data, so this data source control will not have a data-bound control. Built into the SqlDataSource is the Insert method, which you can invoke from your button-click code.
278
Writing Data
Figure 8-13
In this Try It Out, you enhance the gallery upload so that it performs the upload of the image file and then creates a record for the image file in the Gallery table.
Try It Out |
Uploading Files with Record Creation |
1.Using VWD, open the Solution Explorer and make a copy of the GalleryUpload.aspx pages following these instructions. Find in the file list, but do not open, the GalleryUpload.aspx page. Right-click it and select Copy. Right-click the root of the site and select Paste. Now find the nascent file that named Copy of GalleryUpload.aspx. Rename it GalleryUpload Enhanced.aspx. This procedure ensures proper copying and renaming of the associated
code file.
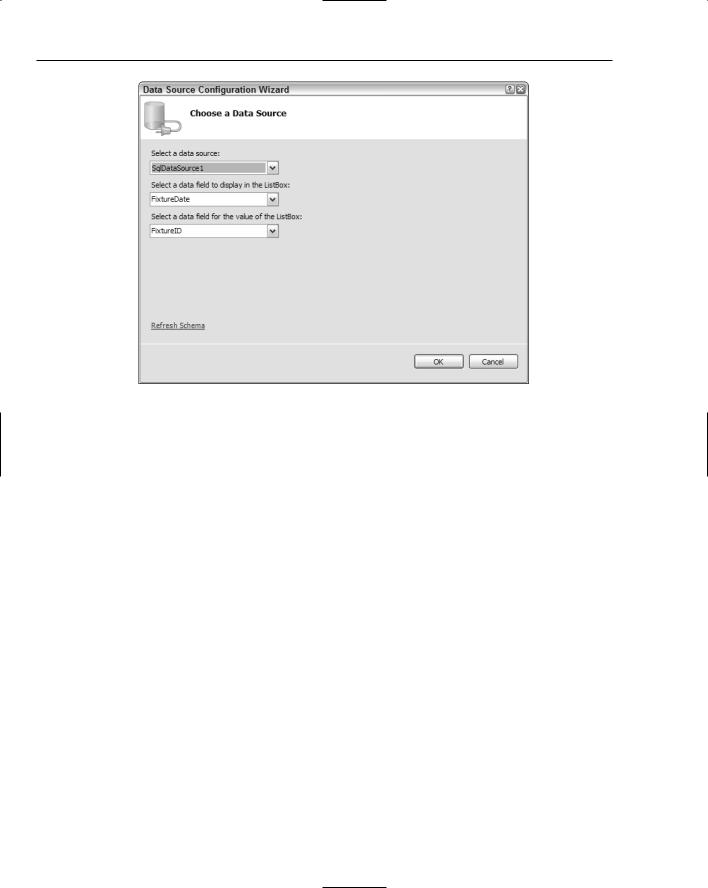
2.Working with GalleryUploadEnhanced.aspx in Design View, move the insertion bar (cursor) below the FileUpload control, add a ListBox, and from the smart task panel, click Choose Data Source. Select a new data source, use a database source, and name the control SqlData SourceFixtures. Use the WroxUnited connection string and set it to display from the Fixtures table only the FixtureID and FixtureDate fields, ordered by date ascending. After finishing the Wizard, you can set the ListBox properties to display the date and field for the value to FixtureID (see Figure 8-14).
279
Chapter 8
Figure 8-14
3.Add to the page two TextBox controls for the fan’s name and notes about the picture. In the Properties window, set the ID of the boxes to TextBoxMemberName and TextBoxNotes. Give them some labels with text that identifies what the user should type in the box.
4.Add a second SqlDataSource to the page that you will configure to create the record in the Gallery table for the new uploaded photo. Name it SqlDataSourceCreateGalleryRecord. Using its smart task panel, configure the data source and choose the WroxUnited connection string. Use the Gallery table and select all of the fields. In the Advanced panel, check the creation of the INSERT, DELETE, and UPDATE commands. Click the Next and Finish buttons. If you want, switch to Source View and delete the commands and parameters for the UPDATE and DELETE functions. They will not be used, so deleting them cleans up the code to make maintenance easier, but they don’t interfere if you want to leave them. Be careful not to delete any end-of-prop- erty double quotes or any end-of-tag > symbols.
5.Switch to Source View and find the set of <InsertParameters>. Modify them so that they come from the four input controls, as per the shaded lines in the following listing of the entire
.aspx page’s code:
<%@ Page Language=”C#” MasterPageFile=”~/site.master” AutoEventWireup=”false” CodeFile=”GalleryUpload-Enhanced.aspx.cs” Inherits=”GalleryUpload” title=”Untitled Page” %>
<asp:Content ID=”Content1” ContentPlaceHolderID=”mainContent” Runat=”Server”> <h2>Upload your photos from matches</h2>
<br /><br />Please enter the name of the photo file: <asp:FileUpload ID=”FileUpload1” runat=”server” /> <br /><br />
Match Date:
<asp:ListBox ID=”ListBox1” runat=”server” DataSourceID=”SqlDataSource1” DataTextField=”FixtureDate”
280

Writing Data
DataValueField=”FixtureID”>
</asp:ListBox>
<asp:SqlDataSource ID=”SqlDataSource1” runat=”server” ConnectionString=”<%$ ConnectionStrings:WroxUnited2 %>” SelectCommand=”SELECT [FixtureID], [FIxtureDate] FROM [Fixtures]”>
</asp:SqlDataSource>
<br /><br />
User Name: <asp:TextBox ID=”TextBoxMemberName” runat=”server”></asp:TextBox> <br /><br />
Comments: <asp:TextBox ID=”TextBoxNotes” runat=”server”></asp:TextBox> <br /><br />
<asp:Button ID=”Button1” runat=”server” Text=”Upload” /><br /> <asp:Label ID=”FileUploadReport” runat=”server”></asp:Label><br />
<asp:SqlDataSource ID=”SqlDataSource2” runat=”server” ConflictDetection=”CompareAllValues” ConnectionString=”<%$ ConnectionStrings:WroxUnited2 %>”
InsertCommand=”INSERT INTO [Gallery] ([FixtureID], [UploadedByMemberName], Notes], [PictureURL]) VALUES (@FixtureID,@UploadedByMemberName,@Notes,@PictureURL)”
OldValuesParameterFormatString=”original_{0}” > <InsertParameters>
<asp:ControlParameter Name=”FixtureID” ControlID=”ListBox1” PropertyName=”SelectedValue” Type=”Int64” />
<asp:ControlParameter Name=”UploadedByMemberName” ControlID=”TextBoxMemberName” PropertyName=”Text”
Type=”String” />
<asp:ControlParameter Name=”Notes” ControlID=”TextBoxNotes” PropertyName=”Text” Type=”String” />
<asp:ControlParameter Name=”PictureURL” ControlID=”FileUpload1” PropertyName=”FileName” Type=”String” />
</InsertParameters>
</asp:SqlDataSource>
</asp:Content>
6.Now you just need to modify the GalleryUpload-Enhanced.aspx.cs code page (shown here). In Design View, double-click the Upload button and add the following shaded line of code:
using System;
using System.IO;
...
protected void Button1_Click(object sender, EventArgs e)
...
try
...
catch(Exception exUpload)
281

Chapter 8
{
// display status of error FileUploadReport.Text = exUpload.Message;
}
SqlDataSourceCreateGalleryRecord.Insert();
}
else // probably file was not selected
{
...
7.Save the page and test it in your browser by uploading any picture (you can use My Pictures/ Samples) along with picking a match and your name and a comment. Figure 8-15 shows the screen prior to clicking the Upload button.
Figure 8-15
8.Confirm your success by closing the browser, returning to VWD, opening the Database Explorer, and expanding WroxUnited and then Tables. Right-click Gallery and select Show Table Data. Observe your new record as in the bottom line of Figure 8-16.
282 |
Figure 8-16 |

Writing Data
How It Works
The objective here was to create a new record in the Gallery table whenever a user uploaded an image. You started by setting up inputs so the user could enter data needed for the record. The ListBox offered a choice of games and two TextBox controls took in the user’s name and notes. In order to populate the ListBox, you created a SqlDataSource that picked up two fields from the Fixtures table.
In order to create a new record, you need to add a SqlDataSource control that holds the INSERT functionality. When you asked VWD to add commands for insert, you got a lot, and it wasn’t what you wanted. You deleted the commands and parameters for SELECT, UPDATE, and DELETE because you won’t use them. Then within <InsertParameters>, you changed to use the input controls as sources.
Last, you wanted to actually tell the SqlDataSource to perform the insert of a new record. You did that with a single line of code in the Button_Click event that invoked the Insert() method.
This enhanced page brings together several ideas from the last few chapters. You used code in an event (Chapter 6) to catch problems with the FileUpload and to invoke the data source control’s Insert() method. You read from a database (Chapter 7) to stock the ListBox. And, last, you wrote to a database (in this chapter) to create a new record to represent the uploaded picture.
Summar y
Writing data includes creating entire new records (called inserting), changing values in existing records (updating), and removing entire records (deleting). Both data source and data-bound controls contain code for behavior to write to databases. This chapter explained how to turn on and use these behaviors.
Most, but not all, data controls support writing. Selection lists (DropDownList and ListBox) do not support writing. GridView can update and delete, but not insert. DetailsView or FormView are ideal for all forms of writing.
Any database front-end that updates data can run into problems when a value is simultaneously changed and needed for identifying a unique record. ASP.NET 2.0 manages a dictionary of old and new values. The fields to be included in the dictionary are listed in the DataKeyNames property of the databound control.
The pattern for inserting, updating, and deleting is to make three changes to the data controls. In the data source control, you must add the appropriate command with the value of a valid SQL statement. You must also include a set of parameters that feed values into the SQL statement. In the data-bound control, you must include a CommandField of the type equal to the writing operation you want to perform. All three of these changes are made through VWD with check-offs in wizards or the Common Tasks panels.
The parameters can be a little tricky until you gain some experience. Simple parameters will hold the existing values that came from the database. ControlParameters will hold values that were entered by the user into controls other than the data-bound control that holds the parameter. Reference to a value in a parameter is made in a command by placing an at symbol (@) before the parameter’s name. Parameters are organized into sets for each kind of writing command. So when performing an INSERT, ASP.NET 2.0 will look up values in the parameter set within <InsertParameters>.
283

Chapter 8
Keep in mind two caveats when writing data:
Writes can lead to logical and organizational errors. For example, your database administrator will not let you delete a customer if that customer has an order (otherwise the order would be shipped to a non-existent customer). It behooves you to limit your user requests and then also be prepared to handle a rejection from your database.
Writing commands opens your data to a number of types of attacks. Whenever possible, present the user with a list of options rather than allowing typed input. When typing is absolutely necessary, use the ASP.NET 2.0 validation controls.
The capability to transfer files from the user to the server enhances many business objectives. A single, simple control provides the functionality to identify a file. However, the actual transfer requires the use of a button to actually execute the uploading behavior. As demonstrated in the final exercise, that button can also trigger the execution of writing behavior in a data source control that has no data-bound control. The data source control can use control parameters to gather values and create an insert in a table.
Over the last eight chapters you have seen how powerful ASP.NET 2.0 can be with the use of practically no code. You have solved many common business scenarios such as logging on, personalization, and working with data. But in some more advanced cases, you will be forced to write custom code, and for those techniques, carry on to Chapter 9.
Exercises
1.Enabling the capability to write to a database requires changes to the properties of a data source control, a data-bound control, or both?
2.Describe the difference between an asp:Parameter and an asp:ControlParameter.
3.What problem does the DataKeyNames property solve?
4.A page needs to delete the date of birth value from one record. Which command should be used?
5.What tags must be added to a page to allow a GridView to create new records?
284

9
Code
You’re now getting to the stage where the site is getting more features, and you need to start learning more about code. Some of the code used in previous chapters might not have been explained fully — that’s because what the code was doing was more important than the actual code itself. It’s not that the code wasn’t important, but rather that the technique being taught was the key; understanding how the actual code worked could come later. Now it’s time to learn about the basics of writing code, what makes good code, and how you put all that code together.
In particular, this chapter looks at the following topics:
What data types and variables are and how they are used
How you make decisions in your code
How you repeat lines of code
What object-oriented programming means and why it’s important
How to think about structuring your code so it’s well organized and easy to maintain
How one of the new language features in ASP.NET 2.0 eases working with collections of objects
There’s a lot to cover, and although some of it might sound difficult, it’s actually quite easy. You start with finding out about data types.
Variables and Data Types
When you use applications, you don’t really care how the application stores your data, just that it does. As a programmer, however, you have to think about this. What sort of data is the user entering? Is it text, numbers, dates, or something else? This matters because how you store data internally in your application affects not only how you deal with the data, but also what you can do with that data. To store data internally, variables are used (variables are simply names, used to store information during code), and variables have types; there is a type for each type of data. For example, there is a data type called string, unsurprisingly used for strings, or text data. There is a data

Chapter 9
type called DateTime for dates and times, an Integer data type for whole numbers, and a Decimal or Double data type for floating-point numbers. Each has different characteristics. The int type can only store integer numbers, and trying to store any other type of data into an int will raise an exception.
Likewise, the DateTime data type can only store dates and times. Following is the full list of data types:
bool is used to store either true or false. The default value is false.
byte is used for a single byte of data. This can be a single character or a number from 0 to 255. The default value is 0.
char is used for two bytes of data. This can be a character or a number from 0 to 65,535. Because it is bigger than a byte, char can store double-byte characters like those used by foreign character sets such as Chinese. The default value is 0.
DateTime is used to store a date and time. The default value is 0:00:00 (midnight) on January 1, 0001.
decimal is used for decimal values. It supports up to 29 significant digits and is therefore the most accurate type for financial numbers. The default value is 0.
double is used for floating-point numbers. Unlike the decimal data type, double has a smaller range and is less accurate. However, it is also faster in use, so it is the preferred data type for floating-point numbers unless a great depth of precision is required. The default value is 0.
int is used for whole numbers between –2,147,483,648 and 2,147,483,647. The default value is 0.
long is used for whole numbers between –9,223,372,036,854,775,808 and 9,223,372,036,854,775,807. The default value is 0.
Object is used to represent objects. The default value is null.
sbyte is used to hold whole numbers between –128 and 127. The default value is 0.
short is used for whole numbers between –32,768 and 32,767. The default value is 0.
float is used for floating-point numbers that don’t require the full size of a double. The default value is 0.
string is used for storing text (or string) data. The default value is null in C#.
uint is the unsigned equivalent of an int. Because it is unsigned it can only store positive numbers, giving a range of 0 to 4,294,967,295. The default value is 0.
ulong is the unsigned equivalent of a long. Because it is unsigned it can only store positive numbers, giving a range of 0 to 18,446,774,073,709,551,615. The default value is 0.
ushort is the unsigned equivalent of a short. Because it is unsigned, it can only store positive numbers, giving a range of 0 to 65,535. The default value is 0.
Having different data types allows the type to provide features that only that type requires. For example, the DateTime type allows dates to be manipulated, the individual parts of the date or time to be extracted, and so on. Also, data types allow you to choose the most efficient way of storing data, so if you need to store a really long number, you would use a long. A long takes up more room in memory than a short, so if you only ever needed to store numbers between 1 and 100, you wouldn’t use a long. In essence, the data type you choose depends not only on the type of data, but also its size.
286

Code
Common Language Runtime Types
This may seem confusing, but there are different names for the same data types. This is because there are data types that the language uses, and data types that the Common Language Runtime (CLR) uses. Simply put, the CLR is the system that actually makes .NET run. You don’t need to know much about it now, although it’s definitely worth learning about as you become more experienced. The reason that the CLR has data types and the language has data types is that the CLR is common to all languages in .NET. Whether you use Visual Basic .NET, C#, or even COBOL .NET, underneath you are using the CLR. However, languages have history (apart from C#, which was new for .NET, but C# has a C and C++ base in terms of the language syntax), and so have data types of their own. For compatibility reasons, it makes sense to keep these specific language types. This enables users of the language to work with familiar data types, and the compiler takes care of using the actual CLR data type.
For much of what you do, you’ll use the language data types, but there are times when you need to know what CLR data type a language data type maps onto, and the following table shows this.
CLR Type |
Visual Basic Type |
C# Type |
|
|
|
Boolean |
Boolean |
bool |
Byte |
Byte |
byte |
Char |
Char |
char |
DateTime |
Date |
DateTime |
Decimal |
Decimal |
decimal |
Double |
Double |
double |
Int32 |
Integer |
int |
Int64 |
Long |
long |
Object |
Object |
Object |
SByte |
SByte |
sbyte |
Int16 |
Short |
short |
Single |
Single |
float |
String |
String |
string |
UInt32 |
UInteger |
uint |
UInt64 |
ULong |
ulong |
UInt16 |
UShort |
ushort |
|
|
|
When you look at converting between data types, you’ll see why it might be important to know the underlying data type.
287