
Beginning ASP.NET 2.0 With CSharp (2006) [eng]
.pdf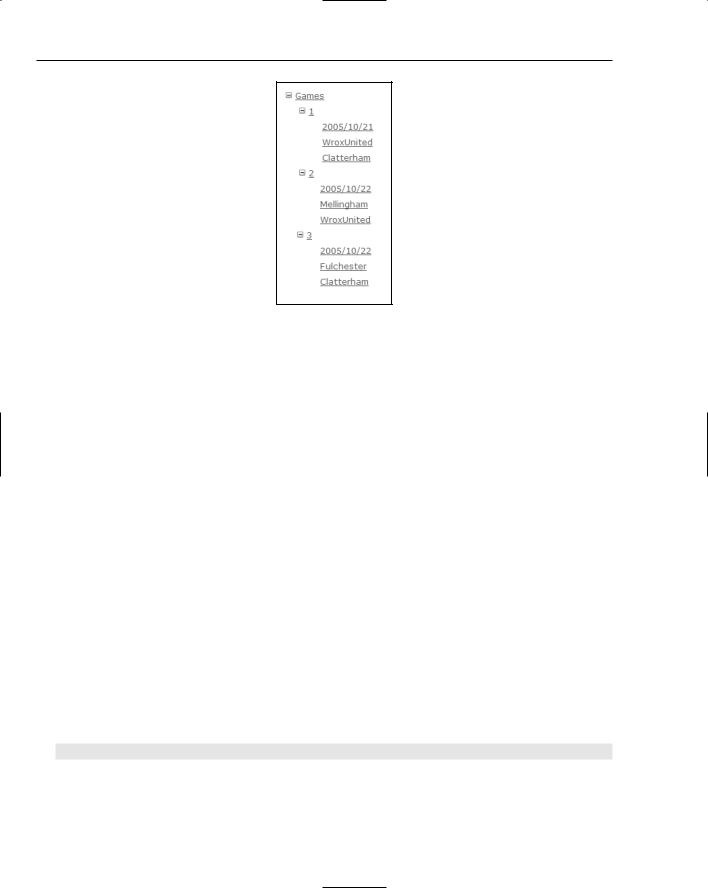
Chapter 7
Figure 7-48
How It Works
In the first step, you found the TreeView control in the Navigation panel of the Toolbox. After dragging it to the page, you can set its source of data the same way that you do for other data-bound controls, by using the Choose Data Source in the smart task panel. But in the case of a TreeView, you want to use a hierarchical source, so you pick the XML file you made in the last exercise.
As you observed in the first run of the page, by default you only get the generic names of the nodes, not the actual data. The data is specified by using the TreeViewDataBindings Editor. You can add (or remove) tags to which you want data rendered. After a field is added, you go to the right side and select its TextField property. If you have data within a tag, such as Number within the <Game> tag, then the name of that data will show up without a number sign. If the data is between an opening and closing tag, such as <Home>WroxUnited</Home>, the TextField option will be set to #InnerText.
Binding Syntax
In this book, you have taken advantage of VWD’s features to build code and thus spent little time examining the code that was built for you. But it is worth understanding code that actually brings together the data source controls and the data-bound controls. Within a template for a GridView, DataList, Repeater, DetailsView, or FormView, you see the following code:
<asp:DataList ID=”DataList1” runat=”server” DataSourceID=”SqlDataSource1”
<ItemTemplate>
<asp:Label ID=”FixtureIDLabel” runat=”server”
Text=’<%# Eval(“FixtureID”) %>’
BackColor=”Yellow”></asp:Label>
</ItemTemplate>
</asp:DataList>
258

Reading Data
The shaded line instructs the page to bind the control named FixtureIDLabel to the field named FixtureID in the data source SqlDataSource1. This method (a request for a specific behavior), named Eval(), actually performs the connection between one field in the data source control and a rendering mechanism in the data-bound control. Two similar methods exist: Eval() is for read-only, and Bind() allows both read and write (and is covered in Chapter 8). Within templates, VWD will write code to specifically employ these methods. But if there is no templating, the binding is implied and will not appear in the code.
Summar y
ASP.NET 2.0 greatly eases the use of data on a web page by encapsulating most of the code into easy-to- use controls. In this chapter, you learned that data source controls and data-bound controls work together. The former provides a connection to an information source, and the latter renders that information onto
a page. ASP.NET 2.0 ships with four data source controls — SqlDataSource, AccessDataSource, XMLDataSource, and SiteMapDataSource — each optimized to work with a particular type of data. This chapter focused primarily on the SqlDataSource control, because it can be used with any database that can understand SQL statements. A fifth data source control, ObjectDataSource, is used for customdesigned business objects.
After describing the basics of data source and data-bound controls, the chapter drilled down into the specifics of how to use them on your pages, specifically covering the following topics:
How to use the GridView, DataList, and Repeater controls to display tabular data
How to use the DetailsView and FormView controls to display single records
How to use the ListBox and DropDownList controls to display a selection of records
How to use the TreeView, SiteMapPath, and Menu controls to display tree data
Additionally, this chapter covered the use of templates and wizards when setting up data source and data-bound controls. Recall that a template is a space into which you can drag various fields or other controls. When they are in a template, these controls can be bound to the record currently shown by the template.
Most data-bound controls offer templates. These spaces can hold many kinds of controls that can be data-bound, including labels, text boxes, and images. All of the bound controls within a template will have their information revised when the user moves from record to record. To change a template, you select the control and switch to Template Editing mode. After making your changes, be sure to click the smart task panel’s End Template Editing to revert to normal mode.
Data-bound controls can be configured to display only a portion of the records. This behavior can be set statically by a value in a WHERE clause of the SELECT command of the data source control. The restriction of records can also be set dynamically. The parameter can come from a querystring or another data-bound control. For example, the selection in a DropDownList (master control) can be used as the parameter of a WHERE clause that limits the records shown in a GridView (child control).
Reading and displaying data is half of the data story. The other half is getting information to flow in the opposite direction. Chapter 8 looks at how to get information from users and write it to your data store.
259

Chapter 7
Exercises
1.Describe the general capabilities of data source and data-bound controls.
2.Which data-bound controls render data in tables?
3.Compare and contrast the DetailsView and FormView controls.
4.Describe how a GridView control can limit its records to only those that match a player’s name selected in a DropDownList of last names.
5.Which data source control is best suited for the Menu or SiteMapPath data-bound controls?
260

8
Writing Data
In Chapter 7, you learned how to read data from a database and present it on a page. In this chapter, you study the reverse: how to gather data from a user and write it to a database. When this book refers to writing, it means three kinds of operations: the creation of new records, changing existing records, and deleting records. The pattern is the same for all three, and the setup is made quite easy with the internal functionality of the data source and data-bound controls, as well as the auto-typing features of VWD. As a bonus, this chapter discusses transferring files from the browser to the server and then wraps up with an exercise that integrates several techniques from Chapter 6 through this one.
Introduction to Writing Data
ASP.NET 2.0 uses two groups of controls to work with data, as previously discussed in Chapter 7. Data source controls provide a connection to a source of data and enable certain behaviors, such as reading and writing to the data source. Data-bound controls provide a user interface on the page that can take advantage of the data source control capabilities. For the most part, the controls are mix-and-match. A DropDownList can use a SqlDataSource, XMLDataSource, or
AccessDataSource control. Conversely, a SqlDataSource control can have its output rendered by a GridView, DetailsView, DataList, or DropDownList data-bound control. Having noted that flexibility, data controls are optimized for either tabular (relational) or hierarchical (tree) data.
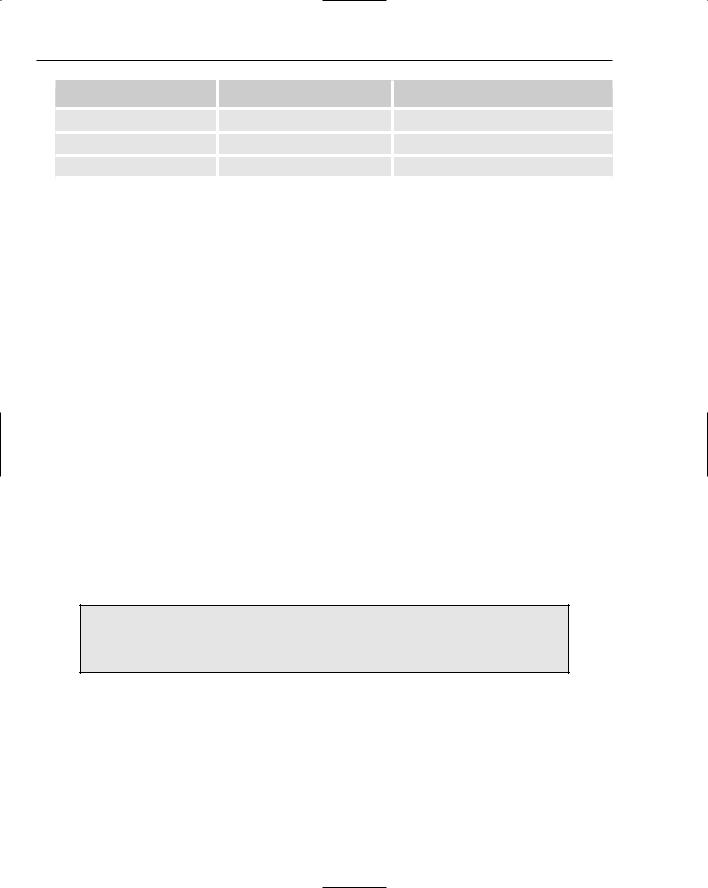
Data controls are optimized for one of two ways to organize information, as discussed in Chapter 7. The first type is relational and the second is hierarchical. Although there can be some crossover in functionality, the division of the controls is described in the following table.
|
Relational |
Hierarchical |
Data Source Controls |
SQLDataSource |
XmlDataSource |
|
AccessDataSource |
SiteMapDataSource |
|
ObjectDataSource |
|
|
|
Table continued on following page |
Chapter 8
|
Relational |
Hierarchical |
Data-bound Controls |
GridView |
TreeView |
|
DataList and Repeater |
Menu |
|
DetailsView and FormView |
SiteMapPath |
Both data source and data-bound controls have functionality (like writing to a database) built into their code and you can specifically turn on any or all of those behaviors. For example, in Chapter 7 you enabled paging and sorting. Most of this chapter discusses how to turn on the writing behaviors.
Before diving into details, let us clarify some terminology surrounding writing data. First, writing actually means changing data, as opposed to just reading it. That means that writing includes changes to existing records, creating new records, and deleting existing records. ASP.NET 2.0 uses some industrystandard language for control properties. Changing an existing record is called an UPDATE, and creating a new record is called an INSERT or INSERT INTO. DELETE means removing an entire record from the database. Note that if you want to delete one value from an existing record (for example, the date of birth of one player), you would Update that player’s record with a change of the birth date value from a date to NULL. The term SELECT, which you used in the last chapter, means reading data (no changes). ASP.NET 2.0 controls add three terms that are used to accept a user’s actions. NEW means to switch to a view of a control that allows the user to enter data for a new record. This action would be followed by create, which actually sends the SQL INSERT INTO instruction to the database. And last, EDIT means switch to a view wherein the user can change a record’s data. That would be followed by a click on UPDATE to actually execute the updating instruction.
Options for Writing Data
Not all data controls support writing. Of the data source controls, all support writing data except for the SiteMapDataSource. But among the data-binding controls, there are more limitations. The selection lists (DropDownList and ListBox) do not support writing. The new ASP.NET 2.0 data-bound controls support the best methods of writing data: GridView, DetailsView, and FormView. However, GridView can only update existing records, not create new records. DataList and Repeater can be used to write data, but because they are older controls, in many cases they must use the older ASP.NET 1.1 techniques.
GridView does not support the creation of new records. But GridView can easily open a DetailsView control (as you practiced in Chapter 7) and that DetailsView can create a new record.
DataKeyNames
When you enable some types of data writing, VWD will add a property to the data-bound control named DataKeyNames. The purpose is to hold both old and new values of a field so that the writing can be performed correctly. To understand this role, imagine that you have a table of comments about Wrox United games named MatchReports. In the table you have as the first field (as most tables do) a field that contains an ID number unique to each row. You call it MatchReportID, and it gets values of 1, 2, 3, and so forth, as fans send in reports about matches. Now say that there was a mix-up and the administrator has to change the ID of a report from 20 to 19. When the administrator makes the change, he starts
262
Writing Data
by selecting which record to change. ASP.NET 2.0 will store that record’s ID value in a parameter, just like it did in Chapter 7 when you used a GridView as a master control. Next, the administrator changes the value of the ID field. When he sends that command to the database, it will look something like the following:
UPDATE MatchReports SET MatchReport=19 WHERE MatchReport=@MatchReportID
Notice that there is the name of the field to change (MatchReportID) and the new value (19). That command also holds an identification of which record to change, something like WHERE MatchReportID= @MatchReportID. But there is a conflict because you have two potential values that could go into @MatchReportID: the old one as saved by the GridView (the value of 20) and the new one that the administrator entered (the value of 19).
DataKeyNames solves this problem by creating a dictionary that keeps two values for fields in its list. One value is old and one is new. When a writing command is issued to a database, ASP.NET uses its smarts to supply the new value from DataKeyNames for the SET part of the command and to use the old value from DataKeyNames for the WHERE part of the command. It would be wasteful and slow to load up the DataKeyNames dictionary with every field, particularly because most fields will not raise conflicts. VWD automatically adds to the DataKeyNames those fields that are structured as unique in the database. You can add others, but VWD usually gets it right. In summary, DataKeyNames holds names of fields for which ASP.NET 2.0 must remember both old and new values. When using VWD, you rarely have to change DataKeyNames.
Changing Existing Records
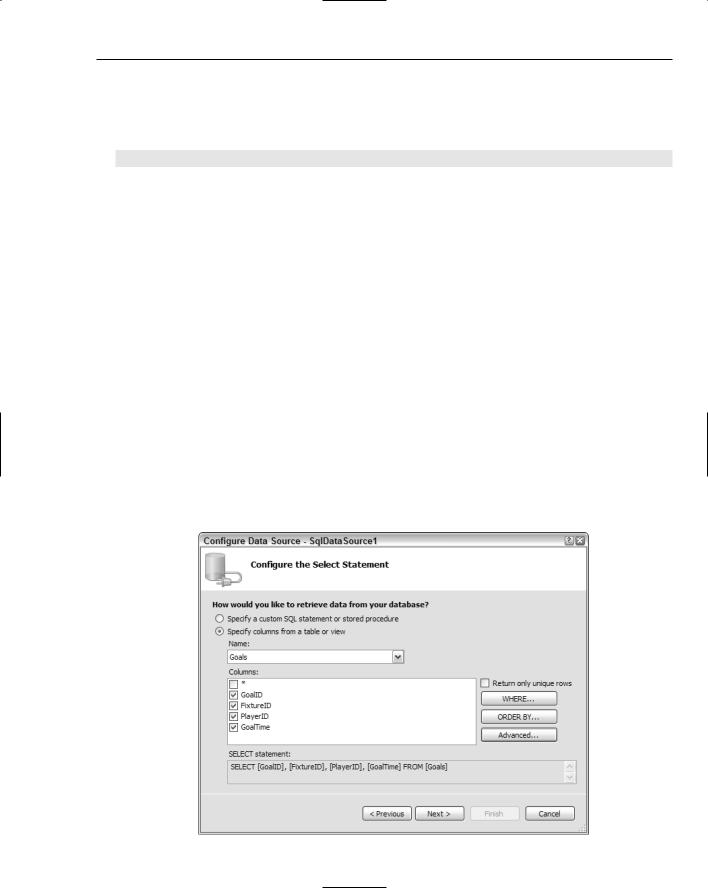
The capability to change an existing record can be turned on with two simple steps using VWD. When you create a data source control, you go through a panel in the wizard that asks you to select the table and columns (see Figure 8-1).
Figure 8-1 |
263 |
Chapter 8
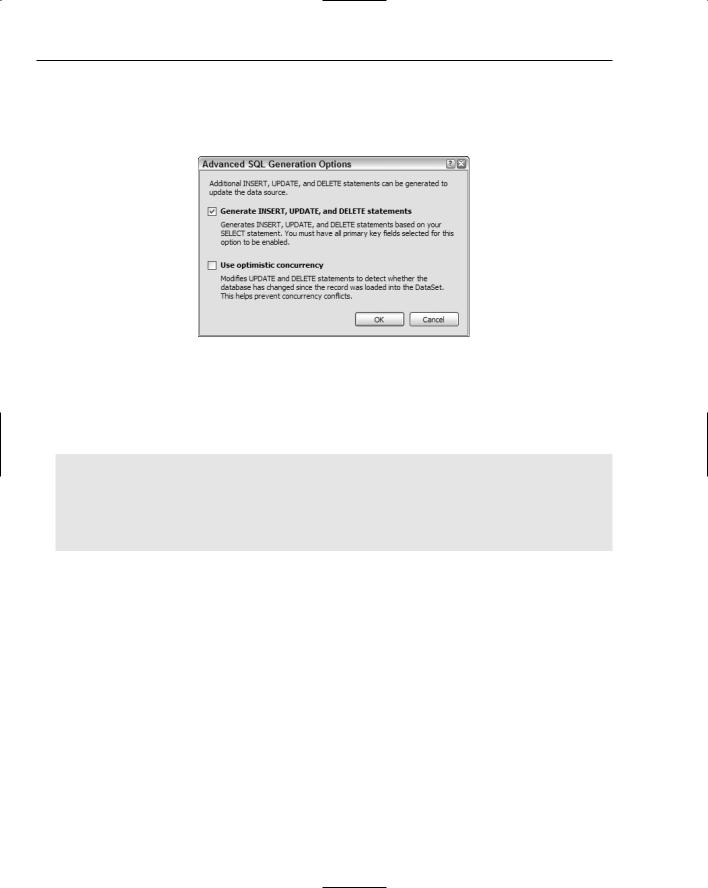
There is also an Advanced button that gives you the option to tell VWD to generate INSERT, UPDATE, and DELETE statements (see Figure 8-2). This simple step enables the UPDATE behavior of the data source control. Also, checking Use optimistic concurrency will reduce conflicts of two updates simultaneously on a busy web site.
Figure 8-2
VWD takes care of all the work for you, fast and without error (we wish we could say the same for the Wrox United strikers). Two changes are made to the data source control. First, an UPDATE statement is added, similar to the following (INSERT and DELETE statements are also added, but those are discussed later):
<asp:SqlDataSource ID=”SqlDataSource1” runat=”server”
...
UpdateCommand= “UPDATE [MyTable]
SET [Field1] = @Field1, [Field2] = @Field2 WHERE [Field1] = @Field1>
...
</asp:SqlDataSource>
The UPDATE statement indicates that you want to change an existing record. You provide the table holding the record (MyTable):
UpdateCommand= “UPDATE [MyTable]
Then you provide a set of field names and the values you want them to contain. ASP.NET 2.0 generally does not specify those values directly in the command; rather, it uses a reference to a parameter that holds the value. References to parameters begin with an at symbol (@) before the parameter’s name, as shown here:
SET [Field1] = @Field1, [Field2] = @Field2
Note the WHERE clause at the end, which specifies which record to modify. The following syntax says to change the record in the database for which the Field1 value matches the value held in the Field1 parameter:
WHERE [Field1] = @Field1
264

Writing Data
You know that the value to match is from the parameter because you use @ before the field name, which directs ASP.NET 2.0 to get the value from the parameters list. Without the WHERE clause, the update would change all of the records to have the new values the user entered.
VWD also adds a set of tags to the data source control to create the UPDATE parameters. ASP.NET 2.0 automatically fills these with the values that currently exist in the table. When the user makes a change to the data-bound control, ASP.NET 2.0 intelligently substitutes in the new value. The exception is for unique fields such as identifiers, in which case ASP.NET 2.0 keeps both the old and new values in the DataKeyNames dictionary as discussed in the introduction to this chapter.
Parameters (of any type) are not controls. They are tags within data source controls.
<ControlParameters> can hold values in the same way as <UpdateParameters>. Whereas
<UpdateParameters> hold the values that the data source control read from the existing record, <ControlParameters> hold values that the user enters or selects from controls other than the databound control that is changing the data. For example, you may be changing the date in a GridView, but you want the date to come from a selection in a Calendar control. You encountered <Control Parameters> in Chapter 7 when you created pages with a master-child relationship, and you will see examples in context of writing data later in this chapter.
An optional property can be added to a data source control: ConflictDetection=”Compare AllValues”. Conflict detection implements the DataKeyNames solution to avoid two users updating the same record at the same time.
In a data-bound control that implements updates, you see two changes as well that are needed to move from a read-only control to a control that can update records (highlighted in the following code listing). First is the addition of a property for DataKeyNames. Second is in the list of fields, where you see the following new “field” added. Called a CommandField because it offers the user a button that will execute a command, it is only a field in the sense that ASP.NET 2.0 will create a field-like rendering for the button on the data-bound control:
<asp:DetailsView ID=”DetailsView1” runat=”server” AutoGenerateRows=”False” DataKeyNames=”FixtureID”
DataSourceID=”SqlDataSource1” Height=”50px” Width=”125px”> <Fields>
<asp:BoundField DataField=”FixtureID” HeaderText=”FixtureID” InsertVisible=”False” ReadOnly=”True” SortExpression=”FixtureID” />
<asp:BoundField DataField=”FixtureDate” HeaderText=”FixtureDate” SortExpression=”FixtureDate” /> <asp:CommandField
ShowEditButton=”True” ShowInsertButton=”True” /> </Fields>
</asp:DetailsView>
265
Chapter 8
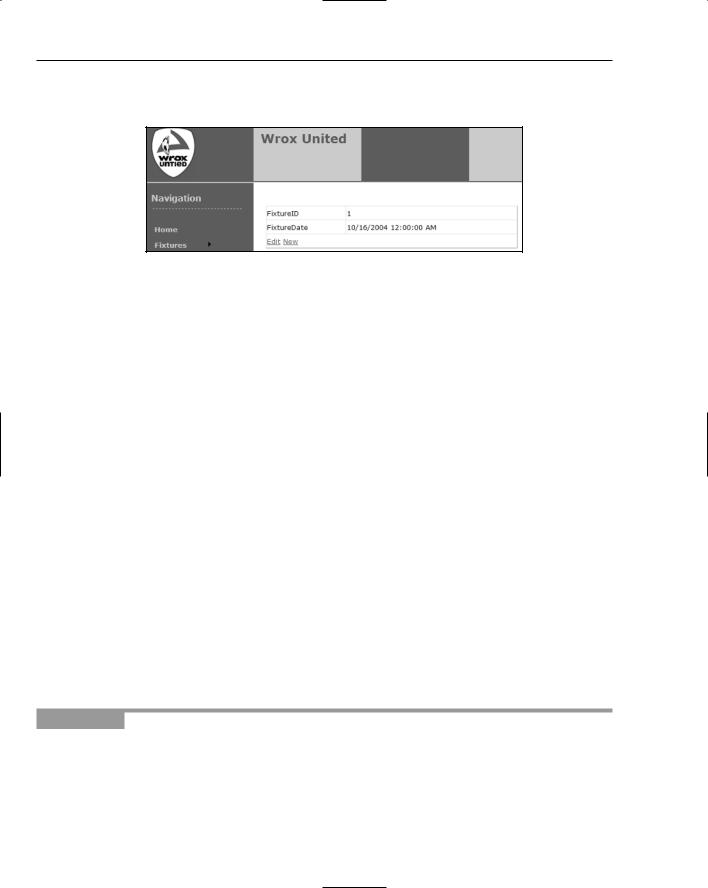
For example, the preceding code would contribute toward a DetailsView as follows in Figure 8-3 with the Edit and New buttons at the bottom of the data-bound DetailsView control.
Figure 8-3
The following small tag enables all of the functionality in the data-bound control to update records. This tag will render itself as a button labeled EDIT on a DetailsView or a column of EDIT buttons in a GridView. It will also automatically hide itself and substitute buttons for Update and Cancel when the control is in edit mode:
<asp:CommandField ShowEditButton=”True”
A common problem is to attempt to update a record with invalid data. For example, in the box for Goals Against, a user may enter a bit of text or a date. When the data controls send this to the database, an error will arise because the database is configured to limit values in a GoalsAgainst field to be integers. The problem can be solved in several ways, two of which are aspects of ASP.NET 2.0. First, you
try to eliminate user-typed input whenever possible. For example, for the user to enter values for GoalsAgainst a football team, you could offer a list box with options from 1 to 10 (maybe 1 to 20 for Wrox United). The second technique is to use the ASP.NET 2.0 validation controls, which are covered in Chapter 15. As a rule of thumb, anything that a user types should be run through a validation control before it is sent to the database. This policy greatly reduces the susceptibility to a SQL injection attack.
The preceding directions explain the steps to turn on editing at the time you create a control. You can still turn on this feature using VWD after the control is on a page. Open the Common Tasks panel for the data source control and click Configure Data Source. You walk through the wizard again, but with choices filled in as per the existing state. It is easy to click the Advanced button and add the extra commands. Then go back and open the Common Tasks panel for the data-bound control and enable the Editing feature.
In the following Try It Out, you practice the technique to enable updating data in a GridView and a DetailsView control by changing data for fixtures (games). You will be building on the Fixtures
.aspx page you created in Chapter 7 that had a GridView with a child control of a DetailsView.
Try It Out |
Updating Existing Records |
1.In VWD, open the chapter web site at C:\BegASPNET2\Chapters\Begin\Chapter08, and open the Fixtures.aspx page in Design View.
2.Add the remainder of the fields to the GridView and its SqlDataSource. Start with the smart task panel of DataSource1 and click Configure Data Source. Click Next to go past the connection and then add all of the fields in the checklist. Click Next and Finish. Select the GridView1
266
Writing Data
control, open its Common Tasks panel, and click Edit Columns. Select the FixtureType field and then click the Add button. Repeat for the other fields that are not selected, and click OK to end editing. Enable Editing and, if not already enabled, enable Selection.
3.Select the SqlDataSource2 control (used by the DetailsView), open its Common Tasks panel, and click Configure Data Source. Make sure you select WroxUnited for the connection. On the Configure Select Statement screen, select the option to specify the columns from a table or view, select the Fixtures table, and select all columns individually (not the *).
4.Click the Advanced button, and on the Advanced window, turn on both options. Click OK to close the window, then click Next and Finish to close the configuration wizard. As always, accept the refresh of the data keys if offered.
5.Select the DetailsView data-bound control and open its Common Tasks panel. Enable Editing. Click Edit Fields and, as in the GridView, select the remaining fields and click Add for each. Close the panel. With these simple changes, you have enabled editing of fixtures in both the
GridView and DetailsView.
6.You will make one final change. VWD is overzealous in creating the WHERE clause for the UpdateCommand. By default, VWD added a check of every field prior to updating. You can be confident that if you match the FixtureID, you have the right record. So in Source View, modify the UpdateCommand of SqlDataSource2 (be sure you pick number 2) to delete the shaded section in the following code — you may have to scroll the Source window to see the UpdateCommand. Your line breaks may be different — we modified the listing for clarity. Be sure that the command still ends with the “> characters:
UpdateCommand=”UPDATE [Fixtures] SET
[FixtureDate] = @FixtureDate, [FixtureType] = @FixtureType, [GoalsFor] = @GoalsFor, [GoalsAgainst] = @GoalsAgainst, [Notes] = @Notes,
[Opponents] = @Opponents WHERE
[FixtureID] = @original_FixtureID
AND [FixtureDate] = @original_FixtureDate AND [FixtureType] = @original_FixtureType
AND [GoalsFor] = @original_GoalsFor
AND [GoalsAgainst] = @original_GoalsAgainst AND [Notes] = @original_Notes
AND [Opponents] = @original_Opponents
“>
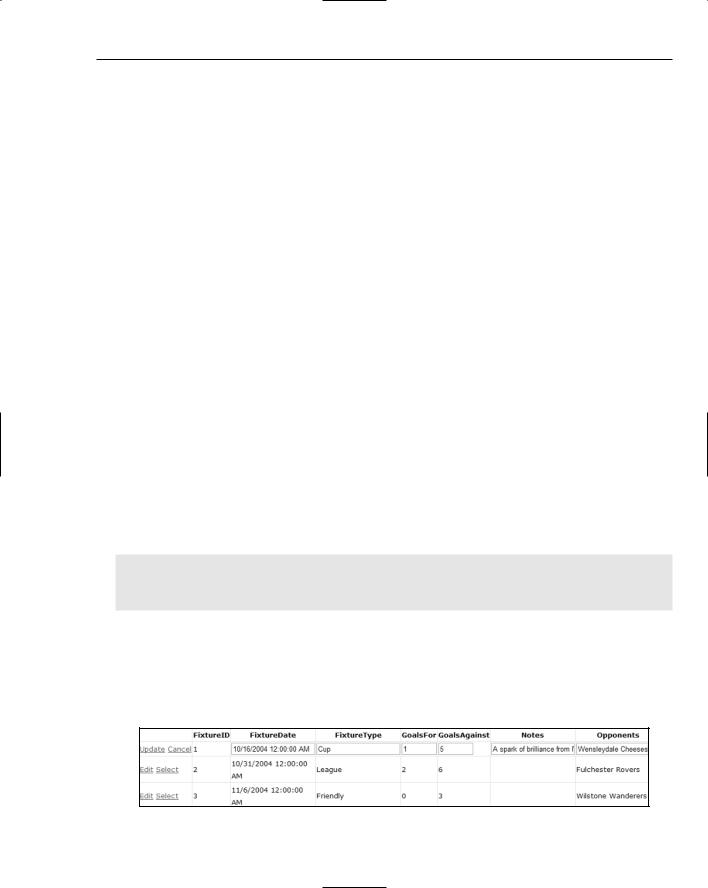
7.Run the page in your browser. In the GridView control, try clicking Edit and changing the name of an opponent as in Figure 8-4. Then do the same in the DetailsView control as shown in Figure 8-5.
Figure 8-4
267
