

Beginning ASP.NET 2.0 With CSharp (2006) [eng]
.pdfChapter 7
<asp:SqlDataSource ID=”SqlDataSource1” Runat=”server” providerName=”System.Data.OracleClient”
ASP.NET 2.0 can use virtually any source of data, including OLEDBor ODBC-enabled systems. Access files can be used for lightly loaded local sites, but complexities emerge when the MDB file has a security scheme. Extensive discussion of the permutations, advantages, and syntax are presented in several chapters of our sister book, Beginning ASP.NET 2.0 Databases.
Data-Bound Controls
Keep in mind the basic model of ASP.NET 2.0 for using data. Two controls must be on the page: a data source control and the data-bound control. The remainder of this chapter focuses on the various databound controls. It starts with selection lists; moves on to the GridView, DataList, and Repeater; the two single-record-display controls (DetailsView and FormView); and finally the tree view for hierarchical data. Along the way, we will pause to look at how multiple data-bound controls can be used to set parameters for each other.
You can add data-bound controls to a page (in Design View) using VWD in three ways:
Add the data-bound control after adding a data source control and point to the existing data source control.
Add the data-bound control directly without an existing data source control, and let the VWD wizard guide you through setting up a data source control.
Add the field names directly from the Database Explorer to the page, and let VWD set up both an appropriate data-bound control and a data source control.
This list increases in terms of ease as you move down the list, but decreases some of your options. For example, a direct drag-and-drop of field names automatically creates a GridView, whereas in the second option you could create a DropDownList.
Data-Bound Selection Lists
Data-bound lists present the user with a set of data from the database and imply a request that the user select from the list. ASP.NET provides four types of lists for user selection: DropDownList, ListBox, RadioButtonList, and CheckBoxList. You can add the items in the selection list either by hard coding (static) or from a data source control (dynamic). After the user makes a selection, the value is available to your code or to other controls on the same page, or even controls on different pages.
It is easy to confuse the topic of this section (lists that request a user selection) with the control named ASP.NET DataList, which presents data without expectation of user selection. ASP.NET DataList is covered later in the chapter.
218

Reading Data
All four of these selection controls support a pair of properties that are easily confused. The first is the DataTextField property, which determines the text that the user will see. Related, but different, is the DataValueField property that will hold the value that is used internally in your site to process the user’s selection. For example, the DataTextField control may show a combination of a customer’s full name and city. But that long and mixed value is not useful to select the single customer from your Customers table. So you set the selection list control’s DataValueField property to be the customer ID number, and that neatly fits into your code to narrow the orders you receive to those for that one customer ID. When you use different fields as sources for the list control’s DataText and DataValue, both fields must be included in the list of fields obtained by the appropriate data source control.
One additional property is of importance for all of the selection lists. AutoPostBack will rebuild and represent the page after a selection is made. This is critical if there is code in the Page_Load event that you want to execute to reflect the user’s selection, such as re-rendering a GridView to show a limited set of records based on the user’s selection from a list box.
Items can be added to a list in three ways. The first way adds items using individual ASP.NET 2.0 tags. The second way binds the list to an array of values. Finally, the items can be read from a data source.
Adding List Items with Individual ASP.NET 2.0 Tags
When the items remain relatively static (for example, a list of states or provinces), you use hard coding to add items. Although the code can be long, it will execute faster than opening up a connection to a data source. Note that in some cases, although the original list of items may be static (the list of states), the items to appear in the selection list may be dynamic (only those states with customers). Items can be added with simple <asp:ListItem> tags as shown in the following code. In this example, you create a drop-down list for users to pick a player position. You want the user to see the full name of the position (such as Left Back), so that is the Text property. After the user makes a selection you, as a programmer, will want to actually work with your code for the position, so that is the Value property. Also note that you can set a default selection on the Central Defender position. For example, in the following code listing, the first item in the list will be for the Goalkeeper. The word Goalkeeper will appear in the list box as text and the value of GK will be the value you can work with if the user selects Goalkeeper. (The concepts of DataTextField and DataValueField are covered a bit later.)
<asp:DropDownList id=”DropDownList1” runat=”server”> <asp:ListItem Value=”GK”>Goalkeeper</asp:ListItem> <asp:ListItem Value=”LB”>Left Back</asp:ListItem>
<asp:ListItem Value=”RB”>Right Back</asp:ListItem>
<asp:ListItem Value=”CD” Selected=”True”>Central Defender</asp:ListItem> </asp:DropDownList>
Binding List Items to an Array
A more sophisticated method for adding static items employs an array. You create an array in the Page_Load event, and then set the array as the data source for the list. Finally, you perform a binding. Binding, in ASP.NET 2.0, refers to the act of bringing data into a control. For example, when you bind a ListBox to a data source control the information from the data source is actually brought into the
ListBox control. This is one of the few places in ASP.NET 2.0 where you use the version 1.x technique of performing binding as a distinct line of code. In most cases in version 2.0, the data controls automatically perform binding as needed. You carry out the steps in C# as follows:
219

Chapter 7
<%@ Page Language=”C#” %>
<!DOCTYPE html PUBLIC “-//W3C//DTD XHTML 1.0 Transitional//EN” “http://www.w3.org/TR/xhtml1/DTD/xhtml1-transitional.dtd”> <script runat=”server”>
protected String[] MyStates ={ “AK”, “AL”, “AR” };
protected void Page_Load(object sender, EventArgs e)
{
DropDownList1.DataBind();
}
</script>
<html xmlns=”http://www.w3.org/1999/xhtml” >
<head runat=”server”> <title>Demo-ListBind</title> </head> <body>
<form id=”form1” runat=”server”> <div>
<asp:DropDownList ID=”DropDownList1” runat=”server” DataSource=”<%# MyStates %>” > </asp:DropDownList>
</div>
</form>
</body>
</html>
The first shaded line creates a variable named MyStates and fills it with three values. The third shaded line identifies that array (MyStates) as the one to be bound to DropDownList1. The second shaded line instructs the ASP.NET 2.0 page to, at the time of page load, actually perform the binding; that is, bring the values in MyStates into DropDownList1.
When you support variation in the items to be displayed, the population of the selection list should be based on a data source control. The selection list will have a property of DataSourceID with the value of the ID of the data source control. Then there are values for the DataTextField and DataValueField, which are set to fields included in the SelectCommand of the data source control.
Adding List Items from a Data Source
In many cases, the items of a list will be stored in a database, so it makes sense to populate the list from the database rather than creating an array or individual tags as shown in the previous sections. Because of ASP.NET 2.0’s mix-and-match design of data source and data-bound controls, you can populate the list from a data source control. You just have to follow the VWD wizard to identify what data source to use to supply the information to the ListBox.
On the page, you want visitors to be able to limit the view of games to just one month. In this Try It Out, you start with a page that hard-codes the months, and then move to a dynamic binding. Note that the teams play games from October to December. You start with static binding for September to December. Then you improve the page to dynamically bind to the actual dates in the database of games.
Try It Out |
Selection List Bound to a Data Source Control |
1.Early in this chapter, you created a Fixtures.aspx page. Open it in VWD. Delete the existing
SqlDataSource control and GridView.
220
Reading Data
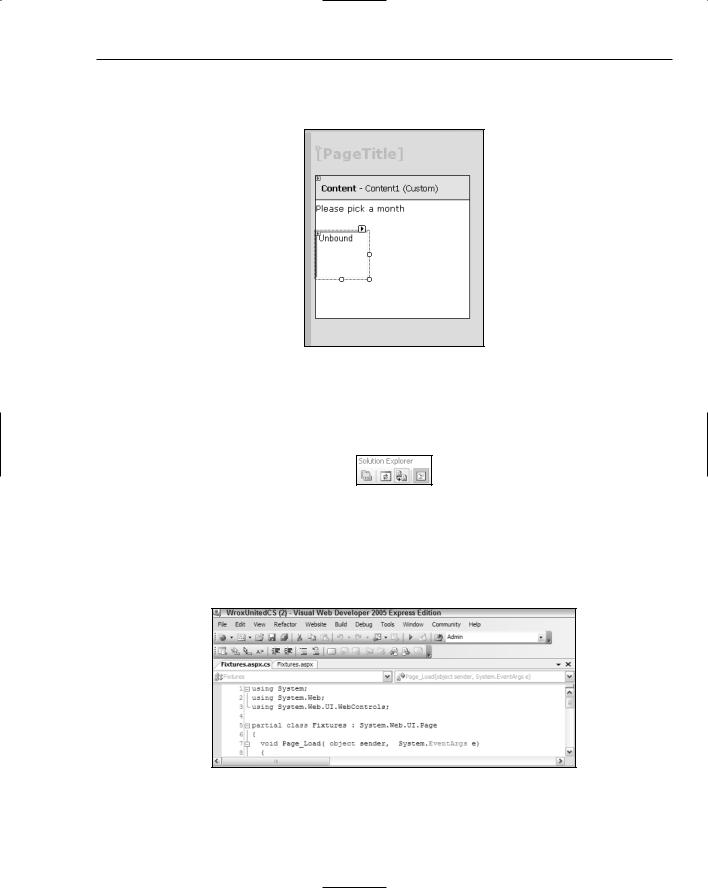
2.Add some text similar to Please pick a month, and then drag a ListBox control from the Toolbox onto the content area. You will probably have to scroll down to see it, as in Figure 7-10.
Figure 7-10
3.Because code-behind is used in this book, you have to write your code in a separate file. At the top of the Solution Explorer, click the View Code icon (the right-most icon in Figure 7-11) to open the editor panel.
Figure 7-11
Notice that VWD automatically sets up the opening and closing lines of a Page_Load event for you (as shown in Figure 7-12). If it was not there (or for other events) you could have created it as follows: at the top left of the editor panel, expand the drop-down list and click the Fixtures object, and at the top-right, expand the drop-down list and select Page_Load.
Figure 7-12
221

Chapter 7
4.Add the following shaded lines to the Page_Load event. Note that around the list of numbers are braces ({}), not parentheses. Also note that the declaration of the array occurs before
Page_Load:
public partial class Fixtures : System.Web.UI.Page
{
protected Int32[] ListOfMonths = { 9, 10, 11, 12 }; protected void Page_Load(object sender, EventArgs e)
{
ListBox1.DataBind();
}
}
5.Direct the ListBox control to use your array for its source of data. Switch from the Fixtures.aspx.cs code page back to the Fixtures.aspx page and switch to Source View. Select the ListBox and modify its properties so that it will get its list of items from the data source control, as shown in the following shaded lines:
<%@ Page Language=”C#” MasterPageFile=”~/site.master” AutoEventWireup=”true” CodeFile=”Fixtures.aspx.cs” Inherits=”Fixtures” Title=”Untitled Page” %> <asp:Content ID=”Content1” ContentPlaceHolderID=”mainContent” Runat=”Server”>
<h2>Fixtures</h2>
(end of TIO-Selection List Bound to Data Source Control)<br /> Please Pick a Month: <br />
<asp:ListBox ID=”ListBox1” runat=”server” DataSource=<%# ListOfMonths %> >
</asp:ListBox></p>
</asp:Content>
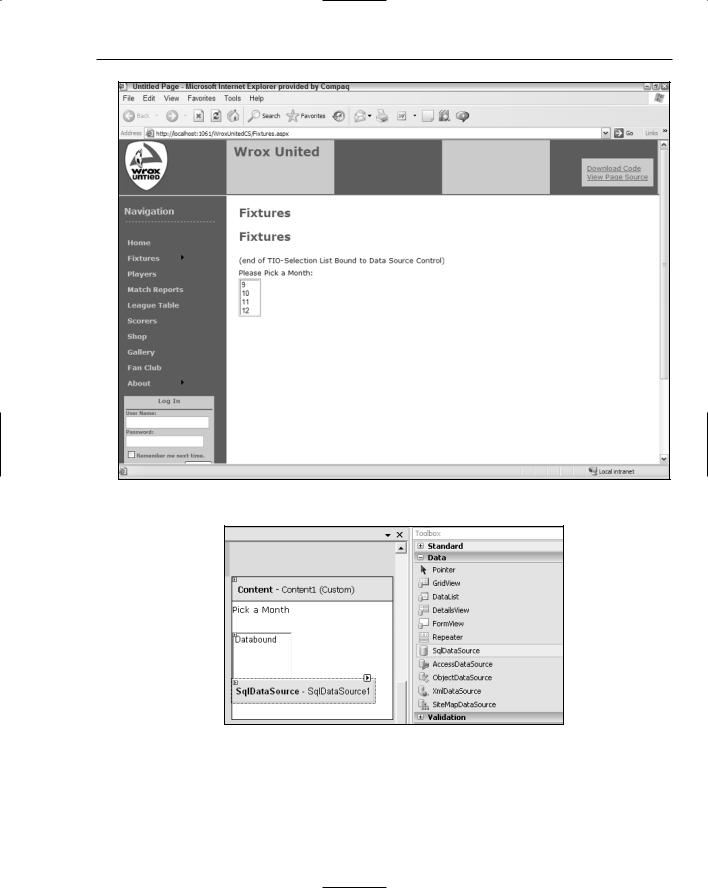
6.Save and test the page in your browser by pressing F5. At this point, the list does not do anything beyond show the months (see Figure 7-13).
But what if the team plays in January or February or you observe that there are no September games even though you have the ninth month in your list box? You want the pages to offer new choices in the list box automatically (dynamically). Now you will improve the ListBox control by binding it to the list of fixtures.
7.Drag a SqlDataSource control from the toolbar onto the fixtures page (the .aspx page, not the code page) to a point just after the ListBox, as shown in Figure 7-14 (you will probably have to scroll down to see it). Then open its smart task panel and configure its data source. Select the WroxUnited connection (not WroxUnited.mdf) and click Next.
8.Specify a custom SQL statement and click Next. Type the following statement:
SELECT DISTINCT MONTH(FixtureDate) AS FixtureMonth FROM Fixtures
9.Click Next, Test Query, and Finish.
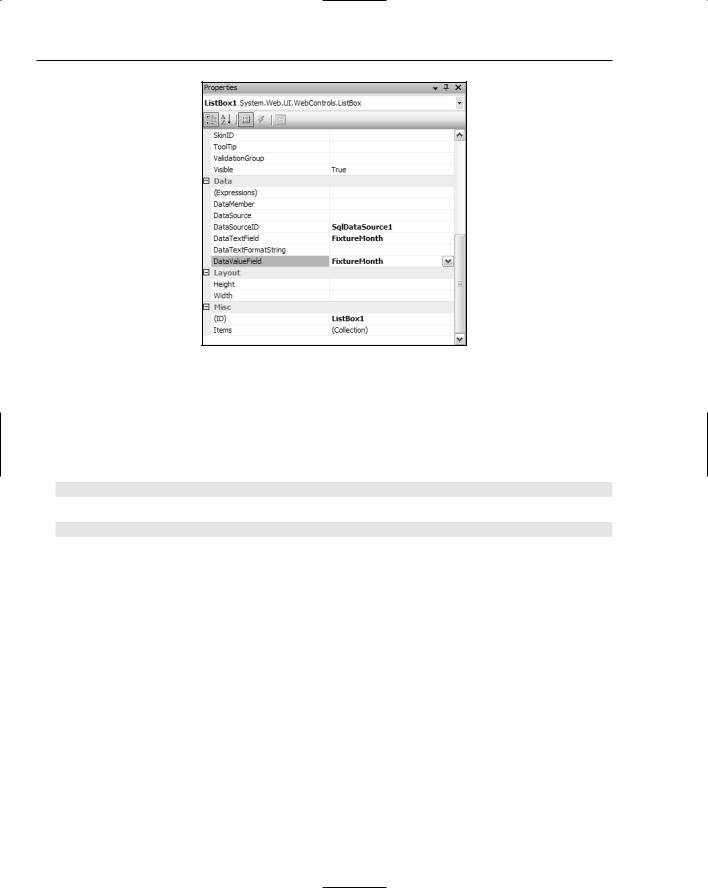
10.Select your ListBox control and make some changes in the Properties window. Eliminate the DataSource value; add a DataSourceID value of SqlDataSource1; and set both the DataTextField and DataValueField to FixtureMonth (see Figure 7-15). If the Properties
window is not already visible (usually in the bottom right of your screen) you can bring it back by pressing F4.
222
Reading Data
Figure 7-13
Figure 7-14
223
Chapter 7
Figure 7-15
11.In Source View, remove the lines in the code page that are no longer needed — the lines shaded here. You could also remove the Page_Load event entirely; because they are devoid of internal lines, the beginning and ending lines of the procedure are not needed here. But as you develop the page in later chapters, you will need them again.
public partial class Fixtures : System.Web.UI.Page
{
protected Int32[] ListOfMonths = { 9, 10, 11, 12 }; protected void Page_Load(object sender, EventArgs e)
{
ListBox1.DataBind();
}
}
12.Run the page. Now the ListBox control only shows the months with games — 9 is left out. Months will also automatically change if the Wrox United schedule adds games in another month.
How It Works
Adding a ListBox control is easy with VWD’s drag-and-drop functionality. In the hard-coded technique, you created an array of integers and filled it with what you expected would be useful values. Then in the ListBox properties, you specified that the items of the list (its DataSource) should come from the values returned by a read of the array ListOfMonths. In the following shaded code, focus
on the right side of the equals (=) sign. Everything within the <% %> is code that should be executed. An additional symbol, the #, indicates that you will be getting back a set of data. Then you state the name of the array you created. When this page is built by IIS, this line will read the contents of the ListOfMonths array and establish that set of values (9,10,11, and 12) as the source of data for the ListBox control. The closing bracket at the end of the line closes the <asp:Listbox> control and is not directly part of the data binding.
224

Reading Data
<asp:ListBox ID=”ListBox1” runat=”server” DataSource=<%# ListOfMonths %> >
</asp:ListBox></p>
Last, back up in the code, you added a line to the Page_Load event that instructs ASP.NET 2.0 to actually bind the data of the array to the data-bound control.
Two problems exist with this technique. First, it uses the ASP.NET version 1.1 technique of binding by explicit command. Although that works (and is the only technique for hard-coded arrays) it does not utilize the automatic binding features of version 2.0. Second, if Wrox United changes the months in which it plays, then your list box choices are out of synch.
In the second technique, you created a new data source control that will read the actual months that are currently in the games list. However, those months are stored as full dates (such as 12/21/04), so you use a SQL function called MONTH to extract the number of the month from the date. And because more than one game is played in a month, you add the DISTINCT term to give you just one of each value. (These kinds of SQL tricks are discussed in Wrox’s Beginning SQL.) Now you do not need the lines to create or fill the array and you can also get rid of the binding line (which ASP.NET 2.0 will do for you when you use an ASP.NET 2.0 data source control).
Notice the subtle but important difference between two properties of the ListBox control. DataSource is used when you are binding by explicit command to an ASP.NET version 1.1 source of data. DataSourceID is employed when you use ASP.NET 2.0 automatic binding to a data source control.
The GridView Control
The GridView data-bound control provides the classic display of tabular data. Each row represents one instance or record, and each column holds one field of data. A cell within the table displays a value that is appropriate for its intersection of record and column. By default, GridView displays all of the columns that are provided by the data source control, but you’ll see how to show the user only a subset. The biggest advance in tabular data display comes when you activate two simple features of the GridView control: sorting and paging. Sorting allows the user to re-order the records according to taste. Paging allows you, as the designer, to specify the number of records to show at one time and then provide the user navigation tools to jump to different sets of records. Both of these features took hundreds of lines of codes to get right in earlier versions of ASP.NET, so they are huge timesavers that you get for free with ASP.NET 2.0.
Like all data-bound controls, the GridView control must have a data source control to provide the values. GridView was optimized to work with the data source controls for tabular data (such as SQL, Access, and Data controls), as opposed to the tree data of an XML source control.
Adding a GridView Control
VWD reduces control implementation to simple drag-and-drop. You can add a GridView control in VWD one of three ways. The techniques in the following list increase in the number of steps required as you go down the list: dragging and dropping a field is quickest, and adding the controls independently requires the most steps. However, in every case, you can go back and edit a GridView control’s properties in Design View, or even modify the source code directly:
225
Chapter 7
From the Data Explorer window, select and drag field names to create a GridView control and automatically create a data source control — with no questions asked.
From the toolbar, drag a GridView control to the page and let VWD walk you through the setup of a new data source control.
From the toolbar, first add a data source control, and then drag on a GridView control and use the nascent data source control.
Regardless of which technique you use, when the GridView control is on the page, its smart task panel is open, as shown in Figure 7-16. Click the Auto Format option to quickly apply a set of colors, borders, and cell sizes. Note the first choice, the ability to remove a prior auto-formatting.
Figure 7-16
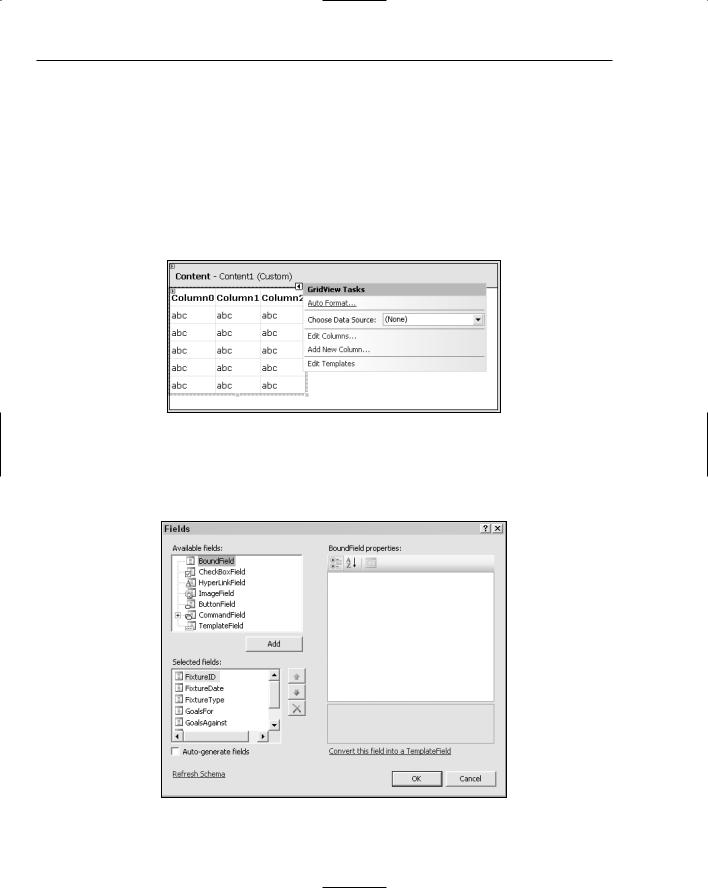
You can add or remove columns with three techniques. The easiest way is to use the smart task panel and click Edit Columns. Expand the entry for BoundField, select a field, and click Add. From the box below, you can select a field and click the X tool to delete (see Figure 7-17).
Figure 7-17
226

Reading Data
A second technique, while you have the Fields dialog box open, is to click the option in the bottom-left corner to Auto-Generate fields. This option displays all fields.
And last, you can switch to Source View and edit the list of fields.
Before moving on, take a look at the code that VWD builds for a GridView control. A data-bound control such as GridView will always have a DataSourceID property that points to the data source control providing the data. Note that the DataSourceID property points to a data source control and is used here. A similarly named property, the DataSource, is used in more advanced scenarios. First, display of all fields by including setting the autogeneratecolumns property to true, as follows:
<asp:gridview id=”EmployeesTable” runat=”server” datasourceid=”EmployeesDataSource”
autogeneratecolumns=”True”
</asp:gridview>
The following syntax would only display three of the fields because you set the autogeneratecolumns to false and instead, will have a set of tags called <Columns>. Within those tags, you add an <asp:BoundFIeld> tag for each field. Note that ASP.NET 2.0 uses the terms columns and fields interchangeably here.
<asp:gridview id=”EmployeesTable” runat=”server” datasourceid=”EmployeesDataSource” autogeneratecolumns=”False”
</asp:gridview>
<Columns>
<asp:BoundField HeaderText=”Hired Date” DataField=”DateHire” </asp:BoundField>
<asp:BoundField HeaderText=”First Name” DataField=”NameFirst” </asp:BoundField>
<asp:BoundField HeaderText=”Last Name” DataField=”NameLast” </asp:BoundField>
</Columns>
</asp:gridview>
Adding Paging and Sorting to a GridView Control
Designers faced an onerous task prior to ASP.NET 2.0 when they had to implement paging and sorting. The ASP.NET 2.0 design team took it upon itself to offer these features fully coded and ready to use. Select a GridView control and open its smart task panel by clicking the small triangle at the top right of the control to see check boxes to turn on paging and sorting as shown Figure 7-18.
Turning on paging and sorting requires three prerequisites. First, the GridView control must have its DataSourceID set to a valid data source control on the page. Second, for sorting only, that data source control must have its DataMode set to Dataset (which is the default), not DataReader. Third, sorting requires that fields have a header value so there is a target for users to click. The logic is that when a user requests a sort by clicking a GridView control, the GridView passes the request down to its data source control. The data source control revises the data and sends the new information back to the GridView control, which re-renders.
227