

Beginning ASP.NET 2.0 With CSharp (2006) [eng]
.pdfChapter 7
Enable Selection to get VWD to build a new column with select buttons for each record. When clicked, ASP.NET will react to the selection of that record, as you will see.
In the child control, you must set a parameter into the WHERE clause of the child control’s data source control. In the previous section, you set the parameter to a field of the querystring using the Add WHERE Clause dialog box of the Configure Data Source Control wizard. You can use the wizard again, but this time when you get to the Add WHERE Clause panel, you set your column equal to a value from a control (not a querystring). The wizard presents a list of controls from which you can select. Within the selecting control, you determine which value to use, normally the SelectionValue.
In the following Try It Out, you practice two combinations of controls. In the first, you use a GridView selection to show additional fields in a DetailsView control. In the second, you use a DropDownList control to show only certain records in a GridView.
Try It Out |
Multiple Controls Working Together |
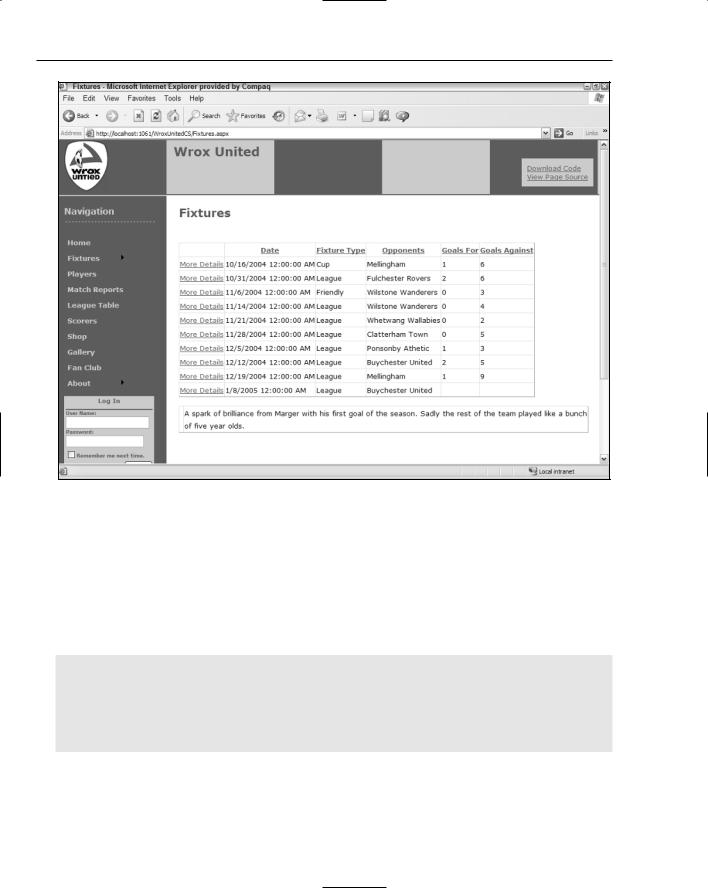
1.Now you will build your final version of Fixtures.aspx. Create a folder named OldPages and move your existing Fixtures.aspx to this retirement home. Because the steps are so quick and easy (and it is a good review), you will start your final Fixtures page from scratch. Add a new item to the site named Fixtures.aspx using the Master page with C# code in a separate file. Switch to Design View.
2.Open Database Explorer and navigate to WroxUnited.mdf Tables Fixtures. Select only the fields for FixtureID, FixtureDate, and Opponents (using Ctrl+Click) and drag them to the page. VWD will crank for a few seconds and then give you a GridView with its smart task panel open. Choose Enable Selection as shown in Figure 7-39. Note that VWD has already added the column of Select buttons.
Figure 7-39
3.Go to the bottom of the content holder and drag a DetailsView control from the Toolbox. Choose a data source of New, configure the database with an ID of SqlDataSource2, and continue using the connection string named WroxUnited that you’ve used throughout this chapter. Specify to get data from the Fixtures table, but this time select only the FixtureID and Notes fields.
248

Reading Data
4.Click the WHERE button and select the column of FixtureID. Set the operator to = and select Control from the Source drop-down list (see Figure 7-40).
Figure 7-40
5.In the parameter properties, set the ControlID to GridView1 and the default value to 1. Don’t forget to click the Add button (not done yet in Figure 7-41). Click OK, Next, and then the Test Query button (a value of 1 is fine), and finally, click the Finish button.
6.Make the DetailsView control wider (through the Properties pane or by dragging the right edge). Save and view it in your browser (see Figure 7-41). Select various matches from the GridView and see their notes below the GridView in the DetailsView control.
7.Now shift gears to work on the Gallery page. You want to only show pages from one match. In Solution Explorer, select Gallery-All.aspx in the root, copy it to the clipboard and paste it back into the root to make a copy. Change the name from Copy of Gallery-All to
Gallery.aspx.
8.Open Gallery.aspx, and add a few line breaks and then a DropDownList box to the top of the page. Configure its data source to a new source of type Database and name it SqlDataSource2. Use the WroxUnited connection string and from the Fixtures table, select the FixtureID,
FixtureDate, and Opponents.
9.Click ORDER BY and sort on FixtureDate ascending. Click OK and Next. Then test the query and click Finish. This brings you back to the Choose a Data Source window.Display (for now) the Opponents and set the value to FixtureID. Click OK. While the DropDownList control is still selected, turn on Enable AutoPostBack from the smart task panel.
249
Chapter 7
Figure 7-41
10.Open the smart task panel for the DataSourceControl1 (used by the DataList) and start its Configure Data Source wizard. Step through to the WHERE clause. Set the Column of FixtureID to equal a control with the ControlID of DropDownList1 and a default value of 1. Don’t forget to click the Add button and then click OK. Continue by clicking Next, and then test query (a parameter value of 1 is fine) and click Finish. When you are prompted to reset the templates for the DetaislView control, answer No. You will see the result shown in Figure 7-42 in your browser (albeit all the photos to-date have been from game 1).
Your code should look like the following in Source View:
<%@ Page Language=”C#” MasterPageFile=”~/site.master” AutoEventWireup=”true” CodeFile=”Gallery.aspx.cs” Inherits=”Gallery_All” Title=”Untitled Page” %> <asp:Content ID=”Content1” ContentPlaceHolderID=”mainContent” Runat=”Server”>
<h2>
Match Images</h2>
TIO - Multiple Controls - Gallery<br /> <br />
250

Reading Data
<asp:DropDownList ID=”DropDownList1” runat=”server” AutoPostBack=”True” DataSourceID=”SqlDataSource2” DataTextField=”Opponents” DataValueField=”FixtureID”>
</asp:DropDownList>
<asp:SqlDataSource ID=”SqlDataSource2” runat=”server” ConnectionString=”<%$ ConnectionStrings:WroxUnited %>” SelectCommand=”SELECT [FixtureID], [FixtureDate], [Opponents]
FROM [Fixtures] ORDER BY [FixtureDate]”> </asp:SqlDataSource>
<br /> <br />
<asp:DataList ID=”DataList1” runat=”server” DataKeyField=”PictureID” DataSourceID=”SqlDataSource1” RepeatColumns=”3” RepeatDirection=”Horizontal”> <ItemTemplate>
FixtureID:
<asp:Label ID=”FixtureIDLabel” runat=”server” Text=’<%# Eval(“FixtureID”) %>’>
</asp:Label>
PictureID:
<asp:Label ID=”PictureIDLabel” runat=”server” Text=’<%# Eval(“PictureID”) %>’></asp:Label><br />
<asp:Image ID=”Image1” runat=”server”
ImageUrl=’<%# Eval(“PictureURL”, “~/MatchImages/{0}”) %>’ /><br /> <asp:Label ID=”NotesLabel” runat=”server”
Text=’<%# Eval(“Notes”) %>’></asp:Label><br /> UploadedByMemberName:
<asp:Label ID=”UploadedByMemberNameLabel” runat=”server” Text=’<%# Eval(“UploadedByMemberName”) %>’>
</asp:Label><br /><br /> </ItemTemplate>
</asp:DataList><asp:SqlDataSource ID=”SqlDataSource1” runat=”server” ConnectionString=”<%$ ConnectionStrings:WroxUnited %>” SelectCommand=”SELECT [PictureID], [FixtureID],
[UploadedByMemberName], [Notes], [PictureURL] FROM [Gallery] WHERE ([FixtureID] = @FixtureID)”>
<SelectParameters>
<asp:ControlParameter ControlID=”DropDownList1” DefaultValue=”1”
Name=”FixtureID”
PropertyName=”SelectedValue” Type=”Int32” />
</SelectParameters>
</asp:SqlDataSource>
</asp:Content>
251

Chapter 7
Figure 7-42
11.You’ll finish up with a trick to resolve the problem of the user not knowing which match to select in the DropDownList when the same opponent is listed several times. Change the
SelectCommand of the DropDownList data source control (SqlDataSource2) and the DataTextField of the DropDownList as follows:
<asp:DropDownList ID=”DropDownList1” runat=”server” DataSourceID=”SqlDataSource2” DataTextField=”FixtureCombo” DataValueField=”FixtureID”
AutoPostBack=true > </asp:DropDownList>
<asp:SqlDataSource ID=”SqlDataSource2” runat=”server” ConnectionString=”<%$ ConnectionStrings:WroxUnited %>”
SelectCommand=”SELECT [FixtureID], (Opponents + ‘ - ‘ + CONVERT(varchar,
FixtureDate, 6)) As FixtureCombo FROM [Fixtures] ORDER BY [FixtureDate]”>
How It Works
Both of these pages are logical extensions of what you did in earlier exercises. As before, you changed the SelectCommand (using VWD’s Configure Data Source wizard) so that there is a WHERE clause that
252

Reading Data
gets its value from a parameter. In the previous Try It Out, the parameter came in with the querystring, but on these two pages, the parameter comes from another control.
In the first case, the GridView filled the parameter with the ID of the record for which the Select button was clicked. That value was then used by the data source control in its WHERE clause. An important (and frequently overlooked) step is to set the DropDownList control to AutoPostBack.
In the final step, you wanted to display more than one field in the DropDownList control. You can achieve that goal by using a SQL statement that creates a new field by concatenating values from existing fields. The following code brings together the opponent’s name, the literal text of spaces, a hyphen, and a converted format of the game date to create a field called FixtureCombo:
SelectCommand=”SELECT [FixtureID], (Opponents + ‘ - ‘ + CONVERT(varchar,
FixtureDate, 6)) As FixtureCombo FROM [Fixtures] ORDER BY [FixtureDate]”>
Note how a plus sign (+) is used between each section of the string of text. The opponent value comes from the database in a form ready to use. The FixtureDate also comes from the database, but it comes in a date format that is not what you want. So you convert it to a type called varchar, which is a string of characters. You then put together the two parts with a dividing section of text that consists of a space, a hyphen, and another space.
Working with XML Data
XML has solidified as the standard format for information on the web. XML files (or streams of data) are self-describing (each value has a label) and hierarchical in that every item of data has a parent except the top-most tag. Typically, an XML file will have its highest-level tags that merely state the kind of information held, such as Players. Then there would be a set of tags called “player” for each member of the team. Within there would be further, lower-level tags describing that player. Each item is called a node, for example, one player. Additionally, XML is case-sensitive. XML files can be created, read, and revised using ASP.NET 2.0. In the following Try It Out, you create an XML file using VWD.
The league has issued a few changes to Wrox United’s 2007 schedule:
|
Game Number |
Date |
Home |
Visitor |
|
|
|
|
|
|
|
|
1 |
|
2007, October 21 |
Wrox United |
Clatterham |
|
2 |
|
2007, October 22 |
Mellingham |
WroxUnited |
|
3 |
|
2007, October 22 |
Wrox United |
Fulchester |
|
|
|
|
||
Try It Out |
Creating XML Data |
|
|
||
1.Right-click the root of your site, add a new item of the type XML file, and name it Schedule2007. Normally you would store an XML file in App_Data, but for this exercise that creates some rights problems when viewing the file in your browser.
253

Chapter 7
2.At the beginning of the file, VWD will automatically add the tag for the XML version. Go to the end of the file and type <Games>. Notice that VWD automatically adds the closing tag for <Games>. These tags are the highest level and describe the entire contents of the XML file.
3.Now you will create a node for the first game. Inside the <Games> tags, create a <Game> tag (note that this is singular). Now add Number=”1” inside the opening <Game> tag as per the code listing after the next step.
4.Inside the <Games> tag, add three pairs of child tags with values for the team names and the date as follows:
<Games>
<Game Number=”1”> <Date>2007/10/21</Date> <Home>WroxUnited</Home> <Visitor>Clatterham</Visitor>
</Game>
</Games>
5.Add the other two games in the same manner and save the file. The additional games will be as follows (for the sake of completeness, the first game is included again):
<Games>
<Game Number=”1”> <Date>2007/10/21</Date> <Home>WroxUnited</Home> <Visitor>Clatterham</Visitor>
</Game>
<Game Number=”2”> <Date>2007/10/22</Date> <Home>Mellingham </Home> <Visitor>WroxUnited</Visitor>
</Game>
<Game Number=”3”> <Date>2007/10/22</Date> <Home>WroxUnited</Home> <Visitor>Fulchester</Visitor>
</Game>
</Games>
6.If you run the file the XML, data will be sent to the browser, and most browsers can render a simple presentation (see Figure 7-43). Try it, noting that there is no ASP.NET 2.0 involvement yet.
How It Works
You saw in this exercise that you start with a top-level node named <Games>. Then, being careful not to make typos in the case, you added a node for the first game. The data for that game was organized in two ways. The number of the game was placed in the <Game> tag as an attribute. But you chose to place the date and competitors in separate tags at a lower level than the <Game> tag. After running the file, you saw how your browser handles a raw XML file. In the next section, you see what ASP.NET 2.0 can do with that information.
254

Reading Data
Figure 7-43
Reading XML Data
Because XML data is organized as a hierarchy, ASP.NET 2.0 provides alternate data source and databound controls from those you used with tabular data earlier in the chapter. The XML data source control provides the data source control for most cases. The key property that must be set in this control is the name of the XML database file.
ASP.NET 2.0 supports rendering of tree data with three data-bound controls named TreeView, Menu, and SiteMapPath. The TreeView is a little tricky to set up, as you will see, but then it does its job just fine. The TreeView control is fine for any XML data. The Menu control is designed only for its named purpose. The SiteMapPath control renders differently depending on the page that is currently opened. Chapter 2 presented more on this navigation control.
VWD offers a handy way to identify which pieces of data should appear in its rendering. The tool is called the TreeViewDataBindings Editor and it can be opened from the TreeView control’s smart task panel, as you will practice in the following exercise.
In the following Try It Out, you create a display of the games scheduled for 2007 at the bottom of the
Fixtures.aspx page.
255

Chapter 7
Try It Out |
Reading XML Data |
1.Open Fixtures.aspx in Design View and drag a TreeView control (in the navigation section of the Toolbox, shown in Figure 7-44) to the bottom of the page.
Figure 7-44
2.On the smart task panel, select Choose Data Source and select New. Note that this time you have different choices for a data source. You want to use an XML file (see Figure 7-45).
Figure 7-45
3.Specify an ID of Schedule2007XML and then in the next dialog box, set the Data File by browsing to the Schedules2007.XML file that you created. For now, leave the Transform and XPath boxes in the wizard blank, and just click OK. Run the page in your browser (see Figure 7-46) and look at the tree at the bottom of the page. The page is rendering the names of the nodes but not the data of the nodes. Close the browser.
256
Reading Data
Figure 7-46
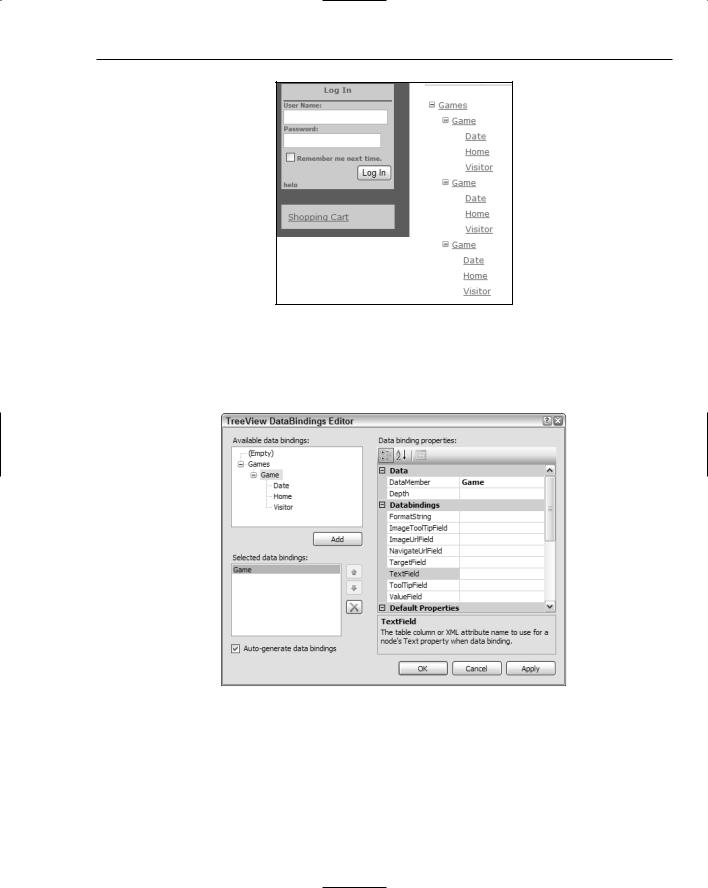
4.In Design View, select the TreeView control, open its smart task panel, and click Edit Treenode Data Bindings. Select Game in the top left (the singular Game, not the plural Games) and click Add (see Figure 7-47).
Figure 7-47
5.In the Properties window, set the TextField to Number. Staying in the DataBindings editor, select Home, click Add, and set its TextField to #InnerText because you want to display the text between the <Home> and </Home> tags on the page. Repeat the setting of #InnerText# for the Date and Visitor data. Save and view in your browser as in Figure 7-48.
257