

FM 21-150 COMBATIVES 1992
.pdfFM 21-150
d. Rear Fall. The soldier starts the fall from the standing position and keeps his head fonward to reduce the chance of head and neck injuries (Figure 2-20, Step 1).
He then falls backward and lowers his center of gravity by bending both knees. As his buttocks touch the ground, he rolls backward to absorb the momentum of the fall (Figure 2-20, Step 2).
He keeps his hands cupped and slaps his hands and arms down to help absorb the shock of impact and to stabilize his body (Figure 2-20, Step 3). He keeps his chin tucked on his chest.
Then, his legs come down slowly with knees bent and make contact with the ground (Figure 2-20, Step 4). He raises his hand to protect his face from kicks or blows. The soldier can kick his opponent from this position.
2-24

FM 21-150
2-11. CRAWL, WALK, AND RUN
Training can be conducted using the crawl, walk, and run techniques, which
may be applied on two levels.
a.First Level. The instructors use these techniques during each initial training session.
(1)Crawl phase. New techniques should be introduced, taught, demonstrated, and executed by the numbers.
(2)Walk phase. During this phase, soldiers practice the new techniques by the numbers, but with more fluid movement and less instructor guidance.
(3)Run phase. Soldiers execute the techniques at combat speed with no guidance.
b.Second Level. The instructors use these techniques when developing unit combatives programs. Before conducting combatives training, the instructor considers the abilities and experience level of the soldiers to be trained. During training, those soldiers with prior martial arts experience can be a great asset; they may be used as demonstrators or as assistant instructors. The crawl, walk, run approach to unit training ensures a high skill level throughout the unit and minimizes the risk of training injuries.
(1)Crawl phase. During the crawl phase, the instructor introduces combatives to the unit. Here, the basic skills that set the standards for advancement to other levels are mastered. Emphasis is placed on proper technique when executing stances, falls, and hand-and-foot strikes. Studying the new techniques in this method ensures that the movements are correctly programmed into the soldiers’ subconscious after a few repetitions. It also develops the flexibility of soldiers.
(2)Walk phase. Once a unit has developed a sufficient proficiency level in basic skills, begin the walk phase. Instructors introduce soldiers to throws, combination strikes with body weapons, reaction drills, knife/bayonet fighting, grappling, and expedient-weapons training.
(3) Run phase. In the run phase, unit soldiers engage in full sparring, advanced-weapons fighting, and sentry removal.
2-12. DEMONSTRATIONS
A well-coordinated demonstration and professional demonstrators are crucial for successful learning by soldiers. Unrehearsed presentations or inadequately trained demonstrators can immediately destroy the credibility of the training. There are two methods appropriate for the demonstration of combative techniques to soldiers. These are based on the size of the group to be taught.
a. Company-Size Formation or Larger. The instructor or demonstrator uses the talk-through method. The primary instructor talks the
2-25

FM 21-150
demonstrators through the techniques by the numbers, and then the demonstrators execute at combat speed. The soldiers can see how to apply the move being taught in relation to the instructor or demonstrator. The primary instructor is free to control the rate of the demonstration and to stress key teaching points. The demonstrators must be skilled in properly applying the techniques so soldiers can adequately grasp the intended concepts.
b. Platoon-Size Formation or Smaller. A good method for demonstrating to a smaller formation is for the primary instructor to apply the technique being taught to an assistant instructor. The primary instructor talks himself through the demonstration. He stresses correct body movement and key teaching points as he does them.
2-13. EXECUTION BY THE NUMBERS
Instructors use execution by the numbers to break down techniques into step-by-step phases so soldiers can see clearly how the movements are developed from start to finish. Execution by the numbers also provides soldiers away to see the mechanics of each technique. This teaching method allows the instructor to explain in detail the sequence of each movement. For example: on the command PHASE ONE, MOVE, the attacker throws a right-hand punch to the defender’s face. At the same time, the defender steps to the inside of the attacker off the line of attack and moves into position for the right-hip throw. Assistant instructors are able to move freely throughout the training formation and make on-the-spot corrections.
2-14. EXECUTION AT COMBAT SPEED
When the instructor is confident that the soldiers being trained are skilled at executing a technique by the numbers, he is ready to have them execute it at combat speed. Executing movements at combat speed enables soldiers to see how effective a technique is. This builds the soldier’s confidence in the techniques, allows him to develop a clear mental picture of the principles behind the technique, and gives him confidence in his ability to perform the technique during an actual attack. The command is, THE RIGHT-HIP THROW AT COMBAT SPEED, MOVE. The soldiers then execute this technique from start to finish.
2-15. DRILLS
Drills are used to maintain soldiers’ skills in executing techniques through repetition. During these drills, techniques or phases of techniques are repeated as often as necessary to ensure programmed learning by the soldiers. Subconscious programming usually occurs after 25 repetitions of movement.
2-26

FM 21-150
Technique drills help soldiers retain their skills, and they are a good tool for reviewing techniques already learned.
2-16. FOAM PADS
Foam pads (Figure 2-21) are highly recommended to enhance training. The pads allow full-forced strikes by soldiers and protect their training partners. The pads enable soldiers to feel the effectiveness of striking techniques and to develop power in their striking. Instructors should encourage spirited aggressiveness. Pads can be tackle dummy pads or martial arts striking pads.
a. The use of pads is especially recommended for knee-strike practice drills, kicking drills, and 3-foot-stick striking drills. The pad is ideally placed on the outside of the training partner’s thigh, protecting the common peroneal nerve. Pads can also be held against the forearms in front of the head and face to allow practice knee/elbow strikes to this area.
b. Training pads can be requisitioned through supply channels or purchased locally.
2-27
CHAPTER 3
CLOSE-RANGE COMBATIVES
In close-range combatives, two opponents have closed the gap between them so they can grab one another in hand-to-hand combat. The principles of balance, leverage, timing, and body positioning are applied. Throws and takedown techniques are used to upset the opponent’s balance and to gain control of the fight by forcing him to the ground. Chokes can be applied to quickly render an opponent unconscious. The soldier should also know counters to choking techniques to protect himself. Grappling involves skillful fighting against an opponent in close-range combat so that a soldier can win through superior body movement or grappling skills. Pain can be used to disable an opponent. A soldier can use painful eye gouges and strikes to soft, vital areas to gain an advantage over his opponent.
3-1. THROWS AND TAKEDOWNS
Throws and takedowns enable a hand-to-hand fighter to take an opponent to the ground where he can be controlled or disabled with further techniques. Throws and takedowns make use of the principles involved in taking the opponent’s balance. The fighter uses his momentum against the attacker; he also uses leverage or body position to gain an opportunity to throw the attacker.
a.It is important for a fighter to control his opponent throughout a throw to the ground to keep the opponent from countering the throw or escaping after he is thrown to the ground. One way to do this is to control the opponent’s fall so that he lands on his head. It is also imperative that a fighter maintain control of his own balance when executing throws and takedowns.
b.After executing a throw or takedown and while the opponent is on the ground, the fighter must control the opponent by any means available. He can drop his weight onto exposed areas of the opponent’s body, using his
elbows and knees. He can control the downed opponent’s limbs by stepping on them or by placing his knees and body weight on them. Joint locks, chokes, and kicks to vital areas are also good control measures. Without endangering
3-1

FM 21-150
himself, the fighter must maintain the advantage and disable his opponent after throwing him (Figures 3-1 through 3-5).
NOTE: Although the five techniques shown in Figures 3-1 through 3-5 may be done while wearing LCE—for training purposes, it is safer to conduct all throws and takedowns without any equipment.
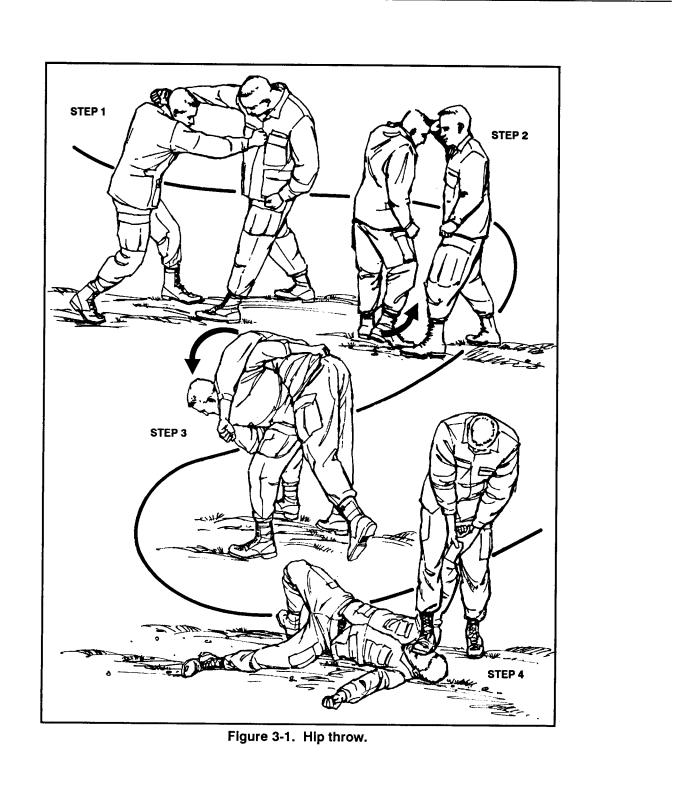
(1) Hip throw. The opponent throws a right punch. The defender steps in with his left foot; at the same time, he blocks the punch with his left forearm and delivers a reverse punch to the face, throat, or other vulnerable area (Figure 3-1, Step 1). (For training, deliver punches to the solar plexus.)
The defender pivots 180 degrees on the ball of his lead foot, wraps his right arm around his opponent’s waist, and grasps his belt or pants (Figure 3-1, Step 2). (If opponent is wearing LCE, grasp by the pistol belt or webbing.)
The defender thrusts his hips into his opponent and maintains a grip on his opponent’s right elbow. He keeps his knees shoulder-width apart and slightly bent (Figure 3-1, Step 3). He locks his knees, pulls his opponent well over his right hip, and slams him to the ground. (For training, soldier being thrown should land in a good side fall.)
By maintaining control of his opponent’s arm, the defender now has the option of kicking or stomping him in the neck, face, or ribs (Figure 3-1, Step 4).
3-2
FM 21-150
3-3

FM 21-150
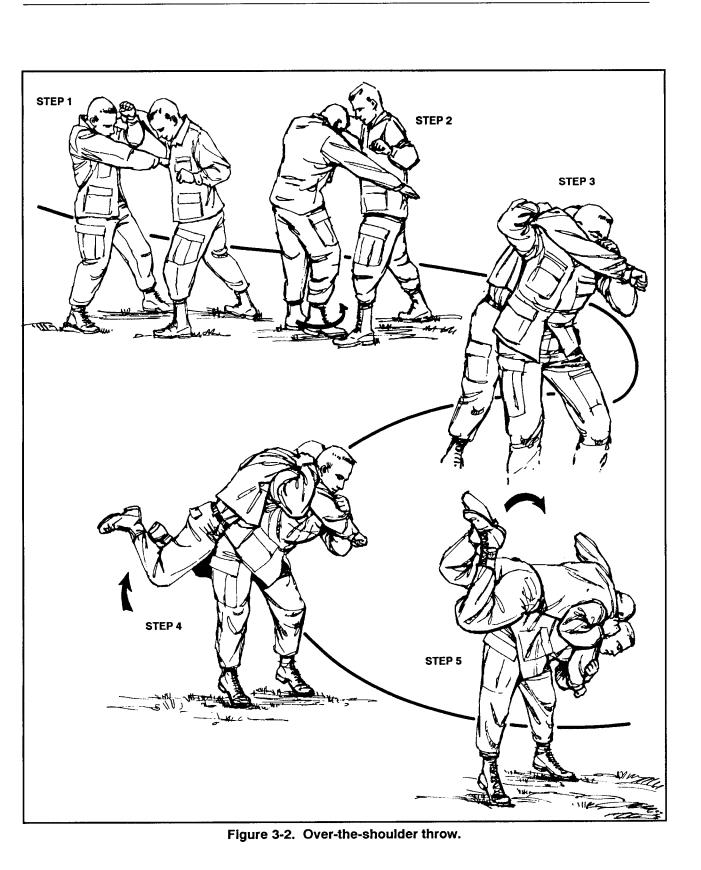
(2) Over-the-shoulder throw. The opponent lunges at the defender with a straight punch (Figure 3-2, Step 1).
The defender blocks the punch with his left forearm, pivots 180 degrees on the ball of his lead foot (Figure 3-2, Step 2), and gets well inside his opponent’s right armpit with his right shoulder.
He reaches well back under his opponent’s right armpit and grasps him by the collar or hair (Figure 3-2, Step 3).
The defender maintains good back-to-chest, buttock-to-groin contact, keeping his knees slightly bent and shoulder-width apart. He maintains control of his opponent’s right arm by grasping the wrist or sleeve (Figure 3-2, Step 4).
The defender bends forward at the waist and holds his opponent tightly against his body. He locks his knees, thrusts his opponent over his shoulder, and slams him to the ground (Figure 3-2, Step 5). He then has the option of disabling his opponent with kicks or stomps to vital areas.
3-4
FM 21-150
3-5

FM 21-150
(3) Throw from rear choke. The opponent attacks the defender with a rear strangle choke. The defender quickly bends his knees and spreads his feet shoulder-width apart (Figure 3-3, Step 1). (Knees are bent quickly to put distance between you and your opponent.)
The defender reaches as far back as possible and uses his right hand to grab his opponent by the collar or hair. He then forces his chin into the vee of the opponent’s arm that is around his neck. With his left hand, he grasps the opponent’s clothing at the tricep and bends forward at the waist (Figure 3-3, Step 2).
The defender locks his knees and, at the same time, pulls his opponent over his shoulder and slams him to the ground (Figure 3-3, Step 3).
He then has the option of spinning around and straddling his opponent or disabling him with punches to vital areas (Figure 3-3, Step 4). (It is important to grip the opponent tightly when executing this move.)
3-6