

FM 21-150 COMBATIVES 1992
.pdfFM 21-150
(b) The modified slash (Figure 5-55, Steps 1,2,3, and 4) is identical to the slash (as described in paragraph (3)(c)) with the exception of the right hand grasping the pistol grip.
(6) Follow-up movements. Follow-up movements are attack movements that naturally follow from the completed position of the previous movement. If the initial thrust, butt stroke, smash, or slash fails to make contact with the opponent’s body, the soldier should instinctively follow up with additional movements until he has disabled or captured the opponent. It is important to follow-up the initial attack with another aggressive action so the initiative is not lost. The instructor explains and demonstrates how instinct should govern your selection of a specific follow-up movement. For example—
PARRY LEFT, BUTT STROKE TO THE HEAD, SMASH, SLASH, ATTACK POSITION.
PARRY LEFT, SLASH, BUTT STROKE TO THE KIDNEY, ATTACK POSITION.
PARRY RIGHT THRUST, BUTT STROKE TO THE GROIN, SLASH, ATTACK POSITION.
Two examples of commands using follow-up movements are—
PARRY LEFT (soldier executes), THRUST (soldier executes), BUTT STROKE TO THE HEAD (soldier executes), SMASH (soldier executes), SLASH (soldier executes), ATTACK POSITION (soldier assumes the attack position).
THRUST (soldier executes), THRUST (soldier executes), THRUST (soldier executes), BUTT STROKE TO THE GROIN (soldier executes), SLASH (soldier executes), ATTACK POSITION (soldier assumes the attack position).
All training will stress damage to the target and violent action, using natural movements as opposed to precise, stereotyped movements. Instinctive, aggressive action and balance are the keys to offense with the rifle and bayonet.
NOTE: For training purposes, the instructor may and should mix up the series of movements.
5-78

FM 21-150
5-79

FM 21-150
Section IV
FIELD-EXPEDIENT WEAPONS
To survive, the soldier in combat must be able to deal with any situation that develops. His ability to adapt any nearby object for use as a weapon in a win-or-die situation is limited only by his ingenuity and resourcefulness. Possible weapons, although not discussed herein, include ink pens or pencils; canteens tied to string to be swung; snap links at the end of sections of rope; kevlar helmets; sand, rocks, or liquids thrown into the enemy’s eyes; or radio antennas. The following techniques demonstrate a few expedient weapons that are readily available to most soldiers for defense and counterattack against the bayonet and rifle with fixed bayonet.
5-11. ENTRENCHING TOOL
Almost all soldiers carry the entrenching tool. It is a versatile and formidable weapon when used by a soldier with some training. It can be used in its straight position—locked out and fully extended-or with its blade bent in a 90-degree configuration.
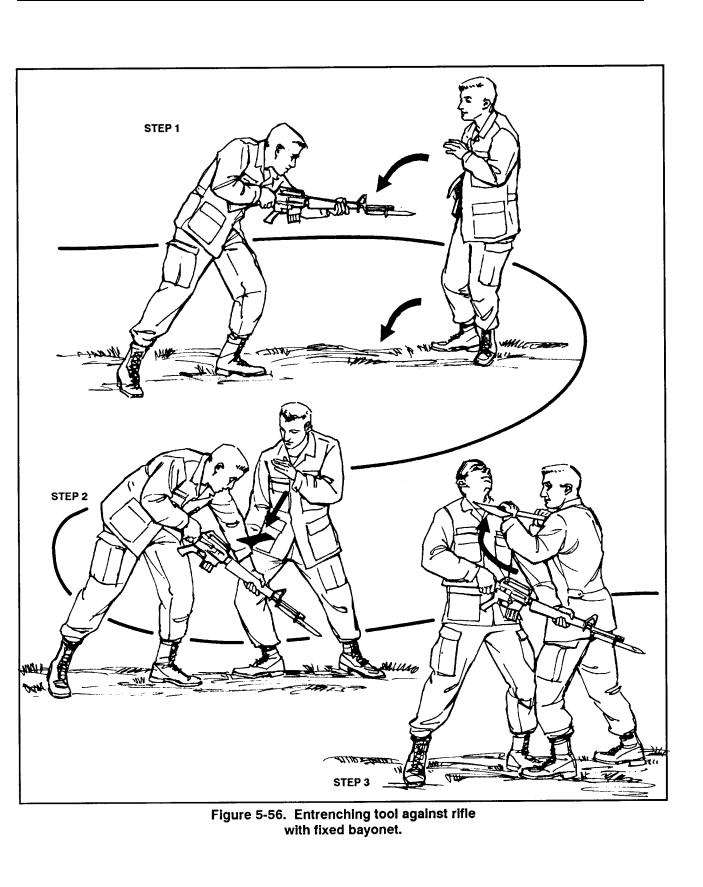
a. To use the entrenching tool against a rifle with fixed bayonet, the attacker lunges with a thrust to the stomach of the defender along a low No. 5 angle of attack (Figure 5-56, Step 1).
The defender moves just outside to avoid the lunge and meets the attacker’s arm with the blade of the fully extended entrenching tool (Figure 5-56, Step 2).
The defender gashes all the way up the attacker’s arm with the force of both body masses coming together. The hand gripping the entrenching tool is given natural protection from the shape of the handle. The defender continues pushing the blade of the entrenching tool up and into the throat of the attacker, driving him backward and downward (Figure 5-56, Step 3).
5-80
FM 21-150
5-81

FM 21-150
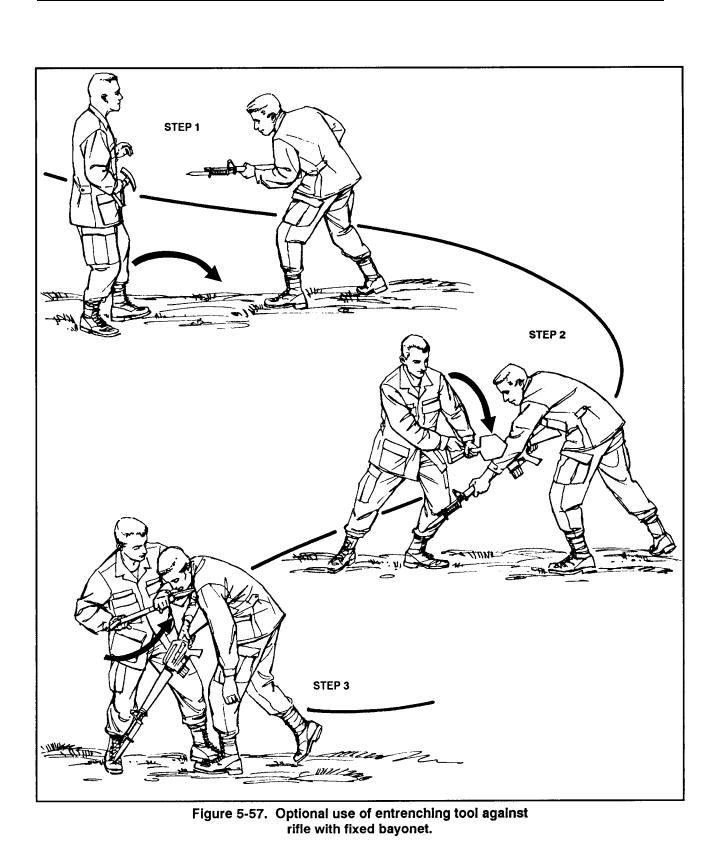
b. An optional use of entrenching tool against a rifle with fixed bayonet is for the attacker to lunge to the stomach of the defender (Figure 5-57, Step 1).
The defender steps to the outside of the line of attack at 45 degrees to avoid the weapon. He then turns his body and strikes downward onto the attacking arm (on the radial nerve) with the blade of the entrenching tool (Figure 5-57, Step 2).
He drops his full body weight down with the strike, and the force causes the attacker to collapse forward. The defender then strikes the point of the entrenching tool into the jugular notch, driving it deeply into the attacker (Figure 5-57, Step 3).
5-82
FM 21-150
5-83

FM 21-150
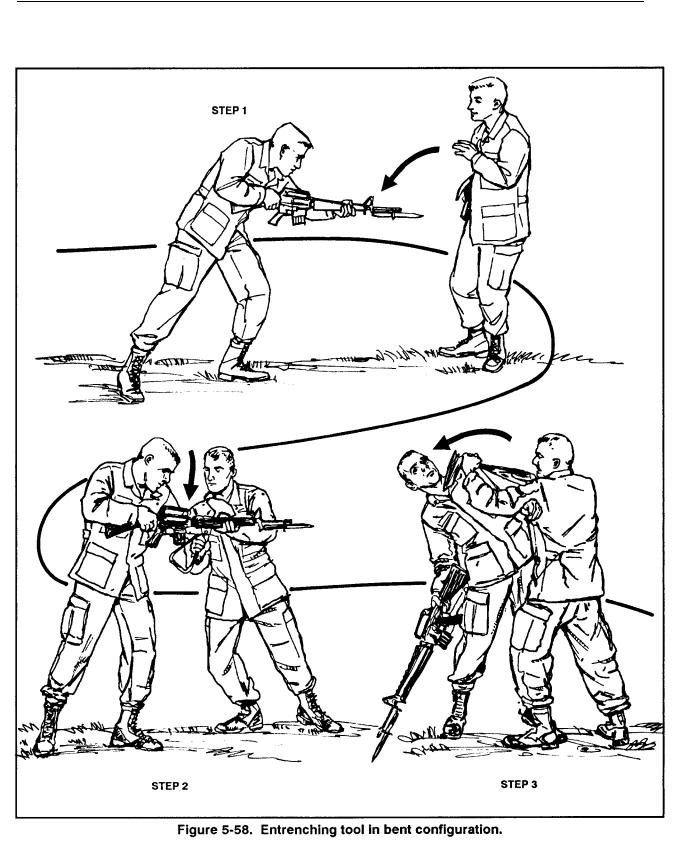
c. In the next two sequences, the entrenching tool is used in the bent configuration—that is, the blade is bent 90 degrees to the handle and locked into place.
(1) The attacker tries to stick the bayonet into the chest of the defender (Figure 5-58, Step 1).
When the attack comes, the defender moves his body off the line of attack by stepping to the outside. He allows his weight to shift forward and uses the blade of the entrenching tool to drag along the length of the weapon, scraping the attacker’s arm and hand (Figure 5-58, Step 2). The defender’s hand is protected by the handle’s natural design.
He continues to move forward into the attacker, strikes the point of the blade into the jugular notch, and drives it downward (Figure 5-58, Step 3).
5-84
FM 21-150
5-85
FM 21-150
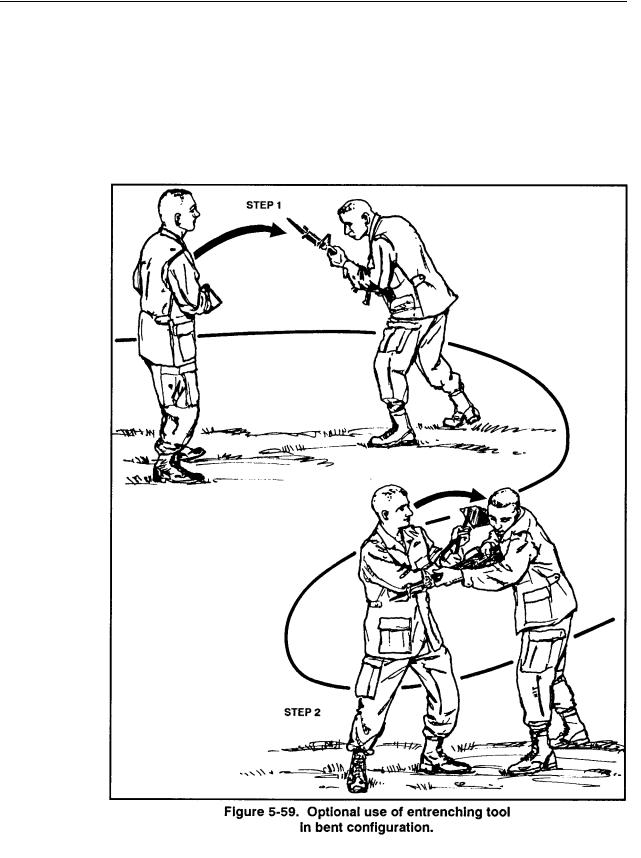
(2) The attacker lunges with a fixed bayonet along the No. 5 angle of attack (Figure 5-59, Step 1).
The defender then steps to the outside to move off the line of attack and turns; he strikes the point of the blade of the entrenching tool into the side of the attacker’s throat (Figure 5-59, Step 2).
5-86

FM 21-150
5-12. THREE-FOOT STICK
Since a stick can be found almost anywhere, a soldier should know its uses as a field-expedient weapon. The stick is a versatile weapon; its capability ranges from simple prisoner control to lethal combat.
a.Use a stick about 3 feet long and grip it by placing it in the vee formed between the thumb and index finger, as in a handshake. It may also be grasped by two hands and used in an unlimited number of techniques. The stick is not held at the end, but at a comfortable distance from the butt end.
b.When striking with the stick, achieve maximum power by using the entire body weight behind each blow. The desired point of contact of the weapon is the last 2 inches at the tip of the stick. The primary targets for
striking with the stick are the vital body points in Chapter 4. Effective striking points are usually the wrist, hand, knees, and other bony protuberances. Soft targets include the side of the neck, jugular notch, solar plexus, and various nerve motor points. Attack soft targets by striking or thrusting the tip of the stick into the area. Three basic methods of striking are—
(1)Thrusting. Grip the stick with both hands and thrust straight into a target with the full body mass behind it.
(2)Whipping. Hold the stick in one hand and whip it in a circular motion; use the whole body mass in motion to generate power.
(3)Snapping. Snap the stick in short, shocking blows, again with the body mass behind each strike.
5-87