

FM 21-150 COMBATIVES 1992
.pdfFM 21-150
(3) Standards. The course must be successfully negotiated by all soldiers in the class with each soldier obtaining kills on 75 percent of the total targets in his lane. The course must be negotiated in 5 minutes or less (about 30 seconds for each 50 meters and time to attack and negotiate obstacles).
WARNING
TO AVOID INJURY, INSTRUCTORS ENSURE THAT THE
PROPER INTERVAL IS CONSTANTLY MAINTAINED.
Section IV
TEACHING TECHNIQUES
This section discusses a variety of effective teaching techniques to use while conducting combative training.
2-14
FM 21-150
2-8. WARM-UPS AND STRETCHES
Before combative training, the soldier must be prepared for the upcoming physical stress. A warm-up period gradually increases the internal temperature of the body and the heart rate. Stretching prepares the ligaments, tendons, muscles, and heart for a workout, decreasing the chances of injury.
a. Warm-up Exercises. To begin warm-up exercises, rotate the major joints—neck, shoulders, hips, and knees. The warm-up should at least include 7 to 10 minutes of stretching, running in place or jogging around the training area, and calisthenics. Grass drills and guerrilla exercises are a good approach as a warm-up for combative training. They condition the body through motion in all ranges, accustom the soldiers to contact with the ground, and promote aggressiveness.
b. Stretching Exercises. Any of the stretching exercises in FM 21-20 are recommended for hand-to-hand combat training. Five other exercises that increase flexibility in areas of the body that benefit hand-to-hand combat movements are as follows:
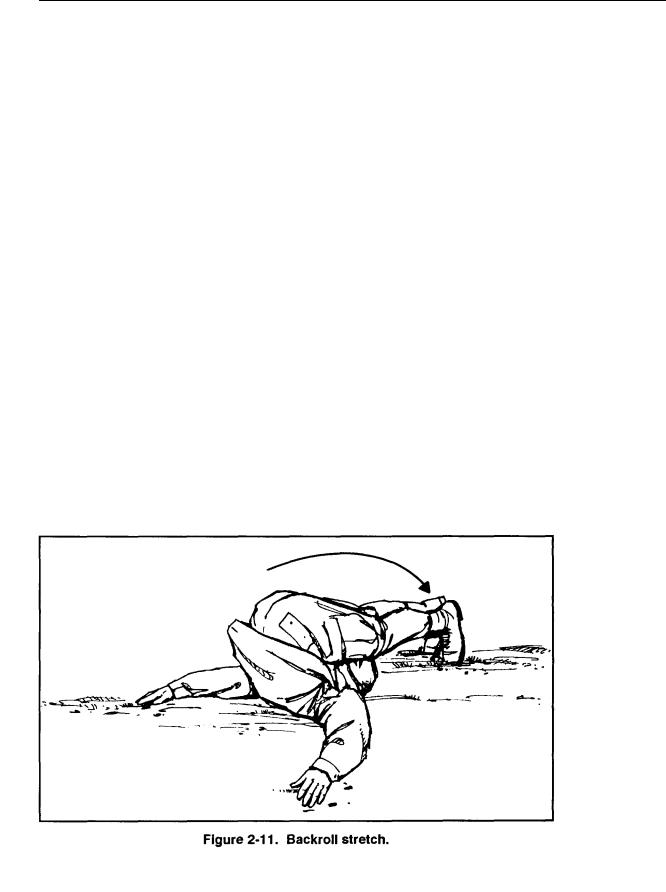
(1) Backroll stretch.
(a)Position: Lay on ground on back with legs extended and arms by sides, palms down.
(b)Action: Raise legs over head and roll back as far as possible, trying to place toes on the ground behind head. Keep knees locked and feet and
knees together; hold for 20 seconds (Figure 2-11). Gradually, return to
starting position. Repeat two or three times.
2-15
FM 21-150
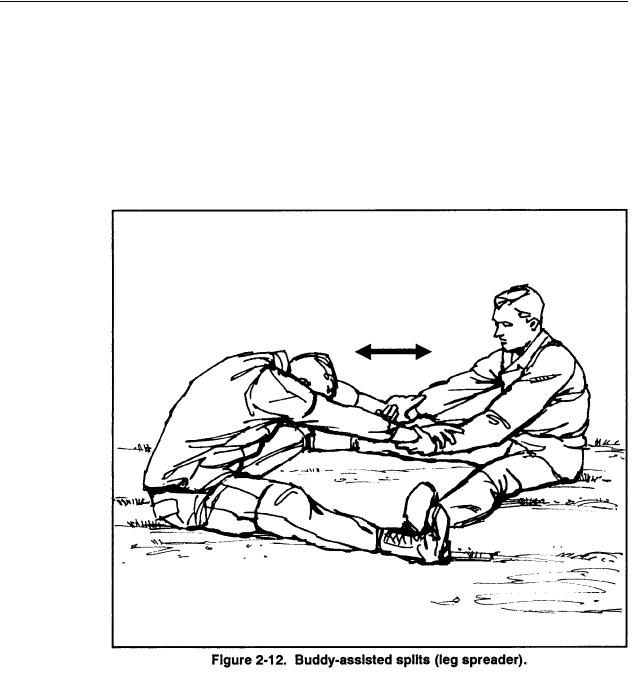
(2) Buddy-assisted splits (leg spreader).
(a)Position: Sit on ground facing buddy with legs extended and spread as far as possible. Position feet inside ankles.
(b)Action: Interlock hands with buddy and alternate pulling one toward
the other, causing the buddy to bend forward over the hips until a stretch is felt (Figure 2-12). Hold this position for 20 seconds, then alternate and have him pull you into a stretch. Do sequence two or three times each.
2-16
FM 21-150
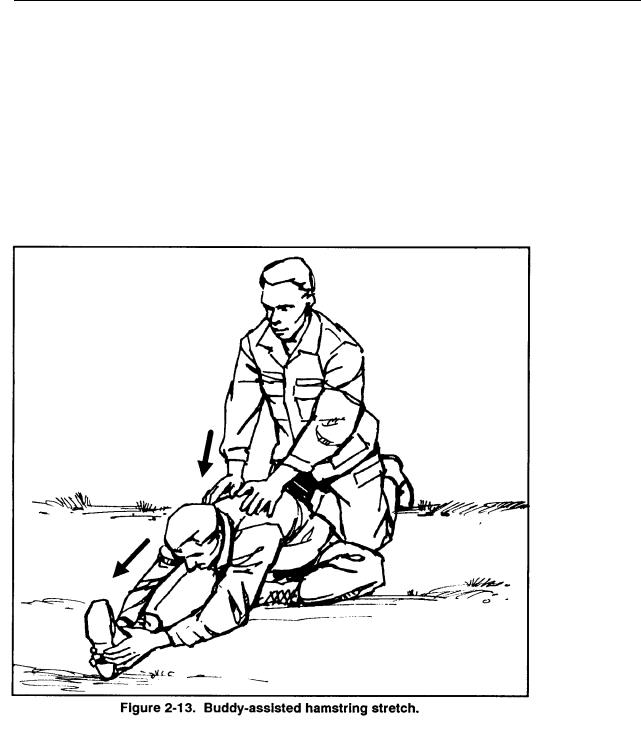
(3)Buddy-assisted hamstring stretch.
(a)Position: Sit on ground with right leg extended to front and foot pointing up. Bend left leg with sole touching to inside of right thigh. Have buddy kneel behind you with his hands on your shoulders (Figure 2-13).
(b)Action: Slowly bend forward from hips over the right leg and reach your hands toward ankles until stretch is felt (Figure 2-l3). Hold this for 10 to 15 seconds. The buddy then applies downward pressure and allows you to adjust your stretch. Hold for 10 to 15 seconds and repeat. Alternate legs and positions after two or three sequences.
2-17
FM 21-150
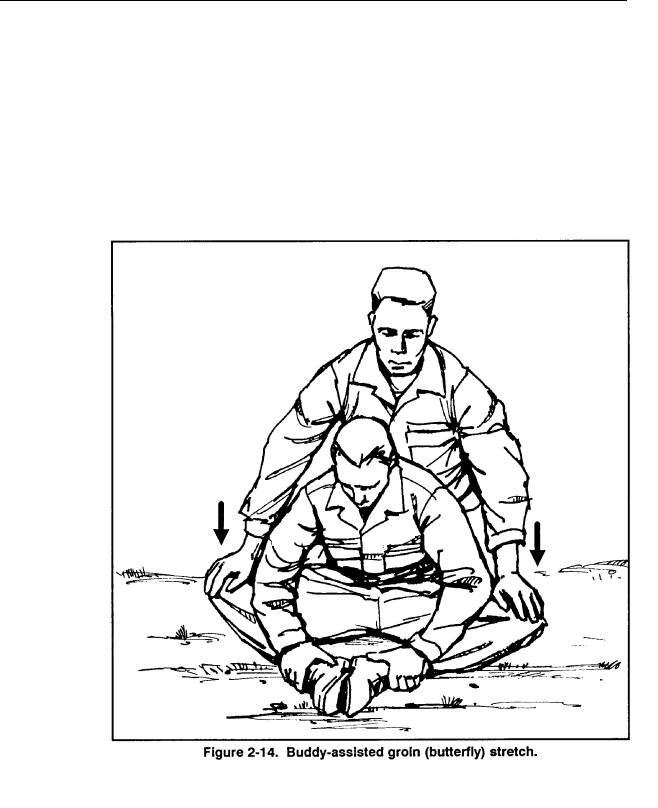
(4) Buddy-assisted groin (butterfly) stretch.
(a)Position: Sit on ground with the soles of your feet together, close to the torso. Hold ankles with hands. Have buddy kneel behind you with his hands on your knees.
(b)Action: The buddy places his hands on top of your thighs at the knees. The buddy’s weight is supported by your shoulders while little weight is placed on the thighs. Then, the buddy increases downward pressure on your thighs until stretch is felt (Figure 2-14). Hold for 20 seconds, then alternate positions.
2-18
FM 21-150
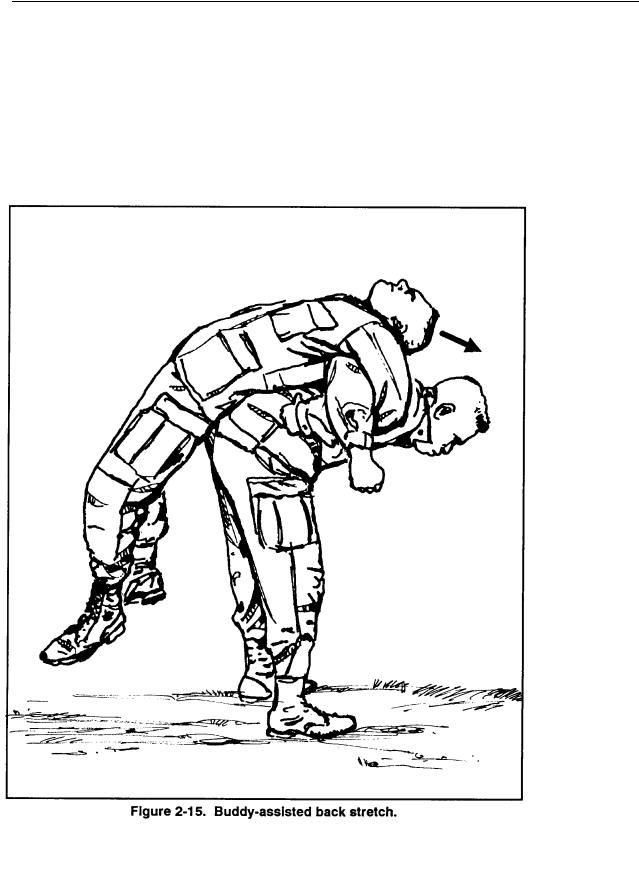
(5) Buddy-assisted back stretch.
(a)Position: Stand back-to-back with buddy and interlock arms at your
sides.
(b)Action: Bend forward at the waist and pull buddy up on your back over your hips. The buddy allows his back to arch and tells you when an adequate stretch is felt (Figure 2- 15). Hold this position for 20 seconds, then, change places.
2-19
FM 21-150
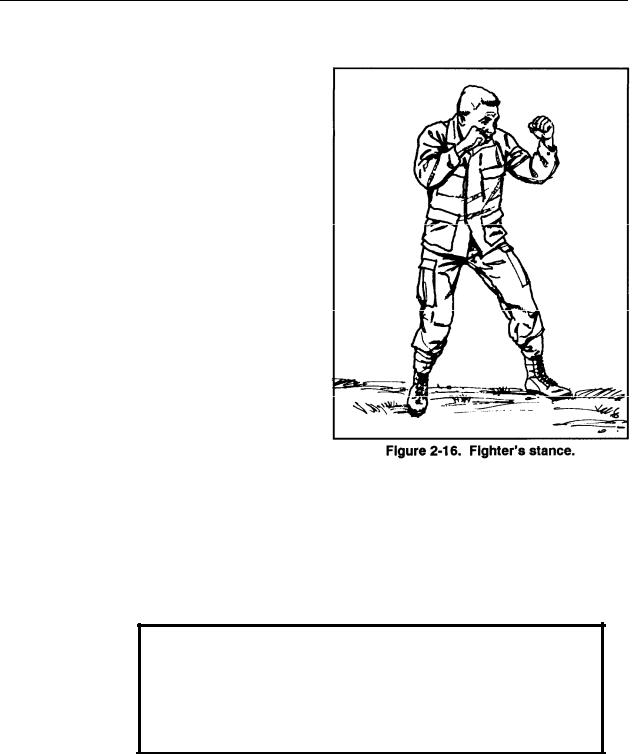
2-9. STANCES
A fighter’s stance (Figure 2-16) is the position he takes in readiness for an unarmed fight. He may launch an attack or defend from this stance.
a.A fighter’s stance not only places his body in a good position from which to attack or defend, but it influences his mental attitude and aggressiveness.
b.He holds his hands high to protect his head and face. His fists are clenched, but relaxed. His elbows are close to his body and his weight is evenly distributed on both feet, creating a stable base. He is light on his feet with his knees slightly flexed to allow quick movement in any direction.
2-10. FALLS
A soldier must learn how to fall to the ground without getting hurt, both during training and during combat. If he loses his balance or is thrown during a fight, his use of basic fall techniques enables him to escape injury or to quickly recover to protect himself.
WARNING
TO HELP PREVENT ACCIDENTS DURING FALLS, IT IS
IMPORTANT TO EXHALE UPON IMPACT WITH THE
GROUND. THIS HELPS THE BODY ABSORB THE
IMPACT
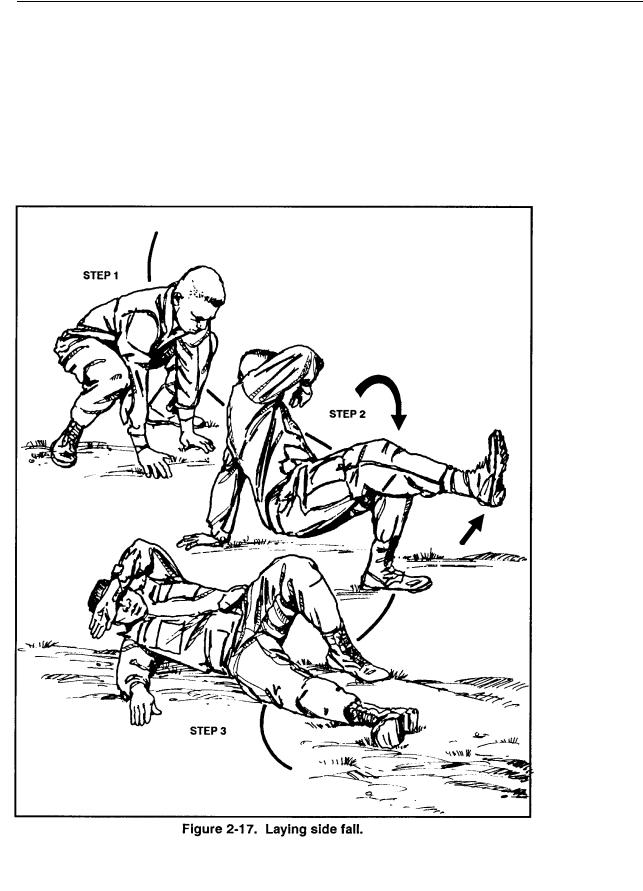
a. Laying Side Fall. The laying side fall is a training exercise that teaches the basic movements for executing a side fall. To be safe, the fall is learned from the squatting position until soldiers can fall properly. From the
2-20
FM 21-150
squatting position (Figure 2-17, Step 1), the soldier extends one leg across the front of the body and raises his arm on the same side across his face (Figure 2-17, Step 2).
Then he rolls onto the exposed side, allowing the extended leg and side to absorb the shock of the fall. He slowly lowers his arm to stabilize his body. He raises his other hand to guard against future strikes (Figure 2-17, Step 3).
2-21
FM 21-150
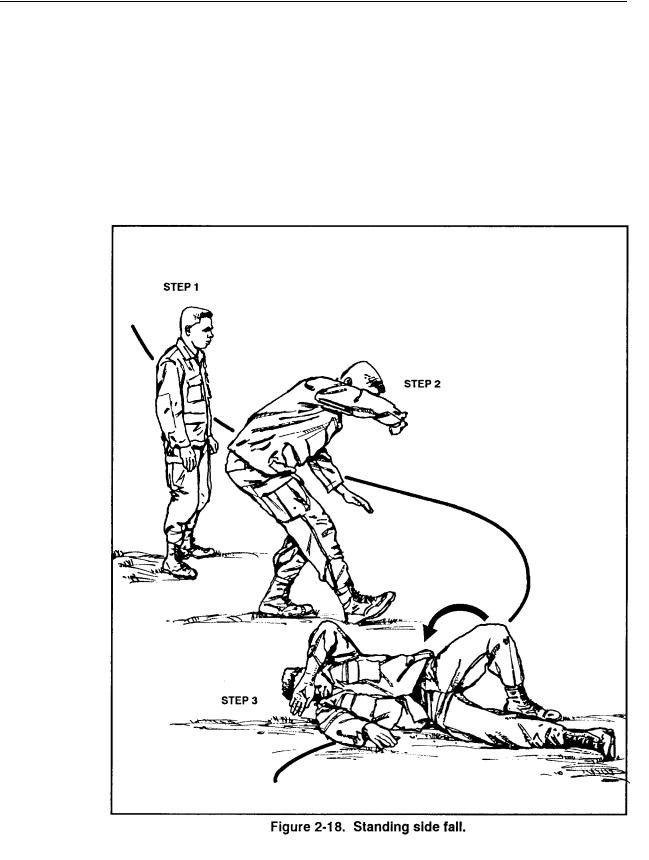
b. Standing Side Fall. The soldier starts the fall from the standing position (Figure 2-18, Step 1).
He lowers his weight on the supporting leg and extends the other leg across the body (Figure 2-18, Step 2).
He then distributes his body weight by rolling along the exposed side from the ankle of the extended leg to the back muscle. The arm on the ground is used to stabilize himself; the other hand is used to guard the body (Figure 2-l8, Step 3).
2-22
FM 21-150
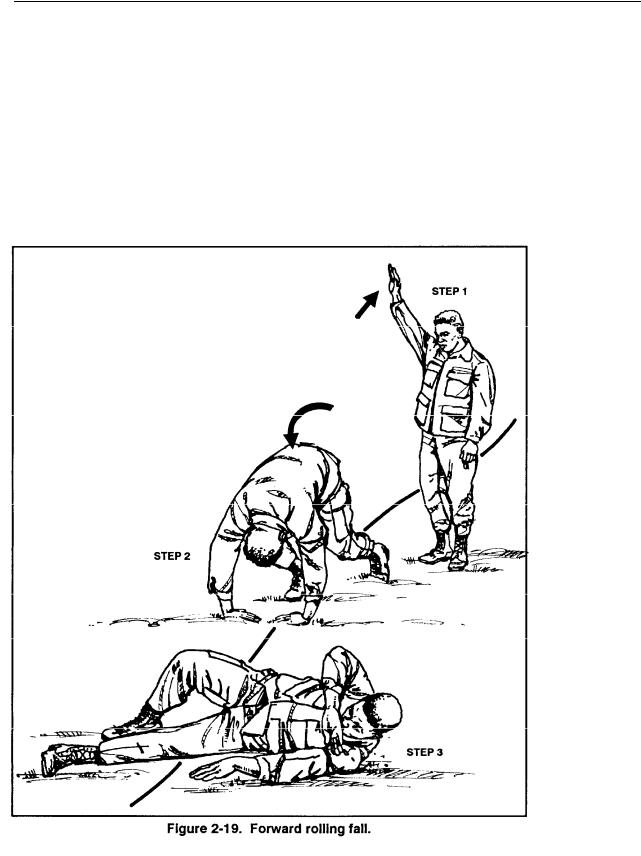
c. Forward Rolling Fall. The soldier starts the fall from the standing position (Figure 2-19, Step 1). He raises one arm to expose his entire side, places both hands on the ground, and bends both knees.
He rolls forward across the body along the hand, arm, and back to the opposite hip (Figure 2-19, Step 2) and ends in a good side fall position (Figure 2-19, Step 3).
He keeps his left leg flat on the ground, knee slightly bent. His right knee points upward and bends inward to help protect the groin. He keeps his right heel and sole flat on the ground behind the left leg.
2-23