


Chapter 13
Write Once, Test Everywhere
Today, Android can be found in a bewildering array of mobile phones, tablets, and other devices. This is both a blessing and a curse. It’s a blessing for consumers because they can choose between Androidpowered devices of different shapes, sizes, and prices. But for developers, it can be a curse to try to support all those variations.
To complicate things, the rapid pace of Android development has left a fragmented trail of devices running different versions of the platform in its wake. The following table shows all the versions of Android ever released:1
Version |
Code name2 |
API |
Released |
Comments |
1.0 |
BASE |
1 |
Oct. 2008 |
No longer in use |
1.1 |
BASE_1_1 |
2 |
Feb. 2009 |
No longer in use |
1.5 |
CUPCAKE |
3 |
May 2009 |
Widgets |
1.6 |
DONUT |
4 |
Sept. 2009 |
Highand low-density |
|
|
|
|
displays |
2.0 |
ECLAIR |
5 |
Nov. 2009 |
No longer in use |
2.0.1 |
ECLAIR_0_1 |
6 |
Dec. 2009 |
Multi-touch, no longer in |
|
|
|
|
use |
2.1 |
ECLAIR_MR1 |
7 |
Jan. 2010 |
Live wallpaper |
2.2 |
FROYO |
8 |
May 2010 |
SD card installs |
This chapter will cover how to support multiple Android versions and screen resolutions in one program. The first step is testing.
1.See http://d.android.com/resources/dashboard/platform-versions.html for an up-to-date chart showing the percentage of devices running each version of Android.
2.Android version codes and API levels are specified in the Build.VERSION_CODES class.
GENTLEMEN, STAR T YOUR EMULATORS  257
257
13.1Gentlemen, Start Your Emulators
For most of this book I’ve been telling you to target your applications to version 2.2 of the Android platform (also known as FroYo). However, there’s one little problem with this advice: your programs may not run on phones that have one of the older versions of Android installed.
The only reliable way of telling whether it will work is to test it. And short of buying one of every Android phone on the market, the best way to test your program on different Android versions and screen sizes is to try it in the emulator.
To do this, you’ll need to set up several virtual devices with different versions and emulator skins. A skin specifies the width, height, and pixel density for an emulated device. In addition to the em22 AVD you created in Section 1.3, Creating an AVD, on page 23, I recommend that you create the following virtual devices for testing:
Name |
Target |
Skin |
Inspired by Device... |
em15 |
1.5 |
HVGA (320×480) |
HTC G1, Eris |
em16 |
1.6 |
HVGA (320×480) |
HTC Hero |
em16-qvga |
1.6 |
QVGA (200×320) |
HTC Tattoo |
em21-854 |
2.1 |
WVGA854 (480×854) |
Motorola Droid (Sholes) |
em22-800 |
2.2 |
WVGA800 (480×800) |
HTC Nexus One |
em22-1024 |
2.2 |
Custom (1024×600) |
Notion Ink Adam |
You can use the em22 AVD for development and then test your program in the other AVDs before you release the application. And don’t forget to try it in both portrait and landscape modes. In the emulator, press Ctrl+F11 or use the 7 or 9 keys on the keypad (NumLock off) to toggle between portrait and landscape.
Unless you have a very powerful desktop computer, you probably won’t be able to run all these AVDs at once. In practice, I find that running only one at a time works best. Try it now by starting up the em16 (Android 1.6) emulator. Wait until the emulator comes up to the home screen, and turn off the screen lock if it appears. Now let’s see some of the things that can go wrong.
13.2Building for Multiple Versions
First, we’ll try running the “Hello, Android” program from Section 1.2, Creating Your First Program, on page 23 in the 1.6 emulator. From the menu, select Run > Run Configurations. Locate the configuration for

BUILDING FOR MULTIPLE VERSIONS  258
258
HelloAndroid and select it, or create a new Android Application configuration if it doesn’t exist. Click the Target tab, and set Deployment Target Selection Mode to Manual. Then click the Run button.
Eclipse will show a dialog asking you to choose a running Android device. You may notice a red X next to the emulator name—ignore it. Select the device called em16, and then click OK. The following error will appear in the Console view:
ERROR: Application requires API version 8. Device API version is 4 (Android 1.6).
Launch canceled!
Note: If you get a warning that says “Application does not specify an API level requirement,” then you need to specify a minimum SDK version (covered in a moment). If you don’t get an error and the application launches in the em16 emulator, it means you’ve already applied the change in this section. And finally, if Eclipse launches a new emulator window, then you probably have your target selection mode set to Automatic. Change it to Manual, and try again.
The error occurs because we specified version 2.2 as the target version of Android when we created the project. Unless we change something, it won’t run at all on older versions. On those devices, it won’t even appear in the Android Market. But I happen to know that this program will work just fine on any version of Android. So, how do we tell Android that?
Easy: In the Android manifest, just set your target SDK version to one number and your minimum SDK version to another number. This lets you target a new version of Android but have it still work on phones that have an older version.
To do this, edit the AndroidManifest.xml file, and change the line that says the following:
<uses-sdk android:minSdkVersion="8" />
to read as follows:
<uses-sdk android:minSdkVersion="3" android:targetSdkVersion="8" />
If you don’t have this line, then add it right before the </manifest> tag.
This tells Android that your program is built for Android 2.2 (API level 8) but will work fine on Android 1.5 (API level 3). Save the file, and try running the project again. It should work this time without any errors. If you get a warning about “Manifest min SDK version (3) is lower than project target API level (8),” just ignore it.
EVOLVING WITH ANDROID APIS  259
259
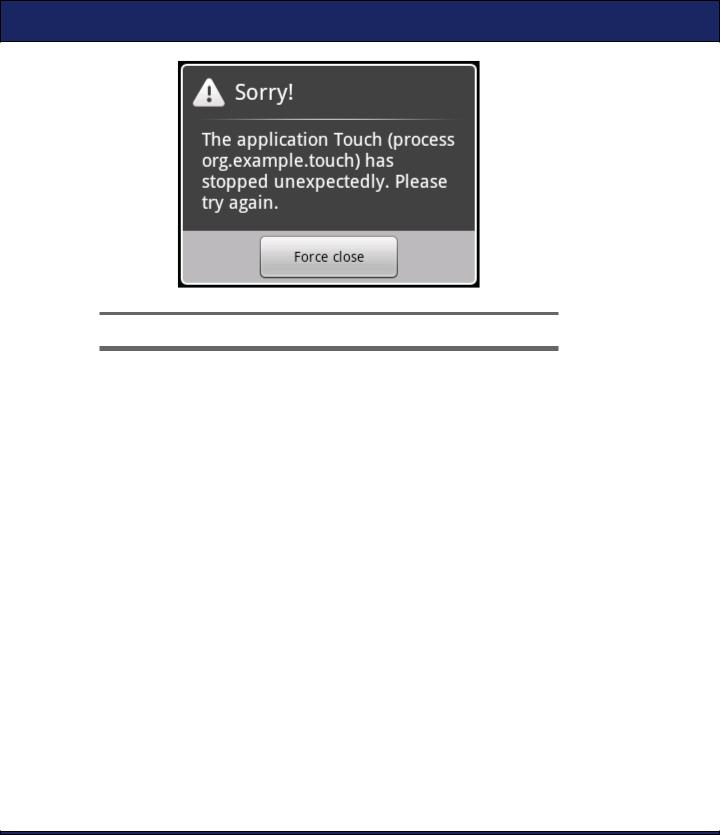
Figure 13.1: The touch example crashes on Android 1.6.
Unfortunately, for some programs, just saying that we support version 3 doesn’t make it so. We’ll see an example of that next.
13.3Evolving with Android APIs
Sometimes you need to use an API that does not appear in all versions of Android. For instance, in the touch example (Chapter 11, MultiTouch, on page 220), we used some new methods of the MotionEvent class that were not there before Android 2.0. If you try to run that example in the em16 emulator, you will get the error in Figure 13.1.
If you then open the LogCat view in Eclipse (Window > Show View > Other > Android Log) and scroll back a little, you’ll find a more detailed error message, which will look something like this:
Could not find method android.view.MotionEvent.getPointerCount, referenced from method org.example.touch.Touch.dumpEvent
VFY: unable to resolve virtual method 11: Landroid/view/MotionEvent;.getPointerCount ()I
Verifier rejected class Lorg/example/touch/Touch;
Class init failed in newInstance call (Lorg/example/touch/Touch;) Uncaught handler: thread main exiting due to uncaught exception java.lang.VerifyError: org.example.touch.Touch
at java.lang.Class.newInstanceImpl(Native Method) at java.lang.Class.newInstance(Class.java:1472)
...

EVOLVING WITH ANDROID APIS  260
260
The important part is the VerifyError exception. At runtime, Android throws a VerifyError exception whenever it tries to load one class that uses methods that don’t exist in a second class. In this case, the Touch class references the getPointerCount( ) method of the MotionEvent class. MotionEvent exists in 1.5, but the getPointerCount( ) method was not introduced until version 2.0. Note that it didn’t complain about the constants we used like ACTION_POINTER_DOWN because they are baked into our program by the compiler at build time.
It would be nice if we could modify the definition of MotionEvent to add the missing method, but unlike JavaScript or Ruby, Java doesn’t support that. We can do something similar, though, using one of three techniques:
•Subclassing: We could make a new class that extends MotionEvent and adds the new method. Unfortunately, MotionEvent is final, which in Java means it can’t be extended, so that won’t work here.
•Reflection: Using utilities from the java.lang.reflect package, we could write code to test for the existence of the new method. If it exists, we’d call it, and if doesn’t exist, we’d do something else like return 1. That would work, but Java reflection is slow to run and messy to program.
•Delegation and factory: We could create two classes, one that will be used on older versions of Android and one that will be used on newer versions. The first one will implement dummy versions of the new methods, while the second one will delegate all calls to the real new methods. Then we pick which class to create using a static factory method (a method the caller uses instead of the new keyword to create a class). This technique is simple and can be used to handle most API differences, so we’ll use it here.
One of our goals should be to minimize the changes to the original Touch class. We start by replacing all references to MotionEvent with a new class, WrapMotionEvent, like this:
Download Touchv2/src/org/example/touch/Touch.java
@Override
public boolean onTouch(View v, MotionEvent rawEvent) { WrapMotionEvent event = WrapMotionEvent.wrap(rawEvent); // ...
}
private void dumpEvent(WrapMotionEvent event) { // ...
}
EVOLVING WITH ANDROID APIS  261
261
private float spacing(WrapMotionEvent event) { // ...
}
private void midPoint(PointF point, WrapMotionEvent event) { // ...
}
In the onTouch( ) method, we take the raw MotionEvent passed in by Android and convert it to a WrapMotionEvent by calling the static factory method WrapMotionEvent.wrap( ). Other than these changes, the rest of the Touch class is...untouched.
Now let’s create the WrapMotionEvent class. Delegation is a pretty common thing to do in Java, so Eclipse provides a command to make it easy. Click the org.example.touch package in the Package Explorer view, and then select the File > New > Class command. Enter the new class name (WrapMotionEvent), and press Return. Now add a field inside the class for the event we want to wrap. The code should look like this so far:
Download Touchv2/src/org/example/touch/WrapMotionEvent.java
package org.example.touch;
import android.view.MotionEvent;
public class WrapMotionEvent { protected MotionEvent event;
}
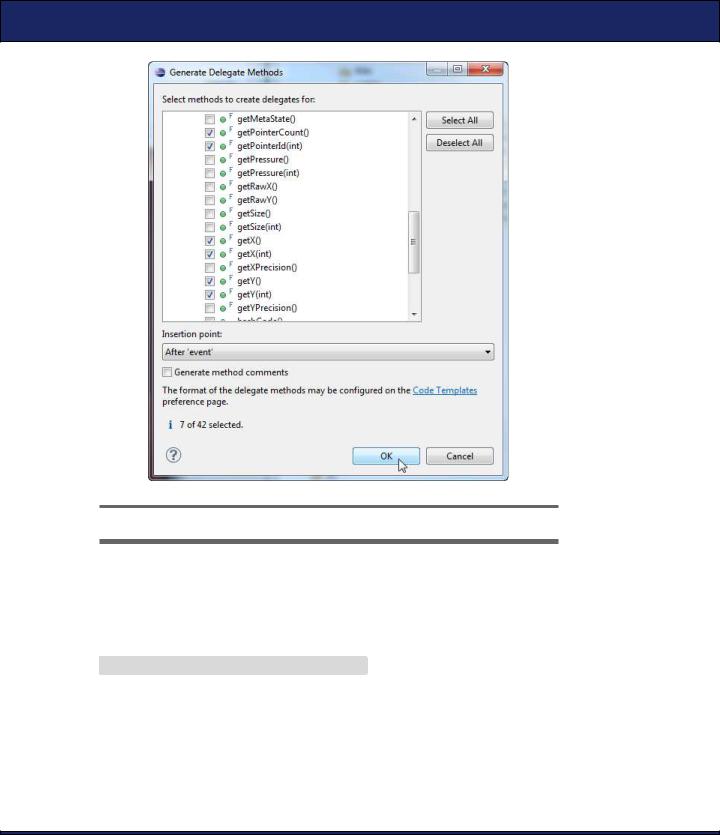
In the Java editor, click the event variable, and then select the Source > Generate Delegate Methods command from the menu. Eclipse will give you a big list of possible methods, but we don’t need the whole list, so deselect all of them and select only the ones that are actually used in the program: getAction( ), getPointerCount( ), getPointerId(int), getX( ), getX(int), getY( ), and getY(int). When you are done, the dialog should look like Figure 13.2, on the next page. Click OK to generate the code.
Before doing anything else, save the WrapMotionEvent.java file, and make a copy called EclairMotionEvent.java. We’ll come back to that one in a moment.
As it currently stands, WrapMotionEvent calls several methods that don’t exist in older Android versions, so we need to replace those. You can tell which ones are a problem by hovering your mouse cursor over each method call.
EVOLVING WITH ANDROID APIS  262
262
Figure 13.2: Let Eclipse create the delegate methods for you.
The new methods will say “Since: API Level 5,” and the old methods will say “Since: API Level 1.” Another way to tell would be to temporarily change your build target to Android 1.6, rebuild, and see where the errors are.
Here’s the new code that will work under Android 1.6:
Download Touchv2/src/org/example/touch/WrapMotionEvent.java
package org.example.touch;
import android.view.MotionEvent;
public class WrapMotionEvent { protected MotionEvent event;
public int getAction() { return event.getAction();
}

EVOLVING WITH ANDROID APIS  263
263
public float getX() { return event.getX();
}
public float getX(int pointerIndex) { verifyPointerIndex(pointerIndex); return getX();
}
public float getY() { return event.getY();
}
public float getY(int pointerIndex) { verifyPointerIndex(pointerIndex); return getY();
}
public int getPointerCount() { return 1;
}
public int getPointerId(int pointerIndex) { verifyPointerIndex(pointerIndex);
return 0;
}
private void verifyPointerIndex(int pointerIndex) { if (pointerIndex > 0) {
throw new IllegalArgumentException(
"Invalid pointer index for Donut/Cupcake");
}
}
}
In this version, getPointerCount( ) will always return 1, indicating there is only one finger pressed. That should ensure that getX(int) and getY(int) will never be called with a pointer index greater than zero, but just in case I’ve added a verifyPointerIndex( ) method to check for that error.
Next, we need to add the wrap( ) method and the constructor for the
WrapMotionEvent class:
Download Touchv2/src/org/example/touch/WrapMotionEvent.java
protected WrapMotionEvent(MotionEvent event) { this.event = event;
}

EVOLVING WITH ANDROID APIS  264
264
static public WrapMotionEvent wrap(MotionEvent event) { try {
return new EclairMotionEvent(event); } catch (VerifyError e) {
return new WrapMotionEvent(event);
}
}
The wrap( ) method is our static factory method. First it tries to create an instance of the EclairMotionEvent class. That will fail under Android 1.5 and 1.6 because EclairMotionEvent uses the new methods introduced in Android 2.0 (Eclair). If it can’t create an EclairMotionEvent class, then it creates an instance of the WrapMotionEvent class instead.3
Now it’s time for us to work on the EclairMotionEvent class that we saved earlier. We’ll finish it by making it extend WrapMotionEvent and adding a constructor. We can also take out the getAction( ) method and the zero-parameter versions of getX( ) and getY( ) because they exist in all versions of Android and are already implemented in WrapMotionEvent. Here’s the full definition:
Download Touchv2/src/org/example/touch/EclairMotionEvent.java
package org.example.touch;
import android.view.MotionEvent;
public class EclairMotionEvent extends WrapMotionEvent {
protected EclairMotionEvent(MotionEvent event) { super(event);
}
public float getX(int pointerIndex) { return event.getX(pointerIndex);
}
public float getY(int pointerIndex) { return event.getY(pointerIndex);
}
public int getPointerCount() { return event.getPointerCount();
}
3. Design pattern purists will probably deride this code, saying I should have created a separate class to hold the factory method and a common interface for both WrapMotionEvent and EclairMotionEvent to implement. But this is simpler, and it works, which is more important in my book.