


Chapter 3
Designing the User Interface
In Chapter 1, Quick Start, on page 17, we used the Android Eclipse plug-in to put together a simple “Hello, Android” program in a few minutes. In Part II, we’ll create a more substantial example: a Sudoku game. By gradually adding features to the game, you’ll learn about many aspects of Android programming. We’ll start with the user interface.
You can find all the sample code used in this book at http://pragprog. com/titles/eband3. If you’re reading the PDF version of this book, you can click the little gray rectangle before the code listings to download that file directly.
3.1Introducing the Sudoku Example
Sudoku makes a great sample program for Android because the game itself is so simple. You have a grid of eighty-one tiles (nine across and nine down), and you try to fill them in with numbers so that each column, each row, and each of the three-by-three boxes contains the numbers 1 through 9 only once. When the game starts, some of the numbers (the givens) are already filled in. All the player has to do is supply the rest. A true Sudoku puzzle has only one unique solution.
Sudoku is usually played with pencil and paper, but computerized versions are quite popular too. With the paper version, it’s easy to make a mistake early on, and when that happens, you have to go back and erase most of your work. In the Android version, you can change the tiles as often as you like without having to brush away all those pesky eraser shavings.
DESIGNING BY DECLARATION |
44 |
Sudoku Trivia
Most people think Sudoku is some kind of ancient Japanese game, but it’s not. Although similar puzzles can be traced to 19th-century French magazines, most experts credit retired American architect Howard Garns with the invention of modern Sudoku. Number Place, as it was known at the time, was first published in the United States in 1979 by Dell Magazines.
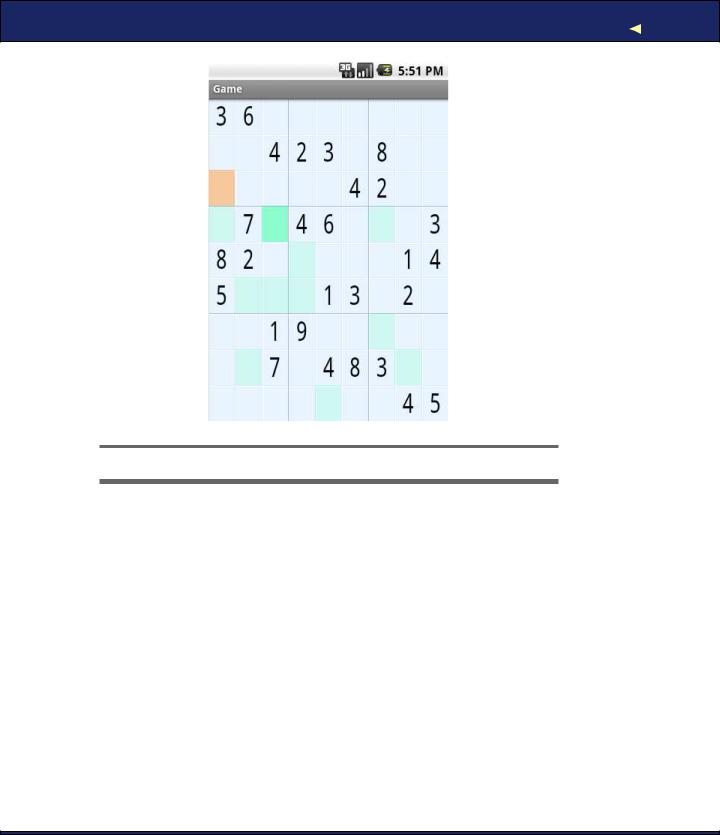
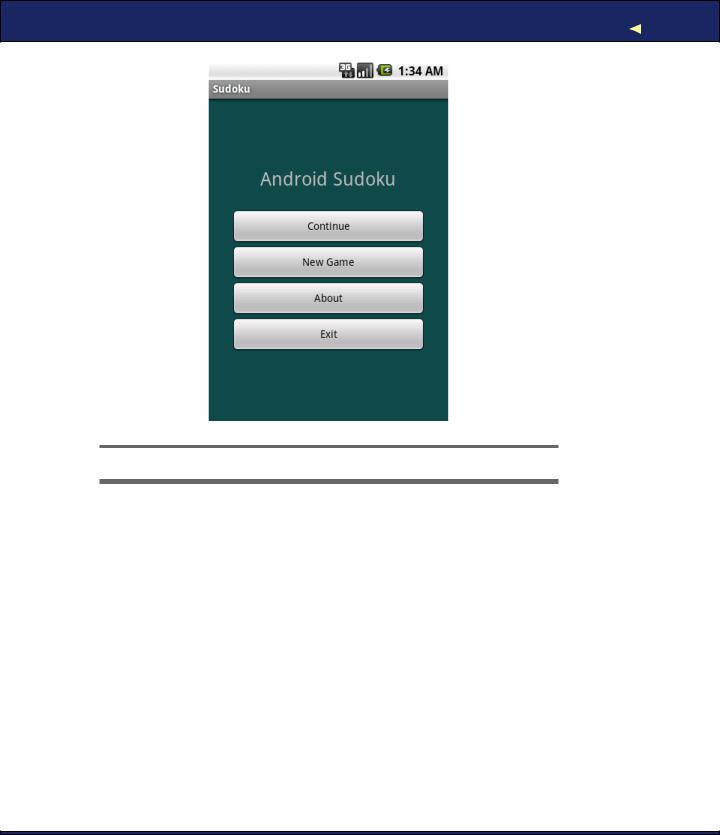
Android Sudoku (see Figure 3.1, on the next page) will also offer a few hints to take some of the grunt work out of puzzle solving. At one extreme, it could just solve the puzzle for you, but that wouldn’t be any fun, would it? So, we have to balance the hints against the challenge and not make it too easy.
3.2Designing by Declaration
User interfaces can be designed using one of two methods: procedural and declarative. Procedural simply means in code. For example, when you’re programming a Swing application, you write Java code to create and manipulate all the user interface objects such as JFrame and JButton. Thus, Swing is procedural.
Declarative design, on the other hand, does not involve any code. When you’re designing a simple web page, you use HTML, a markup language similar to XML that describes what you want to see on the page, not how you want to do it. HTML is declarative.
Android tries to straddle the gap between the procedural and declarative worlds by letting you create user interfaces in either style. You can stay almost entirely in Java code, or you can stay almost entirely in XML descriptors. If you look up the documentation for any Android user interface component, you’ll see both the Java APIs and the corresponding declarative XML attributes that do the same thing.
Which should you use? Either way is valid, but Google’s advice is to use declarative XML as much as possible. The XML code is often shorter and easier to understand than the corresponding Java code, and it’s less likely to change in future versions.
CREATING THE OPENING SCREEN |
45 |
Figure 3.1: The Sudoku example program for Android
Now let’s see how we can use this information to create the Sudoku opening screen.
3.3Creating the Opening Screen
We’ll start with a skeleton Android program created by the Eclipse plugin. Just as you did in Section 1.2, Creating Your First Program, on page 23, create a new “Hello, Android” project, but this time use the following values:
Project name: Sudoku
Build Target: Android 2.2
Application name: Sudoku
Package name: org.example.sudoku
Create Activity: Sudoku
Min SDK Version: 8

CREATING THE OPENING SCREEN |
46 |
In a real program, of course, you would use your own names here. The package name is particularly important. Each application in the system must have a unique package name. Once you choose a package name, it’s a little tricky to change it because it’s used in so many places.
I like to keep the Android emulator window up all the time and run the program after every change, since it takes only a few seconds. If you do that and run the program now, you’ll see a blank screen that just contains the words “Hello World, Sudoku.” The first order of business is to change that into an opening screen for the game, with buttons to let the player start a new game, continue a previous one, get information about the game, and exit. So, what do we have to change to do that?
As discussed in Chapter 2, Key Concepts, on page 30, Android applications are a loose collection of activities, each of which define a user interface screen. When you create the Sudoku project, the Android plug-in makes a single activity for you in Sudoku.java:
Download Sudokuv0/src/org/example/sudoku/Sudoku.java
package org.example.sudoku;
import android.app.Activity; import android.os.Bundle;
public class Sudoku extends Activity {
/** Called when the activity is first created. */ @Override
public void onCreate(Bundle savedInstanceState) { super.onCreate(savedInstanceState); setContentView(R.layout.main);
}
}
Android calls the onCreate( ) method of your activity to initialize it. The call to setContentView( ) fills in the contents of the activity’s screen with an Android view widget.
We could have used several lines of Java code, and possibly another class or two, to define the user interface procedurally. But instead, the plug-in chose the declarative route, and we’ll continue along those lines. In the previous code, R.layout.main is a resource identifier that refers to the main.xml file in the res/layout directory (see Figure 3.2, on the following page). main.xml declares the user interface in XML, so that’s the file we need to modify. At runtime, Android parses and instantiates (inflates) the resource defined there and sets it as the view for the current activity.

CREATING THE OPENING SCREEN |
47 |
Figure 3.2: Initial resources in the Sudoku project
It’s important to note that the R class is managed automatically by the Android Eclipse plug-in. When you put a file anywhere in the res directory, the plug-in notices the change and adds resource IDs in R.java in the gen directory for you. If you remove or change a resource file, R.java is kept in sync. If you bring up the file in the editor, it will look something like this:
Download Sudokuv0/gen/org/example/sudoku/R.java
/* AUTO-GENERATED FILE. DO NOT MODIFY.
*
*This class was automatically generated by the
*aapt tool from the resource data it found. It
*should not be modified by hand.
*/
CREATING THE OPENING SCREEN |
48 |
package org.example.sudoku;
public final class R {
public static final class attr {
}
public static final class drawable {
public static final int icon=0x7f020000;
}
public static final class layout {
public static final int main=0x7f030000;
}
public static final class string {
public static final int app_name=0x7f040001; public static final int hello=0x7f040000;
}
}
The hex numbers are just integers that the Android resource manager uses to load the real data, the strings, and the other assets that are compiled into your package. You don’t need to worry about their values. Just keep in mind that they are handles that refer to the data, not the objects that contain the data. Those objects won’t be inflated until they are needed. Note that almost every Android program, including the base Android framework itself, has an R class. See the online documentation on android.R for all the built-in resources you can use.1
So, now we know we have to modify main.xml. Let’s dissect the original definition to see what we have to change. Double-click main.xml in Eclipse to open it. Depending on how you have Eclipse set up, you may see either a visual layout editor or an XML editor. In current versions of ADT, the visual layout editor isn’t that useful, so click main.xml or the Source tab at the bottom to see the XML. The first line of main.xml is as follows:
<?xml version="1.0" encoding="utf-8"?>
All Android XML files start with this line. It just tells the compiler that the file is XML format, in UTF-8 encoding. UTF-8 is almost exactly like regular ASCII text, except it has escape codes for non-ASCII characters such as Japanese glyphs.
1. http://d.android.com/reference/android/R.html
CREATING THE OPENING SCREEN |
49 |
Joe Asks. . .
Why Does Android Use XML? Isn’t That Inefficient?
Android is optimized for mobile devices with limited memory and horsepower, so you may find it strange that it uses XML so pervasively. After all, XML is a verbose, human-readable format not known for its brevity or efficiency, right?
Although you see XML when writing your program, the Eclipse plug-in invokes the Android resource compiler, aapt, to preprocess the XML into a compressed binary format. It is this format, not the original XML text, that is stored on the device.
Next we see a reference to <LinearLayout>:
<LinearLayout xmlns:android="http://schemas.android.com/apk/res/android" android:orientation="vertical" android:layout_width="fill_parent" android:layout_height="fill_parent">
<!-- ... -->
</LinearLayout>
A layout is a container for one or more child objects and a behavior to position them on the screen within the rectangle of the parent object. Here is a list of the most common layouts provided by Android:
•FrameLayout: Arranges its children so they all start at the top left of the screen. This is used for tabbed views and image switchers.
•LinearLayout: Arranges its children in a single column or row. This is the most common layout you will use.
•RelativeLayout: Arranges its children in relation to each other or to the parent. This is often used in forms.
•TableLayout: Arranges its children in rows and columns, similar to an HTML table.
Some parameters are common to all layouts:
xmlns:android="http://schemas.android.com/apk/res/android"
Defines the XML namespace for Android. You should define this once, on the first XML tag in the file.
CREATING THE OPENING SCREEN |
50 |
android:layout_width="fill_parent", android:layout_height="fill_parent"
Takes up the entire width and height of the parent (in this case, the window). Possible values are fill_parent and wrap_content.
Inside the <LinearLayout> tag you’ll find one child widget:
<TextView android:layout_width="fill_parent" android:layout_height="wrap_content" android:text="@string/hello" />
This defines a simple text label. Let’s replace that with some different text and a few buttons. Here’s our first attempt:
Download Sudokuv1/res/layout/main1.xml
<?xml version="1.0" encoding="utf-8"?>
<LinearLayout xmlns:android="http://schemas.android.com/apk/res/android" android:orientation="vertical" android:layout_width="fill_parent" android:layout_height="fill_parent">
<TextView android:layout_width="fill_parent" android:layout_height="wrap_content" android:text="@string/main_title" />
<Button android:layout_width="fill_parent" android:layout_height="wrap_content"
android:text="@string/continue_label" /> <Button
android:layout_width="fill_parent" android:layout_height="wrap_content" android:text="@string/new_game_label" />
<Button android:layout_width="fill_parent" android:layout_height="wrap_content" android:text="@string/about_label" />
<Button android:layout_width="fill_parent" android:layout_height="wrap_content" android:text="@string/exit_label" />
</LinearLayout>
If you see warnings in the editor about missing grammar constraints (DTD or XML schema), just ignore them. Instead of hard-coding English text into the layout file, we use the @string/resid syntax to refer to strings in the res/values/strings.xml file. You can have different versions of this and other resource files based on the locale or other parameters such as screen resolution and orientation.
CREATING THE OPENING SCREEN |
51 |
Figure 3.3: First version of the opening screen
Open that file now, switch to the strings.xml tab at the bottom if necessary, and enter this:
Download Sudokuv1/res/values/strings.xml
<?xml version="1.0" encoding="utf-8"?> <resources>
<string name="app_name">Sudoku</string>
<string name="main_title">Android Sudoku</string> <string name="continue_label">Continue</string> <string name="new_game_label">New Game</string> <string name="about_label">About</string>
<string name="exit_label">Exit</string> </resources>
Save strings.xml so Eclipse will rebuild the project. When you run the program now, you should see something like Figure 3.3.
Note: Because this is the third edition of the book, I have a pretty good idea where most people run into trouble. This is it, right here. You’ve made a lot of changes, so don’t be surprised if you get an error mes-

CREATING THE OPENING SCREEN |
52 |
sage instead of the opening screen. Don’t panic; just skip ahead to Section 3.10, Debugging, on page 69 for advice on how to diagnose the problem. Usually a clue to the problem is waiting for you in the LogCat view. Sometimes selecting Project > Clean will fix things. If you’re still stuck, drop by the book’s web forum, and somebody would be happy to help you there.2
The current screen is readable, but it could use some cosmetic changes. Let’s make the title text larger and centered, make the buttons smaller, and use a different background color. Here’s the color definition, which you should put in res/values/colors.xml:
Download Sudokuv1/res/values/colors.xml
<?xml version="1.0" encoding="utf-8"?> <resources>
<color name="background">#3500ffff</color> </resources>
And here’s the new layout:
Download Sudokuv1/res/layout/main.xml
<?xml version="1.0" encoding="utf-8"?>
<LinearLayout xmlns:android="http://schemas.android.com/apk/res/android" android:background="@color/background" android:layout_height="fill_parent" android:layout_width="fill_parent"
android:padding="30dip" android:orientation="horizontal"> <LinearLayout
android:orientation="vertical" android:layout_height="wrap_content" android:layout_width="fill_parent" android:layout_gravity="center"> <TextView
android:text="@string/main_title" android:layout_height="wrap_content" android:layout_width="wrap_content" android:layout_gravity="center" android:layout_marginBottom="25dip" android:textSize="24.5sp" />
<Button android:id="@+id/continue_button" android:layout_width="fill_parent" android:layout_height="wrap_content"
android:text="@string/continue_label" />
2. http://forums.pragprog.com/forums/152
CREATING THE OPENING SCREEN |
53 |
Figure 3.4: Opening screen with new layout
<Button android:id="@+id/new_button"
android:layout_width="fill_parent" android:layout_height="wrap_content" android:text="@string/new_game_label" />
<Button android:id="@+id/about_button" android:layout_width="fill_parent"
android:layout_height="wrap_content" android:text="@string/about_label" />
<Button android:id="@+id/exit_button" android:layout_width="fill_parent"
android:layout_height="wrap_content" android:text="@string/exit_label" />
</LinearLayout>
</LinearLayout>
CREATING THE OPENING SCREEN |
54 |
Joe Asks. . .
What Are Dips and Sps?
Historically, programmers always designed computer interfaces in terms of pixels. For example, you might make a field 300 pixels wide, allow 5 pixels of spacing between columns, and define icons 16-by-16 pixels in size. The problem is that if you run that program on new displays with more and more dots per inch (dpi), the user interface appears smaller and smaller. At some point, it becomes too hard to read.
Resolution-independent measurements help solve this problem.
Android supports all the following units:
•px (pixels): Dots on the screen.
•in (inches): Size as measured by a ruler.
•mm (millimeters): Size as measured by a ruler.
•pt (points): 1/72 of an inch.
•dp (density-independent pixels): An abstract unit based on the density of the screen. On a display with 160 dots per inch, 1dp = 1px.
•dip: Synonym for dp, used more often in Google examples.
•sp (scale-independent pixels): Similar to dp but also scaled by the user’s font size preference.
To make your interface scalable to any current and future type of display, I recommend you always use the sp unit for text sizes and the dip unit for everything else. You should also consider using vector graphics instead of bitmaps (see Chapter 4, Exploring 2D Graphics, on page 73).