


Chapter 5
Multimedia
Remember those Apple television ads with the silhouette people dancing wildly to the beat of their iPods? That’s the kind of excitement you want your products to generate.1 Music, sound effects, and video can make your programs more immersive and engaging than text and graphics alone.
This chapter will show you how to add multimedia to your Android application. You may not have your users cavorting in the aisles, but if you do it properly, you can at least put smiles on their faces.
5.1Playing Audio
It was a dark and stormy night.... There goes the starting shot, and they’re off.... The crowd goes wild as State sinks a three-pointer with one second remaining....
Audio cues permeate the environment and set the tempo for our emotions. Think of sound as another way to get into your user’s head. Just like you use graphics on the display to convey some information to the user, you can use audio to back that up and reinforce it.
Android supports sound and music output through the MediaPlayer class in the android.media package.2 Let’s try it with a simple example that plays sounds when you press a key on the keyboard or D-pad.
1.Of course, normal people older than the age of 8 can’t dance like that...except perhaps that time when my kids put a lizard in my...well, I digress.
2.http://d.android.com/guide/topics/media
PLAYING AUDIO  106
106
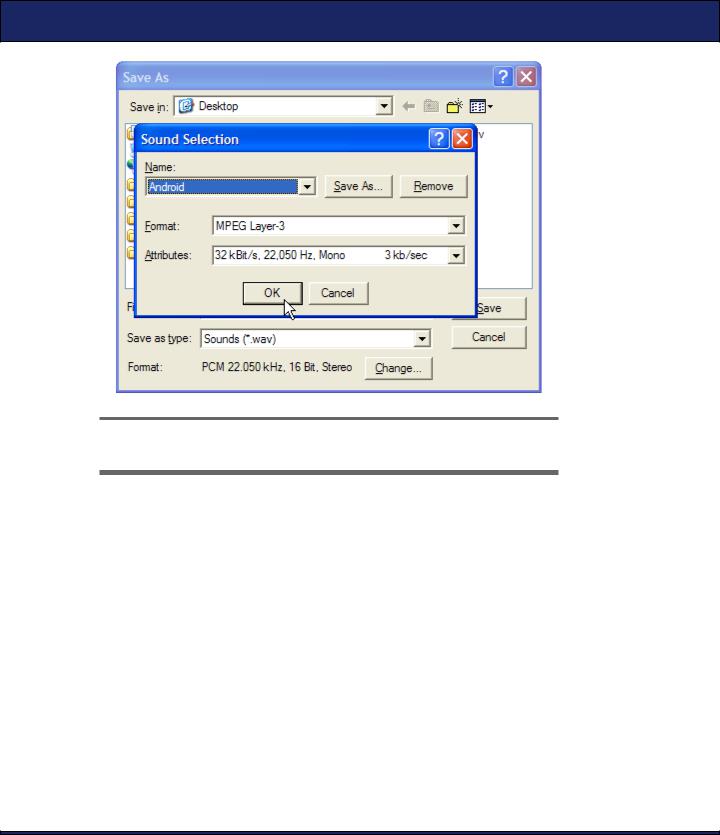
Figure 5.1: Save sound effects in a compressed format that Android can play.
We’ll start by creating a “Hello, Android” project, using the following parameters in the New Android Project dialog box:
Project name: Audio
Build Target: Android 2.2
Application name: Audio
Package name: org.example.audio
Create Activity: Audio
Min SDK Version: 8
Next we’ll need a few sounds to play. For this example, I created my own with the Windows Sound Recorder program (Start > Programs > Accessories > Entertainment > Sound Recorder on Windows XP) and an inexpensive headset. After getting the sound levels right, I recorded each sound, selected File > Save As... from the menu, clicked the Change...
button, and selected a format Android can recognize (see Figure 5.1). You can find all the sound files and source code for these examples on the book’s website.

PLAYING AUDIO  107
107
Copy the sound files into the res/raw directory of your project. As you recall from Section 2.4, Using Resources, on page 40, simply copying a file into the res directory causes the Android Eclipse plug-in to define a Java symbol for you in the R class. When you’re done, the project should look like Figure 5.2, on the next page.
Now it’s time to fill out the Audio activity. First we declare a field called mp to hold an instance of the MediaPlayer class. In this program we’re just going to have one MediaPlayer active at any given time.
Download Audio/src/org/example/audio/Audio.java
package org.example.audio;
import android.app.Activity; import android.media.AudioManager; import android.media.MediaPlayer; import android.os.Bundle;
import android.view.KeyEvent;
public class Audio extends Activity { private MediaPlayer mp;
@Override
public void onCreate(Bundle savedInstanceState) { super.onCreate(savedInstanceState); setContentView(R.layout.main); setVolumeControlStream(AudioManager.STREAM_MUSIC);
}
}
The setVolumeControlStream( ) method tells Android that when the user presses the volume up or down key while this application is running, it should adjust the volume for music and other media instead of the ringer.
Next, we need to intercept the key presses and play the right sounds. We do that by overriding the Activity.onKeyDown( ) method.
Download Audio/src/org/example/audio/Audio.java
Line 1 @Override
-public boolean onKeyDown(int keyCode, KeyEvent event) {
-int resId;
-switch (keyCode) {
5 case KeyEvent.KEYCODE_DPAD_UP:
-resId = R.raw.up;
-break;
-case KeyEvent.KEYCODE_DPAD_DOWN:
-resId = R.raw.down;
10 break;

PLAYING AUDIO  108
108
Figure 5.2: Copy audio files into the res/raw directory of your project.

PLAYING AUDIO  109
109
-case KeyEvent.KEYCODE_DPAD_LEFT:
-resId = R.raw.left;
-break;
-case KeyEvent.KEYCODE_DPAD_RIGHT: 15 resId = R.raw.right;
-break;
-case KeyEvent.KEYCODE_DPAD_CENTER:
-case KeyEvent.KEYCODE_ENTER:
-resId = R.raw.enter;
20 break;
-case KeyEvent.KEYCODE_A:
-resId = R.raw.a;
-break;
-case KeyEvent.KEYCODE_S: 25 resId = R.raw.s;
-break;
-case KeyEvent.KEYCODE_D:
-resId = R.raw.d;
-break;
30 case KeyEvent.KEYCODE_F:
-resId = R.raw.f;
-break;
-default:
-return super.onKeyDown(keyCode, event);
35 |
} |
- |
|
-// Release any resources from previous MediaPlayer
-if (mp != null) {
-mp.release();
40 |
} |
- |
|
-// Create a new MediaPlayer to play this sound
-mp = MediaPlayer.create(this, resId);
-mp.start();
45
-// Indicate this key was handled
-return true;
-}
The first part of the method selects a resource based on which key you pressed. Then on line 39, we call the release( ) method to stop any sounds already playing and free up any resources associated with the old MediaPlayer. If you forget to do that, the program will crash (see the sidebar on the next page).
On line 43, we use the create( ) method to create a new MediaPlayer using the selected sound resource and call the start( ) method to begin playing it. The start( ) method is asynchronous, so it returns immediately regardless of how long the sound lasts. If you like, you can use setOnCompletionListener( ) to be notified when the clip is finished.

PLAYING AUDIO  110
110
When Things Go Wrong
If you do much multimedia programming, you’ll soon discover that Android’s MediaPlayer can be a fickle beast. The version in newer versions of Android is much improved over its predecessors, but it can still crash at the slightest provocation. One reason this happens is that MediaPlayer is mostly a native application with a thin layer of Java on top of it. The native player code is optimized for performance, and it doesn’t seem to do much error checking.
Fortunately, Android’s strong Linux process protections prevent any harm from being done if a crash occurs. The emulator (or the phone if you’re running on a real device) and other applications will continue to run normally. The user would just see the application go away, possibly with a dialog box containing an error message.
During development, though, you can get considerably more diagnostic information to help you determine what went wrong. Messages and tracebacks will be printed to the Android system log, which you can view with the LogCat view in Eclipse or the adb logcat command (see Section 3.10, Debugging with Log Messages, on page 69).
If you run the program now and then press one of the keys (for example, the Enter key or the center D-pad key), you should hear a sound. If you don’t hear anything, check your volume control (don’t laugh), or look at the debugging messages in the LogCat view. If you run this on a phone with no keyboard, D-pad, or trackball, press and hold the Menu key to get the soft keyboard to appear.
Note that audio output may be choppy or delayed in some cases. Try different formats (such as OGG instead of MP3) and lower bit rates. You may also want to investigate using the SoundPool class, which explicitly supports simultaneous streams. It was buggy and poorly documented in the 1.0 release, but as of 1.5 it appears to be stable.
For our next trick, we’ll play a movie using only one line of code.
PLAYING AUDIO  111
111
Joe Asks. . .
What Audio Formats Does Android Support?
Well, there’s support on paper, there’s support in the emulator, and there’s support on the actual devices. On paper, Android supports the following file types (this is subject to change with new releases):
•WAV (PCM uncompressed)
•AAC (Apple iPod format, unprotected)
•MP3 (MPEG-3)
•WMA (Windows media audio)
•AMR (Speech codec)
•OGG (Ogg Vorbis)
•MIDI (Instruments)
In reality, I’ve found that only the OGG, WAV, and MP3 formats work well in the emulator, and thus those are the only ones that I can recommend for application development. Android’s native audio format appears to be 44.1kHz 16-bit stereo. However, since WAV files at that rate are huge, you should just stick to OGG or MP3 files (mono for voice or stereo for music). OGG files seem to work best for short clips like game sound effects.
Stay away from unusual rates like 8kHz because the resampling artifacts make those rates sound terrible. Use 11kHz, 22kHz, or 44.1kHz sampling rates for the best results. Remember that although the phone may have a tiny speaker, many of your users are going to be plugging in headphones (like an iPod), so you want your audio to be high quality.
. http://www.vorbis.com