490 Chapter 11 • Creating an XML.NET Guestbook
Figure 11.9 Continued
select="Comments"/></p><p></p></font></tr>
21:
22:</xsl:for-each>
23:</table>
24:</xsl:template>
25:</xsl:stylesheet>
Figure 11.10 Viewing Basic Guestbook Entries
NOTE
If you have no other recourse but to use XSL to also generate your hyperlinks, the fastest work around to this is will be to simply add the <a> element with an attribute of href and nesting the e-mail element.
Advanced Options for the Guestbook Interface
Now that you have a good understanding of a guestbook and how it works, you can try to do something you haven’t done yet—actually make it look cool! Just

Creating an XML.NET Guestbook • Chapter 11 |
491 |
because you are working with ASP.NET does not mean that you cannot use its new tricks to come up with some really jazzy items and tweak your XML a bit. Let’s start by looking at your guestbook entry page.
Manipulating Colors and Images
Clearly this is a design point and not a very strong showing of ASP.NET. However, how you design your page is just as vital as how you design a graphical user interface. In this example, I made the design pleasing to the eye, and I try to use a couple of design techniques to lure the user’s eye to the proper areas on the add screen.While these are basic points, it’s a good idea to keep the following in mind:
1.Is the area visible on most monitors? (Start off at 800x600 resolution.)
2.Will the user be able to understand what to do?
3.If the user cannot easily figure out what to do, should an easy-to-find help link be visible, or should you perhaps change the design?
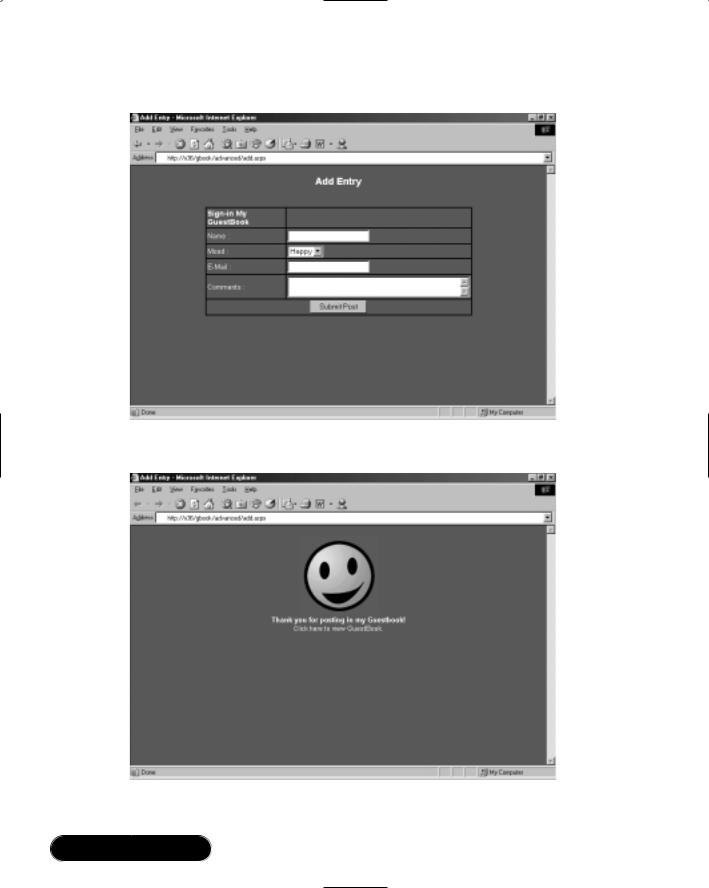
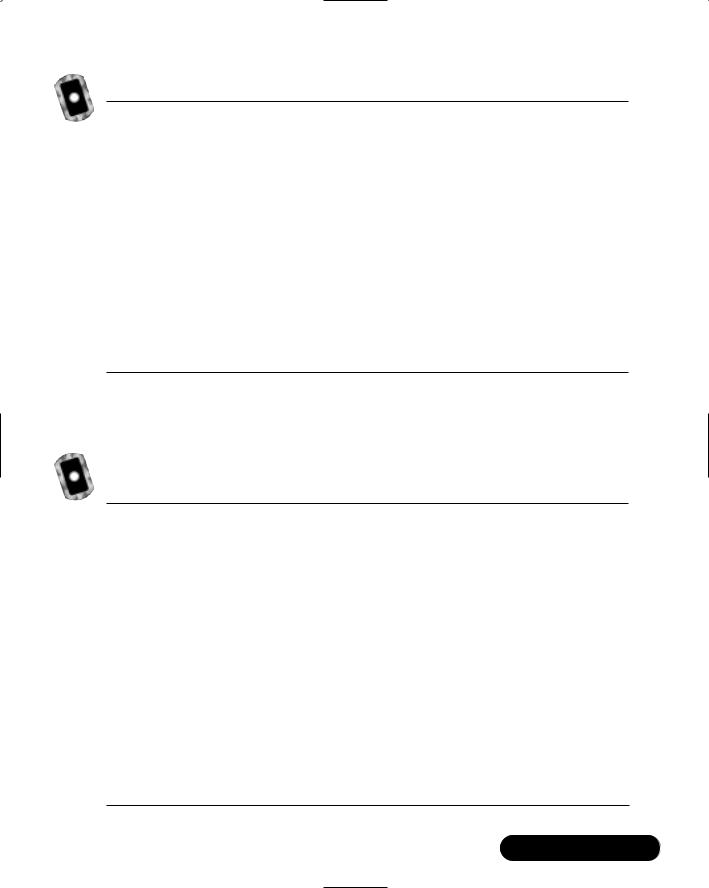
One of the nice things about ASP.NET controls is that you can still use tags with them. In fact, this second version of my add entry page looks so nice because I’m using a Cascading Style Sheet (CSS) script with it (in the CD that accompanies this book as gbook.css in the Advanced directory). Another part of this new design that you haven’t seen before are the emoticons. Emoticons add a little bit of interactivity to the guestbook by enabling users to pick an image that reflects their “feelings” at the time of posting.You will have to add a couple of changes to the XML file and to the add.aspx file as well as to the view.aspx file in order to display the images. Figure 11.11 will show you how the new add.aspx page will look before and Figure 11.12 after entering a message.
Line 16 in Figure 11.13 reflects the change from the previous XML code; all that happened was just to create a new element of “img” to under complex type “gbook.”Your code will read this value and assign the correct image for it. For right now all you are doing is just preparing the inline schema to support the value so that when you store the data it will know where to put it.
492 Chapter 11 • Creating an XML.NET Guestbook
Figure 11.11 add.aspx Before Entering a Comment (Advanced Version)
Figure 11.12 add.aspx After Entering a Comment (Advanced Version)
Creating an XML.NET Guestbook • Chapter 11 |
493 |
Figure 11.13 gbook.xml (Advanced Version)
01: <gbook>
. . .
14:<xsd:sequence>
15:<xsd:element name="Name" type="xsd:string" minOccurs="0"
/>
16:<xsd:element name="Emoticon" type="xsd:string" minOccurs="0"
/>
17:<xsd:element name="Email" type="xsd:string" minOccurs="0" />
18:<xsd:element name="Comments" type="xsd:string" minOccurs="0"
/>
19:<xsd:element name="DateTime" type="xsd:string" minOccurs="0"
/>
20:</xsd:sequence>
Now for your code; first, you have to add the new row to your Submit button handler at the top in order to include the new Emoticon element within the XML (Figure 11.14).
Figure 11.14 Your Changed add.aspx Submit Handler Code (Advanced Version)
10: Sub AddClick(Sender As Object, E As EventArgs)
11:
12:Try
13:Dim dataFile as String = "gb/gbook.xml"
15:'the next line wraps pretty badly
16:Dim fin as New FileStream (Server.MapPath(dataFile), FileMode.Open,FileAccess.Read,FileShare.ReadWrite)
17:
18:'this line also wraps pretty badly
19:Dim fout as New FileStream (Server.MapPath(dataFile), FileMode.Open,FileAccess.Write,FileShare.ReadWrite)
20:
21: Dim guestData as New DataSet()
Continued
494 Chapter 11 • Creating an XML.NET Guestbook
Figure 11.14 Continued
22:Dim newRow as DataRow
23:err.Text = ""
24:guestData.ReadXml(fin)
25:fin.Close()
26:newRow = guestData.Tables(0).NewRow()
27:newRow("Name")=Name.Text
28:newRow("Emoticon")=Emoticon.Value
29:newRow("Chrono")=DateTime.Now.ToString()
30:newRow("Email")=Email.Text
31:newRow("Comments")=Comments.Text
32:guestData.Tables(0).Rows.Add(newRow)
33:guestData.WriteXml(fout, XmlWriteMode.WriteSchema)
34:fout.Close()
35:formPanel.Visible=false
36:thankPanel.Visible=true
37:
38:Catch edd As Exception
39:err.Text="Error writing file at: " & edd.ToString()
42:
43:End Sub
44:</script>
The final change to your add entry is an option button for the image selection; you can add this code anywhere in the add.aspx within the display area.We set ours right after the name.
<tr>
<td>Mood :</td>
<td><select id="Emoticon" runat="server">
<option Value="01.gif">Happy</option>
<option Value="02.gif">Sad</option>
<option Value="03.gif">Cute</option>
Creating an XML.NET Guestbook • Chapter 11 |
495 |
<option Value="04.gif">Ugly</option>
</select>
</td>
</tr>
Modifying the Page Output
You don’t really want to display the same boring, old structured output, so try using some tables to break things up a bit.You are going to take a look at this code a bit differently by starting with the page load code (Figure 11.15).
Figure 11.15 view.aspx (Advanced Version)
Sub Page_Load(Src As Object, E As EventArgs)
Dim ds As New DataSet
Dim fs As New FileStream(Server.MapPath("gb\gbook.xml"),
FileMode.Open)
ds.ReadXml(fs)
gbook.DataSource = ds.Tables(0).DefaultView gbook.DataBind()
fs.close() End Sub
You are telling the server that when the page loads (before ANYTHING else is processed, including HTML) create a dataset (ds) and a filestream (fs) to the XML file.Then you tell the dataset (ds) to read the XML file and bind the information to the “gbook” object with the information contained in the dataset.You close the filestream and finish your initialization code.Your display code has undergone some major changes as well (see Figure 11.16, note that some lines wrap).
Figure 11.16 Your Changed Display Code add.aspx (Advanced Version)
01: <%@ Page Language = "VB" Debug="true" %> 02: <%@ Import Namespace="System.IO" %>
03: <%@ Import Namespace="System.Data" %> 04: <html>
05: <script language="VB" runat="server">
. . .
Continued
496 Chapter 11 • Creating an XML.NET Guestbook
Figure 11.16 Continued
06: </script> 07:
08: <body>
09:<h3>Advanced Guestbook</h3>
10:<ASP:Repeater id="gbook" runat="server">
11:<headertemplate>
12:<table width="350" style="font: 12pt Arial">
13:</headertemplate>
14:
15: <itemtemplate>
15:<tr>
16:<%# DataBinder.Eval(Container.DataItem, "Name") %>
17:<img src="<%# DataBinder.Eval(Container.DataItem, "Emoticon") %>" >
18:<%# DataBinder.Eval(Container.DataItem, "Chrono") %>
19:</tr>
20:<tr>
21:<a href="mailto: <%# DataBinder.Eval(Container.DataItem, "Email") %>"><%# DataBinder.Eval(Container.DataItem, "Email") %></a>
22:</tr>
23:<tr>
24:<%# DataBinder.Eval(Container.DataItem, "Comments") %>
25:</tr>
26:</itemtemplate
27:
28:<footertemplate>
29:</table>
30:</footertemplate>
32:</ASP:Repeater>
33:</body>
34:</html>
Creating an XML.NET Guestbook • Chapter 11 |
497 |
NOTE
This code has had all of the graphical changes stripped; if you want to see the code as the screenshots display it, please check the code on the accompanying CD.
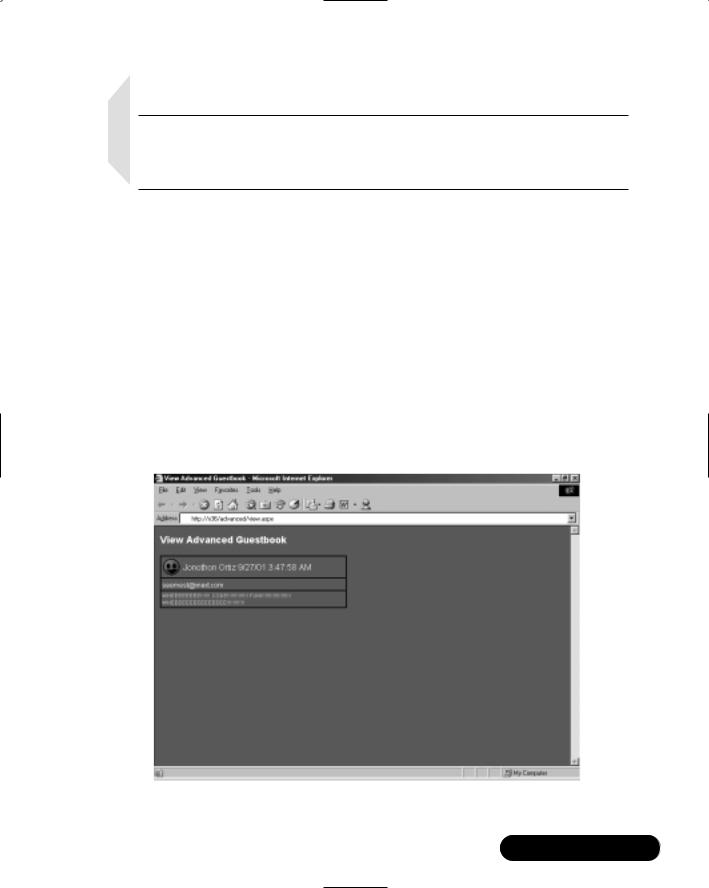
Instead of using the asp:xml server control, you are using the Repeater control and a DataSource. Lines 2 and3 have the two namespaces that you are going to need for your script tag. System.IO handles the Filestream object and System.Data handles the DataSource object.The information acquired from the Page_Load sub will generate the information that is bound to the Repeater object. The Repeater object (id=“gbook”) will read the information bound to it, write the header, and then repeat the sequence within the item template until it finishes; then the footer will be written and the asp:repeater object will close. Line 17 shows your only change to the Repeater by adding the link to the image stored by the image tag.The code above plus the graphical add-ons gives you the happy result as seen in Figure 11.17.
Figure 11.17 view.aspx + graphics (Advanced Version)
498 Chapter 11 • Creating an XML.NET Guestbook
Summary
Well, we started off with basically nothing and finished up with something that is not only useful but can be pleasing to the eye as well. Hopefully this chapter has introduced some concepts that are useful, not only to your hobby programming but also in your work.
XML and ASP.NET can work well together in a variety of ways: from simple reading and writing to proper design and look. Using a combination of either the System.Data namespace and the ASP server objects, you can create a single-line parsing .aspx page or a more robust page with tables, rows, columns, and different colors and graphics. In order to achieve the best performance available, the System.Data namespace requires an inline schema within the XML file, which the System.Data namespace can reference against when reading or writing XML.
ASP server objects themselves are very flexible in that they can be standalone and provide an area to insert inline ASPX code. In the Advanced guestbook, you made heavy use of the inline functions, wrapping table rows and columns around them to provide a view that was readable. Also, by using an inline function you were able to receive the correct image file associated for an emoticon, by placing it within the image html tag. Combined with Cascading Style Sheets (CSS), this method proved capable and provided ample room to grow with.
Solutions Fast Track
Functional Design Requirements
of the XML.NET Guestbook
;XML enables you to use an interface that is both universally read and universally accessed.You do not have to use bulky components such as SQL or Access databases for simple—and even some complicated— database solutions.
;XML provides a schema to use with XML in order to provide validation for data.
Creating an XML.NET Guestbook • Chapter 11 |
499 |
Adding Records to the Guestbook
;When working with the System.Data namespace and planning to write XML, you need to make sure that you have a properly validated inline XML schema, or else the code will not work.
;Even though you can use the XML schema to help determine certain validation points, it is better to have the ASP.NET provide the validation of certain entries, such as e-mail, due to the powerful use of Regular Expressions.
Viewing the Guestbook
;Using System.Data can provide a fast, efficient forward-only read and write solution that is perfect for reading and writing to XML files that are not dependant on heavy node interaction, and that just need information added to them.
;Cascading Style Sheets provide a way to create a more pleasing guestbook without having to change any code structure.
Advanced Options for the Guestbook Interface
;The ASP.NET controls are very versatile and efficient. Keep in mind that by combining them with Cascading Style Sheets, their obvious lack of visual aids are easily bypassed for a true eye-candy feel.
;The asp:repeater object needs to have a <headertemplate>, an <itemtemplate>, and a <footertemplate> within it to function.
;The only part of the asp:repeater object that actually repeats is the <itemtemplate> section.