

Indication
The green indicator on the front panel shows the device status - incl./off there is an indicator of connection of the device, whether which shows the device is connected to fiber optic port. Each port, in turn, has three indicators.
Indicator |
Color |
Value |
Description |
Upper |
Constant yellow |
FDX |
Operation in full-duplex mode |
Blinking yellow |
Col |
Collision detecting |
|
Middle |
Constant green |
Link |
Presence of physical connection |
Blinking green |
Activity |
Data reception |
|
Lower |
Constant green |
100M |
Port work with 100M bitrate |
Blinking green |
10M |
Port work with 10M bitrate |
The back panel
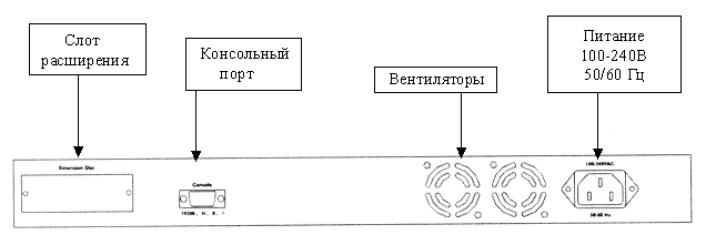
The additional slot
16th port of the switch can be transformed to commutative port 100base-FX. For this purpose it is necessary to install the additional unit in an expansion slot. If the unit is installed, 16th port on the front panel is disabled.
Power supplies
Tolerable limit: from 100В to 240В, frequency: 50/60 HZ.
RS-232 console
RS-232 console is intended for handle of the switch. For handle of the switch by means of the personal computer it is necessary to connect one end of a cable (the cable is delivered together with the switch) in cantilever port of the switch, and another in СОМ1 or COM2 computer port.
Switch FNSW-16/2400S customization
Connection to the PC
After operations on connection RS-232 of the console are fulfilled, it is necessary to start the remote access and handle Hyper Terminal program (goes in a standard configuration of Windows 9.x, 2000, NT) or РгоСОММ:
- Hyper Terminal
After start Hyper Terminal create new connection, having customised following parametres:
Rate baud (speed): 19200 bps
Data byte (data bits): 8 bits
Parity Check (parity): None
Stop bit (stop bits): 1
Flow control (handle of a stream): No
The console menu
Start
the created connection,
and then include the switch. At successful installation of connection
will be shown 6 options for console customization:
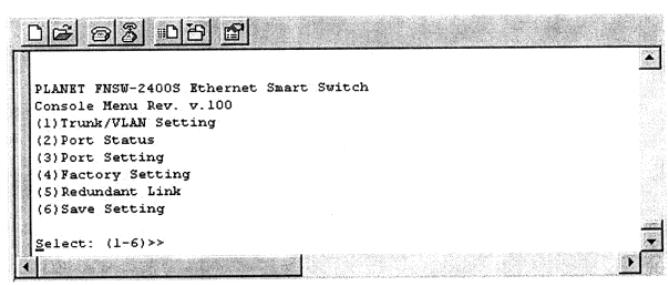
(1) Trunk/VLAN Setting (customisation of network/channel groups)
(2) Port Status (the port status)
(3) Port Setting (port customisation)
(4) Factory Setting (factory setting restoring)
(5) Redundant Link (installation of additional link)
(6) Save Setting (to save customisations)
To get to a submenu dial of an option and press «ENTER».
Customisation of virtual network groups (Trunk/vlan Setting)
Having selected from the main menu the first option Trunk/VLAN Setting you will see the following menu:
![]()
Customisation VLAN of group (virtual network groups)
Having selected from the menu an option «2» you get to the menu
Customisations network virtual group:
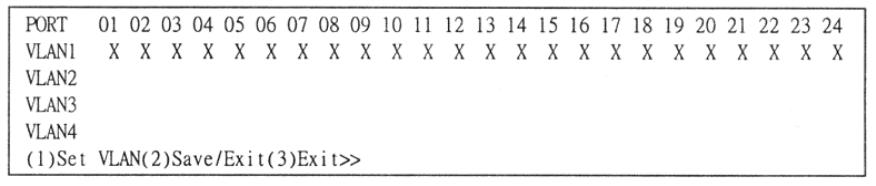
Customisation network groups.
By default: all ports belong to group VLAN1.
For a choice of network group we use cursor. For
Savings of customisations press «SAVE».
Examples of customisation of network group:
Example №1. Addition of ports in group. Select group, then enter port number which you wish to include in this group. For example, group VLAN2, port №1.

As a result you will see the following:
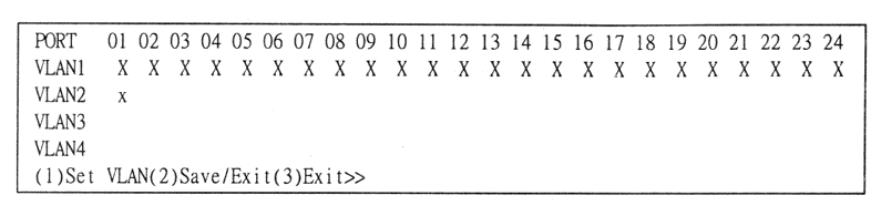
For further customisation of network groups repeat these operations.
Example №2. Creation of the common port.
Add 5th port in all network groups.

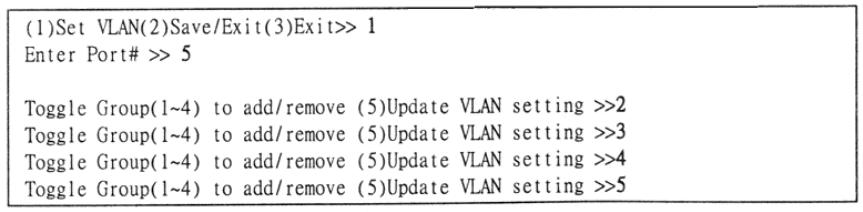
Having received the common 5 port, the first 4 ports will be divided by a server in 4 network groups. Thus, first four ports become unavailable each other on a straight line, but they will have link through the common 5 port (such common port is named as server port).
The status of ports
The port status allows to receive the information on operating modes of ports.
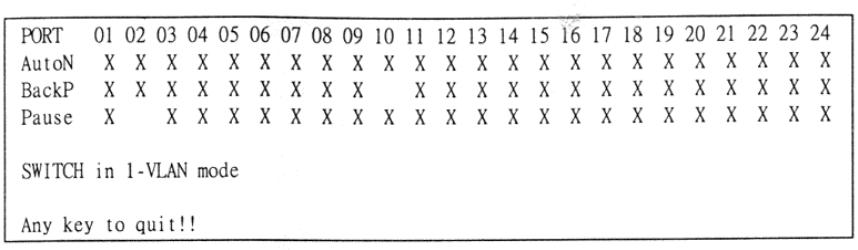 Having
pressed «2» in the console menu, you will see a window in which the
operating mode of ports is mirrored. The given option has exclusively
informational character, i.e. any changes are impossible.
Having
pressed «2» in the console menu, you will see a window in which the
operating mode of ports is mirrored. The given option has exclusively
informational character, i.e. any changes are impossible.
AutoN - an autodetection mode
BackP - the control of a half-duplex stream
Pause - the control of a full-duplex stream
Customisation of ports
Having selected an option «3» in the main menu of the console you are offered to enter port number which you are gathered to customise:
![]()
Let's consider customisation of ports on three examples:
Example №1
Let's customise port №1 on operation in a full-duplex mode with a speed 100Mb/with. For this purpose after a choice of number of customised port, we select at first an option «Port Mode», and then an option «100FDX»:

Example №2
Let's instal a verification mode of a full-duplex stream on 2nd port.

The second port is for this purpose selected

Then we select an operating mode of port "Pause" and it is activated it.
The verification mode of a full-duplex stream is an operating mode of the switch, at which in a case if the switch has not time to cope with informational streams arriving on it from network devices (i.e. the switch is overloaded), it (switch) dispatches the delay frame on the network device. The device temporarily pauses transmission and restores it after a small pause. It is necessary to remember, what not all devices support this function and in that case loss of packages to avoid it will not be possible.

Example №3
Let's install a verification mode of a half-duplex stream on 3rd port.
The given mode is necessary in a case when the device working in half-duplex mode, connected to the switch has not coped with processing of the arrived information and there was a collision. In this case the computers working with «зависшим» as the computer in one network, temporarily stop transmission and restore it anew through some pause.
Factory settings
Function assignment - to restore customisations of the manufacturer. At a choice of an option «6» in the main menu of the console you start a salvager of a configuration of the switch which has been put in pawn by the manufacturer. After restoring the system will automatically reboot.