

WORKING WITH FORMS IN AUTOCAD |
27 |
Events in the Sample Application
When you’re designing an application, one thing you should think about is which user actions you want to respond to. Knowing this, you can locate the correct events to write code for. One way to capture such knowledge is in a Control-Action-Response (CAR) table. Table 99.3 presents a CAR table for your sample application. The Action column shows which events you’ll have to write code for.
Table 99.3 CAR Table for the Sample Application
CONTROL |
ACTION |
RESPONSE |
UserForm |
Initialize |
Fill the list box with possible color values. |
cmdSelectLine |
Click |
Select a line in the drawing to work with. |
txtStartX |
Change |
Change the x-coordinate of the line’s start. |
txtStartY |
Change |
Change the y-coordinate of the line’s start. |
txtStartZ |
Change |
Change the z-coordinate of the line’s start. |
txtEndX |
Change |
Change the x-coordinate of the line’s end. |
txtEndY |
Change |
Change the y-coordinate of the line’s end. |
txtEndZ |
Change |
Change the z-coordinate of the line’s end. |
lboLineColor |
Change |
Change the line’s color. |
Working with Forms in AutoCAD
Now that you’ve created a form and identified the behavior you want it to have, it’s time to write the code to make it all work. This will draw on your knowledge of the AutoCAD object model and VBA, and you will use event procedures to handle the user’s tasks.
In this section, you’ll finish the sample application. You’ll also learn some other techniques that are useful with UserForms, such as launching a UserForm from the AutoCAD interface and using data from a form to modify drawing objects.
Launching a Form
For the event procedure example in the previous section, you saw how you could launch a UserForm from the VBA editor. But you don’t want users of your application to have to follow this procedure. (In fact, you probably don’t even want them to be able to look
Copyright ©2001 SYBEX, Inc., Alameda, CA |
www.sybex.com |
28 |
CHAPTER NINETY-NINE • USING VBA TO CREATE AUTOCAD APPLICATIONS |
at your code in the editor. You’ll see how to prevent this later in the chapter.) The easiest way to tie your UserForm into AutoCAD itself is to write a procedure that AutoCAD will treat as a macro, and have that procedure open the UserForm.
To open the sample application from AutoCAD, follow these steps:
1.Create a new standard module. This will hold the procedure to launch the form.
2.Add the following code to the module:
Public Sub ModifyLine()
frmLineProperties.Show
End Sub
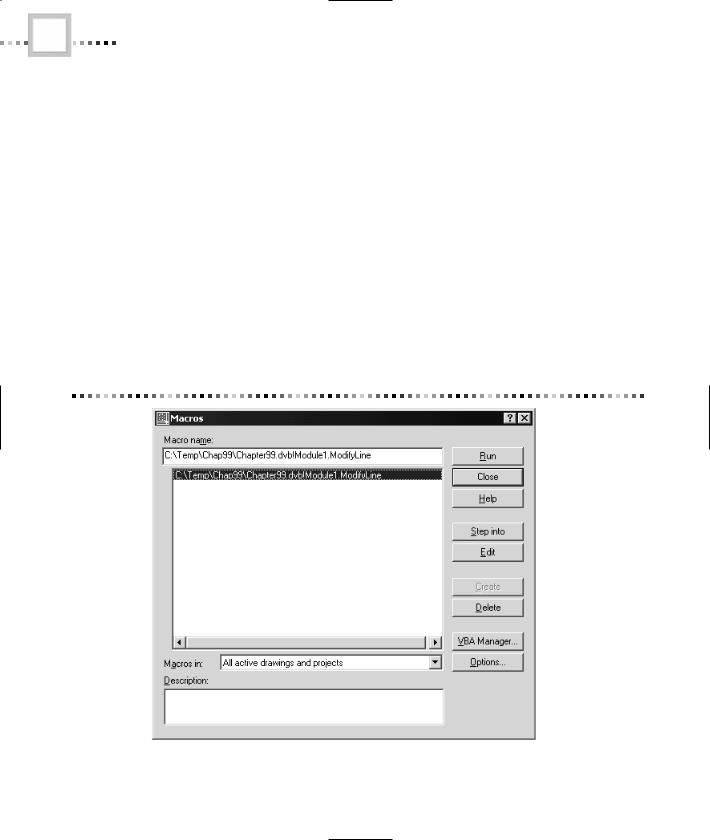
The fact that it’s a public Sub will make AutoCAD treat this procedure as a macro that you can run from the user interface. To demonstrate this, switch back to AutoCAD, and choose Tools Macro Macros from the drop-down menu. You’ll get the dialog box shown in Figure 99.24.
Figure 99.24 The Macros dialog box
Now choose ModifyLine (the name of the procedure you just wrote) and click the Run button. The Line Properties UserForm appears in front of the AutoCAD user interfaceCopyright. To dismiss©2001 theSYBEX,UserForm,Inc. Alameda,just clickCA the Closewww.sybexbutton.comin its upper-right corner.

WORKING WITH FORMS IN AUTOCAD |
29 |
If you know how to modify AutoCAD menus, you can add a menu item to directly launch the UserForm by executing the macro. To execute the macro, use the -vbarun command with the module name and procedure name. For example, the command line or menu technique for launching this particular UserForm would be -vbarun Module1.ModifyLine.
Filling a ListBox
When you first display the UserForm, you want the ListBox control to include all the possible colors for a line. Recall from Chapter 98 that colors are numbered from 0 to 256, with 0 being “By Block” and 256 being “By Layer.” The intermediate values represent various colors. You’ll display the friendliest possible names in the ListBox control, and let the code interpret what the user wants to do with them.
The ListBox control has an AddItem method which, as you’d expect, is used to add items to the ListBox control. Here’s the code you’ll use in the UserForm’s Initialize event to stock the ListBox control:
Private Sub UserForm_Initialize()
‘ Fill the ListBox with available color values
Dim intI As Integer |
|
With lboLineColor |
|
.AddItem |
“By Block” |
.AddItem |
“Red” |
.AddItem |
“Yellow” |
.AddItem |
“Green” |
.AddItem |
“Cyan” |
.AddItem |
“Blue” |
.AddItem |
“Magenta” |
.AddItem |
“White” |
For intI |
= 8 To 255 |
.AddItem “Color “ & CStr(intI) |
|
Next intI |
|
.AddItem |
“By Layer” |
End With |
|
End Sub
When the user selects an item in the ListBox control, you can read the ListIndex property of the control to determine which item was selected. Because this property is zero-based, just like the color list, you can avoid writing any code to translate the userfriendly values in the ListBox control back into color numbers.
Copyright ©2001 SYBEX, Inc., Alameda, CA |
www.sybex.com |
30 |
CHAPTER NINETY-NINE • USING VBA TO CREATE AUTOCAD APPLICATIONS |
Selecting a Line
For this application to function, the user has to be able to select a line in the drawing to work with. There are four steps to this process:
1.Hide the UserForm.
2.Use the AutoCAD automation hierarchy to select an object.
3.Show the UserForm.
4.Check to make sure that what was selected was really a line.
The process starts with hiding the UserForm. This is necessary because this UserForm is modal. A modal form is one that insists on having the focus, so that the user can’t work in any other part of the application while this form is displayed. You can see this effect just by running the ModifyLine macro again and trying to work with AutoCAD. You’ll find that you can’t use the AutoCAD command line, menus, or toolbars until you close the UserForm. By making this a modal UserForm, you can make sure that the drawing isn’t changed by the user while your code is also trying to change it.
Once the UserForm is hidden, you can use the AutoCAD Utility object’s GetEntity method to allow the user to choose a drawing entity interactively. This approach lets the user work with whatever AutoCAD selection method they’re most familiar with, and makes your application function as an integrated part of AutoCAD.
Showing the UserForm brings back the user interface of our application. Finally, you’ll want to check what the user selected using the EntityType property
of the selected entity. If it’s a line, you can fill in the rest of the UserForm with the properties of the line. Otherwise, you’ll let the user know that they’ve made a mistake and let them try again.
All of this needs to be triggered by the user, by clicking the Select Line command button. As a result of the user’s action, the code goes into the CommandButton control’s Click event procedure. Here’s what the code in the sample application looks like:
Private mobjLine As Object
Private Sub cmdSelectLine_Click()
‘Prompt the user to select a line to work with.
‘If the user does not get a line, warn them and
‘abort. Otherwise, retrieve the attributes of the
‘selected line
‘Not used, but required for GetEntity
Copyright ©2001 SYBEX, Inc., Alameda, CA |
www.sybex.com |
WORKING WITH FORMS IN AUTOCAD |
31 |
Dim ptPick(0 To 2) As Double
‘Starting and ending points of the line Dim varStart As Variant
Dim varEnd As Variant
‘Possible error
Const conErrGetEntityFailed = -2147352567
On Error GoTo HandleErr
‘The form must be hidden to use the GetEntity method Me.hide
ThisDrawing.Utility.GetEntity mobjLine, ptPick, _ “Select a Line”
‘See what they selected
If mobjLine.EntityType <> acLine Then BadPick:
MsgBox “No line selected”, vbExclamation + vbOKOnly
Else
‘ We’ve got a line, so get its attributes With mobjLine
varStart = .StartPoint varEnd = .EndPoint
txtStartX.Text = Format(varStart(0), “0.000”) txtStartY.Text = Format(varStart(1), “0.000”) txtStartZ.Text = Format(varStart(2), “0.000”) txtEndX.Text = Format(varEnd(0), “0.000”) txtEndY.Text = Format(varEnd(1), “0.000”) txtEndZ.Text = Format(varEnd(2), “0.000”) lboLineColor.ListIndex = .Color
End With End If
ExitHere:
Me.Show
Exit Sub
HandleErr:
Select Case Err
Case conErrGetEntityFailed
Copyright ©2001 SYBEX, Inc., Alameda, CA |
www.sybex.com |
32 |
CHAPTER NINETY-NINE • USING VBA TO CREATE AUTOCAD APPLICATIONS |
‘The GetEntity method posts an error if
‘the user clicks at an empty spot on the
‘screen. In this case, treat things as if
‘the user picked an invalid object
Resume BadPick
Case Else
‘ Just post unexpected errors to the screen
MsgBox “Unexpected error “ & Err.Number & “:” & _
Err.Description, vbCritical
Resume ExitHere
Resume
End Select
End Sub
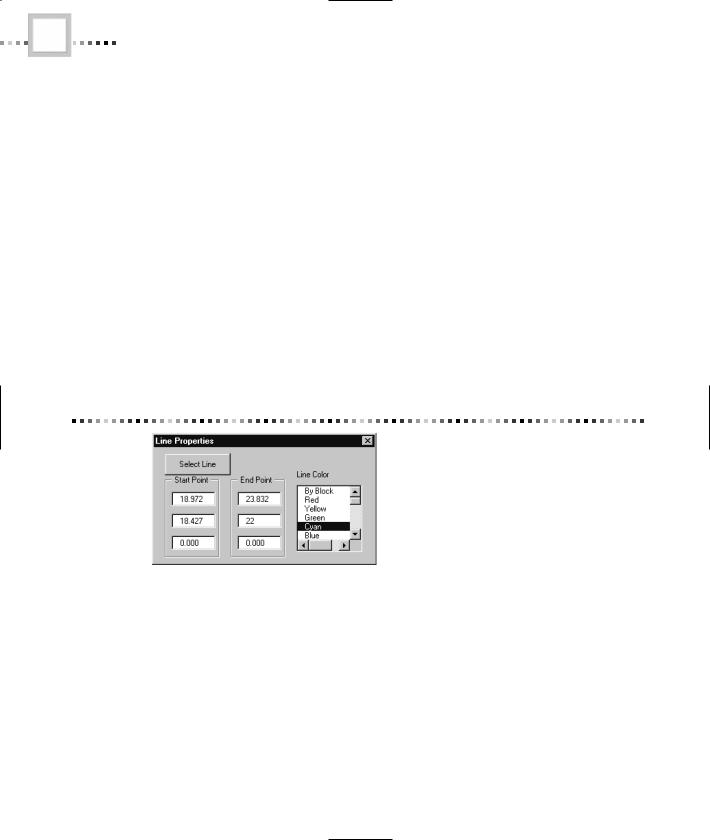
If you run the application at this point, you’ll see that selecting a line and retrieving its properties works. Figure 99.25 shows an example of the UserForm with the properties of an actual line.
Figure 99.25 Retrieving the properties of a line
Modifying a Line’s Properties
Notice that the code for retrieving the properties of the line uses a module-level variable, mobjLine, to store the actual line. This makes the line available to any other procedure within the UserForm. The code for modifying the line’s properties takes advantage of this fact. For example, when the user changes the value displayed in the txtStartX TextBox control, you’ll react to the Change event of the control by changing the corresponding property of the line:
Private Sub txtStartX_Change()
Copyright ©2001 SYBEX, Inc., Alameda, CA |
www.sybex.com |
WORKING WITH FORMS IN AUTOCAD |
33 |
Dim varStart As Variant varStart = mobjLine.StartPoint varStart(0) = txtStartX.Text mobjLine.StartPoint = varStart mobjLine.Update
End Sub
The idea here is simple. When the user changes the text, you retrieve the current start point into a variable. Then you change the x-coordinate to the user’s new value, set the changed point back to be the start point of the line, and execute the Line object’s Update method to cause it to redraw on the screen.
Although points are stored as arrays of Doubles within AutoCAD, a property can’t return an array. That’s why the code uses a Variant to hold the point.
Similar code manages the other TextBox control’s Change events:
Private Sub txtEndX_Change() Dim varEnd As Variant varEnd = mobjLine.EndPoint varEnd(0) = txtEndX.Text mobjLine.EndPoint = varEnd mobjLine.Update
End Sub
Private Sub txtEndY_Change() Dim varEnd As Variant varEnd = mobjLine.EndPoint varEnd(1) = txtEndY.Text mobjLine.EndPoint = varEnd mobjLine.Update
End Sub
Private Sub txtEndZ_Change() Dim varEnd As Variant varEnd = mobjLine.EndPoint varEnd(2) = txtEndZ.Text mobjLine.EndPoint = varEnd mobjLine.Update
End Sub
Copyright ©2001 SYBEX, Inc., Alameda, CA |
www.sybex.com |

34 |
CHAPTER NINETY-NINE • USING VBA TO CREATE AUTOCAD APPLICATIONS |
Private Sub txtStartY_Change() Dim varStart As Variant varStart = mobjLine.StartPoint varStart(1) = txtStartY.Text mobjLine.StartPoint = varStart mobjLine.Update
End Sub
Private Sub txtStartZ_Change() Dim varStart As Variant varStart = mobjLine.StartPoint varStart(2) = txtStartZ.Text mobjLine.StartPoint = varStart mobjLine.Update
End Sub
The code to handle the ListBox control’s Change event is a bit different, but the idea is the same:
Private Sub lboLineColor_Change() mobjLine.Color = lboLineColor.ListIndex mobjLine.Update
End Sub
This code can be simpler than the code for changing the start point and the endpoint, because it doesn’t have to mess around with retrieving points and modifying them. Instead, it can just set the Line object’s color to the value chosen in the list box by the user.
What’s Going On? Debugging
Support
You’ve already met the Immediate window, which allows you to launch procedures and evaluate variables interactively. The VBA editor also offers several other tools for debugging your code. In this section, you’ll learn about single-stepping, the Call Stack, and the Locals window.
Copyright ©2001 SYBEX, Inc., Alameda, CA |
www.sybex.com |
WHAT’S GOING ON? DEBUGGING SUPPORT |
35 |
Break Mode and Single-Stepping
Sometimes the only way to find problems with your code is to go through it step by step. That’s the purpose of break mode in VBA. In break mode, your code is still running, but each line only executes when you tell it to do so. This allows you to look at the program flow and inspect values as the code is still running.
The easiest way to get your code to go into break mode is to set a breakpoint. You can set a breakpoint by clicking in the left margin of the module window next to a line of code. VBA will put a breakpoint icon in the margin for you to indicate the breakpoint. When VBA is ready to execute that line, it displays the module for you with a highlight bar on the line of code.
When you’re in break mode, you can use several methods to continue executing the code. The simplest method is to hit the F8 key, which executes one line of code. This is called single-stepping. This way, you can execute a single line of code at a time, and see what each line is doing.
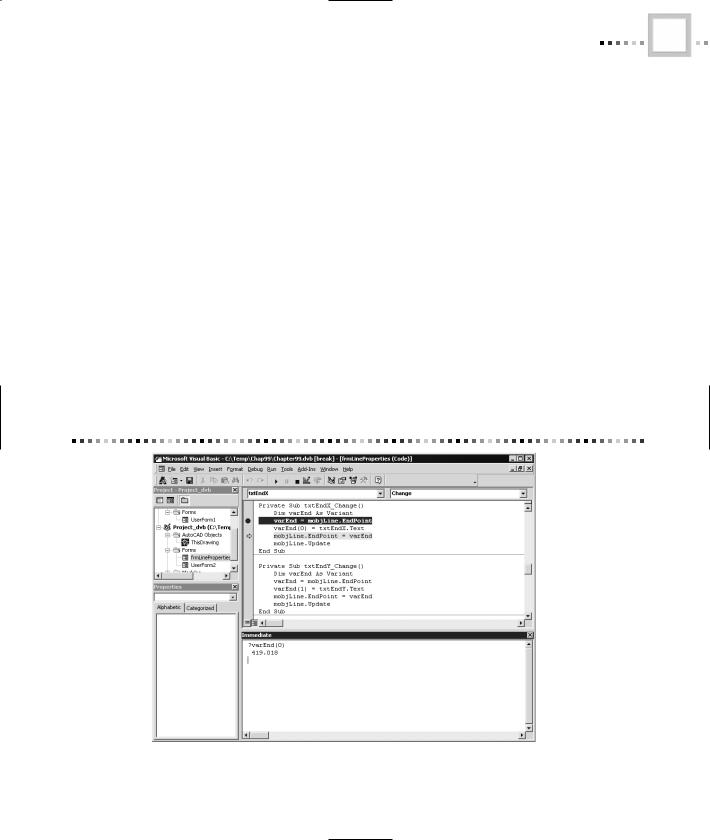
Figure 99.26 shows the Module window after a breakpoint has been hit and F8 was pressed twice. As you can see, you can evaluate variables in the Immediate window while you’re in break mode.
Figure 99.26 Executing code in break mode
Copyright ©2001 SYBEX, Inc., Alameda, CA |
www.sybex.com |