


7.1 INTRODUCTION
This |
G1000 |
Pilot’s |
Guide |
describes |
the |
Multi |
Function |
Display |
(MFD) |
as installed |
in |
the Cessna Nav III aircraft. |
|
|
|
||
DESCRIPTION
The display portion of the G1000 Integrated Cockpit System installed in Cessna Nav III aircraft consists of two 10.4-inch liquid crystal displays (LCDs). During normal operation, the right display is configured as the Multi Function Display (MFD).
REVERSIONARY MODE
Should a failure occur in either display, the G1000 automatically enters reversionary mode. In reversionarymode, critical flight instrumentation is combined with engine instrumentation on the remaining display. Minimal navigation capability is also available on the reversionary mode display. See the System Overview Section for a detailed explanation of the reversionary mode.
MULTI FUNCTION DISPLAY
OPTIONAL EQUIPMENT
This MFD Pilot’s Guide describes the configurable features of the G1000 for the Nav III. Descriptions and procedures relating to the following optional equipment are covered in Section 8.
•L-3 STORMSCOPE® WX-500 Series II Weather Mapping Sensor
•Honeywell® KTA870 TAS/
•GDL 69/69A XM® Radio System
Figure 7-1 MFD Splash Screen
190-00498-00 Rev.A |
Garmin G1000 Pilot’s Guide for Cessna Nav III |
7-1 |

MULTI FUNCTION DISPLAY
MFD POWER-UP
MFD power up is part of the system power up procedure. See the G1000 System Overview Pilot’s Guide for details.
Splash Screen Information
The MFD splash screen (Figure 7-1) displays general system information such as software version and database versions to the pilot upon power-up of the G1000 system. To acknowledge the Splash Screen information and proceed to the Navigation Map Page press the ENT key or the right most softkey twice.
NOTE: Screen images in this pilot’s guide are subject to change and may not reflect current G1000 system software.
MFD BACKLIGHTING
See the Primary Flight Display Pilot’s Guide for instructions on adjusting MFD backlighting.
MFD SOFTKEYS
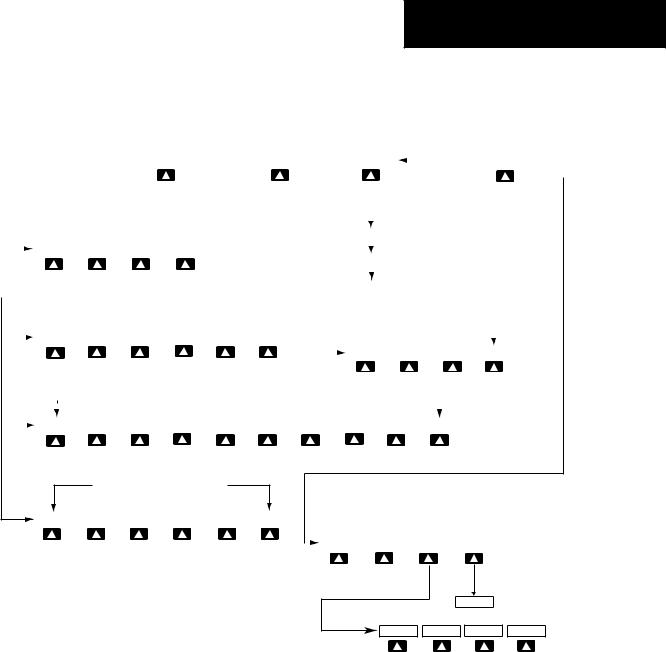
The MFD softkeys are located below the display screen and provide control over flight management functions including GPS Navigation and flight planning. Figure 7-2 shows an MFD flowchart identifying what functions are available via the softkey labels.
The MFD softkeys perform the following functions:
ENGINE – Pressing the ENGINE softkey makes available the LEAN and SYSTEM softkeys which in turn access the Lean Page and the System Page, respectively.
MAP – pressing the MAP softkey enables the following softkeys:
TRAFFIC – pressing the TRAFFIC softkey displays/removes Mode S Traffic on the Navigation Map.
TOPO – pressing the TOPO softkey displays or removes topographic information on the Navigation Map.
TERRAIN – pressing the TERRAIN softkey displays/removes terrain information on the Navigation Map.
BACK – pressing the BACK softkey displays the ENGINE and MAP top level softkeys.
DCLTR (declutter) – pressing the DCLTR softkey removes map information in three levels.
CHKLIST (checklist optional) – pressing the
CHKLIST softkey displays the Checklist Page.
7-2 |
Garmin G1000 Pilot’s Guide for Cessna Nav III |
190-00498-00 Rev.A |
MULTI FUNCTION DISPLAY
|
|
|
|
|
|
|
|
|
|
|
|
|
|
ENGINE |
|
|
|
|
|
|
MAP |
|
|
|
|
|
|
DCLTR |
|
|
|
|
|
|
|
|
|
|
|
CHKLIST |
|
||||||||||
|
|
|
|
|
|
|
|
|
|
|
|
|
|
|
|
|
|
|
|
|
|
|
|
|
|
|
|
|
|
|
|
|
|
|
|
||||||||||||||||
|
|
|
|
|
|
|
|
|
|
|
|
|
|
|
|
|
|
|
|
|
|
|
|
|
|
|
|
|
|
|
|
|
|
|
|
|
|
|
|
|
|
|
|
|
|
|
|
|
|
|
|
|
|
|
|
|
|
|
|
|
|
|
|
|
|
|
|
|
|
|
|
|
|
|
|
|
|
|
|
|
|
|
|
|
|
|
|
|
|
|
|
|
|
|
|
|
|
|
(optional) |
||||
|
|
|
|
|
|
|
|
|
|
|
|
|
|
|
|
|
|
|
|
|
|
|
|
|
|
|
|
|
|
|
|
|
|
|
|
|
|
|
|
|
|
|
|
|
|
|
|||||
|
|
|
|
|
|
|
|
|
|
|
|
|
|
|
|
|
|
|
|
|
|
|
|
|
|
|
|
|
|
|
|
|
|
|
|
|
|
|
|
|
|
|
|
|
|
|
|
|
|
|
|
|
|
|
|
|
|
|
|
|
|
|
|
|
|
|
|
|
|
|
|
|
|
|
|
|
|
|
|
|
|
|
|
|
|
|
|
|
|
|
|
|
|
|
|
|
|
|
|
|
|
|
|
|
|
|
|
|
|
|
|
|
|
|
|
|
|
|
|
|
|
|
|
|
|
|
|
|
|
|
|
|
|
|
|
|
|
|
|
|
|
|
|
|
|
|
|
|
|
|
|
|
|
|
|
|
|
|
|
|
|
|
|
|
|
|
|
|
|
|
|
|
|
|
|
|
|
|
|
|
|
|
|
|
|
|
|
|
DCLTR-1 |
|
|
|
|
|
|
|
|
|
|
|
|
|
|
|
|||
|
|
|
|
|
|
|
|
|
|
|
|
|
|
|
|
|
|
|
|
|
|
|
|
|
|
|
|
|
|
|
|
|
|
|
|
|
|
|
|
|
|
|
|
|
|
|
|
|
|
|
|
|
|
|
|
|
ENGINE |
|
LEAN |
|
SYSTEM |
|
|
BACK |
|
|
|
|
|
|
|
|
|
|
|
|
|
|
|
|
|
|
|
|
|
|
|
|
|
|
|
|
|
|
|
|
|
|
|||||
|
|
|
|
|
|
|
|
|
|
|
|
|
|
|
|
|
|
|
|
|
|
|
|
|
|
|
|
|
|
|
|
|
DCLTR-2 |
|
|
|
|
|
|
|
|
|
|
|
|
|
|
|
|||
|
|
|
|
|
|
|
|
|
|
|
|
|
|
|
|
|
|
|
|
|
|
|
|
|
|
|
|
|
|
|
|
|
|
|
|
|
|
|
|
|
|
|
|
|
|
|
|
|
|
|
|
|
|
|
|
|
|
|
|
|
|
|
|
|
|
|
|
|
|
|
|
|
|
|
|
|
|
|
|
|
|
|
|
|
|
|
|
|
|
|
|
|
|
|
|
|
|
|
|
|
|
|
|
|
|
|
|
|
|
|
|
|
|
|
|
|
|
|
|
|
|
|
|
|
|
|
|
|
|
|
|
|
|
|
|
|
DCLTR-3 |
|
|
|
|
|
|
|
|
|
|
|
|
|
|
|
|||
|
|
|
|
|
|
|
|
|
|
|
|
|
|
|
|
|
|
|
|
|
|
|
|
|
|
|
|
|
|
|
|
|
|
|
|
|
|
|
|
|
|
|
Press the BACK softkey on this level to |
||||||||
|
|
|
|
|
|
|
|
|
|
|
|
|
|
|
|
|
|
|
|
|
|
|
|
|
|
|
|
|
|
|
|
|
|
|
|
|
|
|
|
|
|
|
|||||||||
|
|
|
|
|
|
|
|
|
|
|
|
|
|
|
|
|
|
|
|
|
|
|
|
|
|
|
|
|
|
|
|
|
|
|
|
|
|
|
|
|
|
|
return to the top softkey level. |
||||||||
|
|
|
|
|
|
|
|
|
|
|
|
|
|
|
|
|
|
|
|
|
|
|
|
|
|
|
|
|
|
|
|
|
|
|
|
|
|
|
|
|
|
|
|
|
|
|
|
|
|
|
|
|
|
|
|
|
ENGINE |
|
LEAN |
|
SYSTEM |
|
|
RST FUEL |
|
GAL REM |
|
BACK |
|
|
|
|
|
|
|
|
|
|
|
|
|
|
|
|
|
|
|
|
|
|
|
|
|
|
|||||||||
|
|
|
|
|
|
|
|
|
|
|
|
|
|
|
|
|
|
|
|
|
|
|
|
|
|
|
|
|
|
|
|
|
|
|
|
|
|
|
|
|
|
|
|
|
|
|
|
|
|
|
|
|
|
|
|
|
|
|
|
|
|
|
|
|
|
|
|
|
|
|
|
|
|
|
|
|
|
|
|
|
|
|
|
|
TRAFFIC |
|
TOPO |
|
TERRAIN |
|
BACK |
|
|
||||||||||
|
|
|
|
|
|
|
|
|
|
|
|
|
|
|
|
|
|
|
|
|
|
|
|
|
|
|
|
|
|
|
|
|
|
|
|
|
|
||||||||||||||
|
|
|
|
|
|
|
|
|
|
|
|
|
|
|
|
|
|
|
|
|
|
|
|
|
|
|
|
|
|
|
|
|
|
|
|
|
|
|
|
|
|
|
|
|
|
|
|
||||
|
|
|
|
|
|
|
|
|
|
|
|
|
|
|
|
|
Press the ENGINE or BACK softkey on any level to |
|
|
|
|
|
|
|
|
|
|
|
|
|
|
|
|
|
|
|
|
|
|
|
|||||||||||
|
|
|
|
|
|
|
|
|
|
|
|
|
|
|
|
|
return to the default page level. |
|
|
|
|
|
|
|
|
|
|
|
|
|
|
|
|
|
|
|
|
|
|
|
|
|
|||||||||
|
|
|
|
|
|
|
|
|
|
|
|
|
|
|
|
|
|
|
|
|
|
|
|
|
|
|
|
|
|
|
|
|
|
|
|
|
|
|
|
|
|
|
|
|
|
|
|
|
|
|
|
|
|
|
|
|
ENGINE |
|
LEAN |
|
SYSTEM |
|
|
-10 GAL |
|
-1 GAL |
|
+1 GAL |
|
|
+10 GAL |
|
|
XX GAL |
|
|
XX GAL |
|
|
BACK |
|
|
|
|
|
|
|
|
|||||||||||||||
X = airframe specific values
Press the ENGINE or BACK softkey on any level to return to the default page level.
ENGINE |
|
LEAN |
|
SYSTEM |
|
CYL SLCT |
|
ASSIST |
|
BACK |
|
|
|
|
The DONE softkey changes to UNDO when the checklist |
|||||
|
|
|
|
|
|
|
|
|
|
|
|
|
|
|
item is already checked. |
|
|
|
||
|
|
|
|
|
|
|
|
|
|
|
|
|
|
|
|
|
|
|
|
|
|
|
|
|
|
|
|
|
|
|
|
|
|
ENGINE |
|
DONE |
|
EXIT |
|
EMERGCY |
|
|
|
CLR |
|
ENGINE |
MAP |
DCLTR |
CHKLIST |
Figure 7-2 MFD Softkeys
190-00498-00 Rev.A |
Garmin G1000 Pilot’s Guide for Cessna Nav III |
7-3 |
MULTI FUNCTION DISPLAY
ELECTRONIC CHECKLISTS (OPTIONAL)
The G1000 Multi Function Display provides optional checklists which allow a pilot to quickly find the proper procedure on the ground and during each phase of flight.
NOTE: The checklist information described in this section is not intended to replace the checklist information described in the Aircraft Flight Manual and the Pilot Safety and Warning Supplements document.
NOTE: Garmin is not responsible for the content of the checklists. User-defined checklists are created by the aircraft manufacturer. Additionally, modifications or updates to the checklists are coordinated through the aircraft manufacturer. The user cannot edit the checklists.
Displaying the Checklist Page (Figure 7-3)
The Splash Screen displays the current checklist file that is installed for the Cessna Nav III aircraft. If no checklistispresent,thentheSpalshSceendisplaysthetext “CHECKLIST FILE NOT PRESENT” and the CHKLIST softkey is greyed out.
To select the Checklist Page:
1. From any page, press the CHKLIST softkey.
Selecting a Procedure Group
Depending on the specific airframe, there are a certain number of groups of procedures with their respective checklists available to the pilot.
To select a procedure group:
1.Press the CHKLIST softkey.
2.Turn the large FMS knob to select the ‘GROUP’ field.
3.Turn the small FMS knob to select the desired procedure and press the ENT key.
Selecting a Checklist within the Procedure Group
1.Turn the large FMS knob to select the ‘Checklist’ field.
2.Turn the FMS knob to select the desired checklist and press the ENT key.
7-4 |
Garmin G1000 Pilot’s Guide for Cessna Nav III |
190-00498-00 Rev.A |
Selecting a Checklist Item
Twomethodsareavailabletoselectachecklistitem:(1) pressing the ENT key; or (2) pressing the DONE softkey.
(1) Pressing the ENT key:
With the desired checklist displayed, turn the FMS knob to move up and down the checklist and highlight an item with a hollow white rectangle. The default color for non-selected checklist items is blue and once the item is highlighted, the color turns white. To select a checklist item that is highlighted, press the ENT key. The selected item turns green in color again for ease of identification, and then a check mark is placed in the box next to the item. As an item is selected, the next item is automatically highlighted for selection. (2) Pressing the DONE Softkey: Pressing the DONE softkey produces the same results as pressing the ENT key.
NOTE: All warnings are displayed in yellow for ease of identification.
Removing the Check Mark from a Checklist Item
Press the CLR key to remove a check mark from an item.
Advancing to the Next Checklist
Once the last item in a checklist is selected, the ‘GO TO THE NEXT CHECKLIST?’ text is highlighted. Press the ENT key to advance to the next checklist displayed.
MULTI FUNCTION DISPLAY
One-Button Access to Emergency Procedures
TheEMERGENCYsoftkeyisavailableatalltimeswhen the checklist page is displayed. Press the EMERGENCY softkey at any time to immediately access the emergency procedures.
Exiting the Checklist Page
The EXIT softkey is available as long as the Checklist Page is displayed. Press the EXIT softkey or momentarily hold down the CLR key at anytime to exit the Checklist Page and return to the last page that was displayed before the Checklist Page was selected.
190-00498-00 Rev.A |
Garmin G1000 Pilot’s Guide for Cessna Nav III |
7-5 |

MULTI FUNCTION DISPLAY
Checklist Group
Checklist Name
Checklist Page
Checklist Page Indicator
Softkeys
Figure 7-3 Checklist Page (typical)
Emergency
Softkey
7-6 |
Garmin G1000 Pilot’s Guide for Cessna Nav III |
190-00498-00 Rev.A |