

NAV/COM
3.4 FREQUENCY AUTO-TUNING
The G1000 system offers multiple auto-tuning capabilities. The PFD allows auto-tuning of COM frequenciesassociatedwiththenearestairports. TheMFD provides auto-tuning of both COM and NAV frequencies fromwaypointandnearestpages. Inaddition,theprimary NAV frequency is entered automatically in the NAV window during approach loading or approach activation.
Frequencies can be automatically loaded into the frequency windows in the following ways:
•By using the ENT key when the frequency is highlighted on the appropriate page (PFD and MFD).
•When loading or activating an approach (PFD and MFD).
 NOTE: Turn the FMS knob to scroll through a list of frequencies.
Press the ENT key to load ahighlightedfrequencyinto the frequency window.
TurntheFMSknob to scroll through a list of frequencies.
Figure 3-19 Loading Frequencies
AUTO-TUNING ON THE PFD
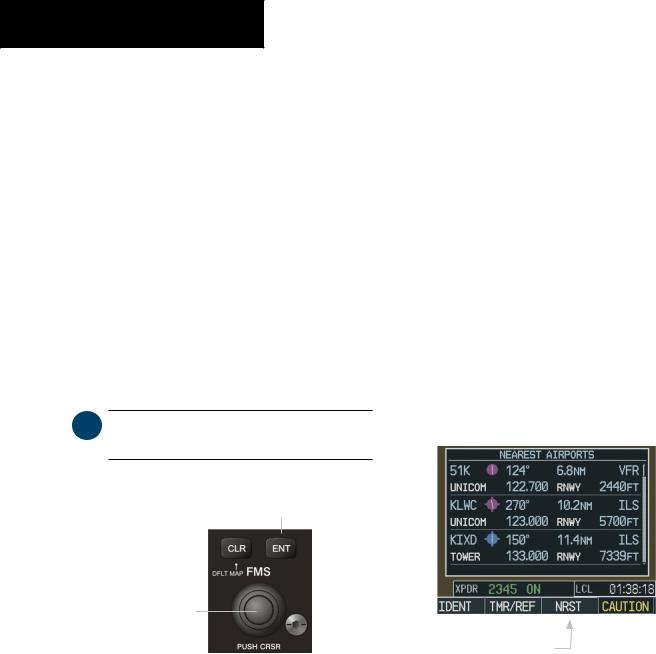
COM frequencies for the nearest airports may be viewedandautomaticallyloadedfromtheNearestAirports Window on the PFD.
To auto-tune a COM frequency for a nearby airport:
1.Press the NRST softkey to open the Nearest Airports Window, which displays the list of airport identifiers and COM frequencies.
2.Turn either FMS knob to highlight the desired COM frequency.
3.Press the ENT key to load the COM frequency into the COM tuning box.
When the desired frequency is entered in the tuning box, it becomes a standby frequency. Pressing the Frequency Transfer key places this frequency into the active field.
Pressing the NRST softkey opens the Nearest Airports window
Figure 3-20 Nearest Airports Window (PFD)
3-10 |
Garmin G1000 Pilot’s Guide for Cessna Nav III |
190-00498-00 Rev.A |
AUTO-TUNING ON THE MFD
Frequencies can be selected and loaded from the following MFD pages:
•WPT – Airport Information
•WPT – VOR Information
•NRST – Nearest Airports
•NRST – Nearest VOR
•NRST – Nearest (ARTCC, FSS, WX) Frequencies
Figure 3-21 MFD Page Group Icon
InNAVmodeduringanyVOR/ILSapproachactivation, the NAV frequency is automatically loaded into the standby field of the selected NAV radio.
InGPSmodeduringanyVOR/ILSapproachactivation, the appropriate NAV frequency is automatically loaded into the active field of NAV1.
NAV/COM
WPT – Airport Information Window
The Airport Information Window displays runway informationandalistoffrequenciesfortheselectedairport identifier as well as departure, arrival, and approach information.
To display the entire list of frequencies for an airport:
1.On the Airport Information Window, press the INFO softkey to display runway and frequency information for a specific airport.
2.Press the FMS knob to activate the selection cursor in the window.
3.Turn the FMS knob to select the desired airport identifier and press the ENT key. A list of all available frequencies for the selected airport appears.
Figure 3-22 WPT – Airport Information Window
190-00498-00 Rev.A |
Garmin G1000 Pilot’s Guide for Cessna Nav III |
3-11 |

NAV/COM
To load a COM frequency into the COM tuning box:
1.When the list of frequencies for the selected airport is displayed, highlight the desired frequency by turning the large FMS knob.
2.Press the ENT key.
The Pilot Controlled Lighting (PCL) frequency, located in the Runways box of the INFO portion of the Airport Information Page, may also be highlighted and loaded into the COM tuning box.
To load the primary approach NAV frequency into the NAV tuning box:
1On the Airport Information Window, press the APR softkey to display approach information for a specific airport.
2.Press the FMS knob to activate the selection cursor in the window.
3.Turn the large FMS knob to highlight the primary NAV frequency located in the Primary Frequency box.
4.Press the ENT key.
Figure 3-23 WPT – Airport Information Page (APR)
(Cessna 172 Shown)
3-12 |
Garmin G1000 Pilot’s Guide for Cessna Nav III |
190-00498-00 Rev.A |

WPT – VOR Information Window
The VOR Information Window displays information specific to individual VORs, including the airport that is nearest to the VOR.
To load a VOR frequency into the NAV window:
1.On the VOR Information Window, press the FMS knob to activate the VOR Information window.
2.Turn the FMS knob as needed to select the desired VOR and press the ENT key to validate the selection.
3.Turn the large FMS knob to highlight the VOR frequency and press the ENT key to load this frequency into the tuning box of the NAV Frequency window.
NAV/COM
 NOTE: If the MENU key is pressed when on the VOR Information Window, the ‘View Recent VOR List’ menu option is displayed for quick access to recently used VORs. If no VOR frequencies have been tuned, this menu option is grayed out.
Figure 3-24 WPT – VOR Information Menu
(Cessna T206 Shown)
190-00498-00 Rev.A |
Garmin G1000 Pilot’s Guide for Cessna Nav III |
3-13 |

NAV/COM
NRST – Nearest Airports Window
The Nearest Airports Window displays a list of the nearest airports with runway, frequency, and approach information. In this window, any frequency associated with the selected airport can be loaded into the NAV or COM Frequency window.
To display the entire list of frequencies for a nearby airport and load a frequency from that list:
1. |
On the Nearest Airports Window, press the |
|
|
FMS knob to activate the cursor in the Nearest |
|
|
Airports Window. |
|
2. |
Turn the FMS knob to scroll through the list |
|
|
of nearest airport identifiers until the desired |
|
|
airport is highlighted. |
|
3. |
Press the FREQ softkey to activate the selection |
|
|
cursor in the Frequencies box. |
|
4. |
Turn the FMS knob to scroll through the list of |
Figure 3-25 NRST – Nearest Airport Window |
|
frequencies for the selected airport. |
|
|
|
5.When the desired frequency is highlighted, press the ENT key to load this frequency into the tuning box of the NAV or COM Frequency window.
3-14 |
Garmin G1000 Pilot’s Guide for Cessna Nav III |
190-00498-00 Rev.A |
NAV/COM
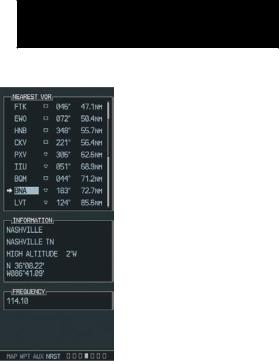
NRST – Nearest VOR Window
The Nearest VOR window displays a list of VORs together with related information, including the VOR frequency.
To load a VOR frequency into the NAV window:
1.On the Nearest VOR Window, press the FMS knob to activate the Nearest VOR window.
2.Turn the FMS knob to scroll through the list of nearest VORs until the desired VOR is highlighted.
3.Press the FREQ softkey to activate the selection cursor in the Frequency box and press the ENT key to load the frequency into the tuning box of the NAV Frequency window.
Figure 3-26 NRST – Nearest VOR Window
190-00498-00 Rev.A |
Garmin G1000 Pilot’s Guide for Cessna Nav III |
3-15 |

NAV/COM
NRST – Nearest Frequencies Windows
The Nearest Frequencies window displays a list of nearest ARTCC, FSS, and WX frequencies. For frequency selection, the cursor can be activated on the ARTCC, FSS, or WX windows by using the ARTCC, FSS, and WX softkeys.
The Nearest ARTCC and FSS frequency windows contain a numbered list of names as well as bearing and distance information from the transmitting antenna.
To view a nearestARTCC or FSS frequency and load it into the standby frequency field:
1.Press the ARTCC or the FSS softkey to activate the selection cursor in the Nearest window.
2.Turn the small FMS knob to scroll through the list of names, then the large FMS knob to highlight the desired frequency.
3.Press the ENT key to load the desired frequency into the COM tuning box.
To view a nearest WX frequency and load it into the standby frequency field:
1.Press the WX softkey to activate the selection cursor in the Nearest WX window.
2.Turn the FMS knob to highlight the desired frequency.
3.Press the ENT key to load the desired frequency into the tuning box.
Figure 3-27 NRST – Nearest Frequencies Windows
3-16 |
Garmin G1000 Pilot’s Guide for Cessna Nav III |
190-00498-00 Rev.A |