- •CONTENTS
- •INTRODUCTION
- •1 Getting Started
- •Better, Cheaper, Easier
- •Who This Book Is For
- •What Kind of Digital Film Should You Make?
- •2 Writing and Scheduling
- •Screenwriting
- •Finding a Story
- •Structure
- •Writing Visually
- •Formatting Your Script
- •Writing for Television
- •Writing for “Unscripted”
- •Writing for Corporate Projects
- •Scheduling
- •Breaking Down a Script
- •Choosing a Shooting Order
- •How Much Can You Shoot in a Day?
- •Production Boards
- •Scheduling for Unscripted Projects
- •3 Digital Video Primer
- •What Is HD?
- •Components of Digital Video
- •Tracks
- •Frames
- •Scan Lines
- •Pixels
- •Audio Tracks
- •Audio Sampling
- •Working with Analog or SD Video
- •Digital Image Quality
- •Color Sampling
- •Bit Depth
- •Compression Ratios
- •Data Rate
- •Understanding Digital Media Files
- •Digital Video Container Files
- •Codecs
- •Audio Container Files and Codecs
- •Transcoding
- •Acquisition Formats
- •Unscientific Answers to Highly Technical Questions
- •4 Choosing a Camera
- •Evaluating a Camera
- •Image Quality
- •Sensors
- •Compression
- •Sharpening
- •White Balance
- •Image Tweaking
- •Lenses
- •Lens Quality
- •Lens Features
- •Interchangeable Lenses
- •Never Mind the Reasons, How Does It Look?
- •Camera Features
- •Camera Body Types
- •Manual Controls
- •Focus
- •Shutter Speed
- •Aperture Control
- •Image Stabilization
- •Viewfinder
- •Interface
- •Audio
- •Media Type
- •Wireless
- •Batteries and AC Adaptors
- •DSLRs
- •Use Your Director of Photography
- •Accessorizing
- •Tripods
- •Field Monitors
- •Remote Controls
- •Microphones
- •Filters
- •All That Other Stuff
- •What You Should Choose
- •5 Planning Your Shoot
- •Storyboarding
- •Shots and Coverage
- •Camera Angles
- •Computer-Generated Storyboards
- •Less Is More
- •Camera Diagrams and Shot Lists
- •Location Scouting
- •Production Design
- •Art Directing Basics
- •Building a Set
- •Set Dressing and Props
- •DIY Art Direction
- •Visual Planning for Documentaries
- •Effects Planning
- •Creating Rough Effects Shots
- •6 Lighting
- •Film-Style Lighting
- •The Art of Lighting
- •Three-Point Lighting
- •Types of Light
- •Color Temperature
- •Types of Lights
- •Wattage
- •Controlling the Quality of Light
- •Lighting Gels
- •Diffusion
- •Lighting Your Actors
- •Interior Lighting
- •Power Supply
- •Mixing Daylight and Interior Light
- •Using Household Lights
- •Exterior Lighting
- •Enhancing Existing Daylight
- •Video Lighting
- •Low-Light Shooting
- •Special Lighting Situations
- •Lighting for Video-to-Film Transfers
- •Lighting for Blue and Green Screen
- •7 Using the Camera
- •Setting Focus
- •Using the Zoom Lens
- •Controlling the Zoom
- •Exposure
- •Aperture
- •Shutter Speed
- •Gain
- •Which One to Adjust?
- •Exposure and Depth of Field
- •White Balancing
- •Composition
- •Headroom
- •Lead Your Subject
- •Following Versus Anticipating
- •Don’t Be Afraid to Get Too Close
- •Listen
- •Eyelines
- •Clearing Frame
- •Beware of the Stage Line
- •TV Framing
- •Breaking the Rules
- •Camera Movement
- •Panning and Tilting
- •Zooms and Dolly Shots
- •Tracking Shots
- •Handholding
- •Deciding When to Move
- •Shooting Checklist
- •8 Production Sound
- •What You Want to Record
- •Microphones
- •What a Mic Hears
- •How a Mic Hears
- •Types of Mics
- •Mixing
- •Connecting It All Up
- •Wireless Mics
- •Setting Up
- •Placing Your Mics
- •Getting the Right Sound for the Picture
- •Testing Sound
- •Reference Tone
- •Managing Your Set
- •Recording Your Sound
- •Room Tone
- •Run-and-Gun Audio
- •Gear Checklist
- •9 Shooting and Directing
- •The Shooting Script
- •Updating the Shooting Script
- •Directing
- •Rehearsals
- •Managing the Set
- •Putting Plans into Action
- •Double-Check Your Camera Settings
- •The Protocol of Shooting
- •Respect for Acting
- •Organization on the Set
- •Script Supervising for Scripted Projects
- •Documentary Field Notes
- •What’s Different with a DSLR?
- •DSLR Camera Settings for HD Video
- •Working with Interchangeable Lenses
- •What Lenses Do I Need?
- •How to Get a Shallow Depth of Field
- •Measuring and Pulling Focus
- •Measuring Focus
- •Pulling Focus
- •Advanced Camera Rigging and Supports
- •Viewing Video on the Set
- •Double-System Audio Recording
- •How to Record Double-System Audio
- •Multi-Cam Shooting
- •Multi-Cam Basics
- •Challenges of Multi-Cam Shoots
- •Going Tapeless
- •On-set Media Workstations
- •Media Cards and Workflow
- •Organizing Media on the Set
- •Audio Media Workflow
- •Shooting Blue-Screen Effects
- •11 Editing Gear
- •Setting Up a Workstation
- •Storage
- •Monitors
- •Videotape Interface
- •Custom Keyboards and Controllers
- •Backing Up
- •Networked Systems
- •Storage Area Networks (SANs) and Network-Attached Storage (NAS)
- •Cloud Storage
- •Render Farms
- •Audio Equipment
- •Digital Video Cables and Connectors
- •FireWire
- •HDMI
- •Fibre Channel
- •Thunderbolt
- •Audio Interfaces
- •Know What You Need
- •12 Editing Software
- •The Interface
- •Editing Tools
- •Drag-and-Drop Editing
- •Three-Point Editing
- •JKL Editing
- •Insert and Overwrite Editing
- •Trimming
- •Ripple and Roll, Slip and Slide
- •Multi-Camera Editing
- •Advanced Features
- •Organizational Tools
- •Importing Media
- •Effects and Titles
- •Types of Effects
- •Titles
- •Audio Tools
- •Equalization
- •Audio Effects and Filters
- •Audio Plug-In Formats
- •Mixing
- •OMF Export
- •Finishing Tools
- •Our Software Recommendations
- •Know What You Need
- •13 Preparing to Edit
- •Organizing Your Media
- •Create a Naming System
- •Setting Up Your Project
- •Importing and Transcoding
- •Capturing Tape-based Media
- •Logging
- •Capturing
- •Importing Audio
- •Importing Still Images
- •Moving Media
- •Sorting Media After Ingest
- •How to Sort by Content
- •Synchronizing Double-System Sound and Picture
- •Preparing Multi-Camera Media
- •Troubleshooting
- •14 Editing
- •Editing Basics
- •Applied Three-Act Structure
- •Building a Rough Cut
- •Watch Everything
- •Radio Cuts
- •Master Shot—Style Coverage
- •Editing Techniques
- •Cutaways and Reaction Shots
- •Matching Action
- •Matching Screen Position
- •Overlapping Edits
- •Matching Emotion and Tone
- •Pauses and Pull-Ups
- •Hard Sound Effects and Music
- •Transitions Between Scenes
- •Hard Cuts
- •Dissolves, Fades, and Wipes
- •Establishing Shots
- •Clearing Frame and Natural “Wipes”
- •Solving Technical Problems
- •Missing Elements
- •Temporary Elements
- •Multi-Cam Editing
- •Fine Cutting
- •Editing for Style
- •Duration
- •The Big Picture
- •15 Sound Editing
- •Sounding Off
- •Setting Up
- •Temp Mixes
- •Audio Levels Metering
- •Clipping and Distortion
- •Using Your Editing App for Sound
- •Dedicated Sound Editing Apps
- •Moving Your Audio
- •Editing Sound
- •Unintelligible Dialogue
- •Changes in Tone
- •Is There Extraneous Noise in the Shot?
- •Are There Bad Video Edits That Can Be Reinforced with Audio?
- •Is There Bad Audio?
- •Are There Vocal Problems You Need to Correct?
- •Dialogue Editing
- •Non-Dialogue Voice Recordings
- •EQ Is Your Friend
- •Sound Effects
- •Sound Effect Sources
- •Music
- •Editing Music
- •License to Play
- •Finding a Composer
- •Do It Yourself
- •16 Color Correction
- •Color Correction
- •Advanced Color Controls
- •Seeing Color
- •A Less Scientific Approach
- •Too Much of a Good Thing
- •Brightening Dark Video
- •Compensating for Overexposure
- •Correcting Bad White Balance
- •Using Tracks and Layers to Adjust Color
- •Black-and-White Effects
- •Correcting Color for Film
- •Making Your Video Look Like Film
- •One More Thing
- •17 Titles and Effects
- •Titles
- •Choosing Your Typeface and Size
- •Ordering Your Titles
- •Coloring Your Titles
- •Placing Your Titles
- •Safe Titles
- •Motion Effects
- •Keyframes and Interpolating
- •Integrating Still Images and Video
- •Special Effects Workflow
- •Compositing 101
- •Keys
- •Keying Tips
- •Mattes
- •Mixing SD and HD Footage
- •Using Effects to Fix Problems
- •Eliminating Camera Shake
- •Getting Rid of Things
- •Moving On
- •18 Finishing
- •What Do You Need?
- •Start Early
- •What Is Mastering?
- •What to Do Now
- •Preparing for Film Festivals
- •DIY File-Based Masters
- •Preparing Your Sequence
- •Color Grading
- •Create a Mix
- •Make a Textless Master
- •Export Your Masters
- •Watch Your Export
- •Web Video and Video-on-Demand
- •Streaming or Download?
- •Compressing for the Web
- •Choosing a Data Rate
- •Choosing a Keyframe Interval
- •DVD and Blu-Ray Discs
- •DVD and Blu-Ray Compression
- •DVD and Blu-Ray Disc Authoring
- •High-End Finishing
- •Reel Changes
- •Preparing for a Professional Audio Mix
- •Preparing for Professional Color Grading
- •Putting Audio and Video Back Together
- •Digital Videotape Masters
- •35mm Film Prints
- •The Film Printing Process
- •Printing from a Negative
- •Direct-to-Print
- •Optical Soundtracks
- •Digital Cinema Masters
- •Archiving Your Project
- •GLOSSARY
- •INDEX
214 The Digital Filmmaking Handbook, 4E
Guerrilla Shooting
DSLR cameras are very low profile (if they’re not outfitted with all the gear discussed in this chapter) and that means they’re better for shooting guerilla-style (for example, without a permit or permission).
DSLR Camera Settings for HD Video
Still cameras that shoot HD video are still cameras first, and video cameras second. So the first step in shooting HD video with a DSLR is to change the camera settings to accommodate video capture. Also, if you have a lot of video camera experience and are new to using a still camera, there are some camera settings that you might not be familiar with.
nStart by setting the camera to video mode. The available menu options and other settings on the camera will change accordingly.
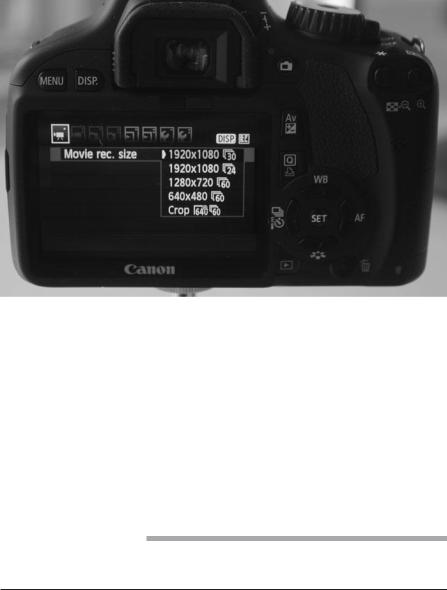
nSelect a frame rate and size. We chose 1920x1080 at 30fps (see Figure 10.4)
nSelect manual exposure. This lets you choose the ISO, shutter speed, and f-stop yourself.
nSet the ISO. ISO is a rating system originally used in still photography to describe the light sensitivity of various film stocks. Digital still cameras don’t use film stock, but the light sensitivity of the image sensor is measured using the same ISO scale used to rate film. Increasing the ISO is the same as boosting the gain on a standard video camera. How high you can push the ISO before you see visible noise in your footage depends on which camera you have, so you’ll want to do some tests before you commit to a specific high ISO.
nSet the shutter speed. High-end video cameras let you adjust the shutter speed and so do DSLRs. A “normal” shutter speed is usually about 1/50th of a second for 24fps shooting and 1/60th of a second for 30fps shooting. If you want to reduce motion blur and other movement artifacts, choose a higher shutter speed although be aware that some people find video shot with a high shutter speed aesthetically unappealing. If you want to increase motion blur, choose a slower shutter speed.
nSet the f-stop. Again, depth-of-field control is one of the great advantages of a DSLR over a video camera, and you’ll manipulate depth of field by carefully choosing an aperture. Wider apertures (lower f-numbers) will give you shallower depth of field, letting you blur out backgrounds to bring more attention to your subject.
nSet the focus. Although some DSLRs can auto focus while recording, the usefulness of this feature is extremely limited because the auto focus on still cameras seeks focus by zooming in and out until focus is achieved—not something that makes for great video. Manual focusing can be a complex process, and we will discuss it in greater detail later in this chapter.
nSet the white balance. Most digital still cameras offer a selection of white-balance presets: tungsten, daylight, overcast, fluorescent, and so on. But for complex lighting situations, it’s best to custom white balance. On most DSLRs, you’ll set custom white balance by shooting a still photo of a white object (such as a piece of paper) in your lighting setup. This picture will be used as the source for the custom white-balance setting.
Chapter 10 n DSLRs and Other Advanced Shooting Situations |
215 |
nDecide if you need image stabilization. If your lens has image stabilization (IS), it can help you get smoother footage when handholding. If you’re shooting from a tripod, it’s usually best to turn image stabilization off, as many IS systems can be confused by the smooth pans that a tripod allows.
In addition to the above settings, there are several features offered on your DSLR that you will want to avoid:
nDisable any image enhancement settings. Canon cameras offer a selection of “Picture styles.” Other manufacturers use their own terminology, but whatever it’s called, you don’t need it when you’re shooting HD video. Image enhancement settings are primarily designed for still photographs. Instead, choose “Neutral” and if you want to enhance the image, you can do so later in postproduction.
nAvoid cropping or any other image manipulation. Again, you can do this stuff in post.
nTurn off auto exposure and auto white-balance. It’s not so much that the camera can’t choose a good exposure or white balance for you, it’s that you don’t want it to do so in the middle of your shot.
Figure 10.4
Carefully go through your camera’s menu to select the settings for recording HD video.
Hacking Your DSLR
Magic Lantern is a product that enhances the firmware in Canon cameras to add features such as on-screen audio meters and zebra stripes. But be aware that installing it may void your warranty.