


404 The Digital Filmmaking Handbook, 4E
Using Effects to Fix Problems
Compositing explosions is pretty fun, but the most common use of special effects isn’t special at all: correcting problems in your footage. Whether it’s a shaky camera, wire removal, or the dreaded “rolling shutter” effect in DSLR footage, special effects can help solve many problems in your footage.
Eliminating Camera Shake
Don’t worry, we’re not going to tell you to take out all of that camera movement that you just put in. However, you can use similar techniques to stabilize footage shot with a shaky camera.
This process is hard, time-consuming work! Don’t use it as a substitute for good shooting!
Just as we animated the movement of an image to make it shake, we can animate the movement of an image to make it stand still. The easiest way to script such an animation is to pick a reference point on your image and animate the position of your image so as to keep that reference point in the same place. Here are some guidelines:
nWork at high magnification. Remember, you’re concerned about tracking an individual pixel. So pick an area of high contrast and zoom in close!
nUse guides. If your program allows you to set guides on an image (as in After Effects), set guides along the top and side of the pixel you are going to use as your reference. This will make it easier to tell if your reference point is in the right position.
nRemember to think backward. Zoomed in close, it can be difficult to remember which direction you need to move. You might have to switch back and forth between frames to figure out which direction the camera is moving. (You might also have to stop for a moment to figure out which frame you’re looking at.) Once you’ve figured that out, move the camera in the opposite direction.
nDon’t expect your reference to always look the same. Unfortunately, as the camera moves and the light on the object you’re tracking changes, the pixel colors and patterns will change slightly. Although your reference point might have been a nice solid black pixel in the first frame, it might be a 60-percent gray pixel in the second. Depending on your camera, it might even change color as it moves! Consequently, when trying to decide how and where to move the frame, you might need to look at several frames before and after your current location to get an idea of how the pattern you are tracking is changing in appearance.
nDon’t use motion blur! If your program can blur motion to smooth animation, be sure this feature is off!
nWatch those subpixels. Some programs actually calculate movement by using distances smaller than a pixel. When zoomed in close, if you press the arrow key to move the image, you might not see anything happen. This is because the program has performed a subpixel movement. You might have to zoom out to test your footage, or zoom out a few steps and try again. You can probably find a zoom level that will let you move in single pixels.
Chapter 17 n Titles and Effects |
405 |
nAim for a reasonable amount of correction. If your image is moving a lot, you’ll have to settle for merely calming it down, as opposed to making it completely static.
nDon’t bother trying to stabilize blurry footage. If your camera was shaky enough that its motion caused your image to blur slightly, then you’re not going to be able to stabilize your footage. The results will be too blurry and weird looking. Image stabilization is really just for evening out slight vibrations and shakes.
nUse a plug-in. There are several specialized image stabilization plug-ins out there, such as After Effects Warp Stabilizer.
As in the previous example, as you move the frame, you’ll be exposing the empty space around the edge of the layer. You can fix this problem with the same steps described in the preceding tutorial.
Getting Rid of Things
There are many things you might want to remove from your footage: bad pixels or dropouts, cables, and other equipment from the set, wires used for puppeteering, camera artifacts such as the infamous rolling shutter effect, flicker from fluorescent lights, naked people with foul mouths—the list goes on.
Here are some tips on how to get rid of unwanted things that somehow ended up in your shots.
Bad Pixels and Dropouts
Sometimes a pixel in your camera goes bad and sometimes a dropout occurs when the magnetic particles in a particular part of the tape get scrambled. Either way, in digital video, dead pixels and dropouts appear in your image as a square of gray (see Figure 17.26). Often, your best course of action is to repair the problem digitally. Fortunately, most dropouts only last for one or two frames, so digital fixes are fairly simple. There are several approaches to take.
nEdit the previous frame over the frame with the dropout. This is the least favorable alternative, as it will create a brief, possibly perceptible stutter in your motion. If you’re in a hurry, though, this will be the quickest fix.
nPaint over the dropout. Take the individual frames into an image editor and fix the bad areas with a Paint Brush or Clone tool. If you have a copy of After Effects, use the Clone tool to clone the same area from a good frame.
nMask and composite over the dropout. Take a still of a frame that isn’t bad and composite it over the bad frame. Using Cropping or Masking tools, matte the upper layer to create a small patch that covers the dropout in the lower layer.
nEnlarge the image. If the dropout is near the edge of the frame, you can enlarge your image and get rid of it.
406 The Digital Filmmaking Handbook, 4E
Figure 17.26
An example of a digital video dropout.
Wire Removal
If your film had any sort of puppeteering, you’ll have some wires to remove. It’s also common that light stands, cables, and other gear on the set accidentally end up in some of your shots. Often, they are difficult to see until you are in the editing room when suddenly you realize there’s a bright orange cable in a dark corner. Luckily, wires and light stands are thin and don’t take up a lot of screen real estate so usually you can get rid of them pretty easily.
nPaint out the wire. Take the individual frames into an image editor and fix the bad areas with a Paint Brush or Clone tool. If you have a copy of After Effects, use the Clone tool to clone a clean part of the image over the wires.
nMask and composite over the dropout. Take a still of a clean frame and composite it over the bad area in the frame with the wire. Using Cropping or Masking tools, matte the upper layer to create a small patch that covers the problem area in the lower layer.
nEnlarge the image. If the wire or light stand is near the edge of the frame, you can enlarge your image and get rid of it.
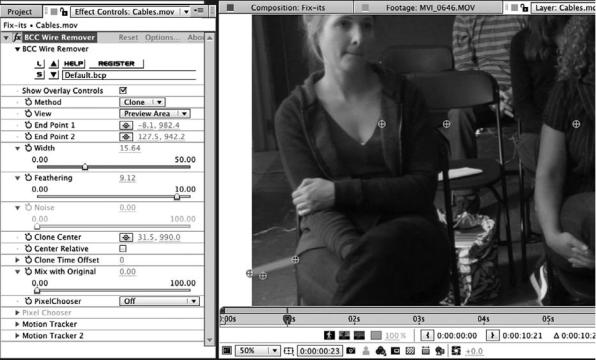
nUse a plug-in. If your shot has camera movement, painting or masking will be much more difficult. Plug-ins such as Boris Continuum Wire Removal offer a couple different ways to get rid of wires and also offer sophisticated motion tracking tools (see Figure 17.27 and Color Plate 39).
Chapter 17 n Titles and Effects |
407 |
Figure 17.27
BorisFX Continuum Wire Removal plug-in lets you choose different ways to paint out a wire and also track motion within the shot.
Flickering Lights
Sometimes you don’t notice the flicker in a bad fluorescent bulb until it is too late or maybe your footage was shot in a foreign country with a different electrical cycle. Either way, flickering lights are distracting to the viewer, but luckily they can be minimized. The most popular solution is to use the Stabilize Color Effect in After Effects. It can also be used to correct iris flares and other shifts in exposure.
Rolling Shutter Problems
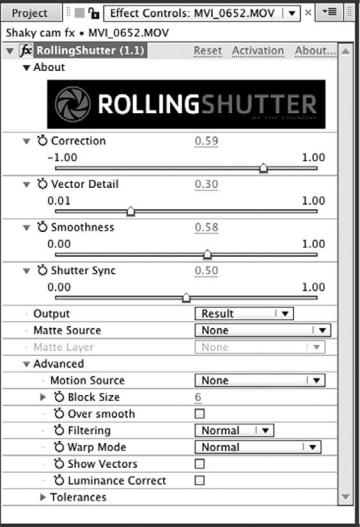
DSLR cameras and other cameras with CMOS sensors are notoriously prone to the “rolling shutter effect,” which causes footage to look wobbly or diagonally distorted. The Foundry Rolling Shutter plug-in works with Premiere, Final Cut Pro, and Media Composer to help you straighten out image distortion due to rolling shutter problems (see Figure 17.28).
408 The Digital Filmmaking Handbook, 4E
Figure 17.28
The Foundry’s Rolling Shutter plug-in helps correct camera artifacts common in footage shot with DSLRs.
Not Ready for Primetime Material
Nudity and bad language might seem harmless to some but highly offensive to others. Some distributors would rather not take any chances. If your project is a feature film, you may have to cut out certain material in order to get the MPAA rating you want for your film. If your project is destined for television or the Web, the tendency is to leave the offending material in the cut but to blur the footage so that you can’t see it. Some networks go so far as to require blurring mouths when foul language is used. Here are a few ways to obscure potentially offensive material:
nBlur it. You can do a DIY blur using the effects tools in your editing software or you can use a specialized plug-in such as the Boris Witness Protection effect.