


18 The Digital Filmmaking Handbook, 4E
Creative Writing Exercises (continued)
nBecause it’s a rhythm, the three-act structure is something you can actually start to feel after a while, once you start learning to pay attention to it. Being able to recognize the rhythms in the movies you watch will help you better understand and control the structure and rhythmic beats in your own script. Start watching movies with an eye toward picking out the act breaks and other rhythmic elements. Can you feel where Act I is? Where the midpoint is? When Act III begins? See if you agree. Be warned, though: once you start watching movies with an eye or feeling toward these structural devices, it can change the way you experience some stories. Suspense stories, in particular, become much less suspenseful when you’re able to realize things like “this must be a false ending, because they haven’t actually solved the problem yet.” However, such a reading also makes you realize that the enjoyment of these types of movies usually derives much more from the telling, than from the actual narrative points.
Other Structures
The dominance of a rigid three-act structure is something that has only come to cinema in the last 30–40 years. Before that, movies did not all adhere so tightly to the rigid rhythms and practices of a modern three-act structure. Watch Casablanca—a masterpiece by any measure—and note that it doesn’t spell out all of the problems at the very beginning. It’s difficult to tell where the Act I break actually occurs. Similarly, Earnest Lehman, the screenwriter of North By Northwest, said that he considers that to be an 11-act script!
nFeeling stuck on a script? Though you can follow all sorts of structural guidelines, and pound your head against your desk, often the answer to your script problems lies not with you, but with your characters. They’re often the ones that have the information you need to figure out what happens next. The problem is that you usually only hear what your characters have to say from the scenes they’re in. If you’re stuck, and not writing scenes, then you’ll quickly get out of touch with your characters. In these instances, it’s often a good idea to find other ways of getting your characters to talk to you. Try conducting interviews with them for various publications. See what they say to the editor of your local newspaper, to a tabloid magazine, to a news weekly, or an entertainment news program. Or write a scene where they’re all on a daytime talk show arguing about their issues. Sure, they might start throwing chairs at each other, but this kind of unbridled talk just might give you some insights into their wants and desires that will feed you lots of ideas.
Formatting Your Script
Traditional movie screenplays have a very specific format that has been designed and refined to convey much more than just dialogue and scene descriptions. Screenplay format makes it easy to quickly judge budget and scheduling concerns in a script. No matter what type of project you’re working on, writing screenplays in this format will make your production job much easier.
Screenplay Format
One of the biggest advantages of screenplay format is that it makes it easier to determine the length and pacing of your script. If you follow standard screenplay margins and layouts, your script will average one minute of screen time per page. In reality, there is a lot of variation, of course. A onepage description of an epic sea battle might actually take five minutes of screen time, while a page
Chapter 2 n Writing and Scheduling |
19 |
of witty banter might fly by in 20 seconds. On average, the one-page-per-minute rule is a good guideline to follow because over the entire length of the screenplay, it will be about right.
If you follow traditional screenplay format, your script will be divided into scenes delineated by sluglines. A slug tells whether the following scene is INTerior or EXTerior, the location of the scene, and whether the scene takes place during the day or night. For example:
INT. MAD SCIENTIST’S PANTRY — NIGHT
Sluglines make it easy to count and reorder your scenes, and make it simple for a producer to quickly arrive at an approximation of cost. If your script has a lot of EXT scenes at NIGHT, then it’s going to be more expensive (lights, location shots, and overtime add up quickly). Similarly, if your slugs all run along the lines of:
EXT. UPPER ATMOSPHERE OF MARS — NIGHT
then it’s pretty obvious that your script is effects-heavy and, therefore, expensive.
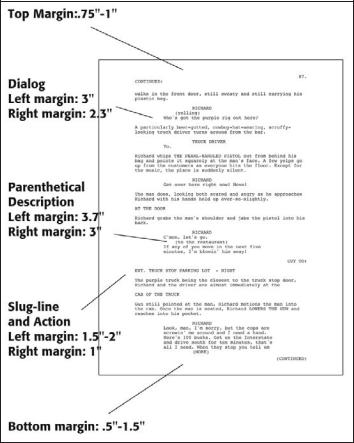
Standard screenplays are always typed in 12-point Courier with the margins shown in Figure 2.1.
Figure 2.1
Although measurements can vary, if you use the margins shown here, you’ll have a script formatted in “standard” screenplay format.
20 The Digital Filmmaking Handbook, 4E
Standard screenplay format has a number of other conventions as well. For example, if a scene continues from one page to the next, then “CONTINUED” is placed at the bottom of the first page. Similarly, if a character’s dialogue jumps to another page, then “MORE” is placed below the flowing dialogue. Through the years, screenplay conventions have been refined and standardized as a way of making script breakdown, budgeting, and scheduling much simpler. It’s safe to say that if your screenplay is not formatted according to standard conventions, no one in the film industry will read it. A poorly formatted screenplay is an instant indication of a very “green” screenwriter.
A Sample Screenplay
On the Chapter 2>Tutorials page of the companion Web site there is a copy of a scene from Richard III (Richard III.pdf ) presented in standard screenplay format. This document will let you see what a normal screenplay should look like. We’ll be using this script for many examples later in the book. The Richard III Cut.pdf is an alternate version of the scene that we’ll be looking at later.
Multi-Column Formats
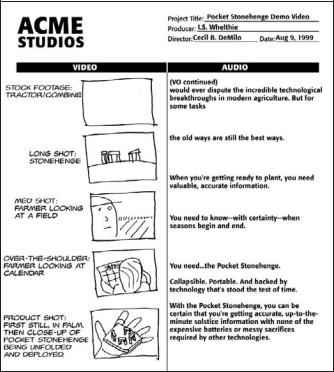
If you’re writing a script for a news, industrial, educational, corporate presentation, or advertising production, then you’ll most likely want to use a multi-column, A/V script format. (A/V is short for audio/video). Much simpler than screenplay format, A/V formats are ideal for planning and scripting live broadcasts, short subjects, and other multi-camera, multi-source shoots (see Figure 2.2).
Figure 2.2
A/V format scripts are divided into multiple columns. Shown here: one for the spoken text (either live talent or voice-over), and another showing simple sketches of any accompanying visuals.

Chapter 2 n Writing and Scheduling |
21 |
Sides
Sometimes it is useful to create “sides” for your talent, especially when recording dialogue or voiceover narration. “Sides” usually consist of one or two relevant pages pulled out of your script. Often, they only contain the actors’ lines, making it easier to read and giving the actor(s) more freedom to uniquely interpret the dialogue by removing stage directions that would otherwise dictate the performance.
Screenwriting Software
A whole range of writing software exists that not only makes it easy to render your scripts in standard screenplay format, but also provides some valuable tools for editing and restructuring your script.
Programs such as Final Draft, Celtz, and Final Draft A/V format your scripts as you write (Figure 2.3). Anyone who has tried to add all the MOREs and CONTINUEDs manually will find this one feature worth the investment.
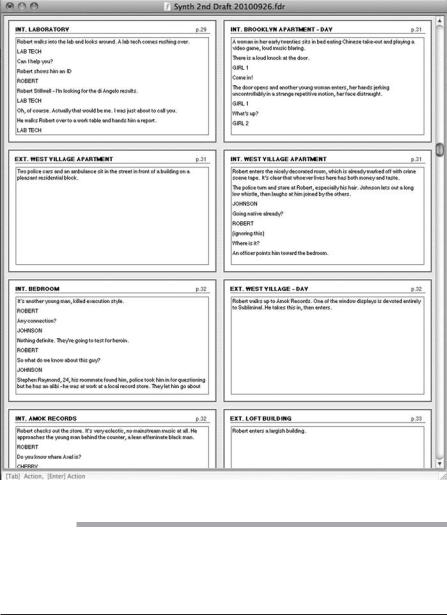
In addition to formatting, Final Draft provides a lot of automation. Character names can be entered by simply typing the first few letters of a name, and the program does a very good job of anticipating what the next character’s name will be, making it simple to type back-and-forth dialogue. Final Draft provides other utilities, including a Scene Navigator that lets you see your scenes as a series of index cards that can be easily rearranged (Figure 2.4).
Celtz is free and includes storyboarding and other movie project management tools. It is also possible to create your own template in Microsoft Word.
Figure 2.3
Final Draft provides a complete, automated screenplay-writing environment. Character names, scene locations, and other repeating elements can be automatically entered by the program. The Navigator (on the right) lets you jump from scene to scene within the script.
22 The Digital Filmmaking Handbook, 4E
Figure 2.4
Like many screenwriting programs, Final Draft includes a special mode that lets you view your script as a series of index cards, one per scene. In this mode, you can simply rearrange cards to restructure your script.
The Pitch
Unfortunately, you can’t expect your script to speak for itself. Most potential backers and crew members won’t have the time or patience to read an entire script, so you’ll have to win them over with a good pitch. The classic elevator pitch is a good guideline: pretend you get in an elevator with Steven Spielberg and have to pitch your movie in the time it takes for the elevator to reach his floor. For more on pitches, check out www.thedigitalfilmmakinghandbook.com/chapter2/pitching.pdf.