


394 The Digital Filmmaking Handbook, 4E
Non-Special Special Effects
Often, when you think of special effects, you think of giant dinosaurs or horribly “be-weaponed” space cruisers. However, you will probably find that most of your special effects needs fall into the simple, non-special realm such as the muzzle flashes and bullet holes we just created. As special effects hardware has grown less expensive, it has become reasonable to create digital effects for many tasks that used to be achieved practically.
Even relatively “simple” practical effects—such as gunfire—can quickly become expensive, even for a high-budget feature. Paul Verhoeven’s Starship Troopers, for example, used over 300,000 rounds of blank ammunition! With the effects power of the average desktop computer, it’s worth spending some time assessing whether some of your “normal” shots and effects might be cheaper to produce using computer-generated imagery.
Keying Tips
Getting a good key—no matter what type you’re using—has more to do with shooting good footage than postproduction tinkering. However, there are some things you can do to get better results from key footage. Consider the following when defining your keys:
nIt might take more than one. It’s okay to apply more than one key to an image. Because it can be difficult to light a blue-screen background evenly—particularly a large one— you’ll often find that the blue screen is darker around the edges than in the middle. In other words, the edges are a different shade of blue. Rather than adjusting the tolerance of a single key to include all the blue—a process that will most likely eliminate some of your foreground—use one key for the lighter blue around your subject and another key to eliminate the darker blue.
nTry mixing keys. There are some instances where you can use a chroma key to knock out a background and a very slight luma key to eliminate some of the leftover fringy weirdness. Because it’s easy to overlight the foreground when lighting your blue screen, an additional luma key can help remove halos around your subject.
nUse garbage mattes. Don’t worry about trying to key out areas that don’t contain a foreground element. Instead, mask those areas with a garbage matte. Most editing packages include a cropping tool or masking tool that lets you crop out unwanted sections of the frame easily (see Figure 17.21). For more complex garbage mattes, consider using an alpha channel (which we’ll get to shortly).
nUse better software. If the keying function in your editing or effects package isn’t doing a good enough job, or if your production depends on a lot of key effects, consider investing in some higher-quality keying software, such as Primatte Keyer by Red Giant Software. No matter what keying program you use, Red Giant’s Composite Wizard provides extraordinary filters for improving your composites. In addition to helping you remove fringes around your foreground elements, Composite Wizard can automatically match the overall color tones of your foreground and background. Composite Wizard can also add light to the edges of your foreground to make it look like your foreground element is affected by the lighting in your background plate.
Some chroma keying plug-ins and apps can use screen correction to improve the quality of their mattes. For screen correction to work, you’ll need to shoot an additional plate of your blue-screen set with full lighting but no foreground elements. The keying package can use this plate as a reference to pull a cleaner matte.
Chapter 17 n Titles and Effects |
395 |
|
|
|
|
|
|
|
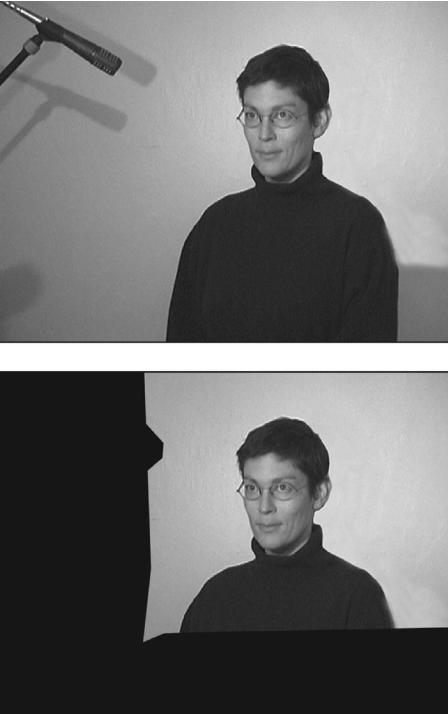
Figure 17.21
You’ll have an easier time keying out the background in this shot, if you first use a “garbage matte” to cut away the unwanted stuff around the edges of the frame.
396 The Digital Filmmaking Handbook, 4E
Mattes
Because it’s difficult to get a good composite using a key, and because it’s not always possible to hang a colored screen behind something during the shoot, you can also perform composites using a special type of mask called a matte. Akin to a stencil, a matte makes it possible for you to cut areas out of one layer of video (or a still) to reveal the layers below. For example, say you want to create a composite showing a giant tuna flying behind a building. Because you can’t hang a giant blue screen behind the building, you’ll need to use a matte inside your compositing program to knock out the background behind the building layer to reveal the giant flying tuna in the underlying layer.
In the old-fashioned film world, mattes used to be drawn by hand. Their purpose was to act as a stencil when inserted into a stack of film. For example, if you wanted to composite a shot of a model spaceship into a background that was shot on location, you would photograph film of the model spaceship against a blue background. Matte cutters would then go in and, by hand, black out the background of each frame of the model spaceship footage. Through a photographic process, a negative, or inverse, of the matte would be created. Next, the background and inverse matte plates would be stuck into a special machine called an optical printer. The optical printer would project the footage of the background onto a new piece of film, but the inverse matte would leave a perfect, spaceship-sized hole in the image. Before developing the piece of film, you would place the spaceship footage and the positive matte into the optical printer and project that onto the new piece of film. The spaceship would project into the hole left from the previous shot, while the matte would keep the background from being overexposed. Through this sandwich of film clips, you would have your final composite.
If that doesn’t sound complicated enough, consider what happens to color when it’s diffused through several layers of celluloid. Although that bright-red spaceship model might look great on your original film, after projecting light through it and several other pieces of film, its color will definitely change.
As a digital filmmaker, you don’t have to worry about such problems and, in most cases, you can have your software create a matte for you automatically. Best of all, your digital mattes can have varying degrees of opacity, rather than the simple stencil-like opacity of a practical matte.
Alpha Channels
Most of the time, color is stored in a digital still image or movie by splitting it into its component red, green, and blue parts, and storing each component in a separate channel. (For some print applications, color is stored using four channels: cyan, magenta, yellow, and black.) When viewed individually, each channel appears as an 8-bit grayscale image. When combined, these separate channels mix together to create a full-color, 24-bit image.
A fourth 8-bit grayscale channel, the alpha channel, can be added to an image or movie. Each pixel in the alpha channel specifies the level of transparency that will be used when compositing the image or video with something else. In other words, the alpha channel is like a stencil, but with the advantage that some areas can be defined as semitransparent.
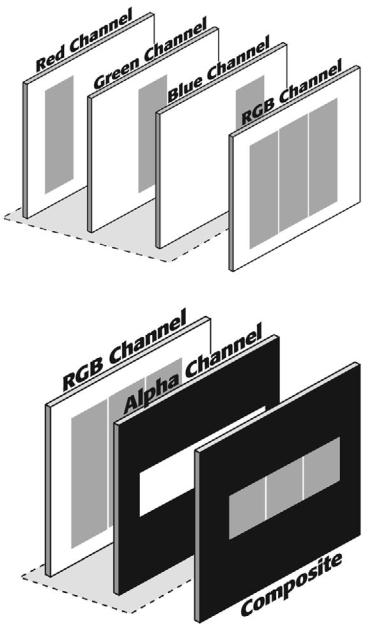
In Figure 17.22 (top), you can see how the different channels combine to create an image. The red, green, and blue channels are mixed together to create a full-color image. In Figure 17.22 (bottom), you can see how the alpha channel is then used to determine which parts of this full-color image will be opaque, and which will be transparent. If an area is transparent, underlying video or image layers will show through.
Chapter 17 n Titles and Effects |
397 |
Figure 17.22
In a normal color image, the red, green, and blue channels are combined to create a full-color image (top). If you add a fourth, “alpha” channel, then you can specify which full-color pixels will actually be seen and how opaque they will be (bottom).
Because each frame of your video includes its own alpha channel information, you can create animated alpha channels (also known as travelling mattes) that correspond to the action in your clip. Therefore, in the preceding example, our alpha channel would be animated to follow the movement of the spaceship.