

Chapter 17 n Titles and Effects |
371 |
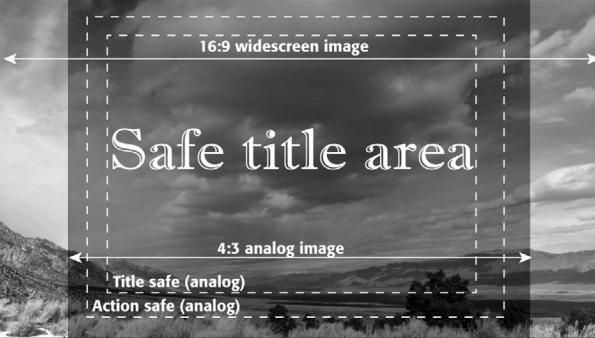
Safe Titles
Digital television doesn’t have the same limits that old school analog (aka NTSC or PAL) television does, but not everyone has a widescreen HD monitor and that means that most broadcasters, VOD distributors, and even Web sites still rely on the standard analog rules for safe titles and safe colors.
Action safe and title safe (see Figure 17.2) are guidelines for making sure that titles and action are visible on analog video monitors that are known for overscanning, or cropping, the image.
Because widescreen footage could get cropped to 4:3 on display, it is considered safest to keep your titles within the standard 4:3 title safe area (Figure 17.2). If you are positive that your project won’t be subject to the delivery requirements of a television network or video-on- demand distributor, you can safely go beyond the boundary of the 4:3 analog image; however, be aware that cropping at the edge of the image can occur on many HD monitors so it’s best to avoid positioning anything important too close to the edge of the screen.
Most editing applications provide an overlay of title safe and action safe guidelines to help you while you are building your titles.
Figure 17.2
Because there is always a chance that your widescreen image might get cropped on display, it’s best to keep your titles within the boundaries of a standard 4:3 analog image.
372 The Digital Filmmaking Handbook, 4E
WHAT TO WATCH
Be sure to watch other people’s titles. The next time you’re at the movies, consider how the director has used the title sequence. Many action movies, for example, skip titles altogether and “cut right to the chase,” so to speak. James Bond movies are famous for their elaborate title sequences that occur after an initial high-energy sequence. These sequences serve to bring the audience down from the chase-scene high to the typically more sedate “first” scene.
Some movies choose to superimpose their titles over initial, expository action. Jerry Maguire is a good example of this technique. Be careful, though. You don’t want to distract the audience from your exposition, and you don’t want to give short shrift to your titles.
At the opposite extreme from these approaches are the title sequences used by Woody Allen in most of his movies. Simple slates on a black background, these titles sequences are completely separate from the “main” presentation.
Although you might think we’re making rather a big deal out of something that can be very simple, don’t forget that every frame that you show the audience can—and usually does— carry some type of information about your story.
Tutorial
Create Your Main Title
No matter how minimal your project, you will want a main title at the beginning. In this tutorial, we’ll walk you through the basic steps of creating a main title card in your editing application. We used Adobe Premiere Pro, but you can use the software of your choice.
STEP 1: CREATE A PROJECT
Create a new project in Premiere with the DSLR 1080p24 preset (see Figure 17.3). Import the clip called “sundial.mov” from the Ch 17 folder on the Web site and drag it onto the timeline. From the title menu, select New > Default Still, and the title tool window will open up.
STEP 2: TYPE IN THE NAME OF YOUR MOVIE
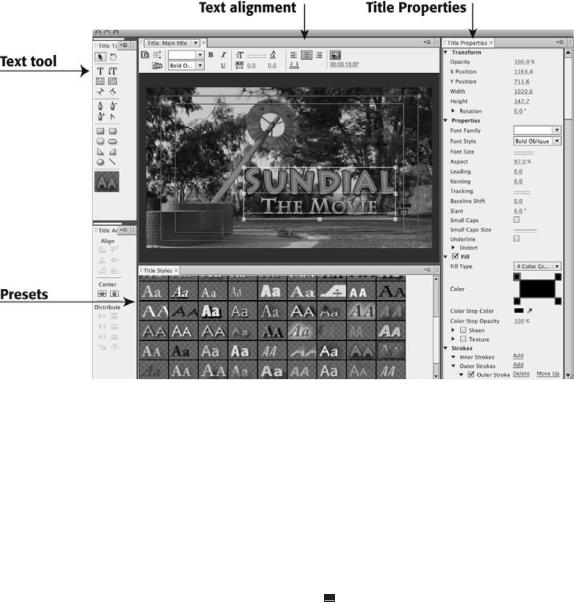
Click on the Text tool icon (upper left) and type in the name of your movie. You can either use the preset title styles in the menu below or you can set the typeface, font size, alignment, and other variables in the typeface settings at the top of the window (see Figure 17.4).
STEP 3: POSITION THE TYPE
With the arrow tool selected, you can position this outline by dragging it around the screen. (As a shortcut, you can hold down the Cmd key [Mac] or Ctrl key [Win] to temporarily change your cursor to the Move tool. When you let go, it will revert back.)

Chapter 17 n Titles and Effects |
373 |
Figure 17.3
Select the preset for “DSLR 1080p24” when you set up the project for this tutorial.
STEP 4: ADD SOME STYLE
Use the Title Properties window (refer to Figure 17.4) to select a fill color and add outlines or drop shadows. You can also make your text slightly transparent to have it blend in a little more with the background image. We chose to leave it at full opacity since the background image has a lot going on visually. We also enhanced the drop shadow and chose a brightly colored fill with a thin outline to further help the type stand out from the background (see Color Plate 36).
374 The Digital Filmmaking Handbook, 4E
Figure 17.4
The Adobe Premiere title tool window.
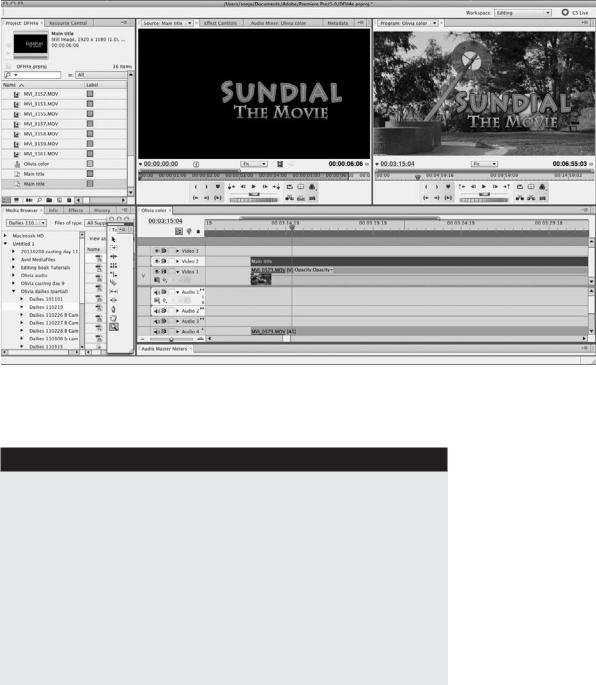
STEP 5: EDIT THE TITLE INTO YOUR TIMELINE
Close the title tool. You’ll now see the clip “Main title” in your Project window. Drag it onto Video track 2 in the timeline and position it over the video clip you added in step 1 (see Figure 17.5). You can use the Move tool to reposition it more precisely in the timeline. Just select the arrow in the tool bar and then go to the Program window and click and drag the title around until you are happy with the placement.
STEP 6: RENDER THE TITLE
Go to the sequence menu and select Render. That’s it—you’re done. You can add some dis-
solves if you want it to fade in and out. |
T |
Chapter 17 n Titles and Effects |
375 |
Figure 17.5
Position the title on the second video track in the timeline.
Making Titles for Film
If your final destination will be a film output, you will need to have your titles recorded from the digital files directly onto film, a process called film printing. You’ll need to create your titles at the proper aspect ratio, usually 1920 1080. Until the recent advent of HD, the standard film resolution for digital files was 2K per frame, or about 2020 1092 pixels for 1.85 theatrical release format 35mm. 2020 1092 seems bigger than 1920 1080, but it includes space for an optical sound track—about 200 pixels of the width—so the image resolution of 2020 1092 is actually about 1820 1090, a little less than 1920 1080. 2K still exists, but its usage is less and less common. There is another standard for film resolution, 4K, which is double the size of 2K and almost double the size of 1920 1080 HD. 4K is usually reserved for projects and formats that require a very high resolution, such as the IMAX film format.
Be sure to keep your titles within the TV safe guidelines, even though you’ll be creating files with a wider aspect ratio because it’s very likely that they’ll end up on a Standard Definition TV screen eventually. In some cases, you’ll have to create one set of titles for film and another for Standard Definition TV.
376 The Digital Filmmaking Handbook, 4E
Check Out the Advanced Titling Tutorials on the Web Site
We have several great tutorials on the Web site from previous editions of this book. If you’re serious about visual effects, be sure to work through them. They can be found at www.thedigitalfilmmakinghandbook. com/chapter17.
Motion Graphics Software
If special effects and compositing are central to your project, then you may want to consider using a third-party motion graphics application or a collection of plug-ins that’s compatible with your editing system. Titling and motion graphics applications run the gamut from simple character generators to full-blown animation apps that let you create 3D flying logos with photo-realistic lighting. If you need more visual effects power, consider one of these stand-alone software options:
nAdobe After Effects: After Effects is a full-blown, exceptional compositing program suitable for feature film effects work and advanced titling. With scores of third-party plug-ins available, After Effects is usually the application of choice for 2D visual effects artists and designers.
nApple Motion: Apple bundles a program called Motion with Final Cut Studio. It’s an excellent titling and motion graphics package. Offering easy-to-use titling, really cool particle effects, and excellent 3D motion control, Motion is particularly impressive for its ability to perform all of these tasks in real-time, making for a much simpler workflow when it comes time to tweak and refine your titles. Motion is even suitable for simple compositing tasks (see Figure 17.6).
Figure 17.6
Apple’s Motion provides an excellent motion graphics/titling application that gives you real-time control over your motion graphics.
In addition to these stand-alone apps, there are some truly great plug-ins out there, designed to work inside your favorite editing or motion graphics software, and the best thing about plug-ins is that they are often available individually for purchase, which means you don’t necessarily have to spend the money for a whole package that you won’t use much. What’s also great is that many plug-ins are compatible with standard editing applications so you can use them without having to change applications or workstations.