
- •CONTENTS
- •INTRODUCTION
- •1 Getting Started
- •Better, Cheaper, Easier
- •Who This Book Is For
- •What Kind of Digital Film Should You Make?
- •2 Writing and Scheduling
- •Screenwriting
- •Finding a Story
- •Structure
- •Writing Visually
- •Formatting Your Script
- •Writing for Television
- •Writing for “Unscripted”
- •Writing for Corporate Projects
- •Scheduling
- •Breaking Down a Script
- •Choosing a Shooting Order
- •How Much Can You Shoot in a Day?
- •Production Boards
- •Scheduling for Unscripted Projects
- •3 Digital Video Primer
- •What Is HD?
- •Components of Digital Video
- •Tracks
- •Frames
- •Scan Lines
- •Pixels
- •Audio Tracks
- •Audio Sampling
- •Working with Analog or SD Video
- •Digital Image Quality
- •Color Sampling
- •Bit Depth
- •Compression Ratios
- •Data Rate
- •Understanding Digital Media Files
- •Digital Video Container Files
- •Codecs
- •Audio Container Files and Codecs
- •Transcoding
- •Acquisition Formats
- •Unscientific Answers to Highly Technical Questions
- •4 Choosing a Camera
- •Evaluating a Camera
- •Image Quality
- •Sensors
- •Compression
- •Sharpening
- •White Balance
- •Image Tweaking
- •Lenses
- •Lens Quality
- •Lens Features
- •Interchangeable Lenses
- •Never Mind the Reasons, How Does It Look?
- •Camera Features
- •Camera Body Types
- •Manual Controls
- •Focus
- •Shutter Speed
- •Aperture Control
- •Image Stabilization
- •Viewfinder
- •Interface
- •Audio
- •Media Type
- •Wireless
- •Batteries and AC Adaptors
- •DSLRs
- •Use Your Director of Photography
- •Accessorizing
- •Tripods
- •Field Monitors
- •Remote Controls
- •Microphones
- •Filters
- •All That Other Stuff
- •What You Should Choose
- •5 Planning Your Shoot
- •Storyboarding
- •Shots and Coverage
- •Camera Angles
- •Computer-Generated Storyboards
- •Less Is More
- •Camera Diagrams and Shot Lists
- •Location Scouting
- •Production Design
- •Art Directing Basics
- •Building a Set
- •Set Dressing and Props
- •DIY Art Direction
- •Visual Planning for Documentaries
- •Effects Planning
- •Creating Rough Effects Shots
- •6 Lighting
- •Film-Style Lighting
- •The Art of Lighting
- •Three-Point Lighting
- •Types of Light
- •Color Temperature
- •Types of Lights
- •Wattage
- •Controlling the Quality of Light
- •Lighting Gels
- •Diffusion
- •Lighting Your Actors
- •Interior Lighting
- •Power Supply
- •Mixing Daylight and Interior Light
- •Using Household Lights
- •Exterior Lighting
- •Enhancing Existing Daylight
- •Video Lighting
- •Low-Light Shooting
- •Special Lighting Situations
- •Lighting for Video-to-Film Transfers
- •Lighting for Blue and Green Screen
- •7 Using the Camera
- •Setting Focus
- •Using the Zoom Lens
- •Controlling the Zoom
- •Exposure
- •Aperture
- •Shutter Speed
- •Gain
- •Which One to Adjust?
- •Exposure and Depth of Field
- •White Balancing
- •Composition
- •Headroom
- •Lead Your Subject
- •Following Versus Anticipating
- •Don’t Be Afraid to Get Too Close
- •Listen
- •Eyelines
- •Clearing Frame
- •Beware of the Stage Line
- •TV Framing
- •Breaking the Rules
- •Camera Movement
- •Panning and Tilting
- •Zooms and Dolly Shots
- •Tracking Shots
- •Handholding
- •Deciding When to Move
- •Shooting Checklist
- •8 Production Sound
- •What You Want to Record
- •Microphones
- •What a Mic Hears
- •How a Mic Hears
- •Types of Mics
- •Mixing
- •Connecting It All Up
- •Wireless Mics
- •Setting Up
- •Placing Your Mics
- •Getting the Right Sound for the Picture
- •Testing Sound
- •Reference Tone
- •Managing Your Set
- •Recording Your Sound
- •Room Tone
- •Run-and-Gun Audio
- •Gear Checklist
- •9 Shooting and Directing
- •The Shooting Script
- •Updating the Shooting Script
- •Directing
- •Rehearsals
- •Managing the Set
- •Putting Plans into Action
- •Double-Check Your Camera Settings
- •The Protocol of Shooting
- •Respect for Acting
- •Organization on the Set
- •Script Supervising for Scripted Projects
- •Documentary Field Notes
- •What’s Different with a DSLR?
- •DSLR Camera Settings for HD Video
- •Working with Interchangeable Lenses
- •What Lenses Do I Need?
- •How to Get a Shallow Depth of Field
- •Measuring and Pulling Focus
- •Measuring Focus
- •Pulling Focus
- •Advanced Camera Rigging and Supports
- •Viewing Video on the Set
- •Double-System Audio Recording
- •How to Record Double-System Audio
- •Multi-Cam Shooting
- •Multi-Cam Basics
- •Challenges of Multi-Cam Shoots
- •Going Tapeless
- •On-set Media Workstations
- •Media Cards and Workflow
- •Organizing Media on the Set
- •Audio Media Workflow
- •Shooting Blue-Screen Effects
- •11 Editing Gear
- •Setting Up a Workstation
- •Storage
- •Monitors
- •Videotape Interface
- •Custom Keyboards and Controllers
- •Backing Up
- •Networked Systems
- •Storage Area Networks (SANs) and Network-Attached Storage (NAS)
- •Cloud Storage
- •Render Farms
- •Audio Equipment
- •Digital Video Cables and Connectors
- •FireWire
- •HDMI
- •Fibre Channel
- •Thunderbolt
- •Audio Interfaces
- •Know What You Need
- •12 Editing Software
- •The Interface
- •Editing Tools
- •Drag-and-Drop Editing
- •Three-Point Editing
- •JKL Editing
- •Insert and Overwrite Editing
- •Trimming
- •Ripple and Roll, Slip and Slide
- •Multi-Camera Editing
- •Advanced Features
- •Organizational Tools
- •Importing Media
- •Effects and Titles
- •Types of Effects
- •Titles
- •Audio Tools
- •Equalization
- •Audio Effects and Filters
- •Audio Plug-In Formats
- •Mixing
- •OMF Export
- •Finishing Tools
- •Our Software Recommendations
- •Know What You Need
- •13 Preparing to Edit
- •Organizing Your Media
- •Create a Naming System
- •Setting Up Your Project
- •Importing and Transcoding
- •Capturing Tape-based Media
- •Logging
- •Capturing
- •Importing Audio
- •Importing Still Images
- •Moving Media
- •Sorting Media After Ingest
- •How to Sort by Content
- •Synchronizing Double-System Sound and Picture
- •Preparing Multi-Camera Media
- •Troubleshooting
- •14 Editing
- •Editing Basics
- •Applied Three-Act Structure
- •Building a Rough Cut
- •Watch Everything
- •Radio Cuts
- •Master Shot—Style Coverage
- •Editing Techniques
- •Cutaways and Reaction Shots
- •Matching Action
- •Matching Screen Position
- •Overlapping Edits
- •Matching Emotion and Tone
- •Pauses and Pull-Ups
- •Hard Sound Effects and Music
- •Transitions Between Scenes
- •Hard Cuts
- •Dissolves, Fades, and Wipes
- •Establishing Shots
- •Clearing Frame and Natural “Wipes”
- •Solving Technical Problems
- •Missing Elements
- •Temporary Elements
- •Multi-Cam Editing
- •Fine Cutting
- •Editing for Style
- •Duration
- •The Big Picture
- •15 Sound Editing
- •Sounding Off
- •Setting Up
- •Temp Mixes
- •Audio Levels Metering
- •Clipping and Distortion
- •Using Your Editing App for Sound
- •Dedicated Sound Editing Apps
- •Moving Your Audio
- •Editing Sound
- •Unintelligible Dialogue
- •Changes in Tone
- •Is There Extraneous Noise in the Shot?
- •Are There Bad Video Edits That Can Be Reinforced with Audio?
- •Is There Bad Audio?
- •Are There Vocal Problems You Need to Correct?
- •Dialogue Editing
- •Non-Dialogue Voice Recordings
- •EQ Is Your Friend
- •Sound Effects
- •Sound Effect Sources
- •Music
- •Editing Music
- •License to Play
- •Finding a Composer
- •Do It Yourself
- •16 Color Correction
- •Color Correction
- •Advanced Color Controls
- •Seeing Color
- •A Less Scientific Approach
- •Too Much of a Good Thing
- •Brightening Dark Video
- •Compensating for Overexposure
- •Correcting Bad White Balance
- •Using Tracks and Layers to Adjust Color
- •Black-and-White Effects
- •Correcting Color for Film
- •Making Your Video Look Like Film
- •One More Thing
- •17 Titles and Effects
- •Titles
- •Choosing Your Typeface and Size
- •Ordering Your Titles
- •Coloring Your Titles
- •Placing Your Titles
- •Safe Titles
- •Motion Effects
- •Keyframes and Interpolating
- •Integrating Still Images and Video
- •Special Effects Workflow
- •Compositing 101
- •Keys
- •Keying Tips
- •Mattes
- •Mixing SD and HD Footage
- •Using Effects to Fix Problems
- •Eliminating Camera Shake
- •Getting Rid of Things
- •Moving On
- •18 Finishing
- •What Do You Need?
- •Start Early
- •What Is Mastering?
- •What to Do Now
- •Preparing for Film Festivals
- •DIY File-Based Masters
- •Preparing Your Sequence
- •Color Grading
- •Create a Mix
- •Make a Textless Master
- •Export Your Masters
- •Watch Your Export
- •Web Video and Video-on-Demand
- •Streaming or Download?
- •Compressing for the Web
- •Choosing a Data Rate
- •Choosing a Keyframe Interval
- •DVD and Blu-Ray Discs
- •DVD and Blu-Ray Compression
- •DVD and Blu-Ray Disc Authoring
- •High-End Finishing
- •Reel Changes
- •Preparing for a Professional Audio Mix
- •Preparing for Professional Color Grading
- •Putting Audio and Video Back Together
- •Digital Videotape Masters
- •35mm Film Prints
- •The Film Printing Process
- •Printing from a Negative
- •Direct-to-Print
- •Optical Soundtracks
- •Digital Cinema Masters
- •Archiving Your Project
- •GLOSSARY
- •INDEX

Chapter 15 n Sound Editing |
325 |
Dedicated Sound Editing Apps
If after looking at your editing software, you decide that you need more audio editing power, then you’ll want to consider a dedicated audio editing application. There are several reasons why you might need more sound editing power.
Many editing apps only let you make cuts between individual frames, so if you need to make very precise edits, such as an edit at an interval that’s smaller than a single frame, or 1/30th of a second, you’ll need to move your audio out of your NLE and into a dedicated sound editing app.
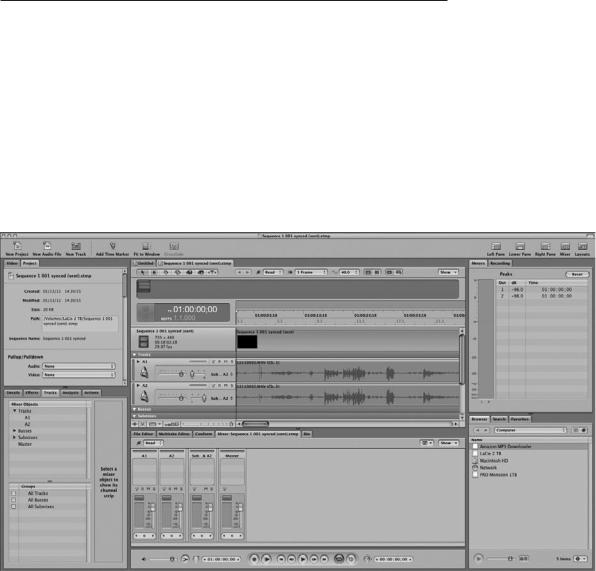
As with picture editing, audio editing can be a very tactile process. Feeling where a cut should fall, or “riding” a level or EQ adjustment, are processes where you often want a fine level of hands-on control. If you prefer such controls to a mouse-driven audio editing interface, then you should consider moving your audio to an application that provides better on-screen controls (see Figure 15.7), or even hardware consoles that can be attached to your computer.
Figure 15.7
Apple SoundTrack Pro comes bundled with Final Cut Studio and provides robust audio editing controls.
326 The Digital Filmmaking Handbook, 4E
Dedicated audio editors provide a number of other powerful features, such as the ability to define and label regions in an audio track. Regions allow you to label what each part of an audio waveform is, making it easier to spot locations for additional edits.
To select a digital audio application, you’ll want to consider many of the same questions introduced earlier. In addition, look for the following:
nHow does the app play back video? Many audio editing programs let you open a QuickTime movie for playback.
nDoes the app support the timecode you are using? Although timecode is not essential for performing outboard edits on small pieces of your audio, you’ll need it if you want to edit all your sound on a different software app or system (see the section “Moving Your Audio”). Many sound applications use timecode to synchronize their audio timeline to a QuickTime movie during the sound editing process.
nSupport for your editing app? Many sound editing apps work hand in hand with a picture editing app: Apple Final Cut Pro and SoundTrack Pro, Avid Media Composer and ProTools, Adobe Premiere Pro and Soundbooth. If you’re counting on exporting audio from your video editing app in the OMF format, make sure your sound editing app supports the same version of OMF. (For more about OMFs, see the section “Moving Your Audio.”)
nAre you editing in real-time? For easier editing, you’ll want an application that can apply effects in real-time. When making subtle EQ changes, for example, it’s preferable to have your audio editor continuously loop and play the sound so that you can hear changes as you make adjustments. Many applications can perform simple stereo effects in real-time. For other effects, and for real-time processing of additional tracks, you’ll need a system with special hardware.
nDo you have room for more hardware? If you opt for a system with special hardware, make sure that you have enough slots in your computer to support more expansion cards.
nDo you need surround sound capabilities? Some sound editing packages make it easy to create a five-channel surround sound mix that takes full advantage of the HD format. If you need surround sound, make sure that your software can handle it.
Obviously, if you’re not going to be performing your audio edits yourself, then software might not be a concern. If you will be hiring a professional audio house to create your final audio edit, or if your sound editor has her own audio hardware, then you will simply need to find out how to deliver your audio. You should also plan to deliver copies of all of your original audio material. That is, all of your video files if you shot sync sound, and all of your original audio files if you shot double-system sound. There’s no telling what your sound editor might need in the way of audio. Whether it’s re-recording a sound, or building an entirely new sound from other material on your tapes, to do her job well, your sound editor will need all of your source material.
Just as there are many video editing applications on the market, there are also many sound editing applications. If you only need basic audio editing capabilities, though, you can stick with the tools in your editing application. However, if you need a more robust toolset, applications like Avid ProTools and Apple SoundTrack Pro, are of the caliber used by professional sound designers, dialogue editors, and mixers. All of them can handle synchronized playback

Chapter 15 n Sound Editing |
327 |
of audio and video, support various types of timecode, import and export OMFs, real-time playback, and offer additional capabilities and performance through added hardware and software plug-ins.
Moving Your Audio
If you’re going to edit your audio outside of your editing application, you’ll need to move your audio—even if you’re just moving it from one app to another on the same computer—and moving audio can be tricky.
Exporting an OMF file is often the easiest way to move sounds around. OMF files let you save the tracks you laid out in your editing software’s timeline and can include audio levels settings, dissolves, and the audio media itself. However, OMF files come in a couple of different flavors: OMFs that only contain the timeline information, OMFs that contain the timeline and the level settings, OMFs that contain all of the aforementioned, and so on. Unfortunately, not all editing and sound editing apps are compatible with all the different types of OMFs, so be sure to check your software manufacturer’s specs and do a little testing to be certain everything works right. Generally, once you export an OMF file from your editing software, you’ll need to convert it to a project file that’s compatible with ProTools or whatever sound app you’re using.
If you need to perform a quick fix on a short, isolated piece of sound, then you can simply export your audio from your editing software in whatever format your sound app requires (AIFF, .WAV, SDII, and so on). Be sure to export at full quality so that the sound editor has a high-quality sound signal with which to work. In addition, no matter how you manipulate the piece of audio, you must take care to maintain the frame rate (usually 29.97fps, 24fps, or 23.978fps) and the audio sampling rate (usually 48kHz). This ensures that you’ll be able to import the new treated audio back into your editing project without losing sync.
If you want to re-edit all of the sound in your entire project, the easiest way to take it out is by using OMF, but you can also output split audio tracks to any standard digital audio file format (WAV, AIFF, etc.). Assuming you have a locked cut of your picture, you’ll have several tracks of sound that you edited along with the picture. By outputting each track to a separate file, and then importing each track separately in your sound editing app, you’ll be able to start polishing the sound with a decent rough cut of the sound already in place. You’ll need to make sure that the length of each track matches exactly the length of your final locked sequence in your editing project. Alternately, you can use sync marks, or 2-pops that match the countdown of your locked picture. 2-pops are a single frame of 60Hz audio reference tone cut into the countdown at the same frame that the two-second counter appears on-screen. Careful measures such as these to maintain sync are absolute necessities for this type of work—losing sync for an entire project is one of the worst things that can happen in post!
High-end sound editing apps such as ProTools work in tandem with a QuickTime video capture of the locked picture cut, so you’ll also need to export a viewing copy of your locked picture sequence with a countdown, including a sync mark if applicable. When you’re done editing the sound, you can reunite the polished audio in your video editing project. (You can find more about final mixes and audio outputs in Chapter 18.) As mentioned earlier, it’s crucial that you maintain the same frame rate and audio sampling ratio that you used in your video editing project if you want your project to stay in sync.