

Manual. V-Ray for Rhino
.pdfA R E N D E R I N G P L U G I N F O R D E S I G N E R S
By Chia Fu Chiang
and Damien Alomar
Table of Contents |
|
Install V-Ray for Rhino.................................................................... |
6 |
Activating V-Ray for Rhino................................................................ |
7 |
Before you Start Rendering............................................................... |
8 |
Understanding Default Settings.......................................................... |
9 |
Render Options............................................................................ |
10 |
Save and Load Option Settings |
|
Two ways to assign materials in V-Ray |
|
Material Editor............................................................................. |
14 |
Diffuse Layer |
|
Adding a new Material |
|
How to duplicate a material |
|
How to change the name of a material |
|
How to remove a material |
|
Others |
|
Material Usage............................................................................. |
18 |
Add Lights.................................................................................. |
20 |
The Characteristics of Rectangular Light............................................... |
23 |
Size does matter |
|
Shadows change according to the size |
|
Impact on reflective objects due to visible and invisible rectangle light |
|
Double Sided Option |
|
Material: Reflection Layer................................................................ |
26 |
Adding Reflection Layer |
|
Fresnel Reflections |
|
Reflections and Highlights................................................................ |
28 |
Other Parameters.......................................................................... |
29 |
Reflection Glossiness |
|
Reflection Filter |
|
Refraction Layer........................................................................... |
31 |
Add Refraction Layer |
|
Controlling the Amount of Transparency |
|
The color of refractive materials |
|
Fog Settings Explained |
|
Adjusting Refraction IOR |
|
The Glossiness of Refractive Materials |
|
Shadows of Refractive Materials |
|
Double-Sided Material |
|
Translucent Material |
|
Emissive Materials......................................................................... |
39 |
Add Emissive Layer |
|
Adjust the Intensity |
|
Adjust the Color |
|
Emissive Textures |
|
Texture Mapping........................................................................... |
43 |
Projection Types and Adjustments |
|
Bump Maps................................................................................. |
47 |
Displacement.............................................................................. |
49 |
Adding Displacement |
|
Displacement Parameters |
|
Adjusting Displacement |
|
Transparency Mapping.................................................................... |
51 |
What is Transparency Mapping |
|
How Transparency Mapping Works |
|
Another Method to create the same result |
|
Other uses for transparency mapping |
|
V-Ray Two-Sided Material................................................................. |
56 |
Adding a V-Ray Two-Sided Material |
|
Working with V-Ray Two-Sided Material |
|
V-Ray for Sketch Up Two-Sided Material................................................. |
57 |
Adding a V-Ray for Sketch Up Two-Sided Material |
|
Working with V-Ray for Sketch Up Two-Sided Material |
|
Environment Lighting..................................................................... |
58 |
Interior or Exterior? |
|
Techniques for adjusting illumination |
|
HDR Environment Light Source |
|
Bitmap Environment Light Source |
|
Environment Light source for semi-open space |
|
Choosing different Render Engines...................................................... |
66 |
Classification of Light Bounces |
|
Primary Engine: Irradiance Map |
|
Primary/Secondary Engine: Quasi Monte Carlo |
|
Secondary Engine: Light Cache |
|
Lighting Dialog Box........................................................................ |
73 |
Light and Shadow.......................................................................... |
74 |
The Quality of Shadow |
|
Radius for Shadow edge |
|
Adjusting the Camera..................................................................... |
75 |
Rotate the camera |
|
Adjusting the lens length |
|
Depth of Field.............................................................................. |
76 |
What is Depth of Field? |
|
How to find out the focal distance |
|
Size of Aperture |
|
Change focal distance |
|
Physical Camera........................................................................... |
79 |
Type of Camera |
|
Exposure |
|
Adjusting Exposure |
|
Using Aperture |
|
Using Shutterspeed |
|
Using ISO |
|
Adjusting White Balance |
|
Sun and Sky................................................................................. |
82 |
Using the Sun with the V-Ray Physical Camera |
|
Accessing the Sun Properties |
|
Exposing Your scene with the Physical Camera |
|
Adding the V-Ray Sky |
|
Time of Day and the Sun's appearance |
|
Changing the Sun's Appearance with Turbidity |
|
Changing the Sun's Appearance with Ozone |
|
Gamma Correction and the V-Ray Sun and Sky |
|
Enabling Gamma Correction |
|
Using Color Mapping with the V-Ray Sun |
|
Liquid inside Transparent Glass.......................................................... |
85 |
Strange Image |
|

Caustics.................................................................................... |
86 |
What are Caustics? |
|
Examples |
|
Color Mapping.............................................................................. |
88 |
The Function of Color Mapping |
|
Types of Color Mapping |
|
Adaptive Subdivision Control............................................................. |
89 |
Adaptive Subdivision Sampler |
|
Fixed Rate Sampler |
|
Adaptive QMC Sampler |
|
Mesh Settings.............................................................................. |
90 |
Setting Custom Render Mesh |
|
Resolution of the Image................................................................... |
91 |
Image size setting |
|
Saving your image |
|
V-Ray Frame Buffer........................................................................ |
92 |
Render image window toolbar |
|
Distributed Rendering..................................................................... |
93 |
Setting Up the V-Ray Distributed Rendering Spawner |
|
Finding the IP address of the slave Computer |
|
Starting the DR Spawner |
|
Connecting to Slave Machines |
|
Some Considerations for Distributed Rendering |
|
Sample Materials.......................................................................... |
95 |
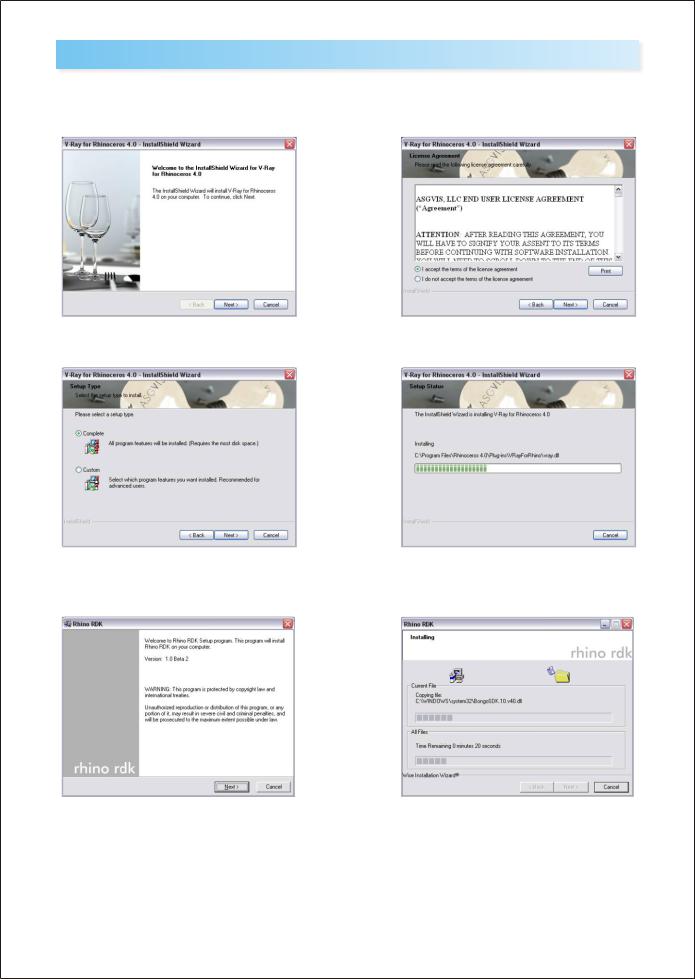
Installing V-Ray for Rhino
1. Make sure that Rhino is closed and begin the installation process.
3. Choose complete setup type, click next to continue
5. V-Ray now installs McNeel’s RDK which allows for added functionality. Click next to continue.
2. License Agreement, click next to continue.
4. Installing
6. RDK installing. After the installation of RDK the installation process will be complete
6 V-Ray for Rhino
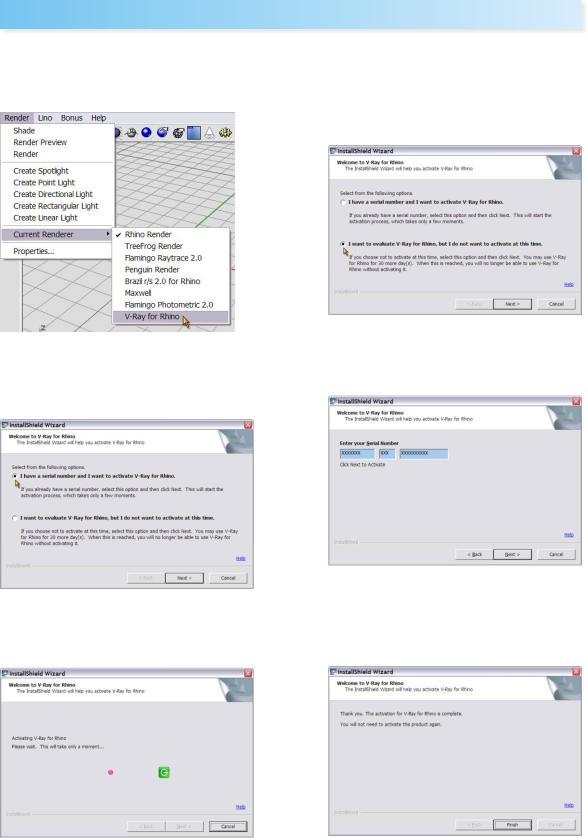
Activating V-Ray for Rhino
1. After finishing the installation, run the Rhino program. Click Render on the tool bar to choose the Current Renderer as V-Ray for Rhino.
3. If you already have a serial number, you can select the other option, “I have a serial number and I want to activate V-Ray for Rhino. Then click next.
5.Activating usually takes several seconds to finish.
2. The InstallShield Wizard will ask you to select one of the options. If you haven't purchased V-Ray for Rhino, you can choose “I want to evaluate V-Ray for Rhino, but I do not want to activate at this time.
4. Enter your serial number then click next. It will start activating.
6. The activation for V-Ray for Rhino is now complete. You will not need to activate it again when you start V-Ray for Rhino next time.
V-Ray for Rhino |
7 |
Before you start rendering with V-Ray for Rhino
When rendering an image with any rendering program, including V-Ray for Rhino, you must understand three main factors that will affect the image: Lighting, Materials, and Mapping. Lighting plays the most important role among these three. It will affect the color, shadow, reflection and refraction among every single object in the scene.
V-Ray for Rhino is a rendering engine equipped with Global Illumination (GI), which helps the users setup the lighting for entire scene easily. So they don't have to spend a lot of time adjusting lighting location and brightness.
The concept of GI is very simple. Imagine a room has a window but no light in it. The natural light from the outside of the room come in through the window so the room doesn't look completely dark even though there is no light in it. Some people even call this the “lazy boy lighting”. Its purpose is allowing the users have the most natural light possible but without spending too much of time to achieve it.
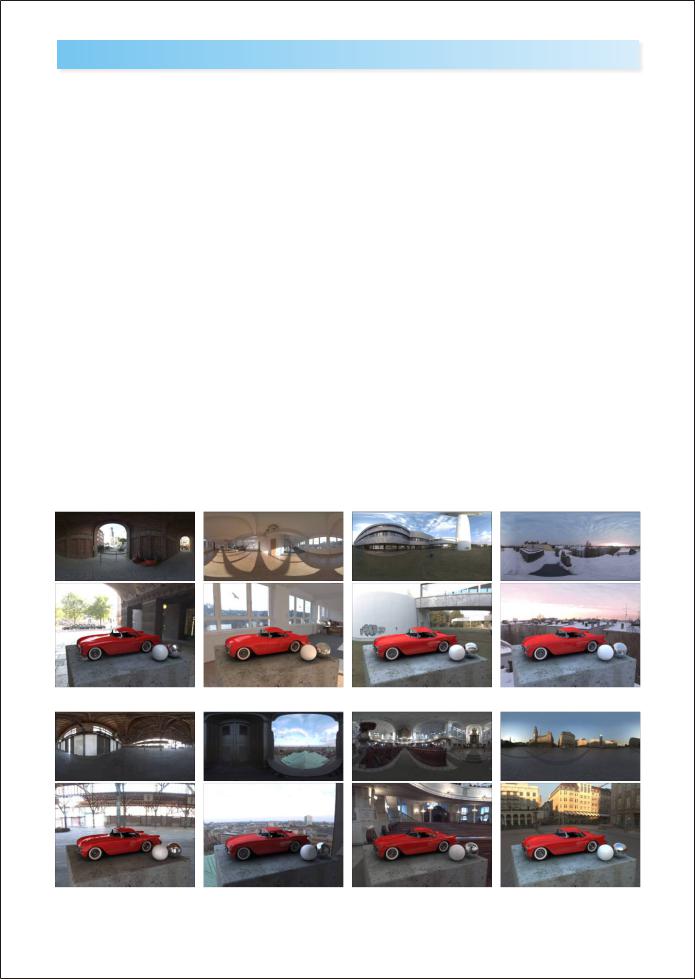
V-Ray for Rhino also supports High Dynamic Range values, also called HDRI (High Dynamic Range Image). With a normal 24bit, 8bit per channel RGB image (Low Dynamic Range Image), the brightest white color you can get is R255, G255 and B255. But this is still thousands times lower than what the sun light can produce. With the HDR file format, users can have more control ranging from dark to bright. The HDR is a very special image file format. It usually starts with professional 360 degree photography, then transforms to 96bit full scene image by using professional HDR software. The benefit of using HDR is that you can use this full scene image as your render light source. It also can be used as the back ground rendering.
V-Ray for Rhino also supports regular image file formats as light source for GI.
However, it is still limited when using HDR image format to describe the lighting environment. Together with other regular image file format simulated lighting environments, it usually being used only as supporting lighting for the entire scene. That means adjusting the setting of major light sources is still a very important work in V-Ray for Rhino. We will discuss more about how to use lighting, materials and mapping later.
(above HDR and renderings are supported by Dosch Design ) http://www.doschdesign.com
8 V-Ray for Rhino
Understanding V-Ray for Rhino’s Default Settings
Rendering with the Default Settings
The Default Options in V-Ray for Rhino are set up so that certain elements of V-Ray are already enabled. This is good because certain aspects that are specific to V-Ray are already configured with a proper setting. However there are a number of elements which are contributing to the final render, and it is important to know what they are so that unwanted results are avoided when we start adjusting the render options ourselves.
Key Elements in the Default Settings
There are three main elements specific to V- Ray that are creating some of the aspects of the default render. These elements are Indirect Illumination, the V-Ray Sun and Sky, and the V-Ray Physical Camera. These elements will be explained very briefly here, and you can reference other chapters in the book for a detailed explanation of these elements.
Indirect Illumination is simply light that does not come directly a light source. In V-Ray this typically references two types of light; Global
Illumination and Bounced light. Global Illumination is simply a dome of light that is emitted around the scene, and this can make setting up lighting very quick and easy. Bounced light is simply the light energy that is bounced from a surface. This bounced light is what allows V-Ray to create highquality renderings. For a more in depth explanation of Indirect Illumination please refer to page 66.
The V-Ray Sun and Sky is physically accurate lighting model allowing for easy recreation of the affects of the Sun and Sky. This is an excellent tool for setting up exterior renderings with a sun. Due to the nature of the model in which the sun and sky are based off of, you will find that under standard conditions the sun and sky will be extremely bright. Because of this the V-Ray Physical Camera is used to expose the scene and brings the rendered image to a desirable level.
The V-Ray Physical Camera is modeled after a real-world camera and can be used to expose a scene. In the real world, lighting is different in many situations, and because of this a photographer will use the capabilities of the camera to properly expose the image. Proper exposure means that the image is not overly bright or too dark. When creating renderings this gives us the opportunity to set our lighting as it would be in the real world (in this case it is the Sun and Sky) and adjust our camera settings until we achieve the desired result.
The detailed explanations of the Sun and Sky and the physical camera are on page 79 and 82.
V-Ray for Rhino |
9 |
Render Options for V-Ray for Rhino
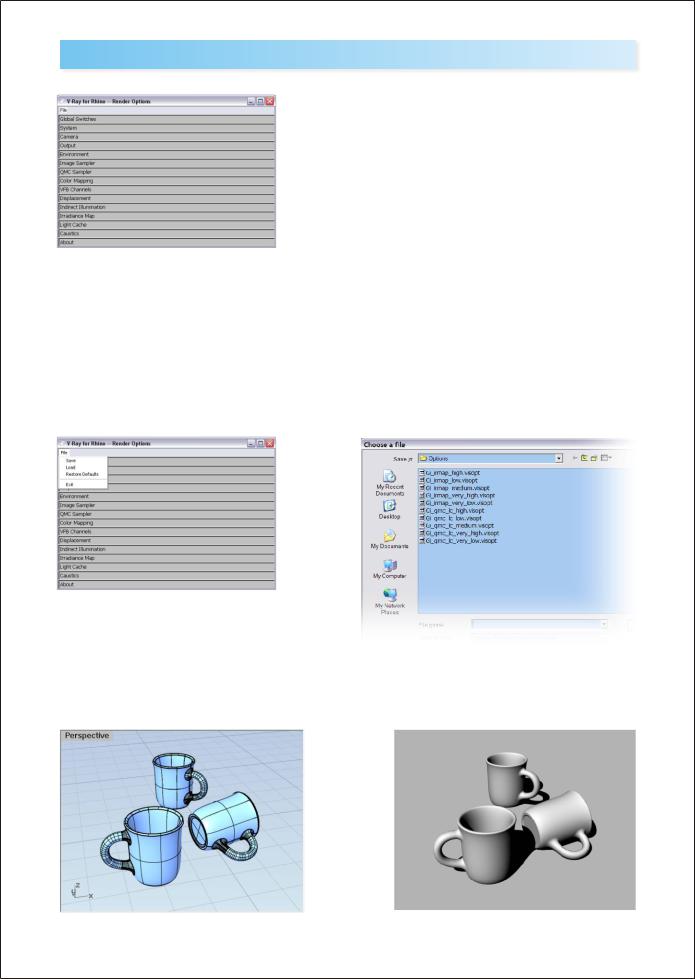
Open V-Ray for Rhino - - Render Options
The V-Ray for Rhino Options controls all rendering parameters. You can open this Render Options from tag above or click directly on the VRay Options.
Save and Load Option settings
There are many Options settings in V-Ray for Rhino. Users can save the current settings, or save different files according to different scenes, different render quality settings, or different render engines.
From File>Save to save Options setting. Use .visopt as the file format. It's about 2KB in file size. When the Rhino file is saved, all changes in V-Ray Options setting will also be saved.
Use File>Load to load saved .visopt Options files. It will replace the current settings. Use Restore Defaults to restore the original V-Ray settings.
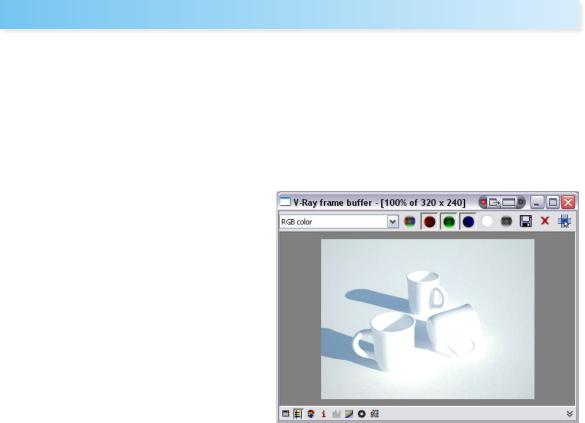
Open file Cups-Original.3dm. There are 3 cups and a very large floor in the file. All objects are not assigned to any material and there is no light in the scene as well. Please click the blue render icon from above directly and you will get this gray tone image without changing any setting in the V-Ray Options.
10 V-Ray for Rhino