

Manual. V-Ray for Rhino
.pdfTransparency Mapping
What's Transparency Mapping?
Transparency mapping is another method using Bitmap to create materials. The difference is that this is using alpha channel to get rid of unwanted part of the Bitmap, saving only the part covered by alpha channel. This is called a mask.
This is used mostly for creating product logos, stickers and numbers. Many users try to avoid using transparency mapping and model the actual object in the scene. Although you can ignore material settings by creating the actual model of objects, that will increase both the number of objects in the scene and the file size. The more objects you get, the longer the rendering time you would need.
You will get the result as left image if you apply the texture map directly without transparency map . The black background of the texture map is blocking part of the cup. The image on the right is rendered with transparency map.
Open Cup_Red.3dm. Here is the object and the transparency map that we will use to create our label.
You will get the result as left image if you apply the texture map directly without transparency map. The black background of the texture map is blocking part of the cup. The image on the right is rendered with transparency map.
V-Ray for Rhino |
51 |
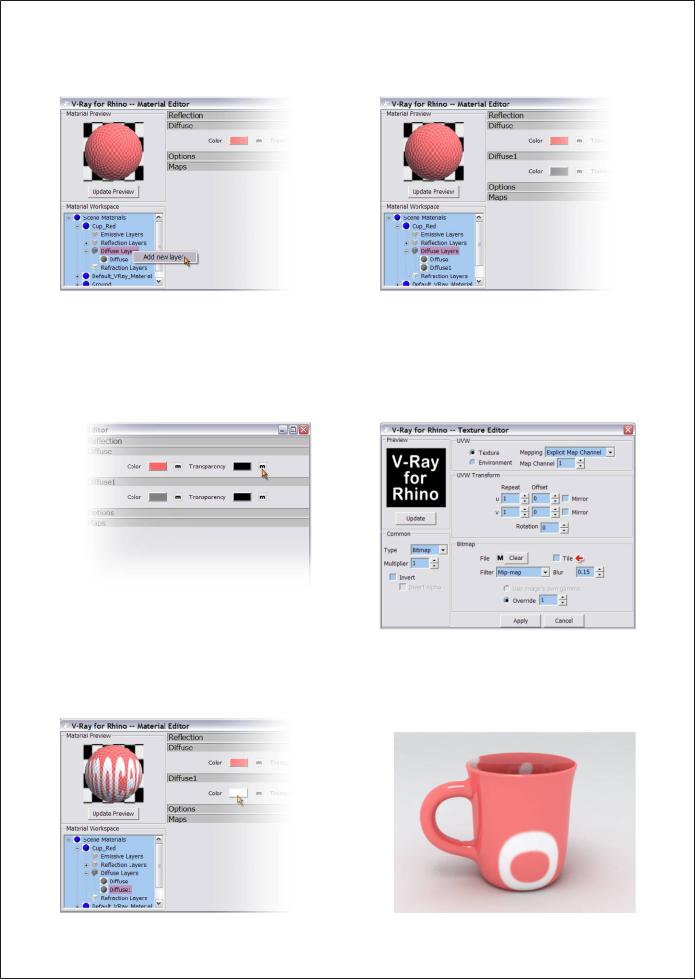
1. Click on the cup and open its Material Editor. Open Cup_Red; right click on Diffuse Layers to add a new layer and you will have the dialog window as image on the right. A Diffuse1 control panel is added under the Diffuse
2. Click on the “m” at the right of Transparency under Diffuse to enter the Texture Editor. Load the
Bitmap for Transparency texture map. Make sure you uncheck the Tile first to avoid repeating this
Bitmap on the object
Use Photoshop, PhotoImpact and similar image editing software to create black and white image and save as .bmp, .jpg or .png which are the formats accepted by V-Ray.
3. Use Diffuse1 color to edit the color for this Transparency map. Click on the “m” at the right of Color to add more texture to this map if needed.
Render it and will get image like below. The Transparency map is covering the entire cup. That's because there is no mapping applied to this cup yet.
52 V-Ray for Rhino
4.Under Properties>Mapping, add a new channel, change the projection type to Planar, and adjust the mapping widget's size and position as image showed below. If the Tile remains checked, it will render as the image on the right
How Transparency Mapping works
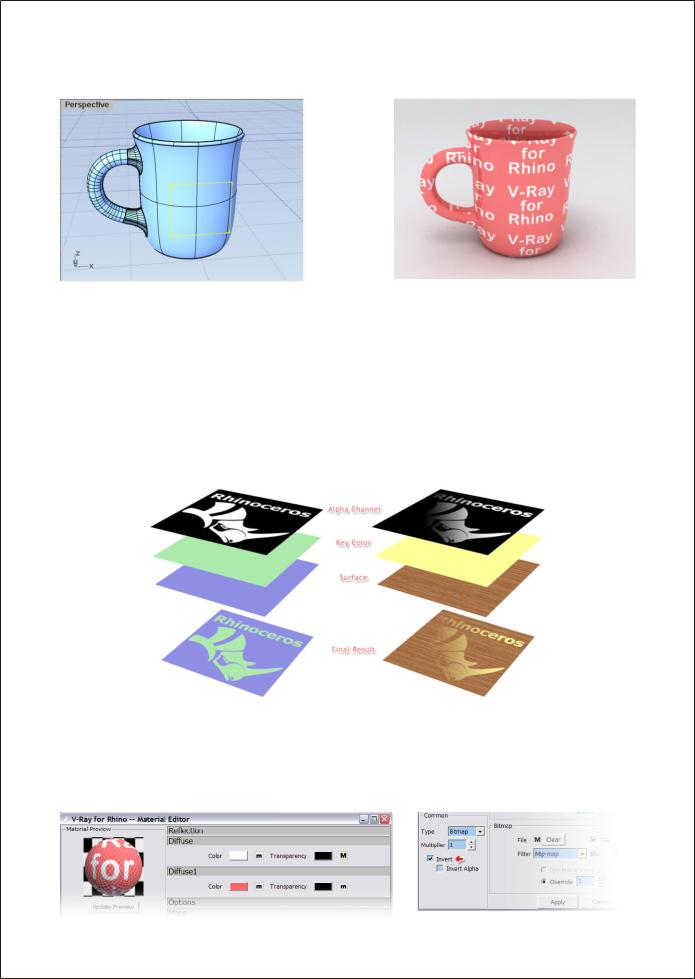
The diagram below depicts transparency mapping. The idea is using a grayscale image as mask, black area will not be penetrated and only white area will let light through, other gray area will then become translucent
The white area get the color assigned in Diffuse1 and end up showing on the surface of the object after rendered.
For the cup example above, after assign a mask to the Transparency, the red color of the cup is affected by the white area of the mask and no longer showing red. The second layer of the Diffuse1 color at the diagram below is used to cover the white area of the first layer.
Another method for creating the same result
Totally opposite from the method above, set the Diffuse to white, Transparency as mask, but switch the black and white area, and let the Diffuse1 color show up at the upper layer. Assign the Diffuse1 color to red and will get the same result as above after rendered
V-Ray for Rhino |
53 |

Other Uses for transparency mapping
There are many ways to use transparency map, not just used only for text mask as example before. Here are some more examples often used to create texture map. First is using a gradient Bitmap as the Diffuse Transparency mask, let the yellow color of Diffuse1 show up through the white area at the cup and create two gradient colors on the cup as image on the right. This is the better way then using a gradient Bitmap directly as the Diffuse texture because of its flexibility of changing the colors. You will have to make another Bitmap of different colors combination if the color need to be changed.
Second example is using other grayscale Bitmap as the transparency mask. Although it is not a gradient image, but they work exact the same. Rendered as image on the right.
Third example is adding another Diffuse2 layer, and assigns a 0 degree and a 180 degree gradient Bitmaps to Diffuse and Diffuse1 in Transparency. Give the Diffuse2 a third color to create this threecolor gradient rendering effect for the cup. Rendered image as right.
54 V-Ray for Rhino
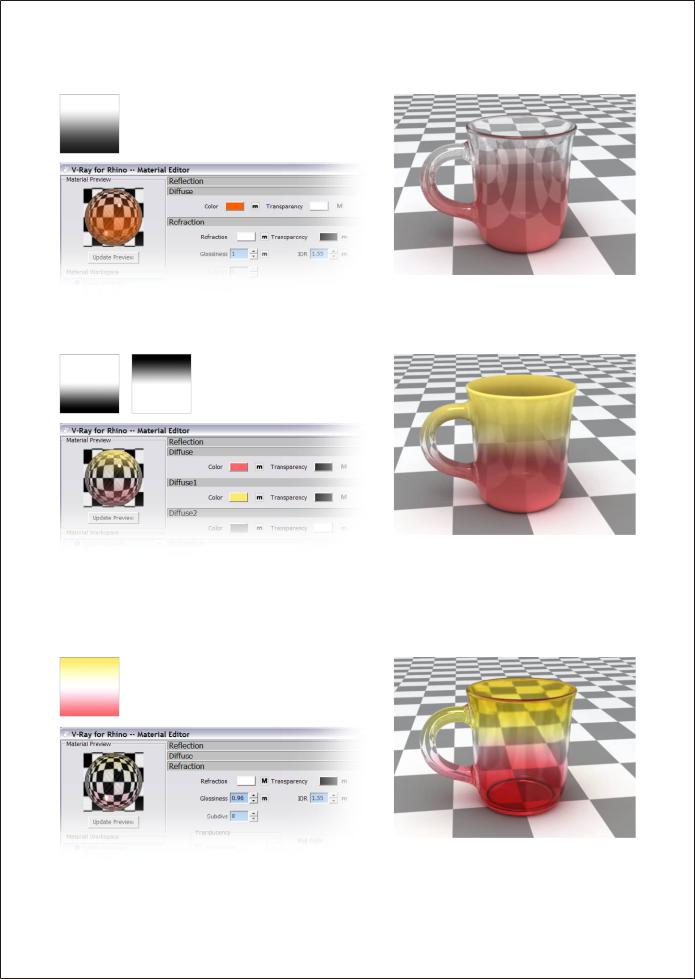
Forth example is to use gradient color in refractive material. Same as previous examples, use a gradient grayscale Bitmap as the Diffuse Transparency mask. Add a Refraction layer to create the half transparent and half opaque effect.
Fifth Example is the same as the Third one, only difference is adding a Refraction layer, and changes Transparency color of Diffuse2 to white. This will make the white area at the middle become transparent. Rendered image as on the right
The example above can not have the transparent quality at the top and bottom of the cup because of the black color in the grayscale gradient Bitmap. The last example here is to use a pre-made gradient Bitmap as the Refraction Transparency map. Set the Diffuse Transparency to a usual white, and then assign the Bitmap to Refraction under Refraction control panel, you will get the same result as the image shown on the right.
V-Ray for Rhino |
55 |

V-Ray Two-Sided Material
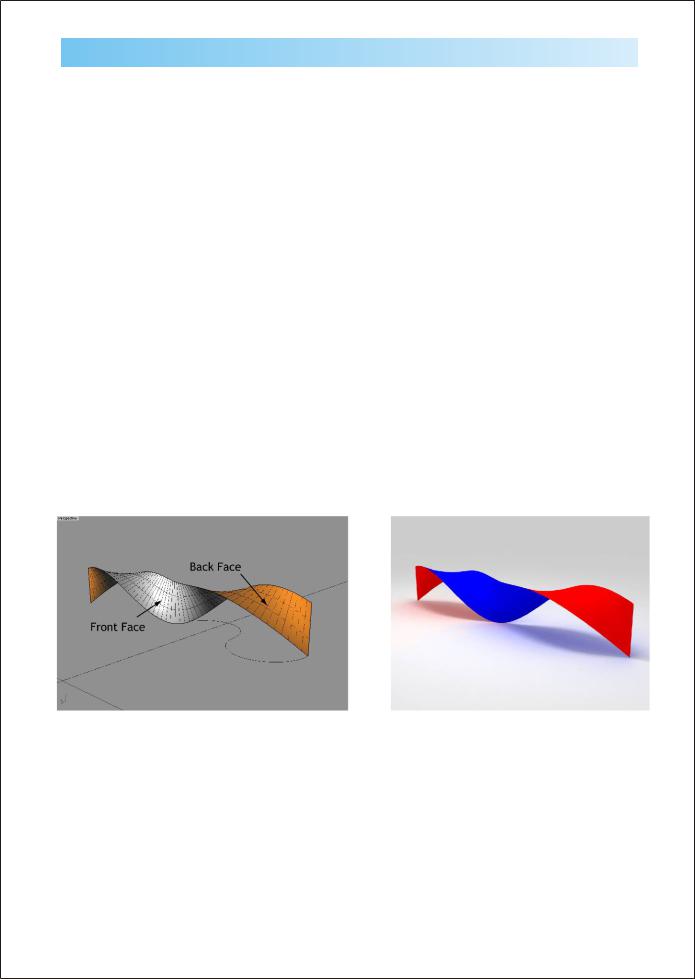
The V-Ray Two-Sided Material, or Vray2SidedMat as it appears in V-Ray for Rhino, is a material that allows easy creation of very thin translucent objects such as paper, lamp shades, or curtains. It works with the very simple controls so its much easier to control the result then using a translucent material, and it renders significantly faster as well. Due to the nature of this material it is actually best to have single surfaces rather than a solid, as you would need for any refractive material.
Adding a V-Ray Two-Sided Material
First we will need to add a Two sided material. Open the material editor and right-click on Scene materials and go to Add Material. This will in turn bring up another menu with several different material formats. Click on Vray2SdMat which is in the middle.
Working with V-Ray Two-Sided Material
Now that the Two-Sided Material has been added, we will expand the material and notice that this looks much different then the standard V-Ray material. This is because the Two sided material works with predefined materials. There are two slots, one for the front material and one for the back material, as well as color which will determine the ratio between the front and the back material.
You cannot actually create a new material once inside the Two-Sided material as it only works with predefined materials. When you click on the button for the front material, a dialog box will open up asking you to choose which material you would like to have be the front material. You must also define a material a material for both sides, but you can define the same material for both sides. If you don’t specify a material for either the front or the back, then Vray will assume that there is no material.
The color is how V-Ray determines the ratio of front material to back material. The color works with grayscale values, and produces the best results between 35-220. Colors on either end of
If you would like to recognize which faces are the front and which are the back, then you can configure backfaces to be a different color when they appear in the viewport. This can be configured by typing AdvancedDisplay into the command line and configuring the backface color in the desired display type.
56 V-Ray for Rhino
V-Ray for Sketch-Up Two-Sided Material
The V-Ray for Sketch-Up Two-Sided Material, or VraySkp2SidedMat as it appears in V-Ray for Rhino, is simply a material that allows for the front faces of a material to have a separate material than the back faces. It can be very useful when creating very quick conceptual renders when trying to convey ideas with minimal modeling. This tool developed out of Sketch-Up users’ desire to create a V-Ray material that would act with different materials as the standard SketchUp material does.
Adding a V-Ray for Sketch-Up Two-Sided Material
First we will need to add the Sketch-Up Two sided material. Open the material editor and rightclick on Scene materials and go to Add Material. This will in turn bring up another menu with several different material formats. Click on VraySkp2SdMat which is the last option.
Working with V-Ray for Sketch-Up Two-Sided Material
The Sketch-Up Two-Sided material looks very similar to the V-Ray Two-Sided material. It has two slots; one for the front material, and another for the back material. As with the V-Ray Two-Sided material the materials cannot be created from within the Two-Sided material, but must be already created in order to be added to either the front or the back material. Although it Is possible to utilize much of the features of the standard V-Ray material within the Sketch-Up TwoSided material, it is not recommended to use any refraction layers within materials used for the Two-Sided material. Unlike the V-Ray Two-Sided Material, which needs a material for each side, the Sketch-Up Two-Sided Material will work just fine without a material defined for each side. For whichever side does not have a material assigned, that side will not be rendered. This can be very useful for architectural visualization, and can be used to look inside rooms with the appearance of the wall still affecting the illumination of the enclosed environment.
V-Ray for Rhino |
57 |
Environment Lighting
Lighting plays the key role in the rendering process. You simply can't get a good rendering result without a good lighting environment.
Same as the real space lighting, light sources are divided into direct and indirect lighting. Direct lighting is using the light command to create Rectangular Light, Omni Light, Spot Light and Parallel Light and use directly on the object. Indirect lighting refers to any lighting which is from bouncing light, or an environment
Lets do a test
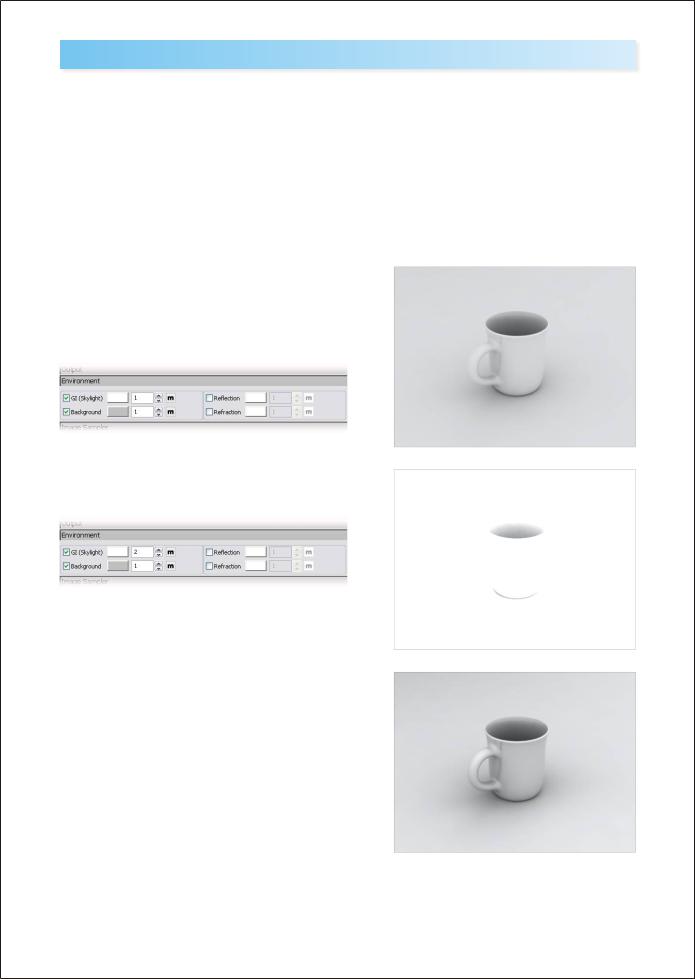
Open file: Cup Illumination-01.3dm, there is no any light in the scene. Light source is from Environment light.
1. So far the cup and ground are using the same Val230 off white color. Render it with GI default setting to 1 and get the result as image shown on the right.
2. Increase the GI value to 2 without changing the color, the result is shown on the right.
3. 01. Do not change the GI value and change the Brightness to Val127 under the Texture Editor. Render it again and the result is very close to the first image on the top.
The reason for doing this test is to let users understand the importance between lighting and material. Should the lighting be adjusted to accommodate material or should material be adjusted to accommodate lighting?
58 V-Ray for Rhino

It is clear from the previous example that the lighting must be adjusted to accommodate materials. With the second image from the previous test if we created another material and inserted into the scene, it would not render how we created it.
Here’s another example. Lets take the shirt that you’re wearing right now. What color is it? If you walked into a closet with no light, what would the color of your shirt be? The answer is that the color of your shirt would be the same, BUT it would appear different based on the lighting environment. This is why you should adjust your lighting to achieve the desired affect, as opposed to changing the materials.
With an incorrect lighting environment, such as the second part of the example on the previous page, it will be very hard to predict how your scene will react. When adding an new material, it will not look how it did when you created it, thus making it harder to achieve the original intended appearance for the material. Incorrect lighting also has an adverse affect on other aspects of your rendering and may affect shadows, reflections, and even make your rendering take longer than it should. Now you see why having a proper lighting solution is very important
Interior or Exterior?
When facing the task of illumination, separate it into interior illumination and exterior illumination. Here exterior means open space. For example, place an object on the ground without any wall surrounds it to block the light. It's easier to adjust illumination for open space. Interior means light source is blocked by wall or other similar objects in the scene, an enclosed space in which the environment light will not have the direct effect to the object. Or maybe some openings on the wall or windows allow part of environment light comes through them. Interior lighting is generally more complex than exterior lighting.
Image on the left shows open space illumination and image on the left shows the semi-open space illumination.
Image on the left shows the same semi-open space but add one more opening to the wall. The brightness increased due to second opening added to the wall. Image on the right shows different locations for openings also affect the brightness of the scene.
V-Ray for Rhino |
59 |
Techniques for adjusting illumination
Before render the scene, try to finish all the modeling as this greatly simplifies the task of adjusting the illumination. The number of objects, object location, material type, color and even size will all affect the illumination in some way.
When beginning to create the lighting solution it is important to have a solid base in which to begin evaluating how you will need to light your scene, as well as how it will react to lighting. With Vray this task is very easy because of how the environment light works. Basically with you’re environment color set to white (255,255,255) and the intensity set to 1, you should get a neutral lighting of your scene. This is useful in that it will allow you to properly assess the appearance of your materials, as well see if there are any areas of your scene which will naturally receive more or less light from the environment.
Now lets see this in action. Open file Cup-Illumination-01.3dm again. This is a easy open space example, there is no light added to the scene, and the Environment color and intensity are currently set to Val 255 and 1 respectively.
Using a white floor color is important as it will show the most amount of light that will effect the scene. This is because white allows the most amount of light energy to be retained after it bounces off a surface. With the white floor, we know that if we change its material to something that is darker, than we can expect a little less bounced light in our scene. In an exterior scene like this one the effect is minimal, but when creating an interior illumination solution this is an important thing to know
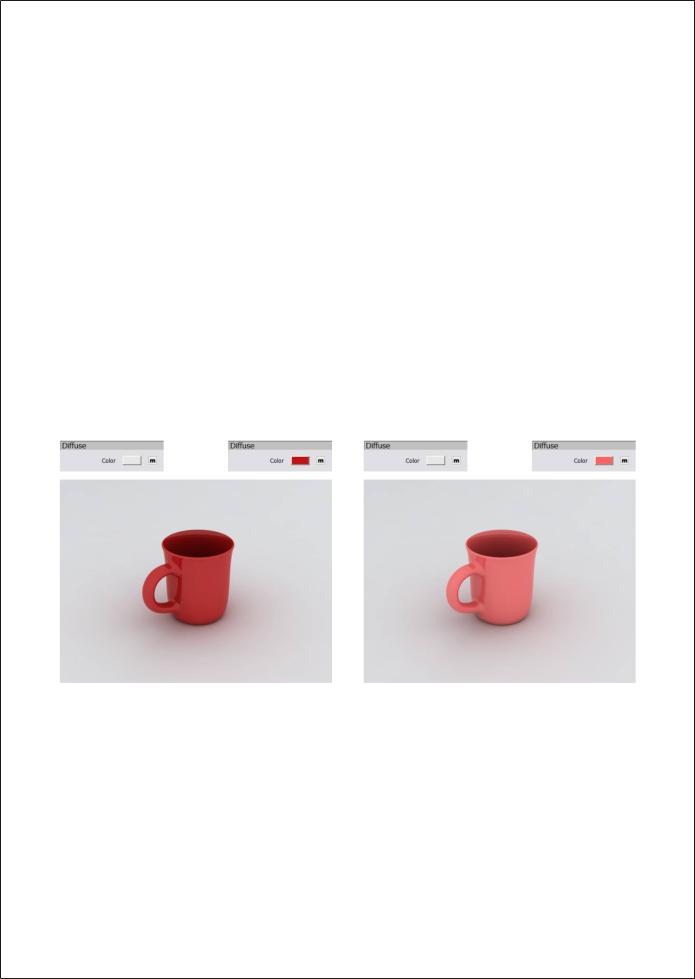
1. Assign the Val 230 color to floor, R191 G19 B19 |
2. Re-assign the R255 G100 B100 red color to the |
red color to cop first, render it and result as below. |
cup and render; you will get the result as below. |
From the two images above we can see the colors for the floor and cup are rendered very close to actual colors, which means the Environment lighting is set to correct intensity and brightness for creating good illumination. Otherwise, if the intensity is too strong, it will make the floor and cup appear brighter that the values that we set when we made the material.
Now that we have a good render we can begin the task of adding more lighting into the scene. Depending on what you are trying to create this may only required one additional light (the sun perhaps) or many lights. The important thing to remember is that the lighting must be balanced. Since we already have a scene which would become overly bright, or burned as it is sometimes called, if any additional light is added there must be a compromise between the different lights. In most cases this will mean that the environment intensity will be decreased, but the ratio between environment lights and other lights is something that you must determine. Try out different options; one where the environment light is stronger than other lights, and another where other lights are stronger than the environment.
60 V-Ray for Rhino