


Compiling and Uploading Programs • 19
means the pin will output 5 volts until further notice, and the LED connected to the pin will light up.
The program then calls delay and waits for 500 milliseconds doing nothing. During this pause, pin 13 remains in HIGH state, and the LED continues to burn. The LED is eventually turned off when we set the pin’s state back to
LOW using digitalWrite again. We wait another 500 milliseconds, and then the loop function ends. The Arduino starts it again, and the LED blinks.
In the next section, you’ll learn how to bring the program to life and transfer it to the Arduino.
Compiling and Uploading Programs
Before you compile and upload a program to the Arduino, you have to configure two things in the IDE: the type of Arduino you’re using and the serial port your Arduino is connected to. Since Arduino 1.6.0, the IDE tries to identify all Arduino boards that are connected to your computer automatically. This feature works quite well, but it also fails sometimes. So, you need to learn how to determine the type of your Arduino board and the name of the serial port it is connected to.
Identifying the Arduino type is easy, because it is printed on the board. Popular types are Uno, Duemilanove, Diecimila, Nano, Mega, Mini, NG, BT, LilyPad, Pro, or Pro Mini. In some cases, you also have to check what microcontroller your Arduino uses—most have an ATmega328. You can find the microcontroller type printed on the microcontroller itself. When you have identified the exact type of your Arduino, choose it from the Tools > Board menu.
Now you have to choose the serial port your Arduino is connected to from the Tools > Serial Port menu. On Mac OS X, the name of the serial port usually starts with /dev/tty.usbserial or /dev/tty.usbmodem. (On my MacBook Pro, it’s
/dev/tty.usbmodem24321.) On Linux systems, it should be /dev/ttyUSB0, /dev/ttyUSB1, or something similar, depending on the number of USB ports your computer has.
On Windows systems, you have to use the Device Manager to find out the right serial port. In the Device Manager, look for USB Serial Port below the Ports (COM & LPT) menu entry. (See Installing the Drivers for Current Arduino Boards, on page 11) Usually the port is named COM1, COM2, or something similar.
report erratum • discuss

Chapter 1. Welcome to the Arduino • 20
After you have chosen the right serial port, click the Verify button, and you should see the following output in the IDE’s message area (the Arduino IDE calls programs sketches):
Build options changed, rebuilding all
Sketch uses 1,030 bytes (3%) of program storage space. Maximum is 32,256 bytes. Global variables use 9 bytes (0%) of dynamic memory, leaving 2,039 bytes for
local variables. Maximum is 2,048 bytes.
This means the IDE has successfully compiled the source code into 1,030 bytes of machine code that we can upload to the Arduino. If you see an error message instead, check whether you have typed in the program correctly. (When in doubt, download the code from the book’s website.)16 Depending on the Arduino board you’re using, the byte maximum may differ. On an Arduino Duemilanove, it’s usually 14336, for example. Also, the size of the sketch might be slightly different depending on the version of the Arduino IDE.
Now click the Upload button, and after a few seconds, you should see the following output in the message area:
Sketch uses 1,030 bytes (3%) of program storage space. Maximum is 32,256 bytes. Global variables use 9 bytes (0%) of dynamic memory, leaving 2,039 bytes for
local variables. Maximum is 2,048 bytes.
This is exactly the same message we got after compiling the program, and it tells us that the 1,030 bytes of machine code were transferred successfully to the Arduino. In case of any errors, check whether you have selected the correct Arduino type and the correct serial port in the Tools menu.
During the upload process, the TX and RX LEDs will flicker for a few seconds. This is normal, and it happens whenever the Arduino and your computer communicate via the serial port. When the Arduino sends information, it turns on the TX LED. When it gets some bits, it turns on the RX LED. Because the communication is pretty fast, the LEDs start to flicker, and you cannot identify the transmission of a single byte. (If you can, you’re probably an alien.)
As soon as the code has been transmitted completely, the Arduino executes it. In our case, this means the status LED starts to blink. It turns on for half a second, then it turns off for half a second, and so on.
16. http://www.pragprog.com/titles/msard2
report erratum • discuss
What If It Doesn’t Work? • 21
The figure shows the activity on pin 5 V
13 while the program is running.
The pin starts in LOW state and doesn’t output any current. We use digitalWrite 0 V to set it to HIGH and let it output 5 volts
for 500 milliseconds. Finally, we set it back to LOW for 500 milliseconds and repeat the whole process.
That’s it! You’ve created your first physical computing project. You’ve written some code, and it makes the world brighter. Your very own digital version of “fiat lux.”17
Admittedly, the status LED doesn’t look spectacular. In Chapter 3, Building Binary Dice, on page 39, we’ll attach “real” LEDs to the Arduino.
You’ll need the theory and skills you’ve learned in this chapter for nearly every Arduino project. In the next chapter, you’ll see how to gain more control over LEDs, and you’ll learn how to benefit from more advanced features of the Arduino IDE.
What If It Doesn’t Work?
Choosing the wrong serial port or Arduino type is the most common mistake when doing the first experiments with an Arduino. If you get an error message such as “Serial port already in use” when uploading a sketch, check whether you have chosen the right serial port from the Tools > Serial Port menu. If you get messages such as “Problem uploading to board” or “Programmer is not responding,” check whether you have chosen the right Arduino board from the Tools > Board menu.
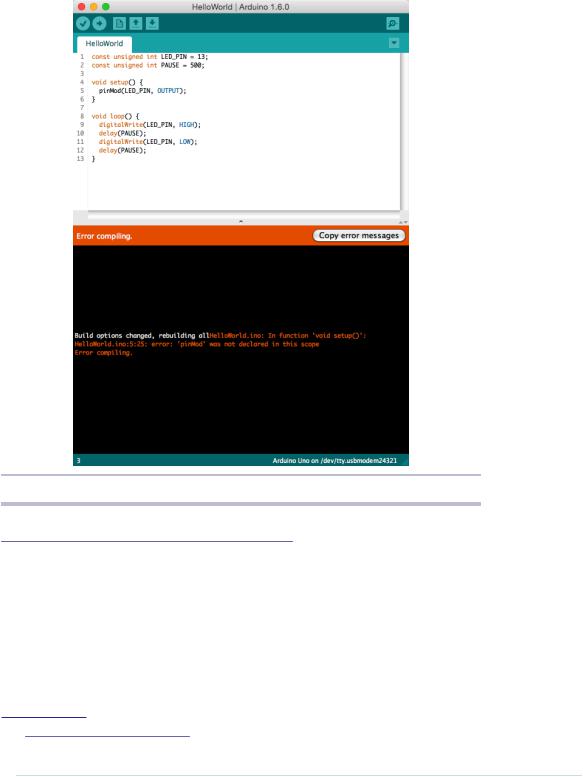
Your Arduino programs, like all programs, will contain bugs. The compiler will detect typos and syntax errors. Figure 6, The Arduino IDE explains syntax errors nicely, on page 22 shows a typical error message. Instead of pinMode, we called pinMod, and because the compiler didn’t find a function with that name, it stopped with an error message. The Arduino IDE highlights the line, showing the error with a yellow background, and prints a helpful error message.
Other bugs might be more subtle, and sometimes you have to carefully study your code and use some plain old debugging techniques. (In Debug It! Find,
17. http://en.wikipedia.org/wiki/Fiat_lux
report erratum • discuss
Chapter 1. Welcome to the Arduino • 22
Figure 6—The Arduino IDE explains syntax errors nicely.
Repair, and Prevent Bugs in Your Code [But09], you can find plenty of useful
advice on this topic.)
Exercises
•Try different blink patterns using more pauses and vary the pause length. (They don’t necessarily all have to be the same.) Also, experiment with very short pauses that make the status LED blink at a high frequency. Can you explain the effect you’re observing?
•Let the status LED output your name in Morse code.18
18.http://en.wikipedia.org/wiki/Morse_code
report erratum • discuss