


CHAPTER 10
Networking with Arduino
With a stand-alone Arduino, you can create countless fun and useful projects. But as soon as you turn the Arduino into a networking device, you open up a whole new world of possibilities.
You now have access to all of the information on the Internet, so you could turn your Arduino into a nice, geeky weather station simply by reading data from a weather service. You can also turn the Arduino into a web server that provides sensor data for other devices or computers on your network.
We’ll start with a “naked” Arduino that doesn’t have any network capabilities. As you’ll see, you can still attach it to the Internet and Tweet1 messages as long as you connect it to a PC.
For our second project, we’ll improve the situation dramatically with an Ethernet shield. Your Arduino will become a full-blown network device that can directly access IP services, such as a Daytime service. This will turn your Arduino into a very accurate clock.
The skills you learn in this chapter are the basis for more advanced techniques and the projects you’ll create in the next chapter.
1.http://twitter.com
report erratum • discuss
Chapter 10. Networking with Arduino • 164
What You Need
1.An Ethernet shield for the Arduino
2.A TMP36 temperature sensor
3.Some wires
4.A breadboard
5.An Arduino board, such as the Uno, Duemilanove, or Diecimila
6.A USB cable to connect the Arduino to your computer
Using Your PC to Transfer Sensor Data to the Internet
Remember when you connected your PC to the Internet, oh, around twenty years ago? It all started with a 38,400 baud modem, Netscape Navigator 3, and one of those AOL floppy disks or CD-ROMs you got in the mail. Today you probably have broadband access via cable, satellite, or DSL, and it’s probably available everywhere in your house via Wi-Fi. So, we’ll start by using your existing connection to connect your Arduino to the Internet.
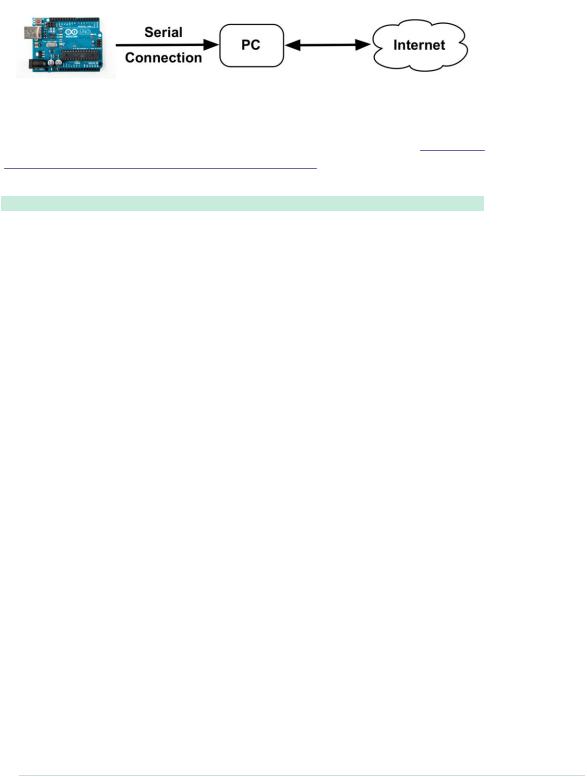
In the following figure, you can see a typical setup for connecting an Arduino to the Internet. A program runs on your PC and communicates with the Arduino using the serial port. Whenever the application needs Internet access, the program on the PC deals with it. Using this architecture, you can Tweet interesting sensor data.
report erratum • discuss
Using Your PC to Transfer Sensor Data to the Internet • 165
We’ll build a system that Tweets a message when the temperature in your working room or office exceeds a certain threshold—32 degrees Celsius (90 degrees Fahrenheit). Build the temperature sensor example from Increasing Precision Using a Temperature Sensor, on page 86, again (try to do it without looking at the circuit) and upload the following sketch to your Arduino:
Ethernet/TwitterTemperature/TwitterTemperature.ino
Line 1 #define CELSIUS
-const unsigned int TEMP_SENSOR_PIN = 0;
-const unsigned int BAUD_RATE = 9600;
-const float SUPPLY_VOLTAGE = 5.0;
5 void setup() {
-Serial.begin(BAUD_RATE);
-}
-
- void loop() {
10 const int sensor_voltage = analogRead(TEMP_SENSOR_PIN);
-const float voltage = sensor_voltage * SUPPLY_VOLTAGE / 1024;
-const float celsius = (voltage * 1000 - 500) / 10;
-#ifdef CELSIUS
-Serial.print(celsius);
15 Serial.println(" C");
-#else
-Serial.print(9.0 / 5.0 * celsius + 32.0);
-Serial.println(" F");
-#endif
20 |
delay(5000); |
- |
} |
|
This is nearly the same sketch we’ve used before. Keep in mind that you have |
|
to set SUPPLY_VOLTAGE to 3.3 in line 4 if you’re using an Arduino that runs with |
|
3.3V instead of 5V. |
|
We support both Celsius and Fahrenheit values now, and you can use a |
|
preprocessor constant to control which unit should be used. If you set the |
|
constant CELSIUS in the first line, the application outputs the temperature in |
|
degree Celsius. If you remove the first line or turn it into a comment line, the |
|
application will use Fahrenheit. |
|
To change the application’s behavior, we use the #ifdef preprocessor directive. |
|
It checks whether a certain preprocessor constant has been set, and then it |
report erratum • discuss

Chapter 10. Networking with Arduino • 166
compiles code conditionally. In our case, it will compile the Celsius-to- Fahrenheit formula in line 17 only if the constant CELSIUS has not been set.
Upload the sketch, and it will output the current temperature to the serial port every five seconds. Its output looks as follows:
27.15 C
26.66 C
27.15 C
What we need now is a program running on your PC that reads this output and Tweets a message as soon as the temperature is greater than 32 degrees Celsius (90 degrees Fahrenheit). We could use any programming language that is capable of reading from a serial port and that supports Twitter, but because Processing2 has excellent support for Twitter and the serial port, we’ll use it for this project.
 The Arduino and the Internet of Things (IoT)
Today for most people the Internet is a network of computers that can be used for looking up entertaining, useful, or interesting information. In recent years the nature of the Internet has changed tremendously. More and more autonomous and automated devices have joined the Internet. For many people it’s normal already to use a smartphone to surf the web, and in a not-too-distant future, devices such as toasters and refrigerators will be part of the Internet, too. This is the Internet of Things, where everyday objects are able to send and receive data over a network connection.
With the advent of cheap open-source hardware and sensors, web services for publishing sensor data have become popular over the past few years. Such services allow you to publish, read, and analyze sensor data. People from all over the world publish data from their weather stations, environmental sensors, and so on, and they make it available for free on the Internet.
These web services offer even more functions today and make it easy to turn an Arduino into a full-blown member of the Internet of Things—that is, you can integrate your Arduino with Google Mail, Facebook, eBay, and so on.
Popular services are Xivelya and Temboo.b In principle, they all work the same: you register an account, and you get back an API key. Then you can use this key to authenticate against the service and upload sensor data or use other functions of their API. Usually, these services also offer special Arduino libraries that help you to build your applications.
a.http://xively.com
b.https://www.temboo.com/
2.https://processing.org/
report erratum • discuss