


CHAPTER 13
Controlling Motors with Arduino
So far, we’ve created projects that have had an impact on the real world. We’ve made LEDs shine, and we’ve controlled devices using infrared light. In this chapter, we’ll create an even more intense experience: we’ll control motors that will actually move things. We won’t go so far as to build a full-blown autonomous robot, but we’ll create a small device that does something useful and funny.
First, though, you’ll learn about the basics of different motor types and their pros and cons. Today you can choose from a variety of motor types for your projects, and this chapter starts with a brief description of their differences.
We’ll concentrate on servo motors, because you can use them for a wide range of projects and they’re cheap and easy to use. You’ll learn to use the Arduino servo library and to control a servo using the serial port.
Based on these first steps, we’ll then build a more sophisticated project. It’s a blaming device that uses nearly the same hardware as the first project in the chapter but more elaborate software. You’ll probably find many applications for it in your office!
What You Need
1.A servo motor, such as the Hitec HS-322HD
2.Some wires
3.A TMP36 temperature sensor (it’s optional, and you need it only for the exercises)
4.An Arduino board, such as the Uno, Duemilanove, or Diecimila
5.A USB cable to connect the Arduino to your computer
report erratum • discuss
Chapter 13. Controlling Motors with Arduino • 226
Introducing Motors
Depending on your project’s needs, you can choose from a variety of motors. For hobby electronics, you’ll usually use DC motors, servo motors, or stepper motors. (In the following figure, you see a few different types of motors.) They differ mainly in speed, precision of control, power consumption, reliability, and price.
Figure 31—Motor types from left to right: standard servo, continuous rotation servo, stepper, DC motor
DC motors are fast and efficient, so you can use them in drill machines, electric bicycles, or remote-control cars. You can control DC motors easily, because they have only two connectors. Connect one to a power supply and the other to ground, and the motor will start to spin. Swap the connections, and the motor will spin the other direction. Add more voltage, and the motor will spin faster; decrease voltage, and it will spin slower.
DC motors aren’t a good choice if you need precise control. In such cases, it’s better to use a stepper motor, which allows for precise control in a range of 360 degrees. Although you might not have noticed it, you’re surrounded by stepper motors. You hear them when your printer, scanner, or disk drive is at work. Controlling stepper motors isn’t rocket science, but it is more complicated than controlling DC motors and servos.
Servo motors are the most popular among hobbyists, because these motors are a good compromise between DC motors and steppers. They’re affordable, reliable, and easy to control. You can move standard servos only in a range
report erratum • discuss
First Steps with a Servo Motor • 227
of 180 degrees, but that’s sufficient for many applications. With continuous rotation servos, you can increase the range to 360 degrees, but you lose the ease of control.
In the next section, you’ll learn how easy it is to control standard servo motors with an Arduino.
First Steps with a Servo Motor
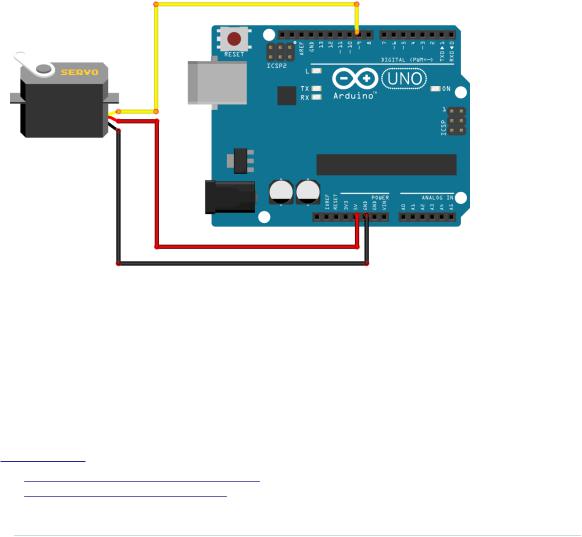
The Arduino IDE comes with a library for controlling servo motors that we’ll use for our first experiments. The following figure shows a basic circuit for connecting an Arduino to a servo motor. Connect the ground wire to one of the Arduino’s GND pins, connect power to the Arduino’s 5V pin, and connect the control line to pin 9.
Please note that this works only for a 5V servo! Many cheap servos use 9V, and in that case you need an external power supply, and you can no longer connect the servo to the Arduino’s 5V pin. If you have a 9V servo, attach an external power supply, such as an AC-to-DC adapter or a DC power supply, to your Arduino’s power jack. Then connect the servo to the Vin pin.1 You should also check the specifications of your Arduino board. For example, you should not use an Arduino BT2 to control motors, because it can only handle a maximum of 5.5V.
1.http://www.arduino.cc/playground/Learning/WhatAdapter
2.http://arduino.cc/en/Main/ArduinoBoardBluetooth
report erratum • discuss
Chapter 13. Controlling Motors with Arduino • 228
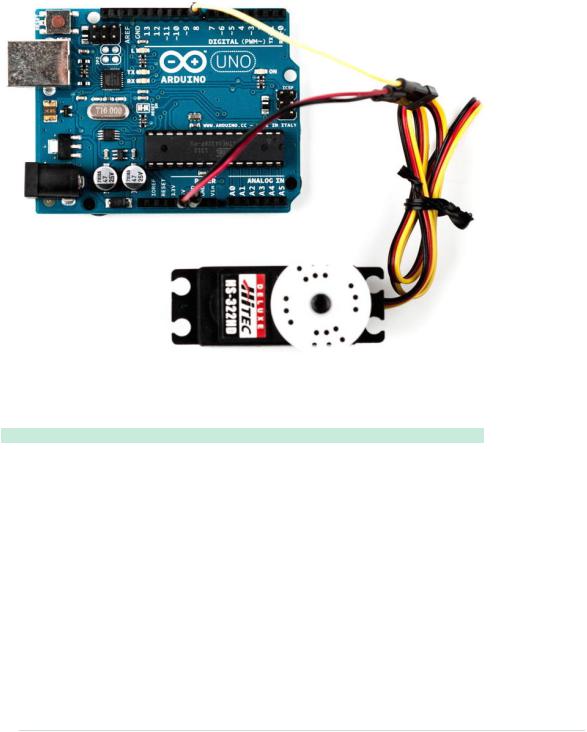
Here’s a picture of a servo motor connected to an Arduino using wires. You can also use pin headers, but wires give you more flexibility.
|
Controlling servo motors is convenient, because you can set the motor’s shaft |
|
to an angle between 0 and 180. With the following sketch, you can send a |
|
degree value via the serial port and move the servo motor accordingly: |
|
Motors/SerialServo/SerialServo.ino |
Line 1 |
#include <Servo.h> |
- |
|
-const unsigned int MOTOR_PIN = 9;
-const unsigned int MOTOR_DELAY = 15;
5 |
const unsigned int SERIAL_DELAY = 5; |
- |
const unsigned int BAUD_RATE = 9600; |
- |
|
- |
Servo servo; |
- |
|
10 |
void setup() { |
-Serial.begin(BAUD_RATE);
-servo.attach(MOTOR_PIN);
-delay(MOTOR_DELAY);
-servo.write(1);
15 |
delay(MOTOR_DELAY); |
- |
} |
- |
|
report erratum • discuss

First Steps with a Servo Motor • 229
-void loop() {
-const unsigned int MAX_ANGLE = 3;
20 char degrees[MAX_ANGLE + 1];
-
-if (Serial.available()) {
-int i = 0;
-while (Serial.available() && i < MAX_ANGLE + 1) { 25 const char c = Serial.read();
-if (c != -1 && c != '\n')
-degrees[i++] = c;
-delay(SERIAL_DELAY);
-}
30 degrees[i] = 0;
-int value = atoi(degrees);
-if (value == 0)
-value = 1;
-Serial.print(value);
35 Serial.println(" degrees.");
-servo.write(value);
-delay(MOTOR_DELAY);
-}
-}
We include the Servo library, and in line 8, we define a new Servo object. In the setup function, we initialize the serial port, and we attach the Servo object to the pin we have defined in MOTOR_PIN. After that, we wait for 15 milliseconds so the servo motor has enough time to process our command. Then we call write to move the servo back to 1 degree. We could also move it back to 0 degrees, but some of the servos I’ve worked with make some annoying noise in this position.
The main purpose of the loop function is to read new degree values from the serial port. These values are in a range from 0 to 180, and we read them as ASCII values. So, we need a string that can contain up to four characters. (Remember, strings are null-terminated in C.) That’s why we declare the degrees string with a length of four in line 20.
Then we wait for new data to arrive at the serial port and read it character by character until no more data is available or until we have read enough. We terminate the string with a zero byte and print the value we’ve read to the serial port. Finally, we convert the string into an integer value using atoi and pass it to the write method of the Servo object in line 36. Then we wait again for the servo to do its job.
Compile and upload the sketch, then open the serial monitor. After the servo has initialized, send some degree values, such as 45, 180, or 10. See how the
report erratum • discuss