

Chapter 12. Creating Your Own Universal Remote Control • 202
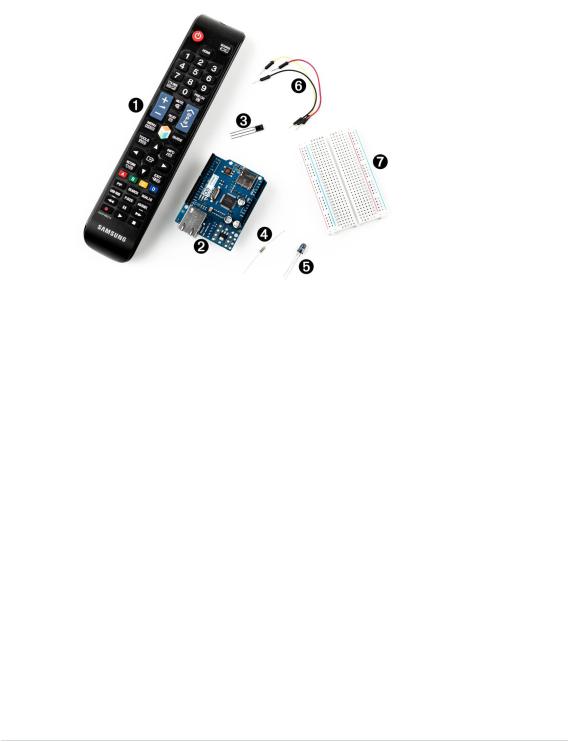
What You Need
1.One or more infrared remote controls. They can be from your TV set or your DVD player, for example.
2.An Ethernet shield for the Arduino.
3.An infrared receiver, such as the PNA4602 or the TSOP38238.
4.A 100Ω resistor.
5.An infrared LED.
6.Some wires.
7.A breadboard.
8.An Arduino board, such as the Uno, Duemilanove, or Diecimila.
9.A USB cable to connect the Arduino to your computer.
Understanding Infrared Remote Controls
To wirelessly control a device such as a TV set, you need a sender and a receiver. The receiver usually is built into the device to be controlled, and the sender is part of a separate remote control. Although you can choose from a variety of technologies, such as Bluetooth or Wi-Fi, most modern remote controls still use infrared light for communication.
Using infrared to transmit signals has several advantages. It is invisible to human beings, so it won’t bother you. Also, you can generate it cheaply with infrared LEDs that can be integrated easily into electronic circuits. So, for
report erratum • discuss

Grabbing Remote Control Codes • 203
many purposes, such as controlling devices in a typical household, it’s an excellent choice.
But infrared also has some drawbacks. It doesn’t work through walls or doors, and the distance between the remote control and the operated device is fairly limited. Even more importantly, the infrared signal is subject to interference from other light sources.
To keep possible distortions caused by other light sources to a minimum, the infrared signal has to be modulated. That means you turn the LED on and off at a certain frequency, usually somewhere between 36 kHz and 40 kHz.
That’s one of the problems that complicates building a robust infrared remote control. The biggest problem is that vendors have invented countless incompatible protocols. They all use different frequencies, and they all interpret data differently. Some interpret “light on” as a 1 bit, while others treat it as 0, and they all define their own commands that have different lengths. So, to work successfully with different remote control protocols, you need to know how to obtain all of these properties for a specific remote control.
To get this information, we’ll take a pragmatic approach. In the next two sections, you’ll learn how to read infrared signals from a commercial-grade remote control, and you’ll also learn how to reproduce them.
Grabbing Remote Control Codes
Because remote controls from different vendors rarely use the same protocol or even the same commands, before we start sending remote control codes ourselves, we should know what we have to send to achieve a certain result. We have to get as much information as possible about the remote control we’d like to emulate.
We have two options for obtaining remote control codes for a specific device: we could use a remote control database on the Internet, such as the Linux Infrared Remote Control project,1 or we could use an infrared receiver to read them directly from our device’s remote. We’ll choose the latter approach because you can learn a lot from it.
Infrared receivers are fairly complex on the inside, but they’re easy to use. They automatically observe the infrared light spectrum at a certain frequency (usually between 36 kHz
and 40 kHz), and they report their observations using a single pin. So, when
1.http://www.lirc.org/
report erratum • discuss
Chapter 12. Creating Your Own Universal Remote Control • 204
you’re using such a receiver, you don’t have to deal with all the complicated transmission details. You can focus on reading and interpreting the incoming signals.
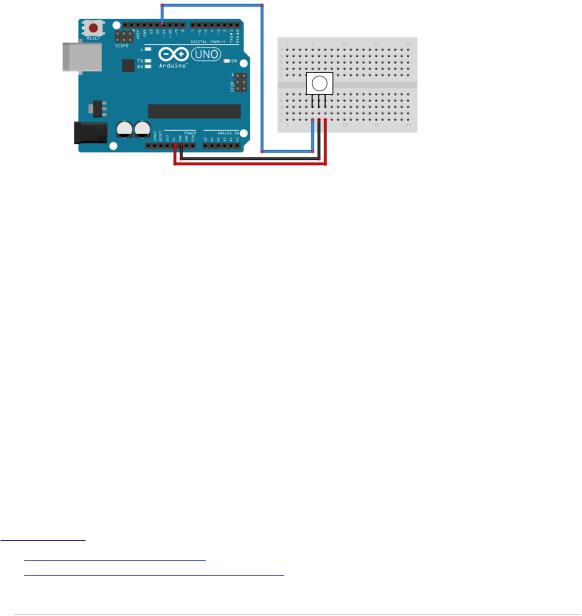
The image that follows shows how to connect a TSOP38238 receiver to an Arduino. It’s cheap, it’s easy to use, and it works at a frequency of 38 kHz, so it detects signals from a broad range of devices. Connect its ground connector to one of the Arduino’s GND pins, the power supply to the Arduino’s 5V pin, and the signal pin to digital pin 11.
You might be tempted to write a sketch that reads and outputs all incoming data on pin 11, and I won’t stop you. Call digitalRead in the loop method and output the results to the serial port. Point your TV set’s remote to the receiver and see what happens.
You’ll probably have a hard time understanding the data you see. The problem is that decoding the incoming data isn’t easy. Even if the receiver has already processed the data, it still has to be transformed and interpreted according to some complicated rules. Also, Arduino’s digitalRead method is too slow to deal with all types of incoming signals. You have to directly access the microcontroller to get the best results.
Fortunately, we don’t have to do this ourselves, because the IRremote library2 hides the nasty details. It supports the most popular infrared protocols, and it can both receive and send data.
After you’ve downloaded and extracted the zip file,3 rename the resulting directory to IRremote. Copy the directory IRremote to either ~/Documents/Arduino/libraries (on a Mac) or My Documents\Arduino\libraries (on a Windows box). Then restart your IDE.
2.https://github.com/shirriff/Arduino-IRremote
3.https://github.com/shirriff/Arduino-IRremote/archive/master.zip
report erratum • discuss
|
Grabbing Remote Control Codes • 205 |
|
If you’re using Arduino 1.6.0, IRremote collides with one of the Arduino IDE’s |
|
new standard libraries named RobotIRremote. In this case you have to delete |
|
RobotIRremote to make this chapter’s examples run. On a Mac you need to delete |
|
/Applications/Arduino.app/Contents/Resources/Java/libraries/RobotIRremote/. On a Windows machine, |
|
it's something like C:\Program Files (x86)\Arduino\libraries\RobotIRremote‘. |
|
With the following sketch, you can then decode incoming infrared signals, if |
|
the IRremote library supports their encoding: |
|
RemoteControl/InfraredDumper/InfraredDumper.ino |
Line 1 |
#include <IRremote.h> |
- |
|
-const unsigned int IR_RECEIVER_PIN = 11;
-const unsigned int BAUD_RATE = 9600;
5
-IRrecv ir_receiver(IR_RECEIVER_PIN);
-decode_results results;
-
- void setup() {
10 Serial.begin(BAUD_RATE);
-ir_receiver.enableIRIn();
-}
-
-void dump(const decode_results* results) { 15 const int protocol = results->decode_type;
-Serial.print("Protocol: ");
-if (protocol == UNKNOWN) {
-Serial.println("not recognized.");
-} else if (protocol == NEC) {
20 Serial.println("NEC");
-} else if (protocol == SONY) {
-Serial.println("SONY");
-} else if (protocol == RC5) {
-Serial.println("RC5");
25 } else if (protocol == RC6) {
-Serial.println("RC6");
-} else if (protocol == DISH) {
-Serial.println("DISH");
-} else if (protocol == SHARP) {
30 Serial.println("SHARP");
-} else if (protocol == PANASONIC) {
-Serial.print("PANASONIC (");
-Serial.print("Address: ");
-Serial.print(results->panasonicAddress, HEX);
35 Serial.println(")");
-} else if (protocol == JVC) {
-Serial.println("JVC");
-} else if (protocol == SANYO) {
-Serial.println("SANYO");
40 } else if (protocol == MITSUBISHI) {
report erratum • discuss

Chapter 12. Creating Your Own Universal Remote Control • 206
-Serial.println("MITSUBISHI");
-} else if (protocol == SAMSUNG) {
-Serial.println("SAMSUNG");
-} else if (protocol == LG) {
45 Serial.println("LG");
-}
-Serial.print("Value: ");
-Serial.print(results->value, HEX);
-Serial.print(" (");
50 Serial.print(results->bits, DEC);
-Serial.println(" bits)");
-}
-
- void loop() {
55 if (ir_receiver.decode(&results)) {
-dump(&results);
-ir_receiver.resume();
-}
-}
First, we define an IRrecv object named ir_receiver that reads from pin 11. We also define a decode_result object that we’ll use to store the attributes of incoming infrared signals. In setup, we initialize the serial port, and we initialize the infrared receiver by calling enableIRIn.
Then we define the dump method that formats and outputs the content of a decode_result object to the serial port. decode_result is one of the core data types of the IRremote library. It encapsulates data such as the protocol type, the length of a command code, and the command code itself. In line 15, we read the protocol type that has been used to encode the incoming signal. When we receive a new signal, we output all of these attributes to the serial port.
The loop method is simple. We call decode to check whether we’ve received a new signal. If yes, we call dump to output it to the serial port, and then we call resume to wait for the next signal.
Compile and upload the sketch to your Arduino. Start the serial monitor and point a remote control at the receiver. Push some of the remote’s buttons and see what happens. Figure 30, Capture the IR codes of a Samsung remote, on page 207 shows happens when you point a recent Samsung remote at the receiver and press menu, up, down, left, right, and play.
If you’re using a remote from a different vendor, your results will differ. Nearly all modern remotes send a unique 32-bit value for each command, but there are exceptions, too. For example, Panasonic devices send not only a command value, but also an address. Also, remote control behavior differs regarding command repetition. If you press and hold a key on a Samsung
report erratum • discuss